
A How-To Guide on Bypassing the Apple iPhone 8 Plus iCloud Lock
A How-To Guide on Bypassing the Apple iPhone 8 Plus iCloud Lock
Have you bought a second-hand Apple iPhone 8 Plus, and it is iCloud locked? Or, do you own an Apple device yet have forgotten its iCloud credentials? Regardless of your issue, you can’t use the locked phone without Apple iPhone 8 Plus iCloud bypass. It is indeed a troublesome experience and can delay your work.
You might attempt to contact Apple support, yet they won’t help you directly without user confirmation. You will get many questions, and they might request the first iOS device payment receipt, even after the confirmation of the Apple iPhone 8 Plus device.
Therefore, we have compiled this Apple iPhone 8 Plus iCloud bypass guide to help users remove the activation lock. So, if you are facing these issues, stay with us till the end to find a solution.
- 1. Get Apple ID and password from the original device owner
- 2. Use DNS Bypass
- 3. Emergency Call
- 4. Dr.Fone - Screen Unlock


Part 1: 4 Efficient Methods to Bypass Apple iPhone 8 Plus iCloud Activation Lock
1. Get Apple ID and password from the original device owner
For an Apple iPhone 8 Plus iCloud bypass, you’ll require a couple of significant pieces of data:
- Bypassing the Activation Lock on iPhone is as straightforward as signing in to the Apple iPhone 8 Plus device. It would help if you had the Apple ID credentials of the previous owner.
- If a device doesn’t have the activation lock, you might see the passcode screen instead of the activation lock screen. Therefore, you should have the Apple iPhone 8 Plus passcode in mind.

After getting the required details, the following are the steps to perform Apple iPhone 8 Plus iCloud bypass:
- Step 1: Go to the Settings application on your Apple iPhone 8 Plus.
- Step 2: Tap the Apple ID photograph from the highest point of the screen. If the Apple iPhone 8 Plus device has a newer version of iOS, then, at that point, you should tap the iCloud choice.
- Step 3: Now tap the “Sign Out” button. You can sign in using your own Apple ID from that point onward.
- Step 4: Next, look down and tap the “Sign Out” choice. When asked, you should enter the Apple ID password of the past owner to disable the Find My iPhone choice.
On the other hand, if you see the lock screen passcode, you can type the passcode and set up the Apple iPhone 8 Plus device without the Apple ID.
With the Apple iPhone 8 Plus device completely set up, access your device’s Settings and sign out of the old Apple account. You can now make one more ID and Sign into it.
2. Use DNS Bypass
What is DNS?
Domain Name System (DNS) changes over the readable names into numeric IP addresses. It utilizes the DNS server as a host to run the app. If your device is iCloud locked, one good way is to change its activation path through the DNS strategy and send it from the first Apple server to the iCloud Bypass DNS server for validation.
You can change the IP server path from the Wi-Fi settings, even if the activation screen is sprung up and you can’t utilize the Apple iPhone 8 Plus device. You can enter the manual Wi-Fi setting and change the DNS address. This section focuses on how you can perform Apple iPhone 8 Plus iCloud bypass via DNS bypass.
Steps to Follow:
Note: Before performing the iCloud DNS bypass, ensure that your device has a SIM card embedded. This step is mandatory for this process to work.
- Step 1: Select your nation and language from the menu on the screen.
- Step 2: When you continue it, you will be coordinated to the Wi-Fi setting page, requesting that you connect with a WIFI connection. Search for the “I” icon close to the Wi-Fi network.
Note: If you don’t see the “I” icon close by, press the Home Button> More Wi-Fi Setting and search for it.
Step 3: You must disconnect the Wi-Fi. When you find the “I” icon, go to the settings tab and select the “Forget this Network” option.
Step 4: Click “I” and enter a DNS server to bypass iCloud Activation Lock as per your area, against the DNS tab. Pick one from the given IP addresses according to your region:
USA: 104.154.51.7
South America: 35.199.88.219
Europe: 104.155.28.90
Asia: 104.155.220.58
Australia and Oceania: 35.189.47.23
Other landmasses: 104.155.28.90
Step 5: After entering the IP address, tap the Back choice at the left of the screen. Now, turn on Wi-Fi, select the Wi-Fi network from the rundown and enter the code.
Step 6: You will see the next page choice; don’t click it and press “Back”. Now you are on the iCloud Bypass screen.

- Step 7: Look down the page, go to the menu and set up your applications, music, camera, and so forth.
3. Emergency Call
Utilizing the Emergency call strategy is another free Apple iPhone 8 Plus iCloud bypass method. It is among the clearest and speediest procedures to remove your iCloud account. The guidelines underneath will show you how to unlock your iCloud free by utilizing the Emergency Call technique:
- Step 1: Turn on your Apple iPhone 8 Plus. Select your preferred language and current region.
- Step 2: Now, on the iCloud activation screen, press the home button three times to begin on Voice Command and multiple times to close down.
- Step 3: Again push on a home button, and this time select Emergency Calls.
- Step 4: Now, you need to key in *#96274825*0000*1#. Then press the call button multiple times.
- Step 5: Then, you need to modify the last digit from 1 to 2 and repeatedly press the call button.
- Step 6: Perform this strategy once more. When you adhere to every one of the guidelines, press the back button, and turn around to the starting screen.
- Step 7: Now, just like you did before, select your language and country. After picking it, you will see the bypass screen.
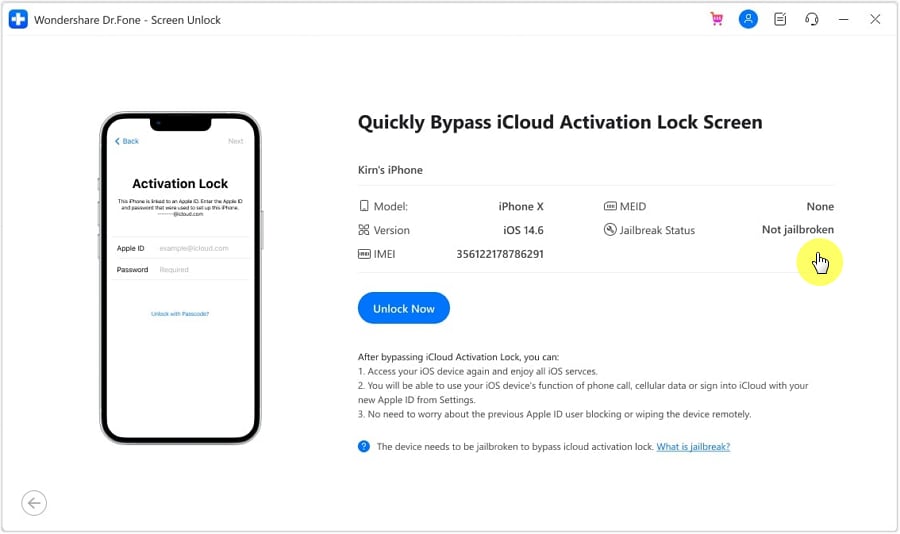
4. Dr.Fone - Screen Unlock
How would I remove the past owner’s Mac ID from an iPhone? Removing the past user’s Apple ID from your iOS device could be difficult if you don’t know the Apple ID credentials. Yet, it is possible due to expert Apple ID bypass software.
If you’re searching for the fastest method for eliminating the activation lock on your Apple iPhone 8 Plus, look no further from Dr.Fone - Screen Unlock (iOS) . This expert program is extremely convenient when you can’t open your iOS device without a password, or you’re experiencing an activation issue. Dr.Fone is fit for rapidly unlocking/bypassing Apple ID from any iOS device. After the Apple iPhone 8 Plus iCloud bypass, you can use your Apple iPhone 8 Plus with no issues.
Step-by-step Guide:
Step 1. Install the Dr.Fone program to the computer and launch the Screen Unlock tool from the home page.
Step 2. Find the “iCloud Activation Lock Removal” button, click it and start to bypass the lock.

Step 3. Before bypassing the activation lock on your Apple iPhone 8 Plus/4s, here is the “Start”.

Step 4. Now you’re having an iPhone without the activation lock, you can prepare a new Apple ID for this device.
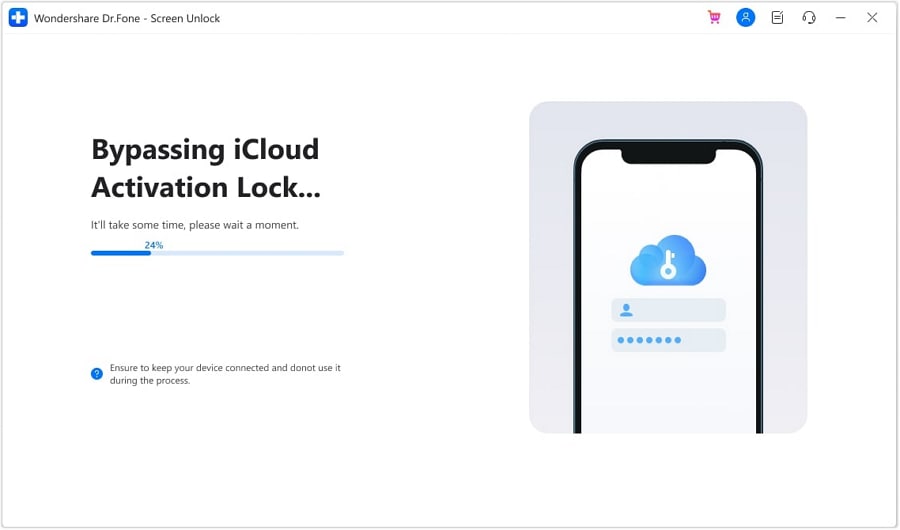
When arriving at this final page, the whole process is done.

Your iPhone will start normally. You can access and utilize all the features of your phone now. Remember that you can’t utilize your new account’s phone call, data, and iCloud features after bypassing them.
Part 2: FAQs
When do we need to bypass Apple iPhone 8 Plus activation lock?
If you have bought a used phone, and it shows the activation lock screen, you may need Apple iPhone 8 Plus iCloud bypass. The activation lock screen happens when you buy a phone from someone else, and they forget to remove the phone from their Apple ID.
Once the lock activates, you can’t reset and use different features of your phone. Therefore, the activation lock can be a troublesome experience for many. So, in such situations, you need to remove/bypass the activation lock through different techniques.
Note: Activation lock ensures the safety and prevents you from buying a stolen phone, which may create problems for you in the future.
What to do to turn off Find My?
- Open up the Settings menu.
- Select your name from the menu. Then select Find My choice.
- At the top of the following page, Tap Find My iPhone and flip the setting off.
- Enter your Apple ID credentials when asked and press “Turn Off”.
The Bottom Line
In this informative guide, we have listed the Apple iPhone 8 Plus iCloud bypass methods. However, if you don’t have the Mac ID credentials to initiate your Apple iPhone 8 Plus, you will require help from an expert program that can bypass the Apple iPhone 8 Plus activation lock. Therefore, we strongly suggest Dr.Fone - Screen Unlock (iOS) . Download the problem-free Dr.Fone activation lock bypass program to get rid of the lock on your Apple iPhone 8 Plus.
Best Ways to Bypass iCloud Activation Lock on Apple iPhone 8 Plus/iPad/iPod
Apple puts importance on making sure that all the Apple iPhone 8 Plus users’ data and records are kept in tight and secured storage. Make sure that the only person that can access it is the owner of the mobile. However, there will be challenges if you have bought a used iPhone and if the owner has not logged out of his account on that phone. If you are in this situation, then you will need to either contact the previous owner or be locked out of your phone. The first one is a tedious option, and the latter would be the least one that we would want to happen.
There are, however, various ways how you can bypass the iCloud Activation Lock without having to contact its previous owner. We will share with you the different ways that you can do it on your own and remove the automated lock and continue using your phone leisurely.
Part 1: What Causes iCloud Activation lock?
The iCloud Activation Lock is a great feature that Apple has added to the “Find My iPhone” application which helps prevent other people aside from yourself from accessing your phone and files. Activating your iCloud Activation lock can be done in just a few steps, and this could even be done remotely if your phone is not within your reach. This is a great feature if you are a victim of theft and would like to remotely lock your phone to be sure that it cannot be accessed by the thief or anyone else.
You can follow the steps below to remotely lock your device:
- Step 1: Open the “Find My iPhone” on your browser while locking your phone remotely.
- Step 2: Log in with your credentials. Make sure it is the same credentials you use for iCloud.
- Step 3: Under the Apple iPhone 8 Plus devices’ list, you can look and tap for the text that says “Lost Mode”.
- Step 4: From there, you can tap on actions, then choose to either tap on “Lost Mode” or “Erase Phone”.
Learn about all the solutions to unlock iPhone quickly through the video below:
If you forget the Activation Lock on your iDevice and fail to access it, you must bypass iCloud Activation Lock. This can be executed with the help of Dr.Fone - Screen Unlock (iOS), an exceptional iCloud unlock tool. Read on for detailed steps on various ways to bypass iCloud Activation Lock or click the Download button below to try it free!
Part 2: 3 Ways to Bypass iCloud Activation Lock on iPhone/iPad with iOS 16
Now you know how an iCloud Activation Lock works and how to remotely lock your phone in case of theft. However, what if you still want to be able the bypass the iCloud Activation Lock but are unable to contact the first owner for their credentials? There are multiple ways that you can do that, and we will share the ways with you below:
Method 1: Removing the Apple iPhone 8 Plus device from the First Owner’s iCloud
Probably one of the easiest and fastest ways to bypass the activation lock is by contacting the owner to remove the Apple iPhone 8 Plus device that you have from their iCloud. If you can still make contact with them, you can try this option and reach out to them.
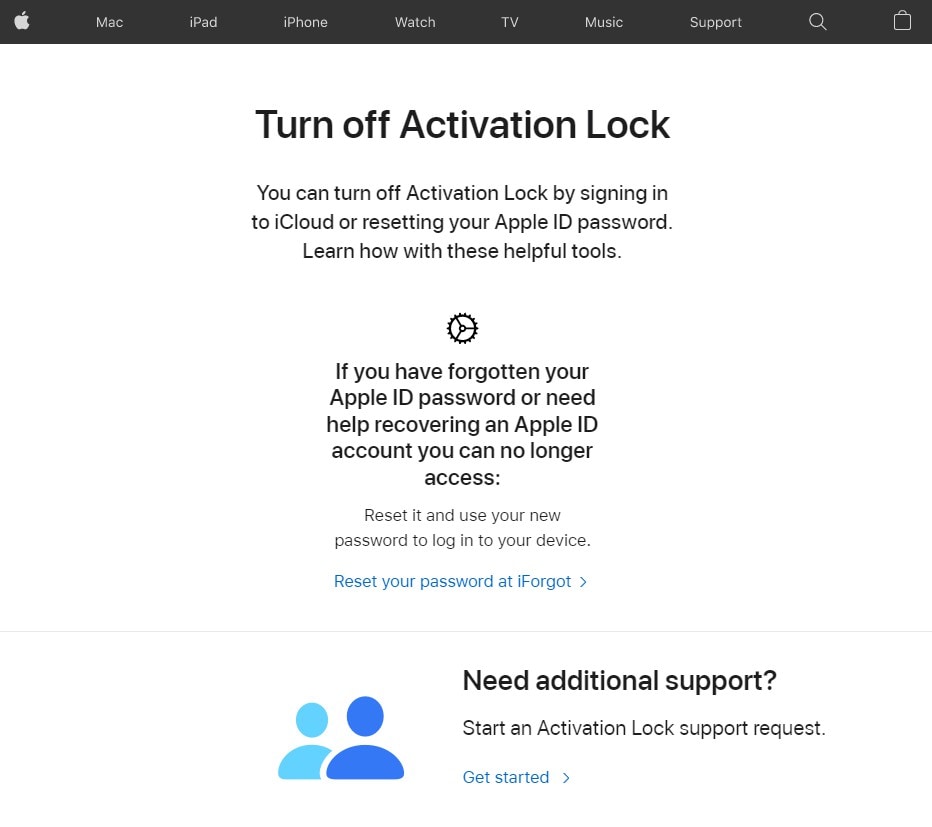
Method 2: Contact Apple to Remove The Activation Lock
If you cannot contact the previous owner, you can then reach out to Apple directly and provide proof that you have inherited or purchased the Apple iPhone 8 Plus device. Documents such as receipts and death certificates if inherited, then you can reach out to their support team to unlock your device.
Method 3: Unlock your device using DNS
Instead of bypassing Apple directly, you can try to bypass the DNS server, and you can do this by following the steps below:
- Step 1: Restart your device.
- Step 2: Go through the process of setting up until you come across the “Choose Wi-Fi Network”.
- Step 3: Then choose “More Wi-Fi settings” and tap on “I”.
- Step 4: Choose “Configure DNS” and select “Manual”.
- Step 5: From there, choose “+Add server” then choose the address as per your location below and click “Save”.
- USA: 104.154.51.7
- Europe: 104.155.28.90
- Asia: 104.155.220.58
- Africa, Australia, and other locations: 78.109.17.60
- Step 6: Select “Ask to Join Networks” and enter the password then click on “Join”.
- Step 7: When it tries to activate, you can tap on the back button and proceed to set up the Apple iPhone 8 Plus device as usual.
Part 3: The Fastest Way to Remove iCloud Activation Lock on iOS/iPadOS 12.0 - 16.6 Without Password
Now, if you want to bypass the activation lock on your own and without the need for a password, you can try Dr.Fone - Screen Unlock (iOS) . This program helps unlock activation locks on iPhone (5S-X), iPad (3-7), and iPod touch (6-7) running iOS 12.0-16.6. Now you can remove iCloud activation lock on iPhone/iPad/iPod Touch without jailbreak by using Dr.Fone.
Dr.Fone - Screen Unlock (iOS)
Bypass iCloud Activation Lock on iPhone/iPad/iPod Without Hassle.
- Bypass iCloud activation lock and enjoy all iCloud services.
- Simple, click-through, no tech knowledge is required, everybody can handle it.
- Compatible with iPhone, iPad, and iPod touch.
- Expert team with over 17 years of expertise & has helped over 50 million users.

4,395,218 people have downloaded it
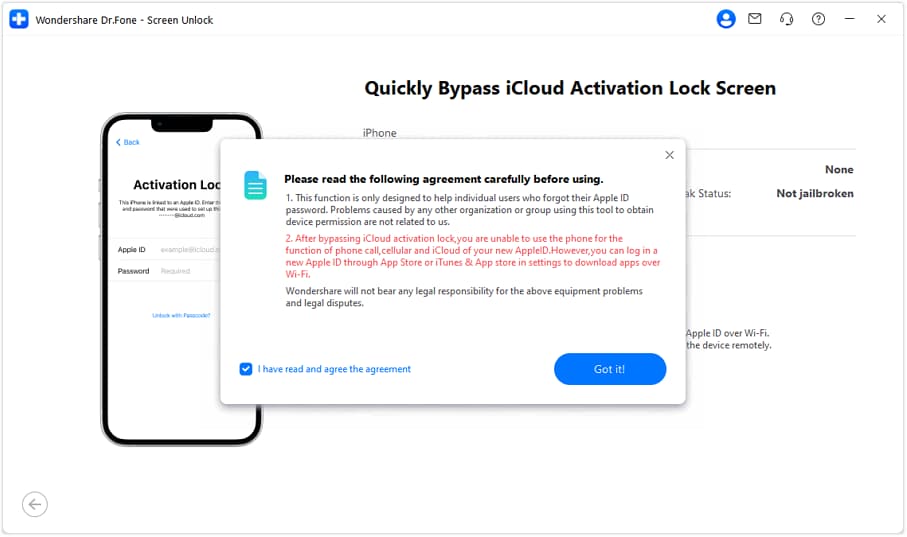
Step 1: Log in Wondershare Dr.Fone and click Toolbox on the homepage. Then select Screen Unlock > iOS. Initiate the removal of the iCloud Activation Lock and click the Unlock Now button.
Step 2: Confirm the prompt on the next window and continue the process by tabbing “Got it!”
Step 3: Start to put device in DFU mode for the first time. During this process, the program will send a demand to the Apple iPhone 8 Plus device.
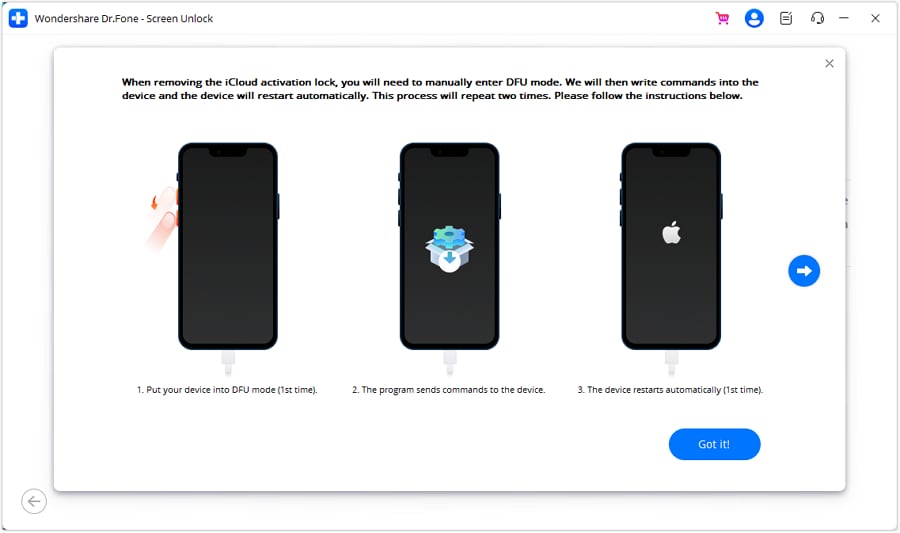
Step 4: Put your device in DFU Mode for the Second Time. If your device is not detected by the platform, follow the on-screen instructions to put their iOS device in DFU Mode.
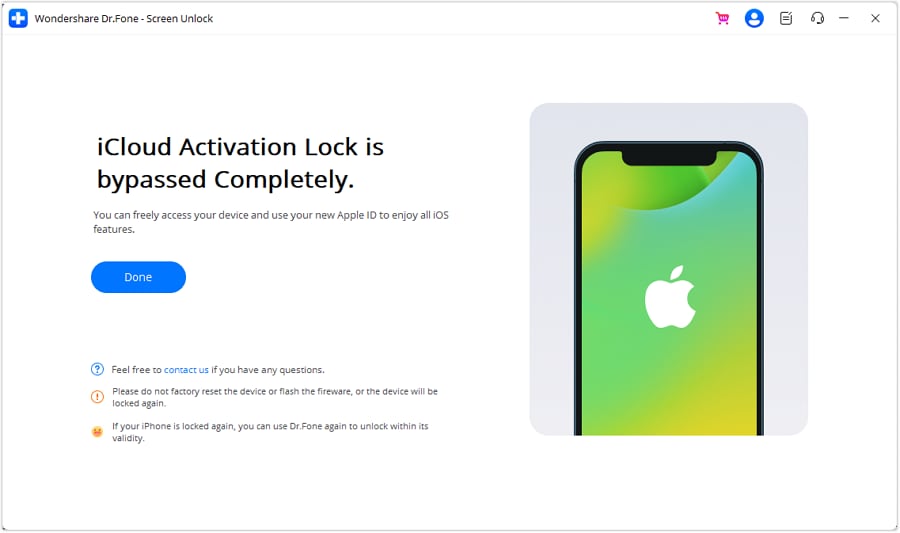
Step 5: Once the Apple iPhone 8 Plus device has been processed under the DFU Mode, the computer’s screen will start displaying the removal of the iCloud Activation Lock. When it’s done, click Done in the next window.
For detailed guide: please check our official guide .
Conclusion
We hope that the tips that we shared will help you to remove the iCloud Activation lock on your phone without having to contact the previous owner or even need any password. For an efficient and effortless solution, you can utilize “Dr. Fone - Screen Unlock (iOS) ” which just needs you to connect your phone to your laptop and in just a few taps. We understand how frustrating it can be to have to contact other people just to be able to use your phone. Follow our methods, and you will be able to use your phone right away.
Unlock Your Device: iCloud DNS Bypass Explained and Tested, Plus Easy Alternatives On Apple iPhone 8 Plus
Have you bought a used iPhone or iPad with an active iCloud Activation Lock? Or perhaps you have an Apple device but cannot remember your iCloud password? Without activating iCloud, you cannot utilize locked devices in either scenario.
You might try contacting Apple customer service, but they won’t be able to assist you without user identification directly. Even after the Apple iPhone 8 Plus device has been authenticated, you will still be bombarded with inquiries, and they may even want the original iOS device payment receipt.
One of the greatest free solutions to prevent these issues is to unlock your Apple iPhone utilizing iCloud DNS Bypass. Read on to know more in this iCloud DNS Bypass Guide.
Part 1: How Can We Use iCloud DNS Bypass for iOS Devices?
After a factory reset or restoration, every time you set up your iOS device, it will send an activation request to Apple’s servers. Apple responds to your request and displays your device’s status.
Additionally, if the Find My iPhone feature of your device is enabled, an iCloud Activation Lock screen will appear and prompt you for your iCloud account login information. The iCloud DNS Bypass can assist you if you forget your login information (Apple ID or password) or purchase a used device with an iCloud lock activated. It is a free approach to unlocking iCloud.
The readable names are transformed into numerical IP addresses via the Domain Name System (DNS). To launch the program, it makes use of a DNS server that serves as a host.
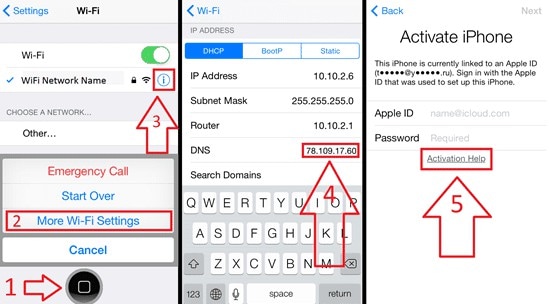
Use DNS to get around iCloud Server IP Address
You may first just ignore the iCloud DNS on your Apple iPhone 8 Plus or iPad. The procedure is easy. Remember that the process must be completed by inserting the SIM card into your Apple iPhone 8 Plus.
Step 1. Turn on your Apple iPhone 8 Plus, then configure it according to the on-screen instructions.
Step 2. Select your language and nation. Click Continue to access the Wi-Fi settings screen after that.
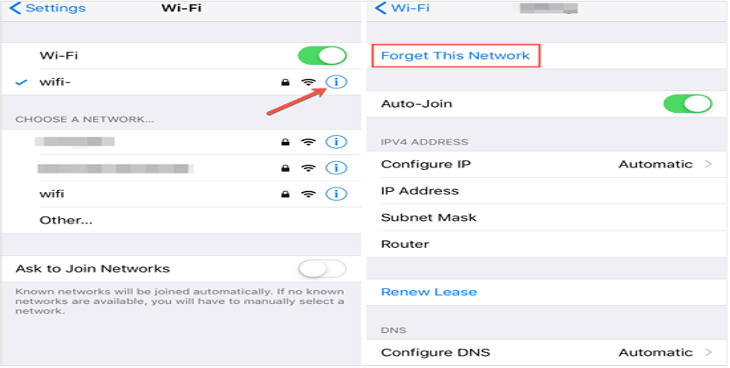
Step 3. If prompted, click the I icon next to the Wi-Fi area.
Step 4. Click Connection Settings > Forget this Network to disconnect from the Wi-Fi network.
Step 5. When asked for a DNS server IP address, tap the I symbol to unlock the iCloud activation lock. Here is a list of places for your information:
USA: 104.154.51.7
155.28.90 Europe
Africa: 35.199.88.219
Asia: 104.155.220.58
189.47.23 Australia and Oceania
It is 78.100.17.60 on other continents.
Step 6. Turn on Wi-Fi and select the Wi-Fi network you wish to connect to by tapping the Back button on the left side of the screen. Enter your passcode after that.
Step 7. When you click Next Page > Back, the iCloud bypass page will appear.
Step 8. Use your device and configure your apps.
Use iCloud DNS Bypass Crash
- Step 1. The procedures below will help you delete iCloud after DNS bypass if you cannot utilize some features on your Apple iPhone 8 Plus.
- Step 2. Tap Menu > Applications after attempting the aforementioned technique.
- Step 3. To restart your smartphone, scroll down and tap the Crash option.
- Step 4. Select “Language and Country” > Select a Wi-Fi network, click Home, More Wi-Fi Settings, Configure Proxy, and then Manual.
- Step 5. In the Server section, delete the existing HTTP address before entering 30 different emojis. Type 8888 into the Port area, then click Save at the top.
- Step 6. To access the Unlock screen, tap Back > Next. To unlock the Apple iPhone 8 Plus device, press the Home button.
- Step 7. When the Home screen appears, tap the Language choice.
Part 2: The Best iCloud DNS Bypass Alternatives to Unlock Your Apple iPhone 8 Plus/iPad/iPod Touch (Easy and Efficient)
Only if you bought a secondhand iPhone with an activation lock or want to restore the Apple iPhone 8 Plus device but forgot that Find My iPhone was ever turned on do you need Dr.Fone - Screen Unlock (iOS) . Dr.Fone - Screen Unlock (iOS) is the most promising and user-friendly product of its sort currently available. With the help of this application, you can simply fix the iCloud activation issue. You don’t need to be an expert in utilizing the application because it is simple and intuitive.
Using Dr.Fone - Screen Unlock, you can get rid of the iCloud activation lock. Launch Dr.Fone and choose “Remove Active Lock” and “Unlock Apple ID” to unlock your iCloud. It still works if you have a used iPad or iPhone.
Dr.Fone - Screen Unlock (iOS)
Remove iCloud Activation lock without Password in Minutes
- Remove Apple ID/iCloud Account efficiently.
- Save your Apple iPhone 8 Plus quickly from the disabled state.
- Free your sim out of any carrier worldwide.
- Bypass iCloud activation lock and enjoy all iCloud services
- Works for all models of iPhone, iPad, and iPod touch.
- Fully compatible with the latest iOS.
4,008,671 people have downloaded it
Here’s a step-by-step guide on how to use it
Step 1. Installing Dr.Fone on your smartphone and selecting Screen Unlock from the available options are the first steps in the procedure. You will note that there is a “iCloud Activation Lock Removal” option, among others, when you first use the Screen Unlock function. Simply clicking on it is all that is required.
Step 2. Before the bypassing process, please tape “Start”.
Step 3. After reaching the ‘Start’ page, Your Apple iPhone 8 Plus’s specific information will be detected to determine the appropriate operation process. Ensure that the data cable is properly connected during this process. Jailbreaking is required for iOS devices running 12.0 to 14.8.1, but for iOS 15.0 to 16.3, simply enter DFU mode twice and proceed to unlock. For detailed instructions on unlocking, you can visit this detailed guide about iCloud Activation Lock Removal.
Step 4. Now we’re bypassing the activation lock, soon your Apple iPhone 8 Plus will work without the activation lock.
Part 3: FAQs
1. When Do We Require iCloud DNS Bypass?
We require it when our carrier locks our phone or when we buy a used phone and cannot use it because of an iCloud activation lock. The use of iCloud DNS bypass enables temporary access to the features and functionality of an iCloud-locked device. Domain Name Server, or DNS for short, serves the function of converting your domain names into IP addresses.
2. What Can iCloud DNS Bypass Do for Us?
When you need an urgent functioning solution for a locked iPhone, using iCloud DNS bypass is helpful since it gives you temporary access to all the features and configuration of an iCloud-restricted device. DNS, or domain name server, converts your domain names into IP addresses.
3. What are the Pros & Cons of iCloud DNS Bypass
This approach can be helpful, but it does have advantages and pitfalls of its own. These advantages and disadvantages are broken down as follows:
Pros
- You may use it without installing any software on the Apple iPhone 8 Plus device, since you can do it in the Wi-Fi settings.
- The internet, camera, and games can all be used after the gadget has been engaged, making it simple to access.
- Utilizing this approach is cost-free.
Cons
- This technique only partially unlocks the Apple iPhone 8 Plus device and represents a hack.
- The iCloud DNS bypassing technique has occasionally been reported as not working by users.
Conclusion
Now you have read all about iCloud DNS bypass, what is iCloud bypass DNS, whether DNS bypass is free, and how to iPhone DNS bypass, it is time to implement all the solutions and bear in mind that all DNS Bypass solutions are 100% free. Dr.Fone - Screen Unlock (iOS) is also a great tool to bypass screen lock, even if you don’t have any tech skills.
Also read:
- [Updated] In 2024, Simple Steps for Looped iPhone Videos
- 2024 Approved Navigating Job Interviews with Confidence and Competence
- 2024 Approved Unraveling Cuts in iMovie Size Modification Mystery
- A Comprehensive Guide to iCloud Unlock From Apple iPhone SE (2022) Online
- Best Ways to Bypass iCloud Activation Lock from Apple iPhone 15/iPad/iPod
- Best Ways to Bypass iCloud Activation Lock on Apple iPhone 8/iPad/iPod
- Effective Ways To Fix Checkra1n Error 31 On iPhone 13 Pro
- Full Guide on Mirroring Your Tecno Camon 30 Pro 5G to Your PC/Mac | Dr.fone
- Hacks to do pokemon go trainer battles For Vivo Y100i | Dr.fone
- How to Sign Out of Apple ID From Apple iPhone 6 without Password?
- In 2024, How to Fix iPad or iPhone 6s Plus Stuck On Activation Lock?
- In 2024, New Multiple Ways How To Remove iCloud Activation Lock From your iPhone 6
- Luminance Levels Top 3 Ways to Revive Your Photo's Vibrancy
- New In 2024, The Best Free MOV Movie Editors A Comprehensive Guide
- PC Game Glitch: Unraveling the Mystery of Consecutive System Failures
- Ultimate Guide on Apple iPhone 12 iCloud Activation Lock Bypass
- Title: A How-To Guide on Bypassing the Apple iPhone 8 Plus iCloud Lock
- Author: Lydia
- Created at : 2025-02-09 04:19:20
- Updated at : 2025-02-15 02:20:37
- Link: https://activate-lock.techidaily.com/a-how-to-guide-on-bypassing-the-apple-iphone-8-plus-icloud-lock-by-drfone-ios/
- License: This work is licensed under CC BY-NC-SA 4.0.