
Easy Fixes How To Recover Forgotten iCloud Password From your Apple iPhone 7 Plus
Easy Fixes: How To Recover Forgotten iCloud Password On your Apple iPhone 7 Plus
In the fast-paced digital era, it’s not uncommon to face the common dilemma: “I forgot my iCloud password.” The significance of accessing your iCloud account, which is packed with precious data and services, cannot be overstated. In this guide, you’ll learn how to find your forgotten password of iCloud, offering you a lifeline back into your digital world.
Get ready to navigate simple steps in recovering your iCloud access, ensuring you effortlessly regain control. Say goodbye to the worry of “forgotten iCloud password.” This article features easy-to-follow solutions to make the journey back to your iCloud account both straightforward and stress-free.
Part I. How To Find Your iCloud Password
In the digital world dominated by Apple services, your iCloud password is the golden key, granting access to a treasure trove of data and seamless connectivity. A forgotten iCloud password could greatly impact your daily life as an Apple user—a potential roadblock to photos, documents, and essential services.
How To Find Your iCloud Password
Thankfully, finding your iCloud password is a straightforward process. Check out the steps below:
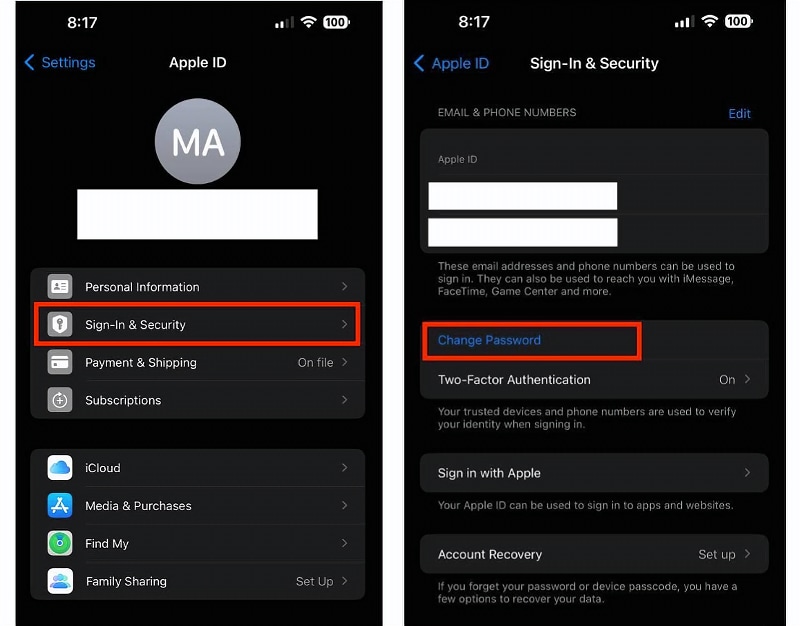
- Step 1: Begin by opening your device’s Settings.
- Step 2: Scroll down and tap on your name, then select Sign-In & Security. There, you’ll find the Change Password option.
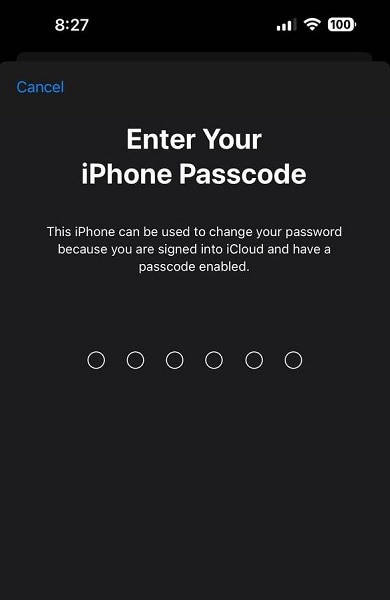
- Step 3: You may be asked to Enter Your Apple iPhone 7 Plus Passcode to proceed.
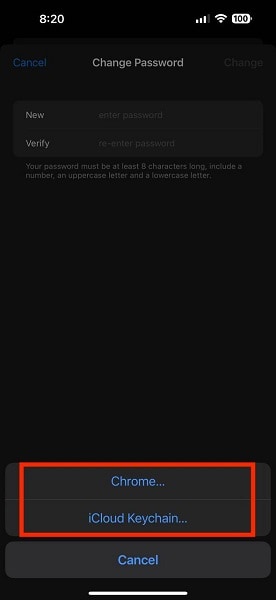
- Step 3: If you can recall your current password, you can proceed to update it. If not, you may use Chrome Passwords or Apple’s iCloud Keychain feature, where you may have saved your iCloud password.
The Frustration of Forgetfulness
The frustration of don’t remember iCloud password is all too relatable. It’s a moment of panic when you realize your access to Apple’s ecosystem is temporarily halted. But fear not, as in the upcoming section, this article will guide you through the simple and effective steps to recover the password, ensuring a swift return to your iCloud account.
Part II. Easy Ways To Recover Forgotten iCloud Password
Recovering a forgotten iCloud password may seem hard, but armed with these easy-to-follow methods, you can reclaim access to your Apple universe.
Official Channels
These are the methods to reset the forgotten password through Apple’s official channels:
Apple ID Account Recovery Process
Apple provides a user-friendly account recovery process.
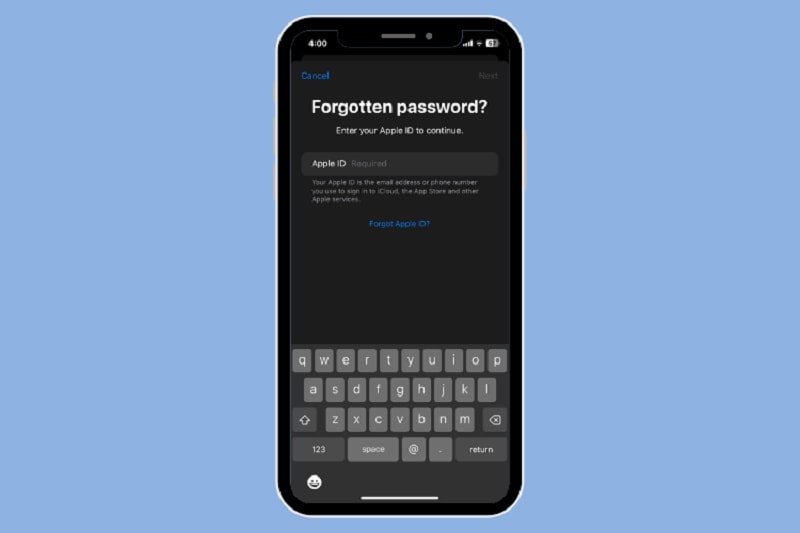
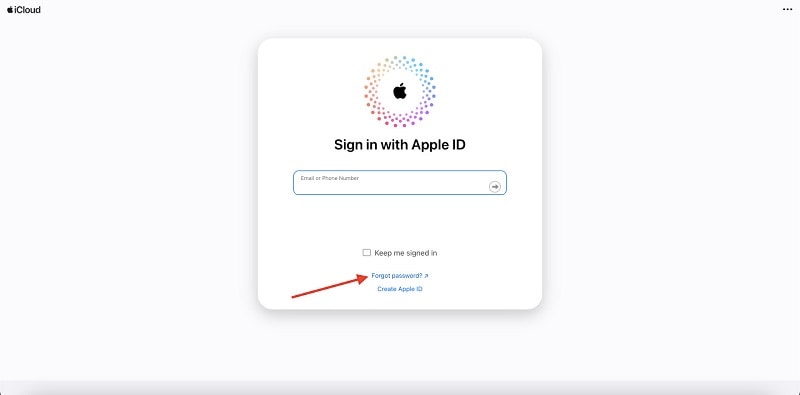
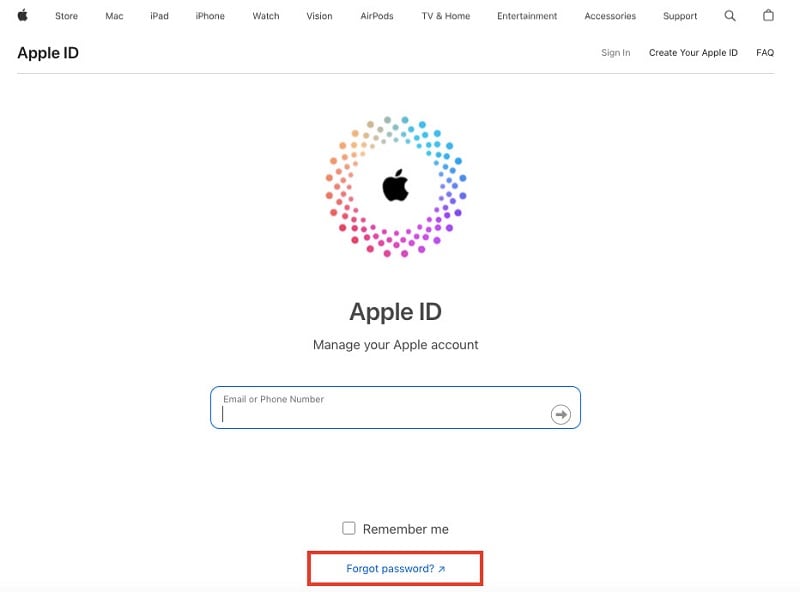
- Step 1: Visit the official Apple iCloud account page. Click Sign In then choose Forgot password?.
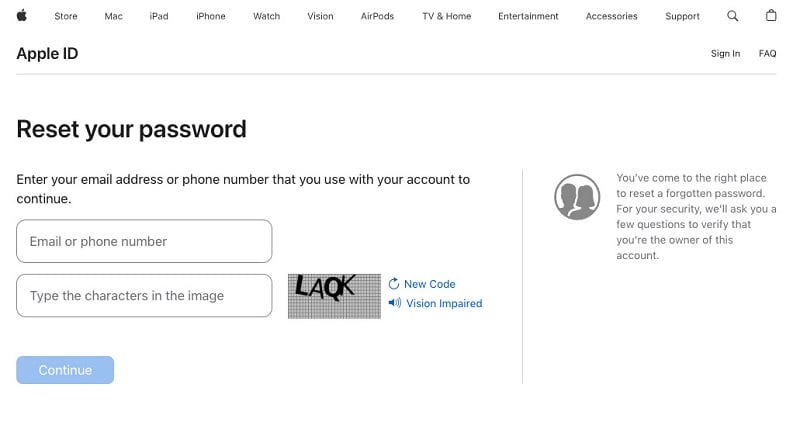
- Step 2: You will then be redirected to a new window to recover access to your iCloud account. Enter your Email or phone number and Type the characters in the image. Click Continue to proceed.
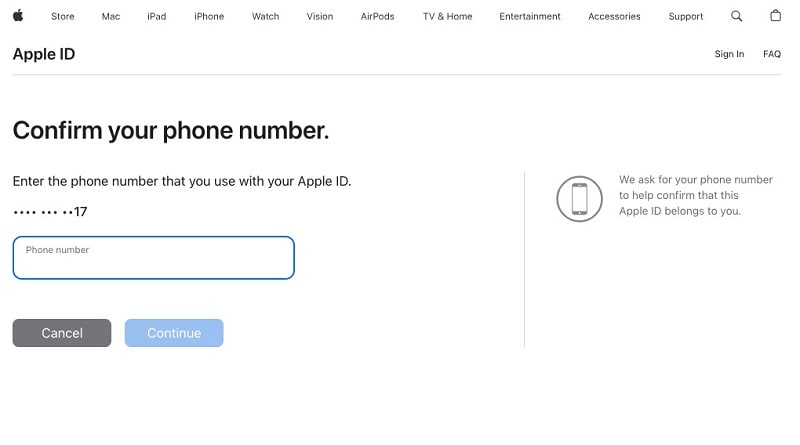
- Step 3: You will then be asked to Confirm your phone number so that Apple can verify that the account belongs to you.
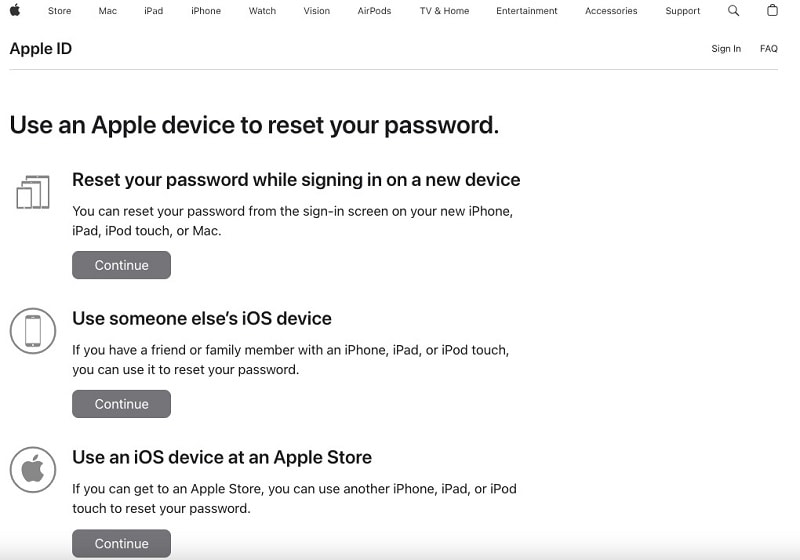
- Step 4: You will be presented with three options. Choose the best option that works for you, then follow the on-screen instructions for the option you’ve chosen.
Two-Factor Authentication Recovery Steps
Recovery is equally straightforward for those who have embraced the added security of two-factor authentication. Access a trusted device or request account recovery through another trusted device. Follow the prompts, confirm your identity, and reset your iCloud password hassle-free.
B. Alternative Approaches
Check out these alternative processes if the above options don’t work for you:
Security Questions and Rescue Email
Don’t overlook the power of security questions and rescue email to recover forgotten iCloud passwords. Access the Apple ID account sign-in page, select Forgot Password? and choose the option to answer security questions or receive an email. Providing the correct answers or accessing the rescue email will pave the way to resetting your iCloud password.
Contacting Apple Support for Assistance
Sometimes, a helping hand is the best solution. If the DIY approaches seem daunting, reaching out to Apple Support can provide personalized assistance. Connect with Apple’s knowledgeable support team via phone or online chat, explain your situation, and let them guide you through the steps to regain control of your iCloud account.

Whether you choose Apple’s official channels or alternative approaches, the goal remains the same – a seamless recovery experience that ensures you’re back in command of your digital kingdom. Stay tuned as this article introduces a reliable advanced solution for a forgotten iCloud password.
Part III. Advanced Solution for Forgotten iCloud Password
What if the above methods to recover your forgotten iCloud password did not work, and you find yourself locked out of your Apple iPhone 7 Plus? Don’t worry; this section offers an advanced solution – Wondershare Dr.Fone – Screen Unlock (iOS). It’s a powerful tool designed to effortlessly unlock your Apple iPhone 7 Plus and rescue you from the frustration of being locked out of your device.
Experience the unparalleled capability of Dr.Fone – Screen Unlock (iOS) to unlock your Apple iPhone 7 Plus easily. No more daunting “I forgot iCloud password” moments. Dr.Fone empowers you to regain control swiftly.

Key Features and Benefits
Check out these amazing features of Dr.Fone – Screen Unlock:
- **Simple and User-Friendly.**Intuitive interface ensuring a hassle-free user experience. No technical expertise is required – just a few clicks to unlock your Apple iPhone 7 Plus.
- Works seamlessly across various iPhone models and iOS versions. Your reliable companion for iCloud password recovery, regardless of the Apple iPhone 7 Plus device.
- **Efficient iCloud Unlock.**Swiftly unlock your device without the need for extensive technical knowledge. Say goodbye to prolonged wait times; Dr.Fone – Screen Unlock ensures a quick and efficient solution.
- **Safe and Secure.**Your data integrity is a priority – Dr.Fone guarantees a secure unlocking process. It protects your privacy while providing a seamless iCloud password recovery experience.
How To Use Dr.Fone – Screen Unlock (iOS)
Dr.Fone – Screen Unlock (iOS) offers a comprehensive solution for unlocking iOS devices without a passcode. The following instructions demonstrate how to unlock an iPhone without a password using this screen unlocking tool:
Step 1: Install Wondershare Dr.Fone on your computer, then open the iOS tool in a new window by going to Toolbox > Screen Unlock > iOS.
Step 2: To unlock your iOS device’s screen, select the Unlock iOS Screen button on the next screen. Press Start on the next screen to start unlocking the iOS device.
_Note:_ Before proceeding, ensure your device’s battery is fully charged.

- Step 3: Next is to enter your iOS device into Recovery Mode. Follow the on-screen prompts to switch your iOS device into the mode for your specific model. If the Recovery Mode fails on your end, you may try DFU mode instead. Just click the Try DFU Mode button at the bottom of the page to proceed.

- Step 4: Once the user has successfully entered Recovery Mode on their iDevice, the platform will automatically detect the Device Model and present it in the appropriate section. Adjust the model and choose the System Version as needed to meet your needs. When you’re ready to unlock your device’s screen, click Start.

- Step 5: You may see how far along the iOS firmware download is on the following screen. If you want to stop the procedure, click the Stop button. When the platform’s iOS firmware download link takes too long, you can copy the link manually by hitting the Copy button.

- Step 6: The iOS firmware is checked and shown on the following screen after a successful download. To proceed with unlocking, click the Unlock Now button again.
- Step 7: A confirmation window will then pop up and ask you to confirm the process. To proceed, type in the appropriate code and then hit Unlock. The iOS device’s progress meter as it unlocks is displayed on the following screen.
_Note:_ Your device needs to stay connected; failing to do so will cause it to brick.

- Step 8: When done, click the Done button to finish unlocking the iDevice. Click Try Again to begin the procedure once more if you still face a locked iDevice.

When all else fails, and you find yourself locked out due to a forgotten iCloud password, Dr.Fone – Screen Unlock (iOS) emerges as the advanced solution you need. Unlock your Apple iPhone 7 Plus effortlessly, ensuring a smooth, stress-free journey back into your digital world. Don’t let iCloud issues hold you back – trust Dr.Fone to be your key to access.
Conclusion
In this article, you navigated the twists and turns of forgotten iCloud passwords, providing you with simple methods and advanced solutions. Whether through official channels, alternative approaches, or the powerful Dr.Fone – Screen Unlock (iOS), this article ensured a comprehensive guide for every user.
Now, as you try reclaiming your iCloud access, remember the ease and efficiency Dr.Fone brings. Say goodbye to the worry of locked iPhones and ‘forgotten iCloud password’ issues. Trust Dr.Fone to be your digital savior, making the whole process smooth and stress-free. Your access, your control – it’s all at your fingertips.
How to Successfully Bypass iCloud Activation Lock on Apple iPhone 7 Plus
An activation lock is a necessary feature of modern devices due to security breaches. It prevents your phone from getting used by the wrong hands. Consequently, it secures your data from getting exploited in case of theft.
However, it can be troublesome if you don’t take enough care. Your phone can get stuck on the activation lock screen if you don’t remember the password or have bought a second-hand device.
If your Apple iPhone 7 Plus is iCloud locked, there are ways to get it unlocked. We’ll initially suggest reaching the seller. We will clear up the Apple iPhone 7 Plus iCloud bypass methods if you can’t. So sit back and relax. This detailed guide explains how to perform Apple iPhone 7 Plus iCloud bypass.
Part 1: How to Bypass Apple iPhone 7 Plus iCloud Activation Lock?
1. Get Apple ID and password from the previous owner
Asking the owner about their Apple ID credentials is the first approach in this guide. You can disable the activation lock on your Apple iPhone 7 Plus when you get those. However, this technique isn’t ensured to help you, as all of you realize that iCloud has individual data about the client.
Subsequently, no owner will want to give them to another person. In this way, you will be left without a response. It is a bad situation, so we could never propose you focus on this method for Apple iPhone 7 Plus iCloud bypass.
This method is best if the owner lives nearby, and you can meet face to face. In particular, they must know their Apple ID password. When you get together, request them to enter their Apple ID credentials, since they might be reluctant to share them via a call. It is very straightforward to remove their Apple ID and the activation lock.
- Step 1. When the activation lock screen appears, enter the Apple ID credentials.
- Step 2. After removing the activation lock, unpair any accessories connected to it.
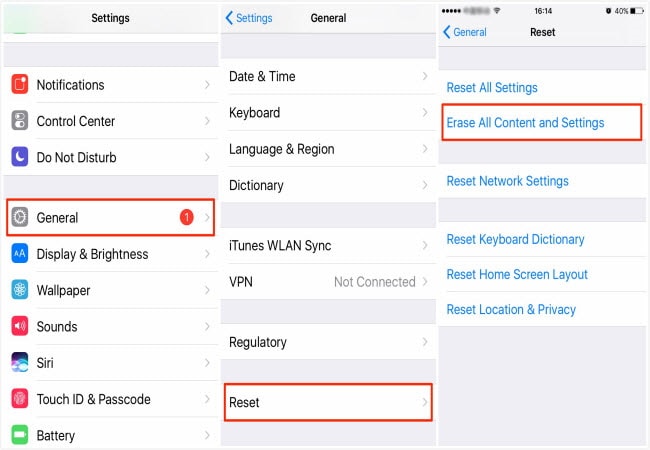
- Step 3. Sign out of the App Store, iCloud, and iTunes.
- Step 4. At last, erase all content and settings by exploring the General menu from the Settings app. Click the Reset button for the “Erase All Content and Settings” option.
2. Use iCloud DNS Bypass
Bypassing the Activation Lock on Apple iPhone 7 Plus is easy if you know the Apple ID credentials that allow you to turn off the Find My feature. If you don’t know about the Apple qualifications of the past owner, then the best free strategy is to utilize a DNS bypass. Here’s what you need to do:
- Step 1. Turn on your Apple iPhone 7 Plus.
- Step 2. Select your language and area in the next step.
- Step 3. When asked to join a Wi-Fi network, tap on the “I” icon close to your Wi-Fi name.
- Step 4. Click the “Configure DNS” option.
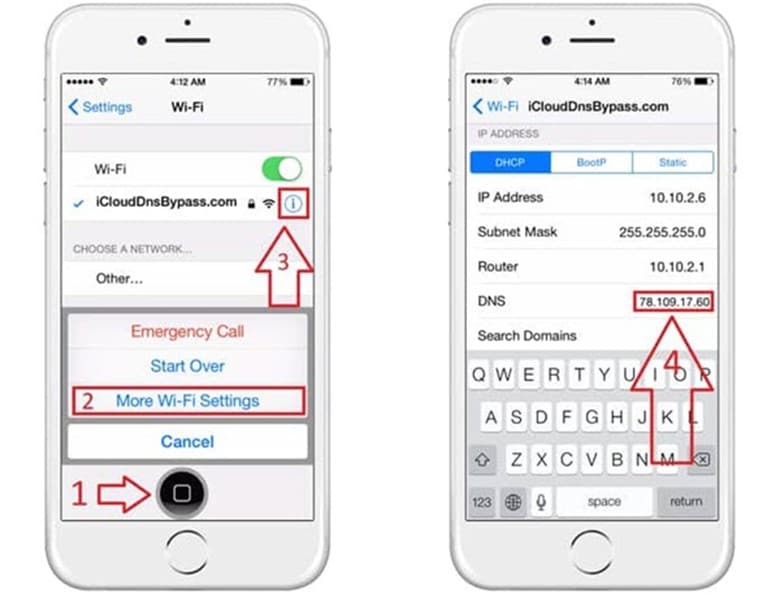
Step 5. Tap “Manual” and enter the DNS IP address closest to your area:
USA: 104.154.51.7
Europe: 104.155.28.90
Asia: 104.155.220.58
South America: 35.199.88.219
Australia and Oceania: 35.189.47.23
Step 6. Get back to the Wi-Fi screen and tap your Wi-Fi name.
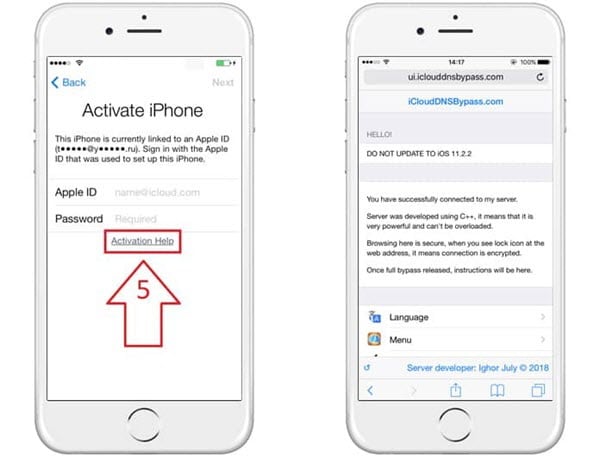
- Step 7. Tap “Back” on the Apple iPhone 7 Plus iCloud bypass screen.
- Step 8. Your iOS device will divert you to the iCloud bypass site.
Pros of Using iCloud DNS Bypass:
- You can physically change the DNS address in Wi-Fi settings.
- You can use various elements and applications on your iOS device if it works.
Limitations of Using iCloud DNS Bypass:
- There is no guarantee that this way will unlock your gadget.
- You will be unable to get to every one of the features of your Apple iPhone 7 Plus after unlocking your iOS device.
- It isn’t compatible with all versions of iOS, particularly the new ones.
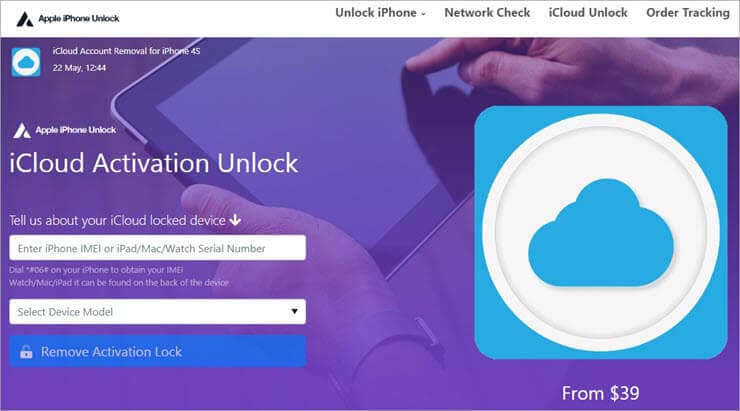
3. Apple iPhone Unlock
You can go for a web-based unlocking tool if no other technique works. We recommend you utilize the Apple iPhone Unlock site for Apple iPhone 7 Plus iCloud bypass. Apple iPhone Unlock is one of the most incredible Apple iPhone 7 Plus iCloud bypass websites. It allows you to unlock your iOS device without the need for jailbreaking.
Key Features:
- Remove your iOS device from the past owner’s account.
- Works with all iOS device up to iOS 14.
- You can unlock iPhone 4 to iPhone 14 with this tool.
Verdict:
Apple iPhone unlocks an incredible site that permits you to initiate practically all Apple cell phones. It functions admirably in bypassing iCloud activation if you have lost your credentials. So, how about we see the way to perform the Apple iPhone 7 Plus iCloud bypass through AppleiPhoneUnlock.uk:
- Step 1. Visit the AppleiPhoneUnlock.uk site and pick the model of the Apple iPhone 7 Plus beginning from the drop menu and type your IMEI number.
You can find your IMEI code in one of these ways:
For most iOS device, the IMEI is put on the SIM plate. So, pop it out and note down the number.
If your Apple iPhone 7 Plus isn’t activated, your screen will have an “I” symbol. Click it, and you’ll see the IMEI.
On specific models, IMEI is set apart on the back of the phone, so flip it over, and you’ll see it.
Step 2. Tap the “Unlock Now/Remove Activation Lock” button.
Step 3. In this step, enter your email account to get completely educated about the process.
Step 4. Press “Continue” and enter your account credentials, and it’s just as simple as that.
If they can unlock the activation lock, you’ll get a notification regarding your request and payment verification. In this manner, kindly wait for a moment and let the website take care of the issue. Once complete, you can set up your Apple iPhone 7 Plus with your new iCloud account and use it.
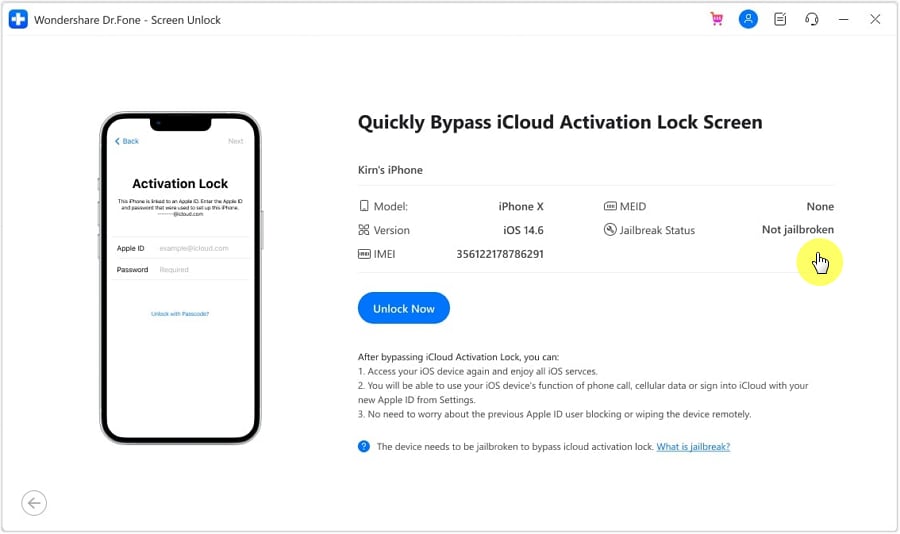
4. Dr.Fone - Screen Unlock (iOS) (iOS/iPadOS 12.0~16.6)
It’s not always necessary that the previous user will help. What if the owner doesn’t recollect the account details? In addition, a few sellers leave the activation lock on intentionally to charge you extra cash. Luckily, you can free unlock your Apple iPhone 7 Plus through third-party software. It is the most straightforward method to perform the Apple iPhone 7 Plus iCloud bypass and the number one choice of users.
Wondershare Dr.Fone - Screen Unlock (iOS) is one of the most remarkable iCloud activation lock bypass programs. It is strongly suggested because of its adaptability with various iPhone versions. You needn’t bother with any technical abilities to use it. Moreover, this amazing software functions best on iOS/iPadOS 12.0-16.6.
Dr.Fone - Screen Unlock (iOS)
Remove iPhone iCloud Activation Lock without Password in Minutes
- Remove Apple ID/iCloud Account efficiently.
- Save your Apple iPhone 7 Plus quickly from the disabled state.
- Free your sim out of any carrier worldwide.
- Bypass iCloud activation lock and enjoy all iCloud services
- Works for iPhone, iPad, and iPod touch.
4,008,670 people have downloaded it
Step-by-Step Guide:
- Step 1. Get into the Dr.Fone software and go for the Screen Unlock option. Then select iCloud Activation Lock Removal.

- Step 2. Now start your process to bypass iCloud activation lock on Apple iPhone 7 Plus/5s/5c.

- Step 3. Then there are GSM and CDMA device you should distinguish clearly, or this problem will change a lot of your device features.
- Step 4. Follow the Jailbreak Guide to make sure Dr.Fone can bypass Apple iPhone 7 Plus/5s/5c successfully.
- Step 5. This image indicates the activation lock will be removed from your device immediately.
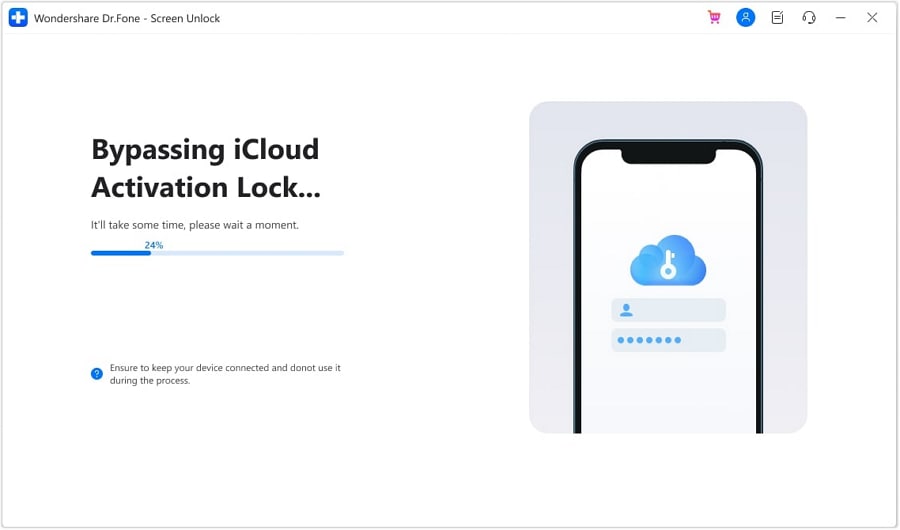
4. Seek help from Apple support
Your iPhone will begin with practically no activation lock. You can access and utilize the phone now. But remember that you can’t utilize your new Apple ID’s phone call, data, and iCloud after that.
Part 2: FAQs about iCloud activation lock
1. Why should I bypass the iCloud activation lock?
The iCloud activation lock has a couple of issues. For example, if your Apple iPhone 7 Plus is locked and you forgot your Apple ID details. You won’t be able to reactivate your device after resetting it. Another issue you could confront is buying an iPhone connected to the past owner’s iCloud account. It makes the smartphone a costly paperweight.
Trying Apple iPhone 7 Plus iCloud bypass permits you to remove the Apple activation lock if a phone is lost or stolen or the old iCloud account is connected.
2. How to set up and turn off the activation lock in Apple iPhone 7 Plus?
You can toggle on/off the iCloud activation lock by turning the Find My feature on/off. Once you turn the Find My feature on, the activation lock will enable it by itself. Here’s how to turn on/off the Find My iPhone feature on your Apple iPhone 7 Plus:
- Step 1. Open the Settings app on your Apple iPhone 7 Plus.
- Step 2. Tap your name; then, at that point, tap the Find My option.
- Step 3. If you want your loved ones to know where you are at a certain time, turn on Find My location.
- Step 4. Tap Find My [device], then, at that point, toggle it on/off.
- Step 5. To see your Apple iPhone 7 Plus, turn on Find My network even when it’s not connected.
Conclusion
Bypassing the iCloud Activation Lock can be chaotic. We have proposed ways to unlock it rapidly. To spend minimal time, go for the Dr.Fone - Screen Unlock (iOS) .
If you need a solid and open tool, download Wondershare Dr.Fone on your PC and allow it to take care of its business. It’s quicker than the above techniques and gives you a simple solution.
A How-To Guide on Bypassing the Apple iPhone 7 Plus iCloud Lock
Have you bought a second-hand Apple iPhone 7 Plus, and it is iCloud locked? Or, do you own an Apple device yet have forgotten its iCloud credentials? Regardless of your issue, you can’t use the locked phone without Apple iPhone 7 Plus iCloud bypass. It is indeed a troublesome experience and can delay your work.
You might attempt to contact Apple support, yet they won’t help you directly without user confirmation. You will get many questions, and they might request the first iOS device payment receipt, even after the confirmation of the Apple iPhone 7 Plus device.
Therefore, we have compiled this Apple iPhone 7 Plus iCloud bypass guide to help users remove the activation lock. So, if you are facing these issues, stay with us till the end to find a solution.
- 1. Get Apple ID and password from the original device owner
- 2. Use DNS Bypass
- 3. Emergency Call
- 4. Dr.Fone - Screen Unlock


Part 1: 4 Efficient Methods to Bypass Apple iPhone 7 Plus iCloud Activation Lock
1. Get Apple ID and password from the original device owner
For an Apple iPhone 7 Plus iCloud bypass, you’ll require a couple of significant pieces of data:
- Bypassing the Activation Lock on iPhone is as straightforward as signing in to the Apple iPhone 7 Plus device. It would help if you had the Apple ID credentials of the previous owner.
- If a device doesn’t have the activation lock, you might see the passcode screen instead of the activation lock screen. Therefore, you should have the Apple iPhone 7 Plus passcode in mind.

After getting the required details, the following are the steps to perform Apple iPhone 7 Plus iCloud bypass:
- Step 1: Go to the Settings application on your Apple iPhone 7 Plus.
- Step 2: Tap the Apple ID photograph from the highest point of the screen. If the Apple iPhone 7 Plus device has a newer version of iOS, then, at that point, you should tap the iCloud choice.
- Step 3: Now tap the “Sign Out” button. You can sign in using your own Apple ID from that point onward.
- Step 4: Next, look down and tap the “Sign Out” choice. When asked, you should enter the Apple ID password of the past owner to disable the Find My iPhone choice.
On the other hand, if you see the lock screen passcode, you can type the passcode and set up the Apple iPhone 7 Plus device without the Apple ID.
With the Apple iPhone 7 Plus device completely set up, access your device’s Settings and sign out of the old Apple account. You can now make one more ID and Sign into it.
2. Use DNS Bypass
What is DNS?
Domain Name System (DNS) changes over the readable names into numeric IP addresses. It utilizes the DNS server as a host to run the app. If your device is iCloud locked, one good way is to change its activation path through the DNS strategy and send it from the first Apple server to the iCloud Bypass DNS server for validation.
You can change the IP server path from the Wi-Fi settings, even if the activation screen is sprung up and you can’t utilize the Apple iPhone 7 Plus device. You can enter the manual Wi-Fi setting and change the DNS address. This section focuses on how you can perform Apple iPhone 7 Plus iCloud bypass via DNS bypass.
Steps to Follow:
Note: Before performing the iCloud DNS bypass, ensure that your device has a SIM card embedded. This step is mandatory for this process to work.
- Step 1: Select your nation and language from the menu on the screen.
- Step 2: When you continue it, you will be coordinated to the Wi-Fi setting page, requesting that you connect with a WIFI connection. Search for the “I” icon close to the Wi-Fi network.
Note: If you don’t see the “I” icon close by, press the Home Button> More Wi-Fi Setting and search for it.
Step 3: You must disconnect the Wi-Fi. When you find the “I” icon, go to the settings tab and select the “Forget this Network” option.
Step 4: Click “I” and enter a DNS server to bypass iCloud Activation Lock as per your area, against the DNS tab. Pick one from the given IP addresses according to your region:
USA: 104.154.51.7
South America: 35.199.88.219
Europe: 104.155.28.90
Asia: 104.155.220.58
Australia and Oceania: 35.189.47.23
Other landmasses: 104.155.28.90
Step 5: After entering the IP address, tap the Back choice at the left of the screen. Now, turn on Wi-Fi, select the Wi-Fi network from the rundown and enter the code.
Step 6: You will see the next page choice; don’t click it and press “Back”. Now you are on the iCloud Bypass screen.

- Step 7: Look down the page, go to the menu and set up your applications, music, camera, and so forth.
3. Emergency Call
Utilizing the Emergency call strategy is another free Apple iPhone 7 Plus iCloud bypass method. It is among the clearest and speediest procedures to remove your iCloud account. The guidelines underneath will show you how to unlock your iCloud free by utilizing the Emergency Call technique:
- Step 1: Turn on your Apple iPhone 7 Plus. Select your preferred language and current region.
- Step 2: Now, on the iCloud activation screen, press the home button three times to begin on Voice Command and multiple times to close down.
- Step 3: Again push on a home button, and this time select Emergency Calls.
- Step 4: Now, you need to key in *#96274825*0000*1#. Then press the call button multiple times.
- Step 5: Then, you need to modify the last digit from 1 to 2 and repeatedly press the call button.
- Step 6: Perform this strategy once more. When you adhere to every one of the guidelines, press the back button, and turn around to the starting screen.
- Step 7: Now, just like you did before, select your language and country. After picking it, you will see the bypass screen.
4. Dr.Fone - Screen Unlock
How would I remove the past owner’s Mac ID from an iPhone? Removing the past user’s Apple ID from your iOS device could be difficult if you don’t know the Apple ID credentials. Yet, it is possible due to expert Apple ID bypass software.
If you’re searching for the fastest method for eliminating the activation lock on your Apple iPhone 7 Plus, look no further from Dr.Fone - Screen Unlock (iOS) . This expert program is extremely convenient when you can’t open your iOS device without a password, or you’re experiencing an activation issue. Dr.Fone is fit for rapidly unlocking/bypassing Apple ID from any iOS device. After the Apple iPhone 7 Plus iCloud bypass, you can use your Apple iPhone 7 Plus with no issues.
Step-by-step Guide:
Step 1. Install the Dr.Fone program to the computer and launch the Screen Unlock tool from the home page.
Step 2. Find the “iCloud Activation Lock Removal” button, click it and start to bypass the lock.
Step 3. Before bypassing the activation lock on your Apple iPhone 7 Plus/4s, here is the “Start”.
Step 4. Now you’re having an iPhone without the activation lock, you can prepare a new Apple ID for this device.
When arriving at this final page, the whole process is done.

Your iPhone will start normally. You can access and utilize all the features of your phone now. Remember that you can’t utilize your new account’s phone call, data, and iCloud features after bypassing them.
Part 2: FAQs
When do we need to bypass Apple iPhone 7 Plus activation lock?
If you have bought a used phone, and it shows the activation lock screen, you may need Apple iPhone 7 Plus iCloud bypass. The activation lock screen happens when you buy a phone from someone else, and they forget to remove the phone from their Apple ID.
Once the lock activates, you can’t reset and use different features of your phone. Therefore, the activation lock can be a troublesome experience for many. So, in such situations, you need to remove/bypass the activation lock through different techniques.
Note: Activation lock ensures the safety and prevents you from buying a stolen phone, which may create problems for you in the future.
What to do to turn off Find My?
- Open up the Settings menu.
- Select your name from the menu. Then select Find My choice.
- At the top of the following page, Tap Find My iPhone and flip the setting off.
- Enter your Apple ID credentials when asked and press “Turn Off”.
The Bottom Line
In this informative guide, we have listed the Apple iPhone 7 Plus iCloud bypass methods. However, if you don’t have the Mac ID credentials to initiate your Apple iPhone 7 Plus, you will require help from an expert program that can bypass the Apple iPhone 7 Plus activation lock. Therefore, we strongly suggest Dr.Fone - Screen Unlock (iOS) . Download the problem-free Dr.Fone activation lock bypass program to get rid of the lock on your Apple iPhone 7 Plus.
Also read:
- [Updated] In 2024, Light Intensity in HDR Scrutinized Beneficial?
- [Updated] SnapCutMaster Insights – Full Video Editor Evaluation
- [Updated] Step-by-Step Success on Youtube with Spectacision Music Videos
- 2024'S Elite Picks: The Finest PC Brands Reviewed
- Erfahren Sie, Wie Man Daten Von Nicht Zugänglichen Speichermedien Wiederherstellt: Profi-Tipps Und Tools | Data Recovery with MyRecover
- How to Bypass iCloud Lock on Apple iPhone 7 Plus
- How to Fix iPad or Apple iPhone 8 Plus Stuck On Activation Lock?
- In 2024, Bypassing Google Account With vnROM Bypass For Motorola Moto G84 5G
- In 2024, How To Bypass iCloud By Checkra1n Even From Apple iPhone 6s Plus If Youve Tried Everything
- In 2024, The 10 Best Tools to Bypass iCloud Activation Lock From iPhone 6s Plus You Should Try Out
- Last Call for Epic Gaming Blowouts in October 202 The Best Prime Day Deals | Save Big 'S Insider Tips!
- Revive Your iPhone's Facial Recognition: Top 7 Methods to Restore Face ID Functionality
- Ultimate Guide to the Best Stylus Compatible Tablets of 2Nndrty: Comprehensive Testing Results and Insights | ZDNET
- Title: Easy Fixes How To Recover Forgotten iCloud Password From your Apple iPhone 7 Plus
- Author: Lydia
- Created at : 2025-03-02 02:06:55
- Updated at : 2025-03-03 18:36:09
- Link: https://activate-lock.techidaily.com/easy-fixes-how-to-recover-forgotten-icloud-password-from-your-apple-iphone-7-plus-by-drfone-ios/
- License: This work is licensed under CC BY-NC-SA 4.0.