
Effective Ways To Fix Checkra1n Error 31 On Apple iPhone 7 Plus
Effective Ways To Fix Checkra1n Error 31 On Apple iPhone 7 Plus
Apple distinguishes itself as a leading smartphone manufacturer by implementing rigorous security protocols. These measures pose challenges for users seeking to jailbreak their iOS devices. Such actions grant users the capability to remove the restrictions enforced by Apple on their devices.
Serving as the primary tool for this purpose, Checkra1n emerges as a popular choice. Nevertheless, similar to any other tool, Checkra1n may face a range of issues, among which Checkra1n Error 31 is notably notorious. This guide aims to help you address Checkra1n Error 31. Moreover, it will introduce a powerful alternative to Checkra1n jailbreak iOS devices.

Part 1. Figuring Out All Possible Reasons for Checkra1n Error 31
Understanding the reasons behind Checkra1n Windows Error 31 is essential in resolving this issue. The reason can relate to the software and hardware aspects of running Checkra1n. Here are some of the reasons why you are encountering Checkra1n error 31:
- Temporary Computer Issues: As Checkra1n is a computer-based tool, issues within your computer can cause the error code 31. These issues can be insufficient resources, compatibility issues, or temporary glitches.
- Mismatched Checkra1n Version: When jailbreaking an iOS device, you must use the right version of the tool. Using incompatible versions of Checkra1n can lead to issues such as error code 31.
- Issues with USB Connection: A major cause behind Checkra1n error 31is the unstable or faulty USB connections. If your device is not properly connected, it will lead to the failure of the jailbreak process.
- **Device Compatibility Issues:**Apple has introduced many measures to ensure that newer devices are hard to jailbreak. That’s why if you use the latest iOS device, there is a high chance it is incompatible with Checkra1n.
- **Security Software Interference:**In rare cases, the security or antivirus software installed on your system can interfere with the working of Checkra1n. Similarly, the Windows firewall can sometimes flag Checkra1n as a virus, disturbing the jailbreaking process.
Part 2: [Top Fixes] Resolve Checkra1n Error 31 to Jailbreak iOS Device
Encountering errors like Checkra1n jailbreak Error 31 is a typical occurrence in the jailbreaking process. Fortunately, there’s no cause for concern, as there are various solutions readily accessible to diagnose and address this particular error. Discussed below are the top 6 fixes to streamline your iOS jailbreaking process:
Fix 1. Wondershare Dr.Fone – Screen Unlock (iOS) Providing a Direct Jailbreaking Solution
While Checkra1n is widely employed for jailbreaking iOS devices, it has notable limitations. This is especially the case concerning compatibility with the latest iOS versions. Therefore, we recommend considering a dependable alternative like Wondershare Dr.Fone. It offers iOS users a user-friendly approach to conducting jailbreaks on their devices.
Working as a dependable companion for iPhone users, Dr.Fone simplifies the jailbreaking process. It especially benefits users grappling with iOS security locks, particularly iCloud activation locks. Notably, Dr.Fone stands out for its compatibility with the latest iOS 17 and iPhone 15 models.
Prominent Features of Wondershare Dr.Fone
- You can bypass all sorts of iOS screen locks, from passcodes to Face IDs.
- Besides unlocking iCloud Activation Lock, it is also an expert in removing SIM locks from the carriers.
- If you have forgotten your iTunes backup encryption password, Dr.Fone can remove it without causing data loss.
Steps To Bypass iCloud Activation Lock via Wondershare Dr.Fone
By combining Dr.Fone with the jailbreaking process, users can effectively bypass the iCloud Activation Lock. Detailed instructions are provided below to bypass the iCloud Activation Lock bypass using Dr.Fone:
- Step 1. Commence the Procedure by Activating Dr.Fone
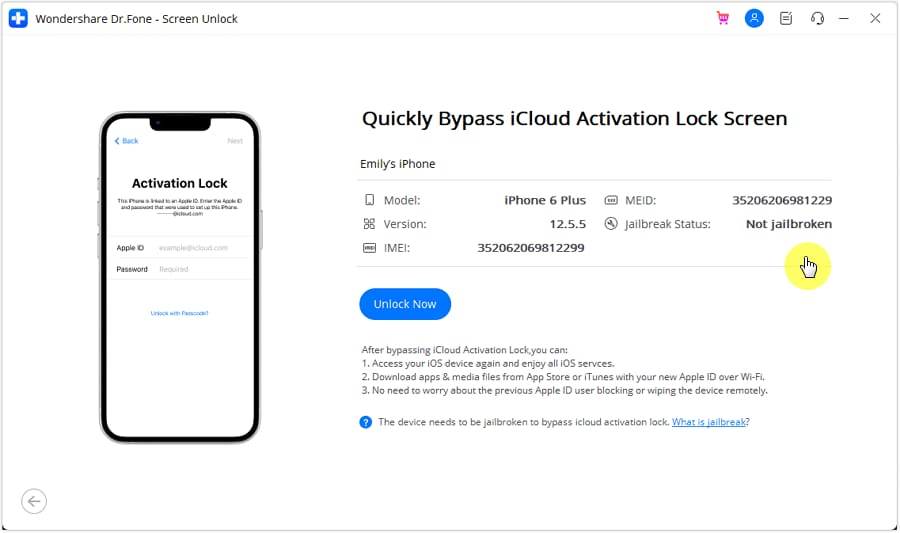
Start by downloading and opening the latest edition of Wondershare Dr.Fone. After completing this step, go to the “Toolbox” section within Dr.Fone and click “Screen Unlock.” Choose “iOS” as your device type, and head to select the “iCloud Activation Lock Removal” option. Now, begin the procedure by selecting “Start” and ensure your device remains connected to the computer throughout this stage.

- Step 2. Jailbreak Your iOS Device
Now, proceed to check if your device is CDMA or GSM. A GSM device will remain the same after iCloud Activation Lock removal. On the other hand, a CDMA device will lose all cellular functionalities. After that, you need to tap “Unlock Now” and agree with the warning by tapping “Got it!” Afterward, you will need to jailbreak your device, for which follow these below-given steps:
- On a computer with Windows 7 or higher, download checkn1x-amd64.iso and rufus.exe. Connect a USB with at least 2 GB storage to the computer. Next, open the Rufus file and choose “checkn1x-amd64.iso” by clicking “Select.”
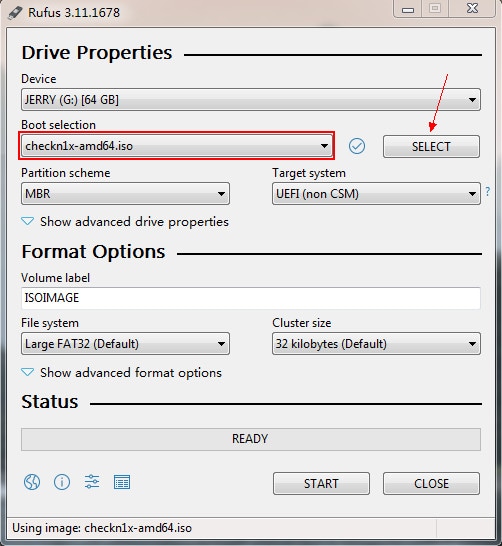
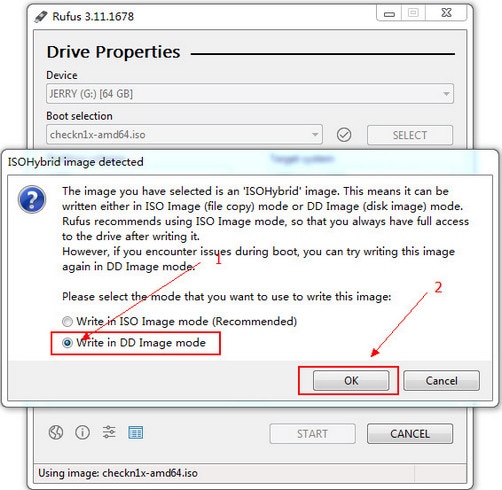
- Now, click “Start,” and on the pop-up window, choose “Write in DD Image Mode.” Then, click “OK” and wait for the process of writing image data to complete. Once completed, tap “Close” and restart your computer with the USB plug-in.

- Press the F12 or relative boot key to access the Boot Menu when the computer restarts. Within the “Boot Menu,” choose the USB and connect your iOS device to the computer. Now, use the arrow keys to move to the “Options” button and press Enter.
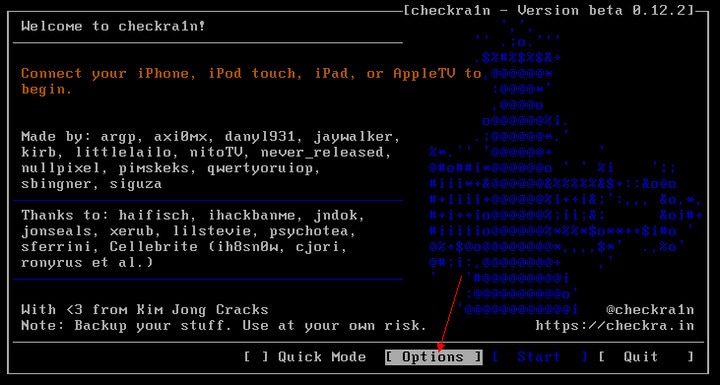
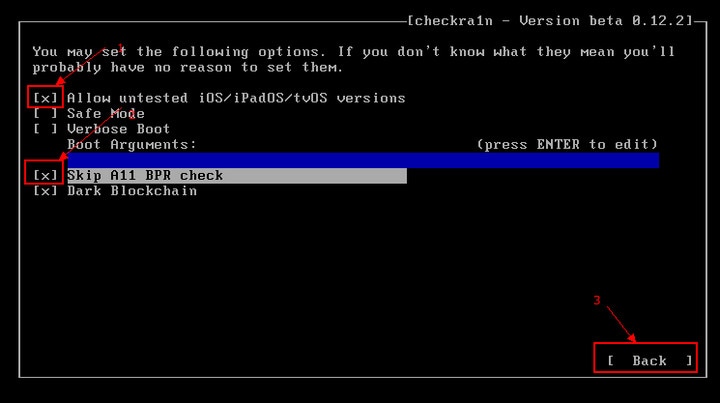
- You must now move to the “Allow untested iOS/iPadOS/tvOS versions” option and hit “Enter.” Follow it by moving to the “Skip All BPR Check” option and pressing “Enter” again. Afterward, move to the “Back” option and use “Enter” to return to the main screen.
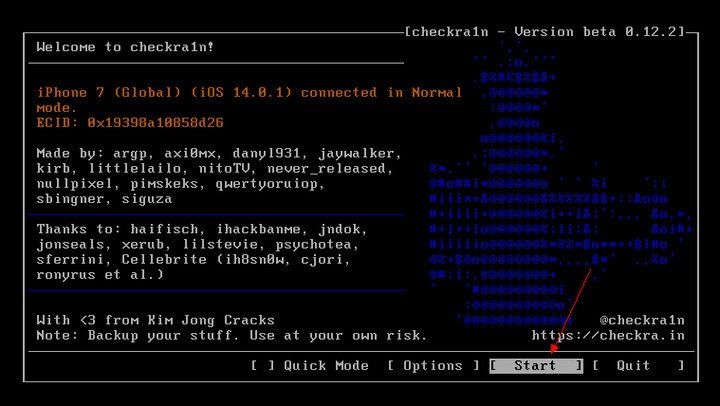
- Once back on the main screen, select “Start” to initiate jailbreaking. For CheckN1x to jailbreak your device, you need to put the Apple iPhone 7 Plus device into DFU Mode. Now, tap “Next” to put your device into Recovery Mode.

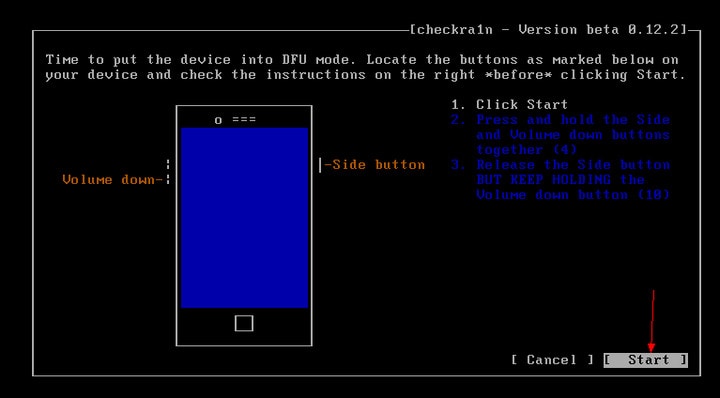
- Once your device is in Recovery Mode, tap “Start” and follow the on-screen guidelines to put it into DFU Mode. When your device enters DFU Mode, Checkn1x will automatically jailbreak it. Finally, select “Finish” and remove the USB to complete the process.
- Step 3. Complete the iOS Activation Lock Bypass Process
Removing the Activation Lock will start as soon as your device is jailbroken. You can follow the progress on the screen, and once it is complete, tap “Done” to conclude the process.


Fix 2. Try Restarting iOS or Computer Device
Sometimes, temporary glitches or bugs within your iOS device or computer can cause the Checkra1n Error 31. The most effective and simple solution in this case is to restart your devices. This simple process removes all temporary glitches and resets all processes. Here is how you can restart your iOS device and computer:
1. Windows PC
Instructions. Click the “Start” button on your Windows PC from the bottom left corner. Here, tap the “Power” icon and select “Restart.”

2. MacBook
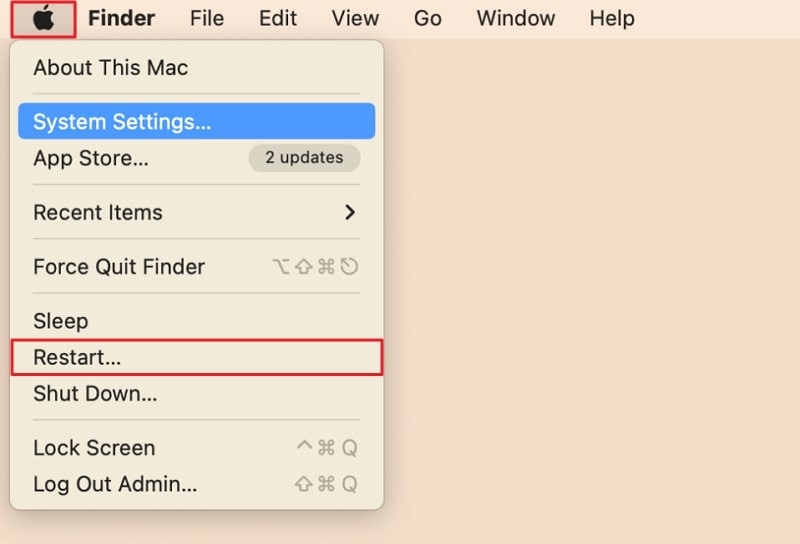
Instructions. When using a Mac, click the “Apple” logo from the top left corner. Press “Restart” from the drop-down menu to reboot your Mac.
3. iPhone/iPad
Instructions. Press the “Side” and any “Volume” buttons to access the Power Slider screen. Now, move the slider to the right to turn off your device. After waiting some time, press the “Side” button to turn on your iOS device.

Fix 3. Download New Checkra1n Version
Crucial for a successful jailbreak is carefully selecting the appropriate Checkra1n version. Compatibility varies across devices, making it essential to choose the version that suits your device. Error 31 issues are likely linked to the specific Checkra1n version in use. In such instances, the recommended solution is to experiment with alternative versions.

Fix 4. Install iOS Firmware From iTunes and Retry Jailbreaking
When encountering Checkra1n jailbreak, error 31 may be attributed to the iOS version on your device. In such cases, the optimal resolution involves reinstalling the iOS version through iTunes. Follow the steps below to personally choose the IPSW file and employ iTunes for the installation on your iOS device:
- Step 1. Access the ipsw.me website using a web browser and download the compatible IPSW file for your iOS device. Before installing, ensure that the “Find My” service is disabled.

- Step 2. Connect the iOS device to the computer and wait for iTunes/Finder to detect it once all requirements are satisfied. For instance, if you have a Mac with the operating system before macOS Catalina, access the “Summary” tab by clicking the Apple iPhone 7 Plus device icon within iTunes. While holding the “Shift” key on Windows or the “Option” key on Mac, click “Restore iPhone.”

- Step 3. You will be asked to select the IPSW file. Choose the file you downloaded and follow the on-screen instructions to complete the installation process. Once complete, re-try the jailbreaking and see if error 31 is resolved.

Fix 5. Consider Using Other Options in Checkra1n
If the reason behind Checkra1n error 31 is the Apple iPhone 7 Plus device incompatibility, Checkra1n provides an inbuilt way. When jailbreaking a device, Checkra1n allows you to select the “Untested versions” option. While employing this option, you can jailbreak the Apple iPhone 7 Plus device with iOS versions still not tested for jailbreaking. Here is how you can select these options in an attempt to jailbreak your device:
Instructions. To get a clean start, reboot your computer and iOS device and launch the Checkra1n app. Now, click the “Options” and select the “Untested Versions” and “Safe Mode” options. Then, try jailbreaking your device and see if error 31 is resolved.

Fix 6. Try a Special Method While Using Checkra1n
At times, the solutions you are looking for can be found among the experiences of fellow users. We found a Reddit post in our search to find solutions to Checkra1n Error 31. In this post, a Reddit user explained a hack he had found to solve error 31 when jailbreaking using Checkra1n.
Remember that this hack includes a specific Checkra1n version and experience that specific user. While you can emulate the experience, the results aren’t guaranteed. Here is what that user tried for successful jailbreaking using Checkra1n:
- Step 1. Download and install the Checkra1n version 0.10.2 beta on your computer. Now, connect your Apple iPhone 7 Plus to DFU Mode to the system. Initiate the jailbreaking process until the “Right before Trigger” option appears.

- Step 2. The user suggests you unplug the cable and re-plug it after waiting for 5 to 7 seconds. According to the user, this action should do the trick. To get out of DFU Mode, press and hold both buttons (Home + Lock) for 10 seconds and go on to release the home button.

Bonus. Jailbreak iOS Using Mac: A Simple Guide To Refer To
Looking for a tool to jailbreak an iOS device on a Mac? Wondershare Dr.Fone has you covered there, as it also provides a comprehensive guide to jailbreaking an iOS device from Mac. You will need to download the Checkra1n tool and a USB cable to connect your Apple iPhone 7 Plus. Once you have both, use the following steps to jailbreak your device from Mac:
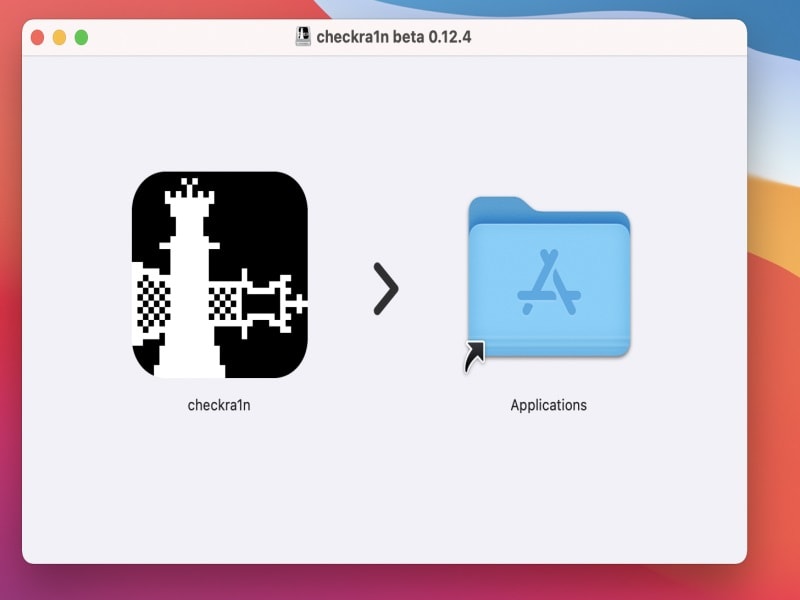
- Step 1. Begin by downloading the .dmg file of Checkra1n and installing it within your Mac’s applications. Now, link your iOS device to the Mac and go to Applications, click “Checkra1n,” and access “Contents.”
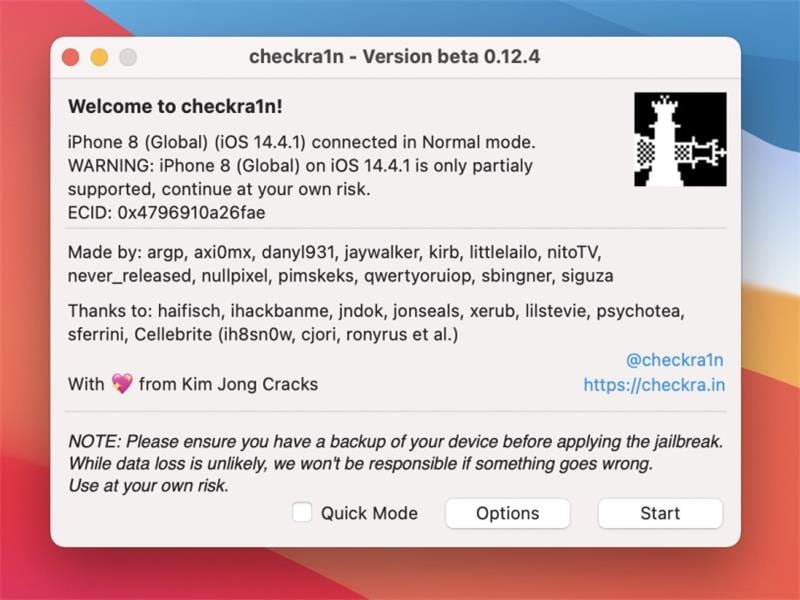
- Step 2. Tap “macOS” and go to “Checkra1n_gui Terminal file” to detect the Apple iPhone 7 Plus device. Now, move ahead by tapping “Start,” you will be led to the screen with instructions for putting the Apple iPhone 7 Plus device into DFU Mode.
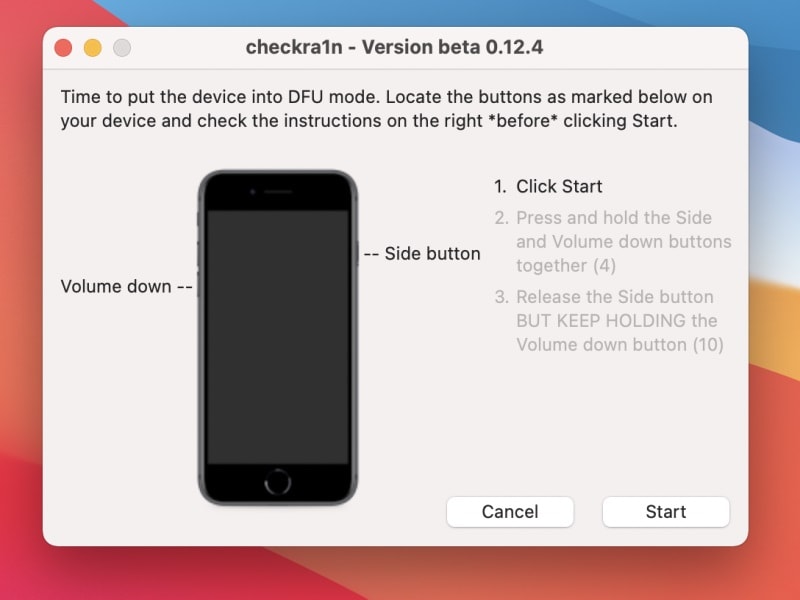
- Step 3. Tap “Next,” put your device into DFU Mode, and press “Start.” Once the Apple iPhone 7 Plus device is in DFU Mode, the jailbreaking process will commence. When it is complete, and your device is jailbroken, tap “Done” to conclude the process.
Conclusion
In wrapping up this guide, those seeking to customize their iOS devices can turn to jailbreak. Checkra1n stands out as a favored option for this procedure, but dealing with Checkra1n Error 31 can be an irritating ordeal. The optimal solution is opting for an alternative, such as Wondershare Dr.Fone. This tool offers comprehensive textual and video guides, aiding users in successful jailbreaks.
Tips: Are you searching for a powerful Activation bypass tool? No worries as Dr.Fone is here to help you. Download it and start a seamless unlock experience!
How to Unlock iCloud lock on your Apple iPhone 7 Plus and iPad?
Part 1: Is it possible to unlock the iCloud lock on iPhone
At the start of 2014, apple introduced what they call “iCloud Activation Lock”. This means that your iPad, iPhone, or Apple Watch is now locked to your iCloud account unless you decide to share your login details with someone. Therefore, the only way you can access your device is by entering the iCloud user ID and password. Essentially what this means is that your Apple device is useless unless you find a way to unlock it. The good news is that it is possible to unlock the iCloud lock on iPhone or iPad even if you don’t have the credentials using third-party software.
 safe & secure
Part 2: One-click to unlock iCloud ID with a convenient tool
Sometimes, getting some penny spent is a great idea. And in case you want to unlock the iCloud locked device, spending is indeed a perfect idea. We would here like to suggest to you Dr.Fone - Screen Unlock (iOS) – a tool that assures unlocking iCloud ID in a few clicks and gives satisfying results.
Dr.Fone - Screen Unlock
Remove iCloud Lock from Any iPhone and iPad without Hassle.
- Unlock iCloud activation lock on iPhones and iPads without an iCloud account.
- Save your Apple iPhone 7 Plus quickly from the disabled state.
- Free your sim out of any carrier worldwide.
- Completely unlinked from the previous iCloud account, it won’t be traced or blocked by it anymore.
- Fully compatible with the latest iOS.

4,008,669 people have downloaded it
Pros
- User friendly; anyone can handle it.
- No need for an IMEI number or email ID/security answers.
- Can easily unlock iCloud without a password.
- Support for a wide range of iOS devices and works fast.
- Can bypass activation lock in a trouble-free way.
Cons
- No free version
Step 1: Download Dr.Fone and open the Screen Unlock (iOS)
To begin with, get the tool downloaded and installed on your PC. Launch it and click on the “Screen Unlock” option from the main screen. Connect your device to the computer now.
Step 2: Choose the option “Unlock Apple ID”
From the following screen, press the “Unlock Apple ID” button.

Step 3: Select “Remove Active Lock”
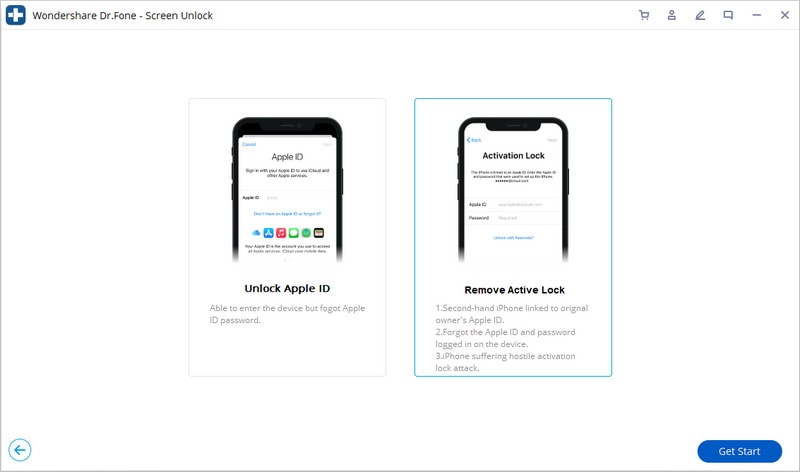
Step 4: Start to unlock
If your Apple iPhone 7 Plus has been jailbroken, click the button “Finished Jailbreak”. For those who haven’t done it, you can follow the jailbreak guide to go on.
Confirm the Apple iPhone 7 Plus device model and start to unlock safely.
Step 5: Unlock completed.
Lastly, all you need is to check if you succeeded in unlocking the iCloud lock. This can be done on the new window that appears.
Part 3: How to Free Unlock the iCloud Lock on iPhone
Since your Apple iPhone 7 Plus is locked, you will not be able to access files until you unlock iCloud on your Apple device. One way to unlock iCloud locked phone is to bypass the iCloud activation lock by following the steps below
Step 1. Take your Apple iPhone 7 Plus and while on the “Activate iPhone” screen, press the home button and then press the “Wi-Fi” settings. Next to the “Wi-Fi” symbol, tap on “i”. Now you need to change the existing DNS settings. The DNS settings you need to type are as follows:
- If you are in the USA type in 104.154.51.7
- In Europe, type 104.155.28.90
- In Asia, type 104.155.220.58
- The rest of the world, please type in 78.109.17.60
Step 2. Tap on the “Back” button then click “Done”. Next, click “Activation help”. Once you have done that, you will see a message that says: You have successfully connected to my server.” If you tap on the menu, you will be able to access different iCloud services such as iCloud Locked User Chat, Mail, Social, Maps, Video, YouTube, Audia, and games, among others.
Part 4: How to unlock iCloud lock by Apple iPhone Unlock
Sometimes it may not be possible to completely unlock your iCloud Lock. For instance, the free method of unlocking your iCloud Lock only works on iOS 9 and iOS 8 for iPhones. Anything else will not work properly. Moreover, you may not be able to know how to unlock iCloud lock-free if you are in certain countries. That is when you can think of using the Official iPhone Unlock service which will completely unlock your Apple iPhone 7 Plus without any hassle. The iCloud Activation Lock Removal tool will quickly remove the iCloud activation lock from the previous owner’s account. In short, this is an easy and seamless tool for removing the iCloud lock to set your own.
Step 1 - Visit the Apple iPhone unlock by clicking on this link.
Step 2 - Enter the IMEI/Serial number of your device and send it.

Step 3 - Just wait for a confirmation message telling you that the iCloud Lock has been removed.
Step 4 - Now create a new iCloud account and start using your device
This tool works on all iPhone 6, 6+, 5S, 5C, 5, 4S, 4, and iPad 4, 3, 2 Air 2 and also works on iOS, and it doesn’t matter why you are unlocking it from.
Wrap it up
Unlike the free iCloud Lock unlock solution, Dr.Fone - Screen Unlock (iCloud Activation Lock Removal) tool provides a permanent solution to the problem of how to unlock iCloud locked irrespective of your country. It will only cost you a couple of dollars pounds to unlock your Phone. This is a small price to pay because you might have spent hundreds of dollars to purchase a new iPhone or iPad.
New Multiple Ways: How To Remove iCloud Activation Lock On your Apple iPhone 7 Plus
Undeniably, one of Apple’s selling points is its focus on security. iPhones, iPads, Macs, and other Apple stuff all enjoy this robust security system. Of course, this is mainly made by Apple through iCloud or Apple ID. This system is designed to protect your data and prevent unauthorized access. This is what makes Apple’s devices highly secure and sought after.
However, a common challenge arises when you acquire a second-hand iPhone or iPad. You may find it’s connected to the previous owner’s iCloud account through an Activation Lock. This situation can be a significant hurdle, rendering the Apple iPhone 7 Plus device almost unusable. As you may expect, this article will help you remove the iCloud Activation Lock.

Part 1. What Is the iCloud Activation Lock
The iCloud Activation Lock is a security feature unique to iOS. It’s intended to prevent people from accessing or resetting stolen devices. This feature is automatically enabled when “Find My iPhone” is turned on and effectively locks the Apple iPhone 7 Plus device to a specific Apple ID.
Attempting To Remove iCloud Activation Lock
Simply logging in with the correct Apple ID credentials will suffice to overcome this lock under normal circumstances. This process is straightforward if you are the original owner and remember your login details. However, there are instances where it could be more. You might forget your Apple ID, buy a second-hand device still linked to the previous owner’s account, or inadvertently reset your phone and face the iCloud Activation Lock.
In these situations, you’re left with a virtually unusable device. But there’s no need to panic. Several methods exist to bypass or remove the iCloud Activation Lock, even when the original Apple ID is unknown or forgotten. In the following sections, you’ll explore these methods. You’ll find step-by-step guidance to remove the iCloud Activation Lock to enjoy its full functionality.
Part 2. Method 1: Remove iCloud With Apple ID Password
If you’re fortunate enough to know the Apple ID associated with the Apple iPhone 7 Plus device, learning how to remove iCloud Activation Lock is straightforward. This method is ideal for those who have either forgotten their password or acquired a second-hand device still linked to the previous owner’s Apple ID but have their cooperation in unlocking it.
If you see the Activation Lock screen, it means the Apple iPhone 7 Plus device is still tethered to an Apple ID. Follow the onscreen instructions to input the Apple ID and password initially used to set up the Apple iPhone 7 Plus device. If the Apple iPhone 7 Plus device has a passcode, you may also use that for unlocking. Then, you can remove the old Apple ID by going to Settings > Tap on the profile on top of the app > Sign Out.

If you’ve forgotten your Apple ID, it can be recovered by signing in with your Apple ID account. Then, click the Forgot Password button. You may need to answer security questions or receive a code on a trusted device to complete this process.
Removing Activation Lock via iCloud (For Offline Devices)
Alternatively, you can remove the iCloud account by following the steps below. You can ask the original owner to do this or do it independently if you can access the account.
- Step 1: Go to <www.iCloud.com/find> on any web browser.
- Step 2: Log in with your Apple ID (or the Apple iPhone 7 Plus device owner’s ID) and password.

- Step 3: From the list of devices associated with this Apple ID, select the one you wish to unlock.
- Step 4: Click Remove from Account. This action will disassociate the Apple iPhone 7 Plus device from the Apple ID, removing the Activation Lock.
Following these steps, you can remove the iCloud Activation Lock from your device, provided you can access the necessary Apple ID credentials. This method is the most secure and straightforward way to regain access to your device without compromising your data or the Apple iPhone 7 Plus device’s functionality.
Part 3. Method 2: Remove iCloud Without an Apple ID Code in a Few Clicks
Third-party tools like Wondershare Dr.Fone provide an effective solution when you can’t access the Apple ID passcode. Dr.Fone is recognized as an all-in-one mobile solution, catering to various needs beyond unlocking devices. It has features like recovery, system repair, data transfer, backup and restore, and Screen Unlock (iOS).
The Screen Unlock feature is valuable for bypassing the iCloud Activation Lock without needing the original Apple ID passcode. It’s a useful tool for those who have bought a second-hand device still tied to the previous owner’s Apple ID or have forgotten their Apple ID details.
Read the steps below to learn how to use the Screen Unlock feature to remove the iCloud Activation Lock.
Method 2.1: Removing Apple ID Without Jailbreak
First, Dr.Fone’s Screen Unlock can remove the iCloud Activation Lock without jailbreaking the Apple iPhone 7 Plus device. Note that this only works when the phone is not in activation mode. This can be any time before the phone is reset. The steps below guide you how to remove the Apple ID from the Apple iPhone 7 Plus device.
Step 1: Download and install Wondershare Dr.Fone from the official website.
Step 2: Open Toolbox > Screen Unlock > iOS.

- Step 3: Choose Remove Apple ID on this page.

- Step 4: Connect your phone to the computer. A verification message should appear. Then, click Unlock Now.

- Step 5: Verify if your phone has two-factor authentication enabled on this page. Follow the onscreen instructions.

- Step 6: Dr.Fone will give instructions on how to put your phone in Recovery mode. If it doesn’t work, click DFU Mode at the bottom of the screen.

- Step 7: Wait for the download of the firmware.

- Step 8: After verifying the firmware, click Unlock Now. Type in “000000” on the text box when the prompt appears.

- Step 9: Wait for the process to finish. Then, check if the iCloud account is removed through Settings. If not, click Try Again.

Method 2.2: Bypassing iCloud Activation Lock (Jailbreak Method)
If your device is on the activation screen, the above-presented method will not work. This is where you’ll have to jailbreak your device and bypass the iCloud Activation Lock with Dr.Fone. It might seem daunting. Don’t worry, as Dr.Fone will be guiding you through this. Just follow the steps below:
- Step 1: Go to Toolbox > Screen Unlock > iOS.
- Step 3: This time, choose iCloud Activation Lock Removal.

- Step 4: Click Start.
- Step 5: When Dr.Fone prompts you to connect your Apple iPhone 7 Plus, use a cable to connect it to your computer.
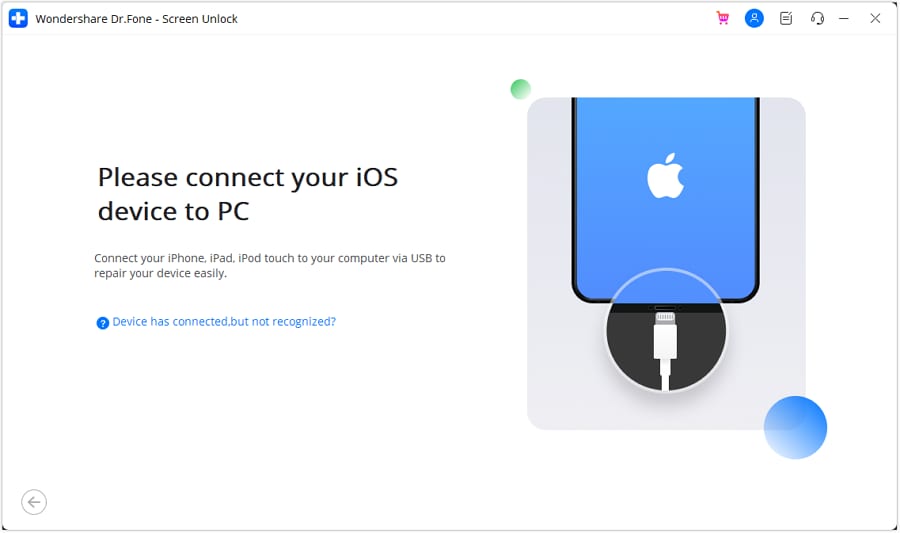
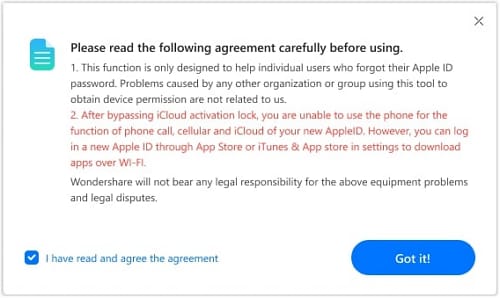
- Step 6: To identify if your phone is GSM or CDMA, navigate to Settings > General > About. If it’s CDMA, cellular/SIM functions won’t work, but other features remain usable. Upon selecting Unlock Now, a warning pop-up appears. Confirm by clicking Got it.
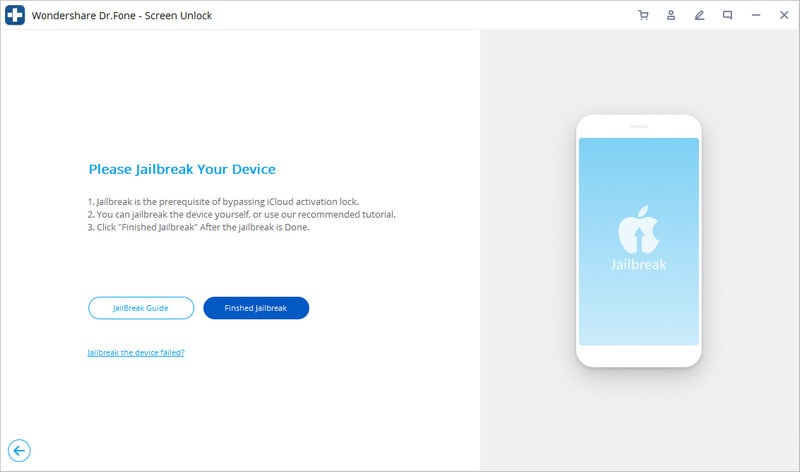
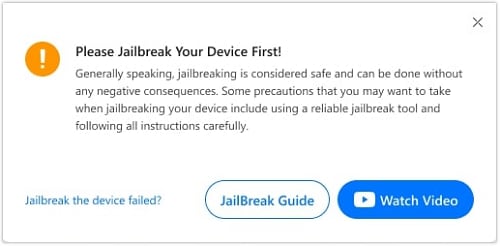
- Step 7: At this part, you should jailbreak your device. Click JailBreak Guide or Watch Video to be guided on the process.
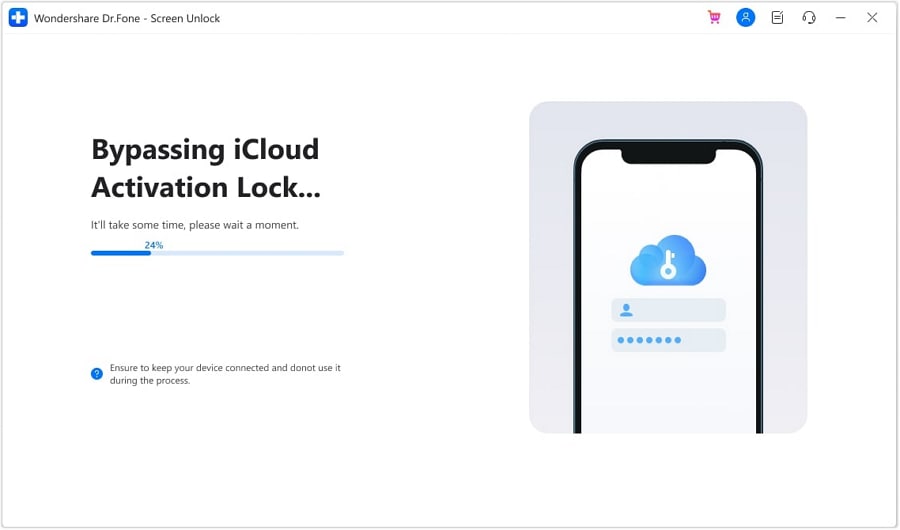
- Step 8: Dr.Fone will automatically begin the bypassing process after jailbreaking the Apple iPhone 7 Plus device.
- Step 9: After the process finishes, click Done.
Part 4. Method 3: Use Dedicated Third-Party Services To Remove iCloud Lock
Numerous dedicated third-party services, such as IMEICheck.co and iUnlocker.com, offer activation lock removal for those seeking alternative solutions. These websites typically work by using the Apple iPhone 7 Plus device’s IMEI number to unlock the associated iCloud account.
Users visit these websites, enter their device’s IMEI number, and request the iCloud unlock service. Depending on the service provider, these platforms process the unlock request, which can take a few days. While convenient, users should exercise caution and ensure they’re using reputable services to avoid potential scams.
Conclusion
In summary, removing iCloud Activation Lock can be crucial for those dealing with locked Apple devices. This article has explored several methods: using the Apple ID password, leveraging the capabilities of Dr.Fone for those without the password, and opting for third-party services.
It’s important to remember that these methods should only be used for legitimate purposes, such as unlocking a device you legally own. Dr.Fone remains a recommended tool for a comprehensive mobile solution, particularly for unlocking needs.
Tips: Are you searching for a powerful Unlock tool? No worries as Dr.Fone is here to help you. Download it and start a seamless unlock experience!
- Title: Effective Ways To Fix Checkra1n Error 31 On Apple iPhone 7 Plus
- Author: Lydia
- Created at : 2024-07-14 20:32:32
- Updated at : 2024-07-15 20:32:32
- Link: https://activate-lock.techidaily.com/effective-ways-to-fix-checkra1n-error-31-on-apple-iphone-7-plus-by-drfone-ios/
- License: This work is licensed under CC BY-NC-SA 4.0.