
How To Bypass iCloud By Checkra1n Even On Apple iPhone 15 Plus If Youve Tried Everything
How To Bypass iCloud By Checkra1n Even On Apple iPhone 15 Plus If You’ve Tried Everything
Since iOS 12.3, Apple has been using its new Activation Lock feature to deter theft. This security measure requires users to enter their iCloud login information to use an iPhone or iPad previously locked by someone else.
While this is a welcomed addition for those looking to protect their device, it can also be a major inconvenience for those who have lost or forgotten their iCloud password. Checkra1n is a new tool that allows users to bypass iCloud activation without entering any login information. You will learn in this post how to use Checkra1n iCloud bypass to unlock your Apple iPhone 15 Plus or iPad.
Let’s get started!
Part 1: What is Checkra1n?
Checkra1n is a jailbreak tool that allows you to jailbreak your Apple iPhone 15 Plus or iPad running iOS 12.3 and up. As part of the jailbreak tool team, it is one of the most popular jailbreak tools. Checkra1n is a semi-tethered jailbreak tool, meaning you will need to re-jailbreak your device each time you reboot it. It is, however, a very reliable jailbreak tool that is easy to use.
Checkra1n is the only jailbreak that allows for the BFU (Before First Unlock) acquisition of locked devices with an unknown passcode. It means that if you have a locked iPhone that you don’t know the passcode for, you can still use checkra1n to jailbreak it and access the data.
Additionally, checkra1n does not require you to sign the jailbreak IPA file (using AltStore or the Developer Account at Apple), which makes it much easier to use. Overall, checkra1n is a powerful tool that you can use to access data on locked iPhones, even if you don’t know the passcode.
Pros
- The tool doesn’t require tech skills
- It supports iPhones, iPads, and many other devices
- Supports a wide range of hardware platforms
- It is not possible to exploit remotely
Cons
- Jailbreaking older devices is limited
- A reboot won’t save them
Part 2: How to Bypass iCloud Activation Lock with Checkra1n?
You may consider using Checkra1n if you are looking for a method to bypass the iCloud activation lock. You can remove the iCloud activation lock from your Apple iPhone 15 Plus or iPad using this method.
1. How to Jailbreak an iOS Device with Checkra1n?
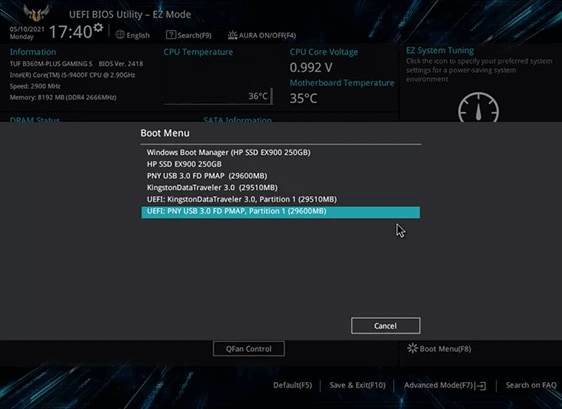
Step 1: Enter the BIOS settings after the computer has rebooted.
Step 2: Go to Boot Menu and select the jailbreak USB drive you just created.
Step 3: Plug your iOS device into the PC and click [Start].
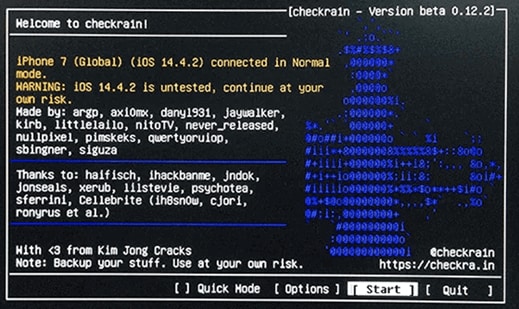
Step 4: The software may inform you that your iOS version is not tested. Follow the steps below to enable the Start key on the iOS device at risk if you are ready to jailbreak.
Follow these steps to enable the [Start] key:
- Select [Options].
- Ensure that Untested iOS, iPadOS, and TVOS versions are checked.
- To return to the homepage, click [Back].
- To begin the jailbreaking process, click [Start].
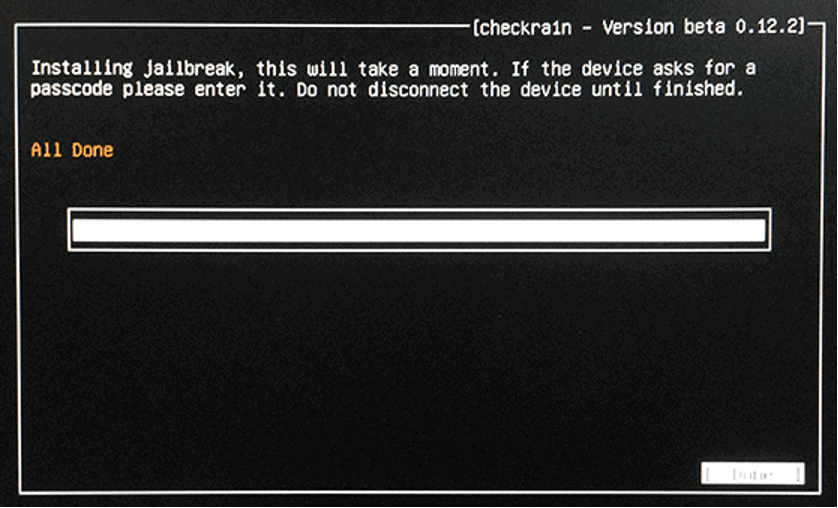
Step 5: You will be shown how to enter DFU mode on the Apple iPhone 15 Plus device. Follow the instructions step by step.

Step 6: You have successfully jailbroken your device.
Since Cocosenor bypass Tuner now uses checkra1n 0.12.2 to help jailbreak, it won’t be able to jailbreak iOS 14.5.
2. How to Bypass iCloud Activation Lock with Checkra1n?
The next step is to figure out how to bypass iCloud with Checkra1n iCloud Bypass. We will show you how to use the method on a Mac. The Checkra1n installation process has a few technical aspects, but if you follow the steps, you shouldn’t have any problem.
Step 1. Download Checkra1n from the official website.
Step 2. Using the Terminal app, install brew and usbmuxd by entering the following commands:
- /usr/bin/ruby -e “$(curl -fsSL https://raw.githubusercontent.com/Homebrew/install… )”
- brew install usbmuxd
Step 3. Launch Checkra1n once those have been installed.
Step 4. Follow the instructions to jailbreak your Apple iPhone 15 Plus by connecting it to your computer.
Step 5. The following command will create a tunnel from Port 2222 to Port 44 (or 22 if this fails) using USBmuxd’s built-in iProxy tool:
- iproxy 2222 44
Step 6. Enter the following command in a new Terminal window by pressing Command + T:
- ssh root@localhost -p 2222
Step 7. To move the setup file and patch the system, enter the following commands:
- mount -o rw,union,update /
- mv /Applications/Setup.app /Applications/Setup.bak
- rm -rf /Applications/Setup.app
Step 8. Lastly, enter these two commands to clear any springboard processes and clear the setup file’s cache:
- uicache -all
- Killall backboardd
Checkra1n will bypass the iCloud Activation Lock after you enter the last command.
Using the Terminal app and entering many unfamiliar commands may be intimidating for some people, but if you copy exactly what we’ve shown you, you’ll be fine.
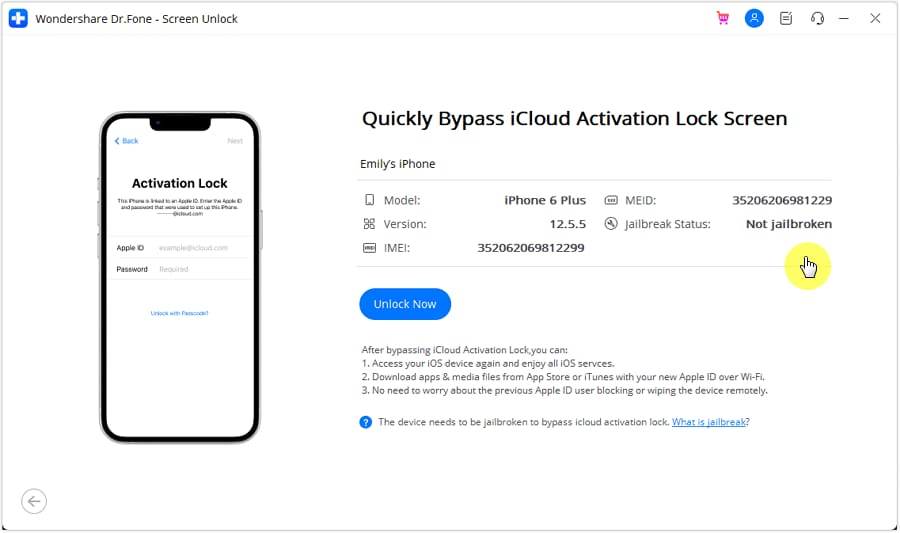
Part 3: Easy Tool for iCloud Activation Lock
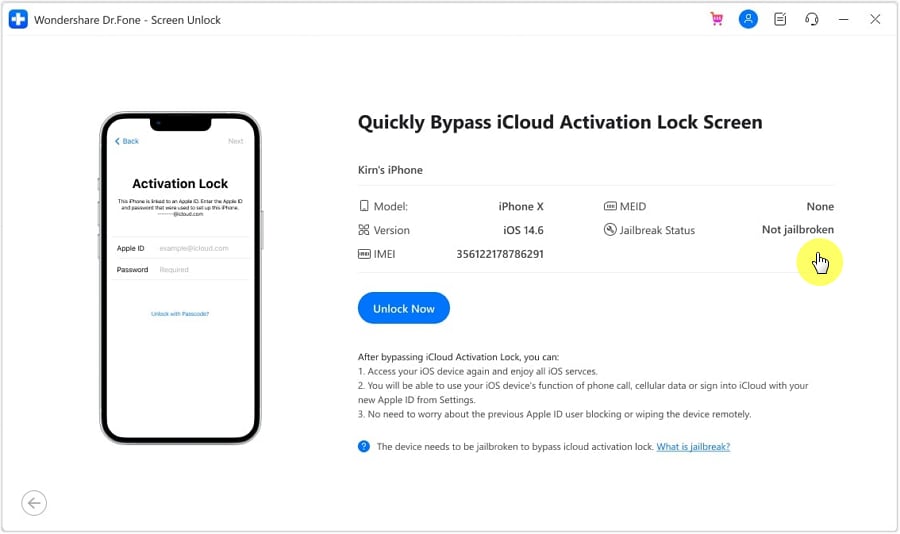
Dr.Fone - Screen Unlock
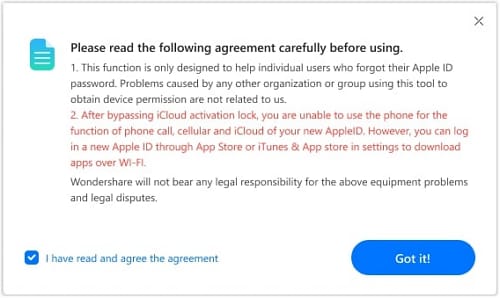
It is possible to bypass the iCloud activation lock with a tool called Dr.Fone - Screen Unlock. This powerful tool can bypass the iCloud activation lock on any iOS device, regardless of the version of iOS.
Here’s how to use Dr.Fone - Screen Unlock to bypass the iCloud activation lock:
Step 1. Choose Screen Unlock from Dr.Fone after installing the program.

Step 2. Click on “Bypass Activate Lock.”

Step 3. Please select the “Start” button for the next steps.

Step 4. Please confirm which device you have.
(For GSM devices, you can enjoy all functions)
(For CDMA devices, some functions will be limited, so you cannot use them anymore.)
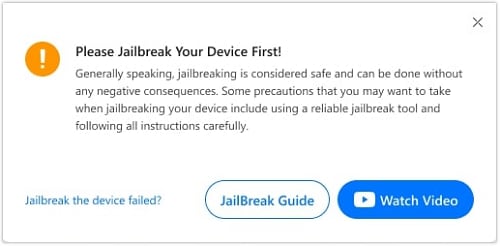
Step 5. Do you jailbreak your device? If not, you can do our jailbreak guide for this step.
Step 6. Please wait for a minute, and the process will be over.
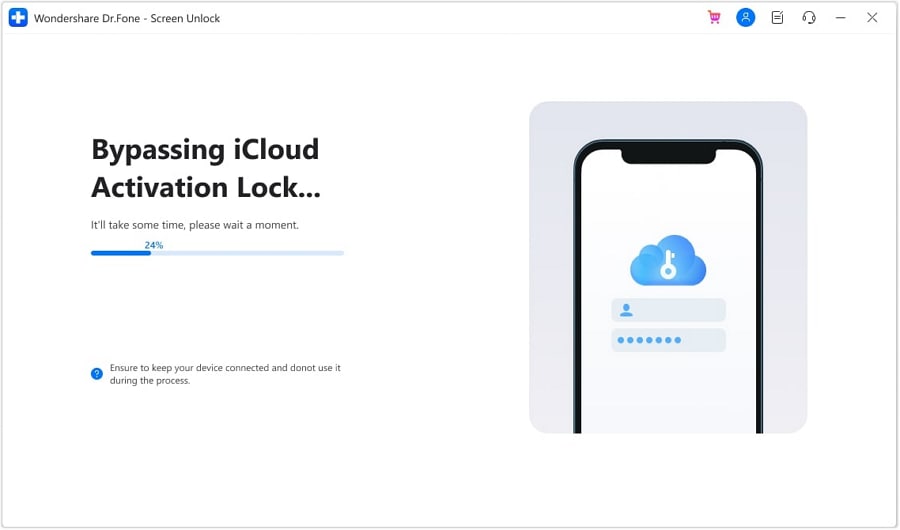
Step 7. Congrats, the iCloud activation lock is bypassed completely.

You can now access and use your Mac without any activation lock. In addition to bypassing the iCloud lock, your new Apple ID is compatible with your cellular network or iCloud.
Conclusion
Many requirements exist to remove the iCloud Activation Lock without a password. With WonderShare-Screen Unlock, you can remove your Apple ID and password associated with the iCloud Activation Lock. With this easy-to-use tool, you can remove the lock screen from your phone without losing any data. Any other suggestions you have to fix this issue would be greatly appreciated!
How to jailbreak iCloud locked Apple iPhone 15 Plus
Jailbreaking is an act of removing different software restrictions imposed on your Apple iPhone 15 Plus by your operating system, in this case, iOS. Once such restrictions have been removed, you can download applications that were previously restricted by the Apple operating system. If you want to jailbreak iCloud locked iPhone, I have some methods which you can use to bypass these restrictions. What you should keep in mind is the fact that you first have to remove the iCloud lock and then jailbreak your Apple iPhone 15 Plus.
In this article, I’m going to painstakingly elaborate two (2) unique methods that you can use to jailbreak iCloud locked iPhone. The jailbreaking method you chose will depend on your preferences.
Part 1: Will Jailbreaking Remove iCloud lock?
Many people have always asked me if it’s possible to remove the iCloud lock with a jailbreak method. Well, the answer to this simple technological question is a definite NO, as we have seen in the introduction section, jailbreaking functions by removing any form of software (s) that may be restricting you from fully accessing your iDevice, but not removing the iCloud lock. In simple terms, jailbreaking will unlock your phone only after the lock has been removed by another method.
Part 2: Contact the Previous iPhone Owner
This method is only applicable to those people who bought the Apple iPhone 15 Plus from a second-hand shop or from a friend. If you bought an iCloud locked iPhone from a friend, the first thing you have to do is to contact them. In most cases, the seller is usually available to help you jailbreak the locked iPhone. Once you get in touch with the previous owner, ask them to follow the following steps to unlock the iCloud locked iPhone.
Sign in to the iCloud account> Go to “Find My Apple iPhone 15 Plus”> Select each and every device under this tab> click “Erase iPhone.” Up to this point, any information present in the phone will be deleted. Since we want to remove the previous account completely, we’ll proceed to the next step, which is to click the “Next” tab. Once we’ve done this, a new tab with “Remove Account” will emerge. Click on it to completely remove the previous iCloud account details.
Visit an Authorised Apple Store
You can jailbreak your locked iPhone by getting help from an authorized Apple specialist. The catch of using this method is the fact that you should be the original owner of the iPhone. What you need is your ID and the warranty if it’s still valid. As long as you have the required documents, these specialists will jailbreak your locked iPhone in a matter of minutes.
Part 3: How to Jailbreak iPhone
You can jailbreak your Apple iPhone 15 Plus device with the help of a jailbreaking software such as Pangu. Pangu gives you the opportunity to jailbreak your Apple iPhone 15 Plus and render it free for use. The following is a detailed step by step guide on how you can jailbreak your Apple iPhone 15 Plus.
Step 1: Download the Software
Visit the following website http://en.pangu.io/ and click on the “Download and Help” tab. A new page with the download option will open up. The entire download is about 21MB in size. With the file downloaded, install the program on your Mac and launch it. Its interface looks like the screenshot below.

Step 2: Connect iDevice
Switch OFF the “Find My Apple iPhone 15 Plus” feature and switch ON the “Aeroplane Mode.” Connect your Apple iPhone 15 Plus to your Mac using its USB cable and click on the “Start Jailbreak” tab to initiate the jailbreaking process.
Step 3: Confirmation
A new interface with a screen notification will open up. Carefully read the three steps before proceeding. If you are okay with the information, click on the “Already did” icon. The jailbreaking process will begin from this point.

Step 4: Jailbreak Complete
Your iPhone will reboot a number of times, which is normal. Once the process is done, you will get a “Jailbreak Succeeded” message and the Cydia icon display on your iDevice. Unplug your Apple iPhone 15 Plus and turn ON the “Find My Apple iPhone 15 Plus” feature. Set up your Apple iPhone 15 Plus using your new preferred details.
Part 4: Bypass iCloud Activation Lock offline with few clicks
To bypass jailbreak locked iPhone offline, you can rely on Dr.Fone - Screen Unlock (iOS). This tool comes with the power of unlocking the iPhone/iPad lock screen in minutes. Being compatible with all the iPhones, including the latest ones, the tool never disappoints users in removing iCloud lock with jailbreak devices. Let us know how to do this.
How to remove iCloud lock with Dr.Fone - Screen Unlock (iOS)
Step 1: Let the Program Downloaded
Begin to download the software and install it. Launch the program and click on the “Unlock” option on the main interface. Don’t forget to connect your Apple iPhone 15 Plus to the computer via the original lightning cord.
Step 2: Choose the Option
On the next screen, you need to press the “Unlock Apple ID” option.

Step 3: Just Key in Password
Now, you have to type in the screen password so that the scanning process becomes easier. Simply trust this computer to move further.

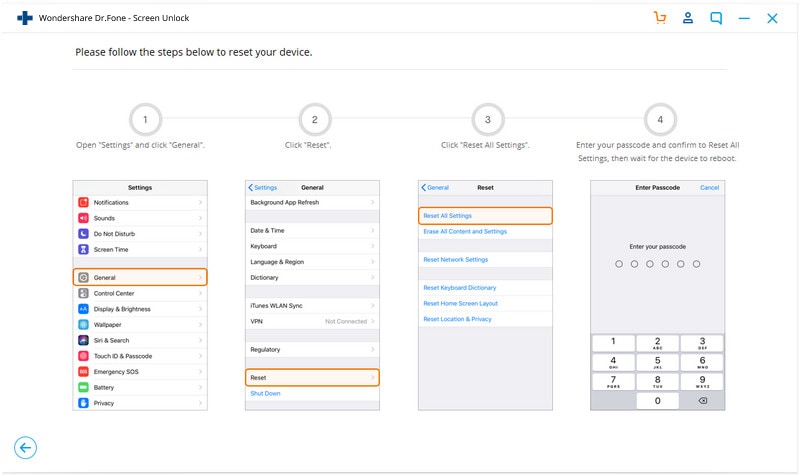
Step 4: Reset All Settings
You will now see the instructions on the screen. Follow those on your device to reset all settings. Reboot the Apple iPhone 15 Plus device right after this.
Step 5: Remove iCloud Lock
Upon the restarting of the Apple iPhone 15 Plus device, Dr.Fone will start to remove the iCloud lock, and you just need to wait till the process gets completed.

Step 6: Check the iCloud ID
Finally, you will get a new window. You are allowed to check if you have unlocked the iCloud ID successfully.

From the methods mentioned above, we can comfortably conclude that it’s easy to jailbreak iCloud locked iPhone. Regardless of the method you choose, jailbreaking a locked phone is as easy as formatting one, as long as the restrictive iCloud lock has been removed by a previous method, such as the one mentioned in part 3
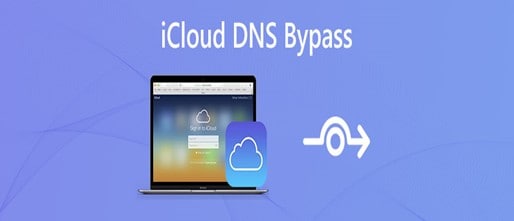
Unlock Your Device: iCloud DNS Bypass Explained and Tested, Plus Easy Alternatives On Apple iPhone 15 Plus
Have you bought a used iPhone or iPad with an active iCloud Activation Lock? Or perhaps you have an Apple device but cannot remember your iCloud password? Without activating iCloud, you cannot utilize locked devices in either scenario.
You might try contacting Apple customer service, but they won’t be able to assist you without user identification directly. Even after the Apple iPhone 15 Plus device has been authenticated, you will still be bombarded with inquiries, and they may even want the original iOS device payment receipt.
One of the greatest free solutions to prevent these issues is to unlock your Apple iPhone utilizing iCloud DNS Bypass. Read on to know more in this iCloud DNS Bypass Guide.
Part 1: How Can We Use iCloud DNS Bypass for iOS Devices?
After a factory reset or restoration, every time you set up your iOS device, it will send an activation request to Apple’s servers. Apple responds to your request and displays your device’s status.
Additionally, if the Find My iPhone feature of your device is enabled, an iCloud Activation Lock screen will appear and prompt you for your iCloud account login information. The iCloud DNS Bypass can assist you if you forget your login information (Apple ID or password) or purchase a used device with an iCloud lock activated. It is a free approach to unlocking iCloud.
The readable names are transformed into numerical IP addresses via the Domain Name System (DNS). To launch the program, it makes use of a DNS server that serves as a host.
Use DNS to get around iCloud Server IP Address
You may first just ignore the iCloud DNS on your Apple iPhone 15 Plus or iPad. The procedure is easy. Remember that the process must be completed by inserting the SIM card into your Apple iPhone 15 Plus.
Step 1. Turn on your Apple iPhone 15 Plus, then configure it according to the on-screen instructions.
Step 2. Select your language and nation. Click Continue to access the Wi-Fi settings screen after that.
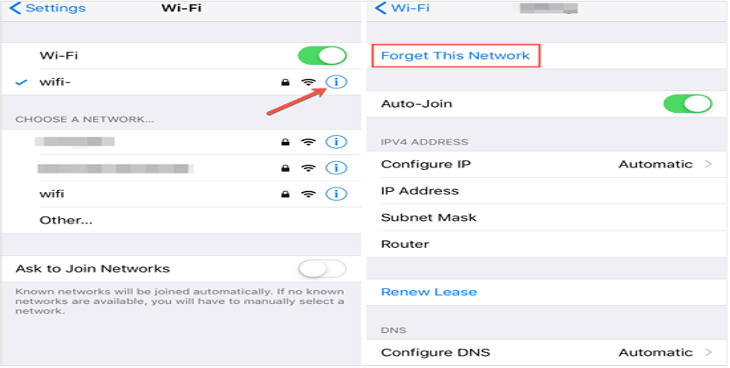
Step 3. If prompted, click the I icon next to the Wi-Fi area.
Step 4. Click Connection Settings > Forget this Network to disconnect from the Wi-Fi network.
Step 5. When asked for a DNS server IP address, tap the I symbol to unlock the iCloud activation lock. Here is a list of places for your information:
USA: 104.154.51.7
155.28.90 Europe
Africa: 35.199.88.219
Asia: 104.155.220.58
189.47.23 Australia and Oceania
It is 78.100.17.60 on other continents.
Step 6. Turn on Wi-Fi and select the Wi-Fi network you wish to connect to by tapping the Back button on the left side of the screen. Enter your passcode after that.
Step 7. When you click Next Page > Back, the iCloud bypass page will appear.
Step 8. Use your device and configure your apps.
Use iCloud DNS Bypass Crash
- Step 1. The procedures below will help you delete iCloud after DNS bypass if you cannot utilize some features on your Apple iPhone 15 Plus.
- Step 2. Tap Menu > Applications after attempting the aforementioned technique.
- Step 3. To restart your smartphone, scroll down and tap the Crash option.
- Step 4. Select “Language and Country” > Select a Wi-Fi network, click Home, More Wi-Fi Settings, Configure Proxy, and then Manual.
- Step 5. In the Server section, delete the existing HTTP address before entering 30 different emojis. Type 8888 into the Port area, then click Save at the top.
- Step 6. To access the Unlock screen, tap Back > Next. To unlock the Apple iPhone 15 Plus device, press the Home button.
- Step 7. When the Home screen appears, tap the Language choice.
Part 2: The Best iCloud DNS Bypass Alternatives to Unlock Your Apple iPhone 15 Plus/iPad/iPod Touch (Easy and Efficient)
Only if you bought a secondhand iPhone with an activation lock or want to restore the Apple iPhone 15 Plus device but forgot that Find My iPhone was ever turned on do you need Dr.Fone - Screen Unlock (iOS) . Dr.Fone - Screen Unlock (iOS) is the most promising and user-friendly product of its sort currently available. With the help of this application, you can simply fix the iCloud activation issue. You don’t need to be an expert in utilizing the application because it is simple and intuitive.
Using Dr.Fone - Screen Unlock, you can get rid of the iCloud activation lock. Launch Dr.Fone and choose “Remove Active Lock” and “Unlock Apple ID” to unlock your iCloud. It still works if you have a used iPad or iPhone.
Dr.Fone - Screen Unlock (iOS)
Remove iCloud Activation lock without Password in Minutes
- Remove Apple ID/iCloud Account efficiently.
- Save your Apple iPhone 15 Plus quickly from the disabled state.
- Free your sim out of any carrier worldwide.
- Bypass iCloud activation lock and enjoy all iCloud services
- Works for all models of iPhone, iPad, and iPod touch.
- Fully compatible with the latest iOS.


4,008,671 people have downloaded it
Here’s a step-by-step guide on how to use it
Step 1. Installing Dr.Fone on your smartphone and selecting Screen Unlock from the available options are the first steps in the procedure. You will note that there is a “iCloud Activation Lock Removal” option, among others, when you first use the Screen Unlock function. Simply clicking on it is all that is required.
Step 2. Before the bypassing process, please tape “Start”.
Step 3. After reaching the ‘Start’ page, Your Apple iPhone 15 Plus’s specific information will be detected to determine the appropriate operation process. Ensure that the data cable is properly connected during this process. Jailbreaking is required for iOS devices running 12.0 to 14.8.1, but for iOS 15.0 to 16.3, simply enter DFU mode twice and proceed to unlock. For detailed instructions on unlocking, you can visit this detailed guide about iCloud Activation Lock Removal.
Step 4. Now we’re bypassing the activation lock, soon your Apple iPhone 15 Plus will work without the activation lock.
Part 3: FAQs
1. When Do We Require iCloud DNS Bypass?
We require it when our carrier locks our phone or when we buy a used phone and cannot use it because of an iCloud activation lock. The use of iCloud DNS bypass enables temporary access to the features and functionality of an iCloud-locked device. Domain Name Server, or DNS for short, serves the function of converting your domain names into IP addresses.
2. What Can iCloud DNS Bypass Do for Us?
When you need an urgent functioning solution for a locked iPhone, using iCloud DNS bypass is helpful since it gives you temporary access to all the features and configuration of an iCloud-restricted device. DNS, or domain name server, converts your domain names into IP addresses.
3. What are the Pros & Cons of iCloud DNS Bypass
This approach can be helpful, but it does have advantages and pitfalls of its own. These advantages and disadvantages are broken down as follows:
Pros
- You may use it without installing any software on the Apple iPhone 15 Plus device, since you can do it in the Wi-Fi settings.
- The internet, camera, and games can all be used after the gadget has been engaged, making it simple to access.
- Utilizing this approach is cost-free.
Cons
- This technique only partially unlocks the Apple iPhone 15 Plus device and represents a hack.
- The iCloud DNS bypassing technique has occasionally been reported as not working by users.
Conclusion
Now you have read all about iCloud DNS bypass, what is iCloud bypass DNS, whether DNS bypass is free, and how to iPhone DNS bypass, it is time to implement all the solutions and bear in mind that all DNS Bypass solutions are 100% free. Dr.Fone - Screen Unlock (iOS) is also a great tool to bypass screen lock, even if you don’t have any tech skills.
Also read:
- [New] 2024 Approved No. 1 Ranked YouTube To Text Online Service
- [Updated] In 2024, Harness the Full Potential of Your YouTube Content Using WMM
- Easy Tutorial for Activating iCloud from Apple iPhone XS Safe and Legal
- Going Beyond Price Tag: Diving Into the World of TP-Link Archer C9 Reviews
- How To Bypass iCloud By Checkra1n Even On iPhone 15 Pro If Youve Tried Everything
- How to Bypass iCloud Lock on iPhone 12 Pro Max
- In 2024, 5 Best Mid-Range Gaming Keyboards for Enthusiasts
- In 2024, Efficient Writing Techniques for Impactful Ad Creation
- In 2024, How To Bypass iCloud Activation Lock on Mac For iPhone SE?
- In 2024, How to Remove Apple iPhone 15 Plus Activation Lock
- In 2024, Taking Control of Quality Edit Your Published Videos on YouTube
- SAS Driver Updates and Installation Instructions for Users of Windows 11, 8, and 7
- The Ultimate Plan for Building Your Ideal YouTube Playlist for 2024
- Ultimate Guide on Apple iPhone 15 Plus iCloud Activation Lock Bypass
- Unlock Your Device iCloud DNS Bypass Explained and Tested, Plus Easy Alternatives From iPhone 15 Pro Max
- Title: How To Bypass iCloud By Checkra1n Even On Apple iPhone 15 Plus If Youve Tried Everything
- Author: Lydia
- Created at : 2024-10-06 19:14:34
- Updated at : 2024-10-08 23:05:45
- Link: https://activate-lock.techidaily.com/how-to-bypass-icloud-by-checkra1n-even-on-apple-iphone-15-plus-if-youve-tried-everything-by-drfone-ios/
- License: This work is licensed under CC BY-NC-SA 4.0.