
How To Bypass iCloud By Checkra1n Even On iPhone 14 Plus If Youve Tried Everything
How To Bypass iCloud By Checkra1n Even On Apple iPhone 14 Plus If You’ve Tried Everything
Since iOS 12.3, Apple has been using its new Activation Lock feature to deter theft. This security measure requires users to enter their iCloud login information to use an iPhone or iPad previously locked by someone else.
While this is a welcomed addition for those looking to protect their device, it can also be a major inconvenience for those who have lost or forgotten their iCloud password. Checkra1n is a new tool that allows users to bypass iCloud activation without entering any login information. You will learn in this post how to use Checkra1n iCloud bypass to unlock your Apple iPhone 14 Plus or iPad.
Let’s get started!
Part 1: What is Checkra1n?
Checkra1n is a jailbreak tool that allows you to jailbreak your Apple iPhone 14 Plus or iPad running iOS 12.3 and up. As part of the jailbreak tool team, it is one of the most popular jailbreak tools. Checkra1n is a semi-tethered jailbreak tool, meaning you will need to re-jailbreak your device each time you reboot it. It is, however, a very reliable jailbreak tool that is easy to use.
Checkra1n is the only jailbreak that allows for the BFU (Before First Unlock) acquisition of locked devices with an unknown passcode. It means that if you have a locked iPhone that you don’t know the passcode for, you can still use checkra1n to jailbreak it and access the data.
Additionally, checkra1n does not require you to sign the jailbreak IPA file (using AltStore or the Developer Account at Apple), which makes it much easier to use. Overall, checkra1n is a powerful tool that you can use to access data on locked iPhones, even if you don’t know the passcode.
Pros
- The tool doesn’t require tech skills
- It supports iPhones, iPads, and many other devices
- Supports a wide range of hardware platforms
- It is not possible to exploit remotely
Cons
- Jailbreaking older devices is limited
- A reboot won’t save them
Part 2: How to Bypass iCloud Activation Lock with Checkra1n?
You may consider using Checkra1n if you are looking for a method to bypass the iCloud activation lock. You can remove the iCloud activation lock from your Apple iPhone 14 Plus or iPad using this method.
1. How to Jailbreak an iOS Device with Checkra1n?
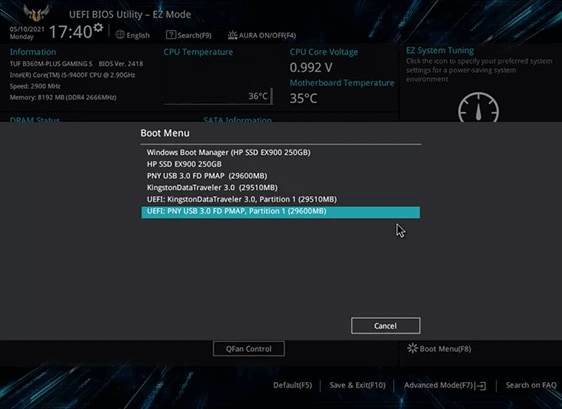
Step 1: Enter the BIOS settings after the computer has rebooted.
Step 2: Go to Boot Menu and select the jailbreak USB drive you just created.
Step 3: Plug your iOS device into the PC and click [Start].
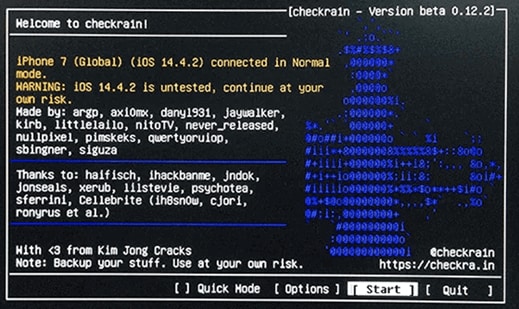
Step 4: The software may inform you that your iOS version is not tested. Follow the steps below to enable the Start key on the iOS device at risk if you are ready to jailbreak.
Follow these steps to enable the [Start] key:
- Select [Options].
- Ensure that Untested iOS, iPadOS, and TVOS versions are checked.
- To return to the homepage, click [Back].
- To begin the jailbreaking process, click [Start].
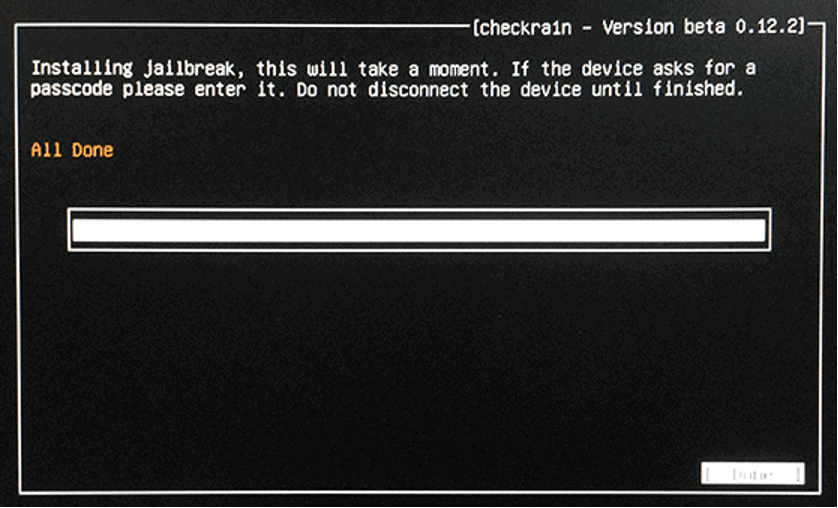
Step 5: You will be shown how to enter DFU mode on the Apple iPhone 14 Plus device. Follow the instructions step by step.

Step 6: You have successfully jailbroken your device.
Since Cocosenor bypass Tuner now uses checkra1n 0.12.2 to help jailbreak, it won’t be able to jailbreak iOS 14.5.
2. How to Bypass iCloud Activation Lock with Checkra1n?
The next step is to figure out how to bypass iCloud with Checkra1n iCloud Bypass. We will show you how to use the method on a Mac. The Checkra1n installation process has a few technical aspects, but if you follow the steps, you shouldn’t have any problem.
Step 1. Download Checkra1n from the official website.
Step 2. Using the Terminal app, install brew and usbmuxd by entering the following commands:
- /usr/bin/ruby -e “$(curl -fsSL https://raw.githubusercontent.com/Homebrew/install… )”
- brew install usbmuxd
Step 3. Launch Checkra1n once those have been installed.
Step 4. Follow the instructions to jailbreak your Apple iPhone 14 Plus by connecting it to your computer.
Step 5. The following command will create a tunnel from Port 2222 to Port 44 (or 22 if this fails) using USBmuxd’s built-in iProxy tool:
- iproxy 2222 44
Step 6. Enter the following command in a new Terminal window by pressing Command + T:
- ssh root@localhost -p 2222
Step 7. To move the setup file and patch the system, enter the following commands:
- mount -o rw,union,update /
- mv /Applications/Setup.app /Applications/Setup.bak
- rm -rf /Applications/Setup.app
Step 8. Lastly, enter these two commands to clear any springboard processes and clear the setup file’s cache:
- uicache -all
- Killall backboardd
Checkra1n will bypass the iCloud Activation Lock after you enter the last command.
Using the Terminal app and entering many unfamiliar commands may be intimidating for some people, but if you copy exactly what we’ve shown you, you’ll be fine.
Part 3: Easy Tool for iCloud Activation Lock
Dr.Fone - Screen Unlock
It is possible to bypass the iCloud activation lock with a tool called Dr.Fone - Screen Unlock. This powerful tool can bypass the iCloud activation lock on any iOS device, regardless of the version of iOS.
Here’s how to use Dr.Fone - Screen Unlock to bypass the iCloud activation lock:
Step 1. Choose Screen Unlock from Dr.Fone after installing the program.

Step 2. Click on “Bypass Activate Lock.”

Step 3. Please select the “Start” button for the next steps.

Step 4. Please confirm which device you have.
(For GSM devices, you can enjoy all functions)
(For CDMA devices, some functions will be limited, so you cannot use them anymore.)
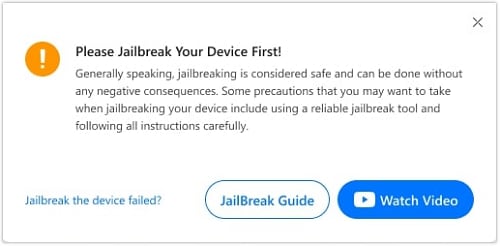
Step 5. Do you jailbreak your device? If not, you can do our jailbreak guide for this step.
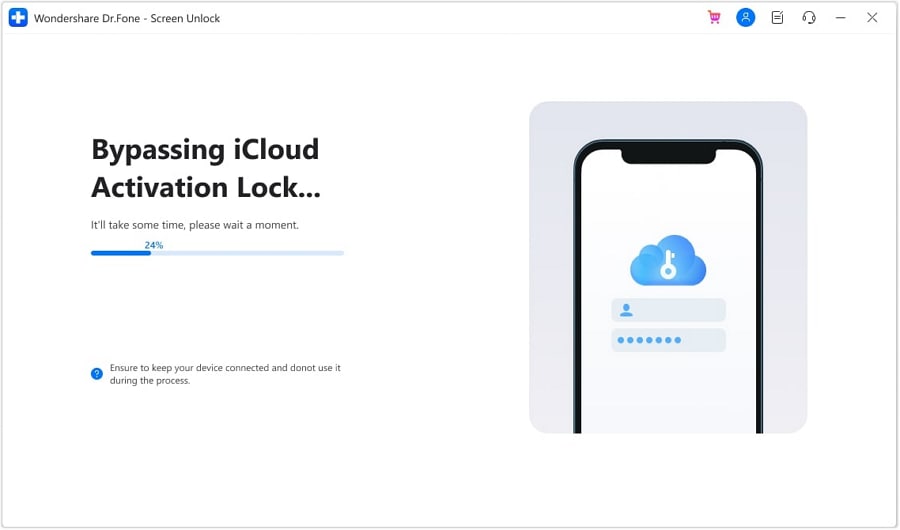
Step 6. Please wait for a minute, and the process will be over.
Step 7. Congrats, the iCloud activation lock is bypassed completely.

You can now access and use your Mac without any activation lock. In addition to bypassing the iCloud lock, your new Apple ID is compatible with your cellular network or iCloud.
Conclusion
Many requirements exist to remove the iCloud Activation Lock without a password. With WonderShare-Screen Unlock, you can remove your Apple ID and password associated with the iCloud Activation Lock. With this easy-to-use tool, you can remove the lock screen from your phone without losing any data. Any other suggestions you have to fix this issue would be greatly appreciated!
The Ultimate Guide to Bypassing iCloud Activation Lock on Apple iPhone 14 Plus
For many iPhone users, the dreaded iCloud activation lock can be an unnerving barrier to getting the most out of their devices. Whether you’ve encountered it after purchasing a second-hand iPhone, or you’ve simply forgotten your login credentials, this lock demands attention and often a bit of digital gymnastics to unlock. This comprehensive guide is for you, equipped with detailed instructions on various methods to bypass the iCloud activation lock on your Apple iPhone 14 Plus.
If you’re ready to take back control of your device, read on. We’ll walk you through the process step by step and arm you with the knowledge to access your smartphone’s full potential.
Part 1: How to bypass iCloud activation on iPhone through the DNS method?
This method is one of the oldest tricks in the guide, and while it still works for some users with specific models and iOS versions, it doesn’t guarantee universal success. Here’s a brief overview of how to proceed:

In the activation window, press the home button and then select Wi-Fi settings and then tap on the ‘I’ bonded by a circle. Now it’s time to remove the existing DNS server and put a custom one in motion. Now, let’s follow the steps below to bypass iCloud activation on iPhone.
How to bypass iCloud activation lock?
Step 1: Start the Setup Process
Turn on your Apple iPhone 14 Plus and start the setup process until you reach the page where you’re asked to connect to a Wi-Fi network.
Step 2: Select a Custom DNS Server
When prompted to connect to a Wi-Fi network and input a password, select “i” on your Apple iPhone 14 Plus screen, which will take you to a menu with network details. Tap “Configure DNS” and choose “Manual”.
Enter a DNS server address based on your geographic location:
- For USA/North America, enter 104.154.51.7
- For Europe, enter 104.155.28.90
- For Asia, enter 104.155.220.58
- For any other area, enter 78.109.17.60
Step 3: Proceed with iCloud Bypass
Return to Wi-Fi settings and select your desired network. You might need to enter a password, but instead, you can skip this step and continue. Your Apple iPhone 14 Plus will try to activate with these new settings and may allow you to bypass the activation lock.
Video Guide: How to bypass iCloud activation through DNS?
Note: The DNS method is an experimental and non-guaranteed way to bypass the iCloud activation lock. It is worth trying if you prefer not to use third-party tools, but be prepared for the possibility that it may not work for your specific device or iOS version.
Tips: During iCloud, we use it most for data backup to avoid data loss. But if you can’t access your iCloud, maybe you are supposed to back up your iPhone data to the computer .
Part 2: How to bypass iCloud activation on iPhone with a smart tool? [iOS 12.0~16.6]
A fast and safe tool to unlock locked iCloud
While talking about a suitable tool to bypass iCloud activation, missing out on Dr.Fone - Screen Unlock (iOS) doesn’t make any sense as it is the most trusted and loved tool by millions of users. Available for Windows and Mac operating systems, it offers an extremely easy process to make the work of bypassing iCloud done. Many other tools don’t hesitate to make false promises, but Wondershare has always managed to upkeep the security and trust of the users and does what it says. Let us bring you closer to this iCloud bypass tool.
Dr.Fone - Screen Unlock
Unlock iPhone, iPad, and iPod touch screen and Activation lock within minutes
- Easy for the users to unlock locked iCloud by providing a really easy interface.
- Exceptional speed for unlocking i.e., works in less than a minute.
- Compatible with iPhone 5S to iPhone X, iPad 4 to iPad 7, and iPod touch 7 to iPod touch 9 running iOS 12.0 to iOS 16.6.
- Effectively remove the Apple iPhone 14 Plus lock screen without the passcode.
3981454 people have downloaded it
Check out the following guide to know how to use this tool to bypass iCloud activation in detail.
Bypass iCloud activation on iPhone with Dr.Fone
Step 1: Click the “Download Now” button above to download Dr.Fone on your computer
Connect your Apple iPhone 14 Plus to the system and launch the Dr.Fone. From its home, select the ‘Screen Unlock’ section.
Just choose the feature ‘iCloud Activation Lock Removal’ to unlock the Activation lock of an iOS device to continue.
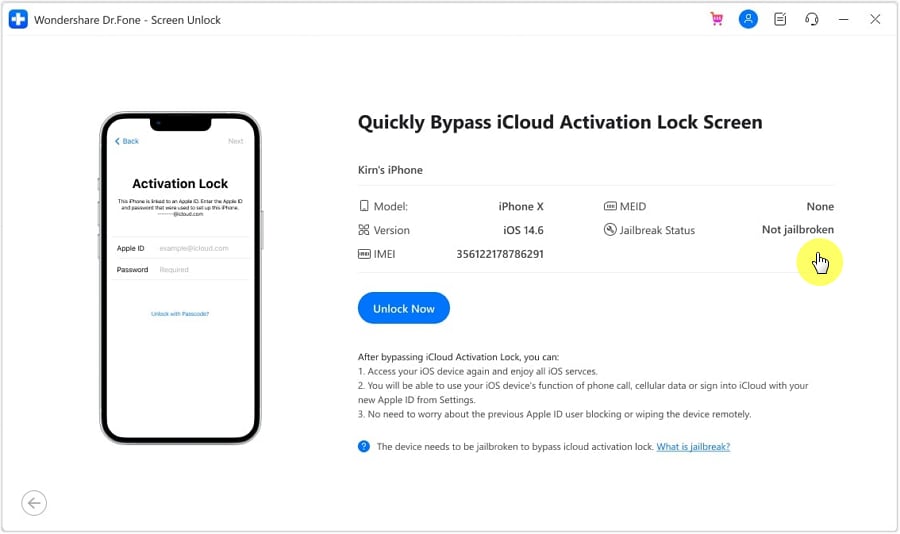
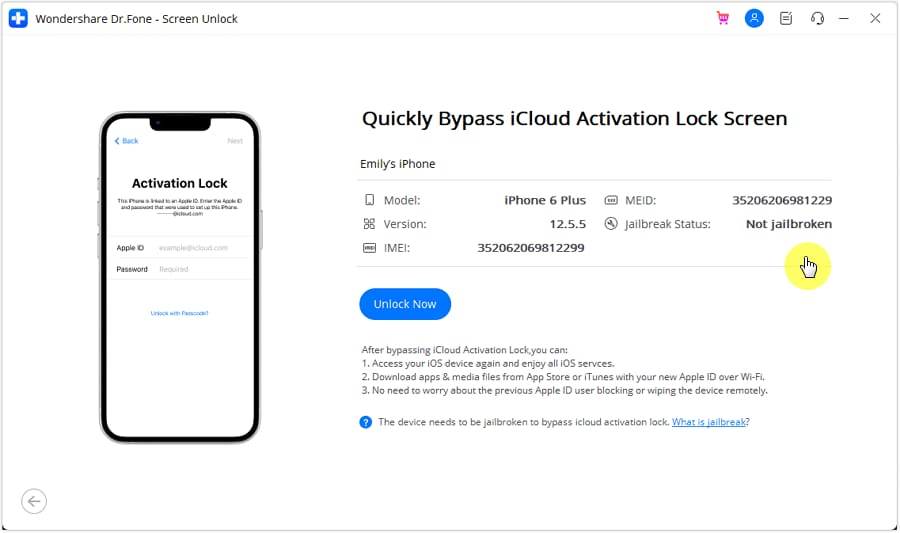
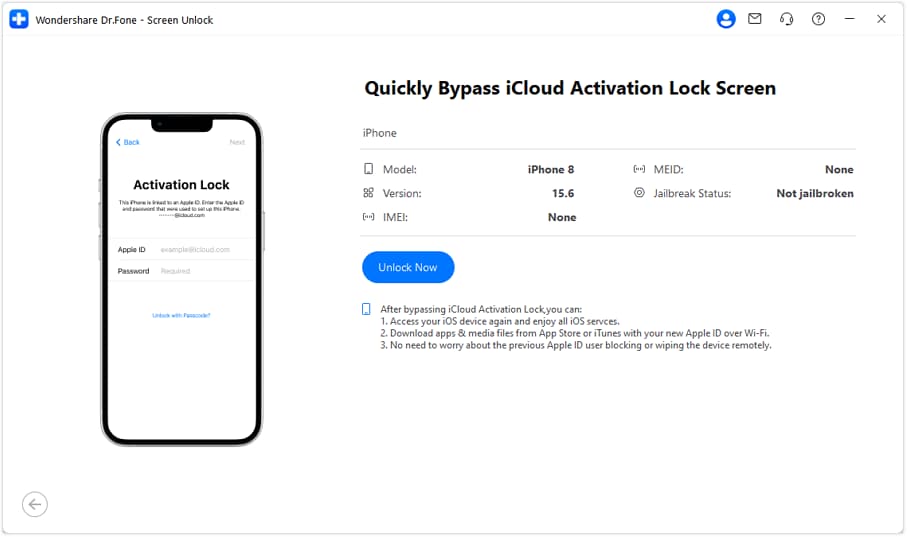
Step 2: Confirm device information
You will see your device information. Click ‘Unlock Now’ after confirming all device details are correct.
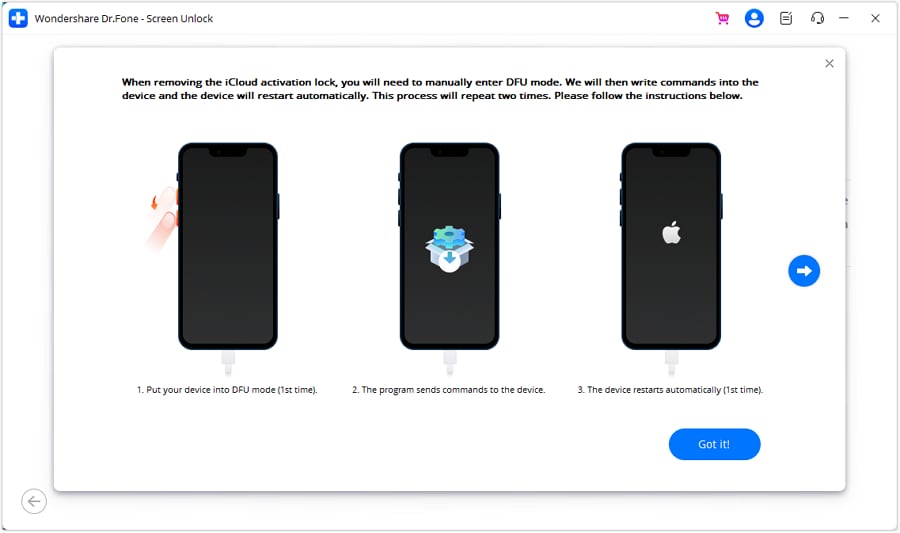
Step 3: Put your Apple iPhone 14 Plus into DFU mode or jailbreak your Apple iPhone 14 Plus properly
For iPhone users running iOS 15.316.3, to bypass the iCloud activation lock, you need to follow the instruction you will see to put your device into DFU mode. For iPhone users running iOS 12.014.8.1 or iOS 16.4~16.6, you should follow textual guidelines for jailbreaking your Apple iPhone 14 Plus .
Step 4: Remove iCloud activation lock successfully
Dr.Fone will bypass activation lock automatically after your device is in DFU mode. Wait patiently to complete the bypass process.
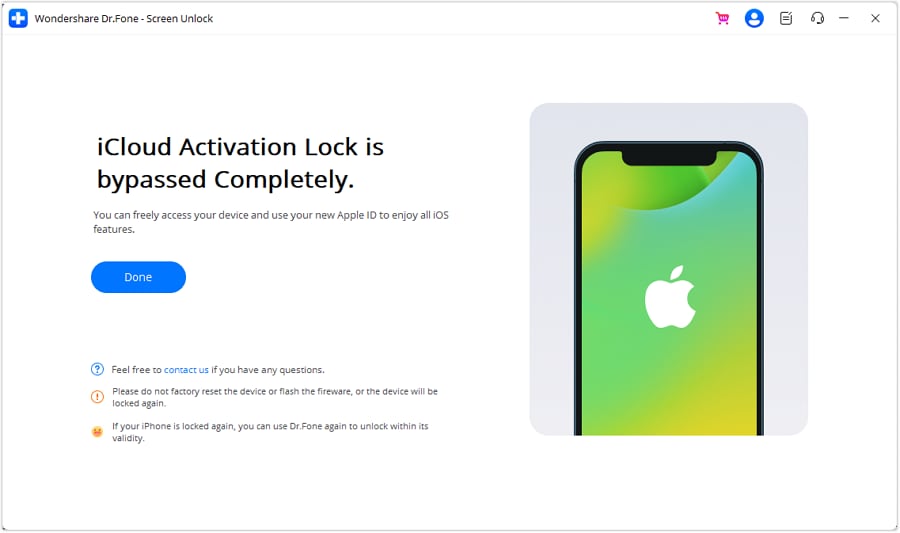
Dr.Fone - Screen Unlock (iOS) provides a hassle-free experience, consistently working across multiple iPhone models and iOS versions. It ensures that you can bypass the activation lock without password .
An optional tool to bypass iCloud activation lock
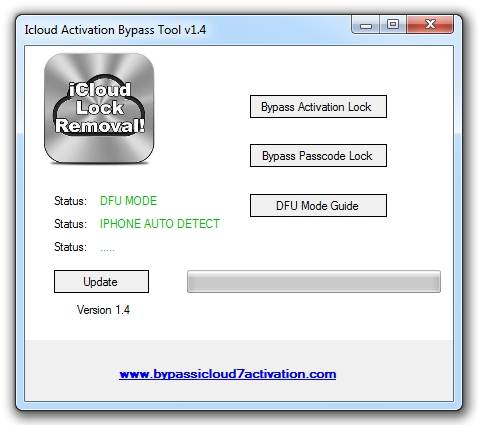
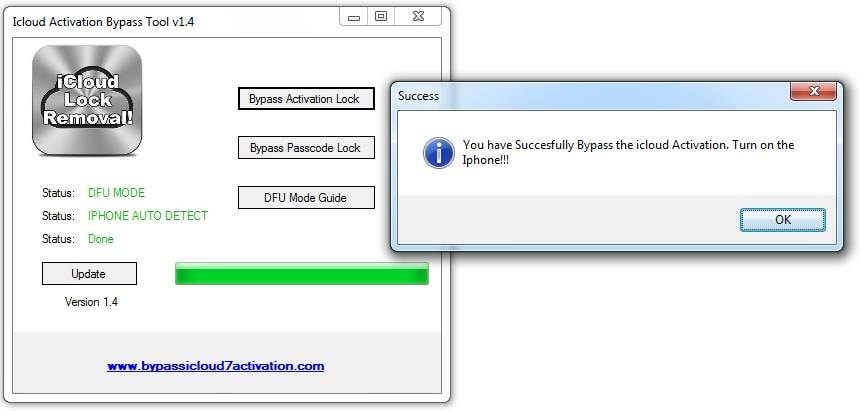
There are a limited number of functional tools available that can come in handy in bypassing the iCloud activation for your Apple iPhone 14 Plus or iPad. One of the names is ‘iCloud activation bypass tool version 1.4’. The tool’s name abides by what it says and is a really easy tool to use.
Below are the steps to bypass iCloud activation by using this tool.
Download and install the program on your desktop.
Launch the application and connect your Apple iPhone 14 Plus or iPad via the USB cable to your desktop.

The tool will now scan your device and reads its IMEI number.
Click on the ‘Bypass Activation Lock’ button and patiently wait for the procedure to be completed. The tool, with the help of your devices IMEI code will connect to the Apple servers from where it will terminate and delete all linked iCloud accounts of your device.
Once the process is complete, disconnect your phone and reboot it. You will notice that the iCloud lock has been permanently removed and hence no prior activation is required to use the Apple iPhone 14 Plus device.
Tips: If you’d like to know more about iCloud bypass tools, you can just read this article: Top 8 iCloud Bypass Tools .
Part 3: How to bypass iCloud activation on iOS 11 devices?
Starting with iOS 11, Apple has introduced a bizarre bug in their Activation mechanism that allows you to bypass iCloud activation completely (with SIM card working) in certain conditions. The bug relies on the passcode activation method and requires Second Factor Authentication (2FA) to be enabled on the account to which the Apple iPhone 14 Plus device is locked. As of iOS 11, the passcode activation option appears for the iCloud Locked devices if 2FA is on.
The bug allows a user to input a false passcode “0000” or “0000” if the requirement is for a 6-digit passcode a few times, then leave the Apple iPhone 14 Plus device to rest for ~1 hour, so that the session with the Apple Activation Server (albert.apple.com) expires. After that, the user would input the false passcode a few more times and the Apple iPhone 14 Plus device will skip the activation part, essentially disabling Find My iPhone server-side.
A video tutorial on how to apply this method can be followed here:
Note: You can only follow this tutorial on iOS 13/.x. iOS 10 and iOS 9 versions do not have the “Activate with passcode” option. Apple has patched this bug on the newer firmware, so it is recommended to try on iOS 11.1.1 and lower.
If 2FA is not enabled in the account, you will not see the “Activate with Passcode” option under the Username and Password fields. Instead, you will see an option called “Activation Help”.
Part 4: How to erase data remotely from your lost iPhone?
If your Apple iPhone 14 Plus is lost or stolen, one of the first steps you should take is to erase the data remotely. This not only protects your personal information but also removes the activation lock.
Note: Before proceeding, one should know that once all the data is erased from your Apple iPhone 14 Plus, you will no longer be able to use ‘Find my iPhone’ and all your data will be erased.
Steps to erase data remotely from your lost iPhone
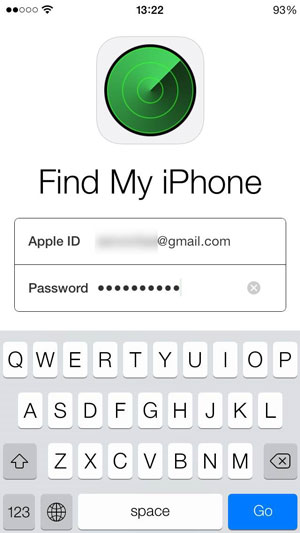
Launch Find My iPhone on any iOS device and enter your account credentials. You can use any iOS device for this procedure.
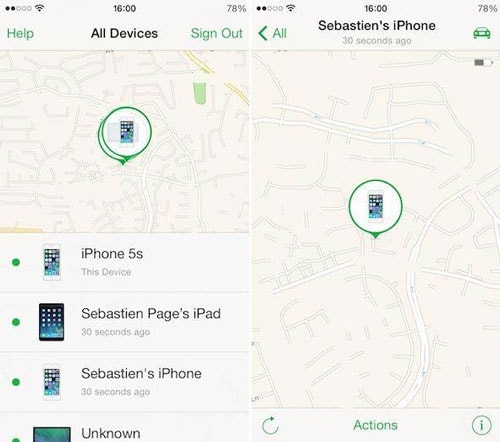
Once you log in, you’ll be able to view all the Apple iPhone 14 Plus devices linked to your account. Select the Apple iPhone 14 Plus device you wish to erase.
Please note that your device will be viewable only if the Find my iPhone feature is on your lost device and is active.
Tap on the actions button on the bottom and tap on erasing.
You will be asked for confirmation to erase your lost iPhone and will then require you to fill in your account credentials for one last time.
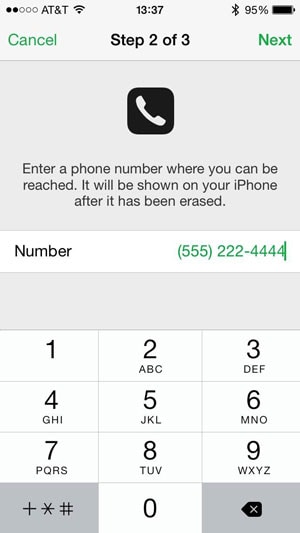
Now you will require to fill in a contact number that would appear on your lost iPhone along with a suitable message. This way, a generous person could get in contact with you to help you retrieve your Apple iPhone 14 Plus.
Once the required information is obtained, the erasing of data will start and you’ll be notified when it completes.


Video Guide
It’s pretty easy to keep your iCloud account safe if you know the simple tricks. Whether you are using iCloud on your Apple iPhone 14 Plus or any other Apple device, following these steps will ensure that your information is kept secure. And it’s really easy to bypass iCloud activation!
Part 5: How to unlock iCloud on activated iPhone / iPad / iPod?
How to remove iCloud activation lock for all iOS 13/12/11/x, iPhones 100%, and lower-version devices?
Here is how:
1. Download first the customized iTunes backup without iCloud (“Find my iPhone” should be turned OFF).
2. Connect your locked device to iTunes. Then follow the instructions in the video below, and you can add a new iCloud ID account and use the Apple iPhone 14 Plus or iPad as normal.
Note: This method will not remove iCloud from the Apple server. If you check your IMEI, you still have iCloud ON. This method, however, will remove iCloud from the local device iPhone / iPad / iPod.
Besides, Apple only offers 5GB of free storage for each iCloud account. If your iCloud storage is full or getting close, you will get annoying popups every day. You can follow these 14 simple hacks to fix iCloud storage full on your Apple iPhone 14 Plus/iPad.
Conclusion
Unlocking your Apple iPhone 14 Plus from the iCloud activation lock requires patience, precision, and tech-savviness. Choose a method that suits your comfort and device specifics: DNS servers, tools like Dr.Fone - Screen Unlock (iOS) , or Apple’s support. Evaluate methods, watch out for scams, and trust reliable solutions. The journey to an iCloud-free iPhone may have twists, but many have succeeded—so can you. This guide aims to help you reclaim your Apple iPhone 14 Plus’s functionality and demystify iCloud locks. Remember, patience, research, and the right approach are key.
How to Delete iCloud Account with or without Password from your Apple iPhone 14 Plus/Windows/Mac
Apple only offers 5 GB of free storage for each iCloud account. If your iCloud storage is full or getting close, you will get annoying popups every day. You can follow these 14 simple hacks to fix iCloud storage full on your Apple iPhone 14 Plus/iPad.
In this article, we will be looking at how to delete/remove/unlock the iCloud account on different devices, even without a password. Let’s begin with how you can do this on your Apple iPhone 14 Plus or iPad!
 safe & secure
Solution 1: How to Unlock My iCloud Password with Dr.Fone? [Quick Fix]
With Dr.Fone, you can effortlessly bypass/remove/unlock your iCloud account lock within a few seconds.
Being the best and the most trusted tool in the market, Dr.Fone has the highest success rate. Moreover, this tool is absolutely compatible with the latest iOS version or with any iPhone/iPad. The process is as easy as the “1–2–3” thing.
Let’s get to know how to use Dr.Fone - Screen Unlock (iOS)!
Dr.Fone - Screen Unlock
Remove iCloud Account without Password in Minutes
- Remove Apple ID/iCloud Account efficiently.
- Save your Apple iPhone 14 Plus quickly from the disabled state.
- Free your sim out of any carrier worldwide.
- Bypass iCloud activation lock and enjoy all iCloud services
- Works for all models of iPhone, iPad, and iPod touch.
- Fully compatible with the latest iOS.

4,008,669 people have downloaded it
Here’s all that you need to do to remove the iCloud account lock with Dr.Fone - Screen Unlock (iOS) :
Step 1: Install Dr. Fone’s toolkit
Get on the browser and download the Dr.Fone - Screen Unlock. Install and launch it afterward. From the main screen interface of Dr.Fone, you need to opt for the “Screen Unlock” option.
Step 2: Get the Apple iPhone 14 Plus device to connect and boot in DFU mode
Now, you need to establish a firm connection between your device and the computer using the authentic lightning cable only, and then select the “Remove Apple ID” option.

Continue with selecting the Unlock Now button. If your device operates on iOS/iPadOS 11.4 or later, unlocking will result in data loss. For devices running iOS/iPadOS versions below 11.4 (exclusive), data will be retained after unlocking.

Following it, you will be asked to boot your device into DFU mode to proceed further. Follow the onscreen steps to get through the process to boot your device into DFU mode easily.

Step 3: Device Detected [Check device information]
As soon as your device boots into DFU mode, the program will automatically detect it and display the Apple iPhone 14 Plus device’s corresponding information over your screen. Double-check it and then hit the “Start” button to initiate downloading the latest compatible firmware version for your device.

Step 4: Remove the iCloud Account Lock
Lastly, when the firmware version is successfully downloaded, you need to hit on the “Unlock Now” button to get started with removing the iCloud account lock.

Wait for the process to complete. “Completely unlocked”, the iCloud account lock will no longer be there on your device.
Solution 3: How to Disable iCloud on Mac?
If you need to disable iCloud on the Mac, follow these straightforward steps.
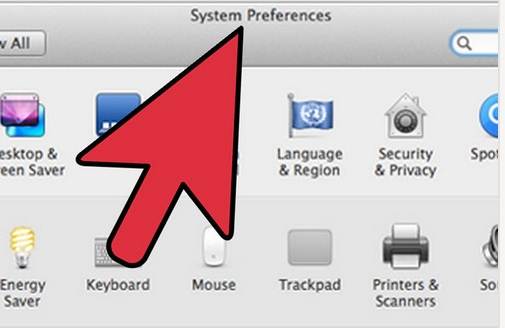
- Step 1. Click on the Apple Icon and then “System Preferences” from the Context menu.
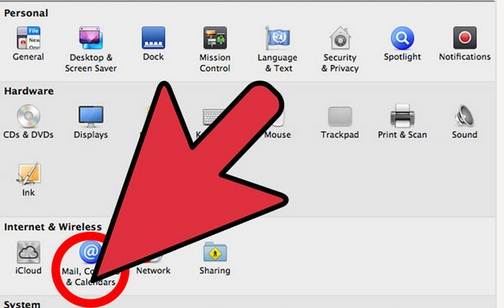
- Step 2. In the System Preferences Window, click on “Mail, Contacts & Calendars”.
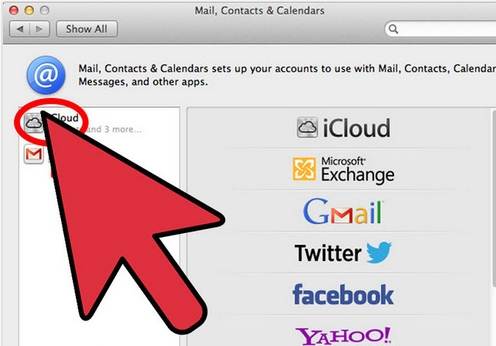
- Step 3. Choose iCloud from the left pane of the resultant window.
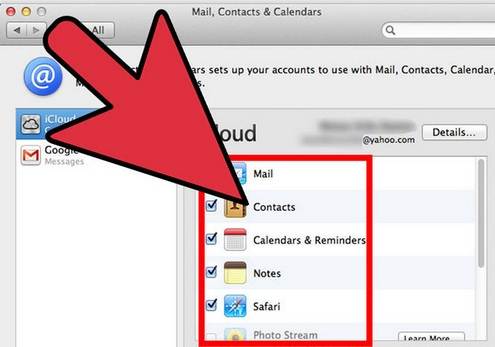
- Step 4. Check the box next to the App you want to disable or enable in the pane on the right.
Also Read: How to Reset iPhone Without Apple ID >>
Solution 4: How to Delete iCloud on Windows Computers?
If your iCloud account is on a Windows computer, and you want to remove it, here’s a step-by-step on how to easily do that. But before we get to the steps, you must have a backup for all your information on the iCloud.
Steps to remove iCloud on Windows computers
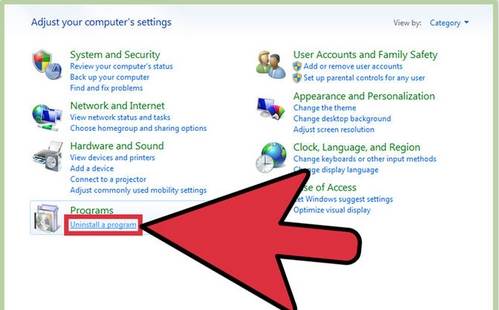
- Step 1. On your Windows PC, click on “Start” and the Control Panel. In the Control Panel, select “Uninstall a Program”.
- Step 2. Find iCloud in the List of programs on your computer.
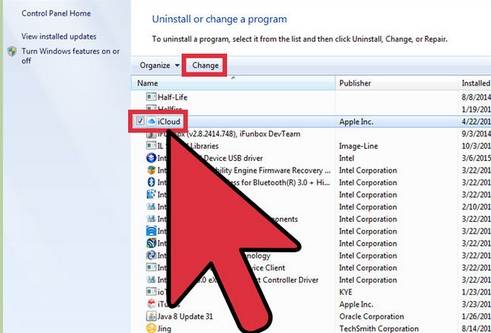
- Step 3. Select remove iCloud for Windows from this Computer when prompted. Then click on “Yes” to confirm the deletion, and then wait for the process to complete.


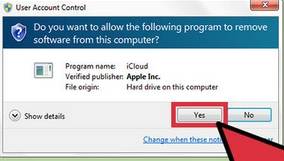
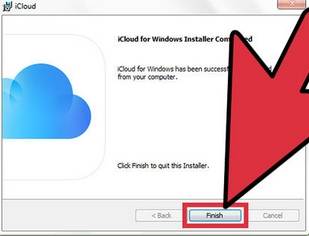
- Step 4. Click on “Yes” when the PC asks if you want iCloud to make changes to it. Once the process is complete, click on “Finish” and then manually restart your system.
Solution 5: Tips to Remove the iCloud Account Without a Password on iPhone?
The iCloud account is a great way for Apple users to sync their phone data, but you may need to remove your iCloud account for personal reasons. This is normal, but if you forgot your iCloud account’s password, how can you remove the iCloud account without a password on your Apple iPhone 14 Plus?
Steps to delete iCloud account on iPhone/iPad
In case you forgot the Apple iPhone 14 Plus password and want to remove the iCloud account without a password, here’s how to do it in simple steps.
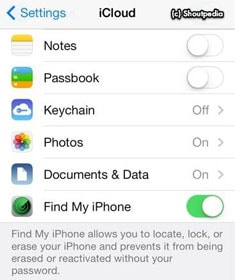
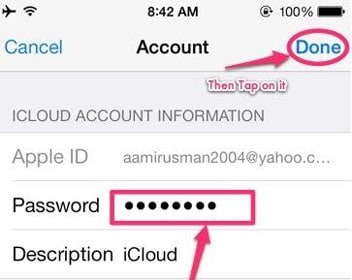
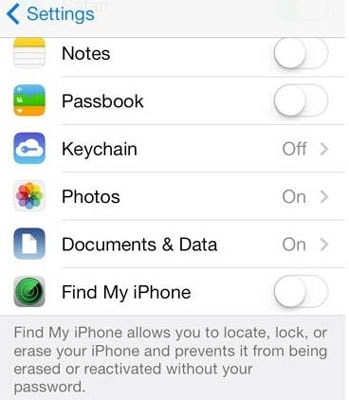
- Step 1. Go to the Settings app and find iCloud. Tap on it to open. When prompted for a password, enter any random number. Then tap on “Done”.
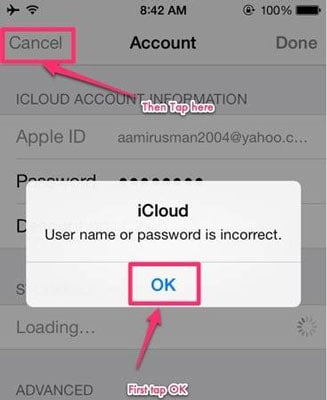
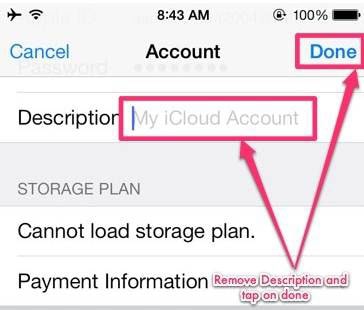
- Step 2. iCloud will tell you that the username and password you entered is incorrect. Click on “OK” and then “Cancel” to go back to the main iCloud page. After that, tap on Account again but this time, remove the description and then tap on “Done”.
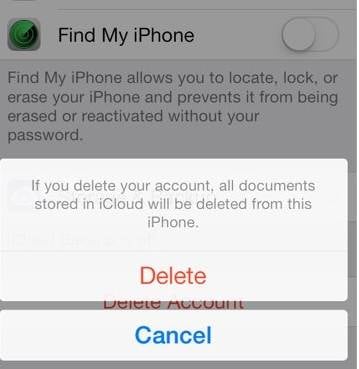
- Step 3. This time, you will be taken back to the main iCloud page without entering your password. You will also notice that the “Find my Phone” feature has been turned off automatically. Then scroll down and tap on Delete. You will be prompted to confirm the deletion, you can do by tapping on “Delete” again.
What if the above steps fail to remove the iCloud account without a passcode
If the above steps fail, you need to bypass iCloud activation before removing an iCloud account, since the passcode is forgotten. So, here I will share with you an iCloud removal website to unlock iCloud lock (remove iCloud account) permanently without a passcode.
Note: To be honest, this method cannot ensure a 100% success rate, but you can still give it a try anyway.
Steps to unlock your iCloud account online
- Step 1. Go to the Official iPhone unlock and click “iCloud Unlock” on the window’s left side.
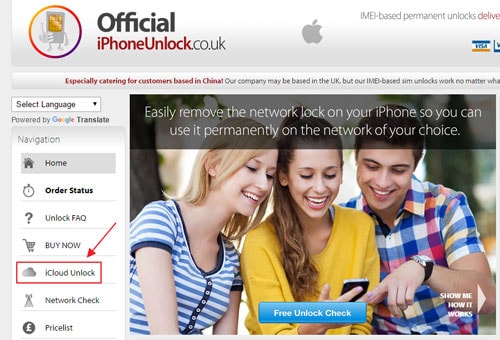
- Step 2. Select your Apple iPhone 14 Plus model and enter the IMEI code of your device. If you don’t know how to find your IMEI number, you can click the blue text “Click here if you need help finding your IMEI” below.

- Step 3. Then you can get a confirmation message that your iCloud will be unlocked in 1–3 days.
Conclusion
So, here you unlock your iCloud account. iCloud activation lock can be easily bypassed if you have the right tool. With the highest success rate of bypassing the iCloud activation lock, Dr.Fone - Screen Unlock (iOS) is what you are looking for. I hope it will be useful for you to bypass iCloud activation when confronting such kinds of problems.
Also read:
- [Updated] 2024 Approved Enhancing Online Stream Quality with a Single Source Approach
- [Updated] Accelerating Learning on TikTok Changing Your Profile Number
- Apply These Techniques to Improve How to Detect Fake GPS Location On Vivo Y02T | Dr.fone
- Best Ways to Bypass iCloud Activation Lock on Apple iPhone 6/iPad/iPod
- Download the Latest HP Network Drivers: Compatible with Windows 10, 7 & 8
- Easy Download Guide to Installing Intel Iris Graphics Software on Win10 or Win11
- How To Change Vivo Y100 5G Lock Screen Clock in Seconds
- How to Reset Vivo T2 Pro 5G without Losing Data | Dr.fone
- In 2024, 3 Effective Ways to Bypass Activation Lock on Apple iPhone 8 Plus
- In 2024, How to Remove Find My iPhone without Apple ID From your Apple iPhone 15 Pro Max?
- Mastering iPhone Display Settings: How to Enable Smooth Mode Transitions
- The Ultimate Guide to Unlocking Apple Watch Or Apple iPhone 12 Pro Max from iCloud
- The Ultimate Guide to Unlocking Apple Watch Or Apple iPhone 6s from iCloud
- Unlock Free Access to Apple Devices Through Target's Exclusive Promotion
- Title: How To Bypass iCloud By Checkra1n Even On iPhone 14 Plus If Youve Tried Everything
- Author: Lydia
- Created at : 2024-10-19 17:40:00
- Updated at : 2024-10-20 19:14:05
- Link: https://activate-lock.techidaily.com/how-to-bypass-icloud-by-checkra1n-even-on-iphone-14-plus-if-youve-tried-everything-by-drfone-ios/
- License: This work is licensed under CC BY-NC-SA 4.0.