
How to Factory Reset iPad or iPhone 14 without iCloud Password or Apple ID?
How to Factory Reset iPad or Apple iPhone 14 without iCloud Password or Apple ID?
If you are an iPad or Apple iPhone 14 owner and are looking to reset your iPad or Apple iPhone 14 without knowing the passcode, you do not need to worry anymore. Most gadget owners already know how to factory reset their phones. But in cases where you have forgotten your Apple ID password or passcode and want to reset your iPad or Apple iPhone 14, it can be done via various ways and techniques. Here, we shall discuss a few of them.
In this article, you shall find multiple ways by which you can effectively factory reset iPad or Apple iPhone 14 without iCloud password and get a clean slate to work on. A factory reset will wipe all the data off of your iPad or Apple iPhone 14, so be mindful of that. The methods are all quite simple yet effective in producing the desired result. Without further ado, let us begin!
Part 1: How to Factory Reset iPad or Apple iPhone 14 without Apple ID by Removing Apple ID?
If you wish to factory reset the iPad or Apple iPhone 14 without an Apple ID password or iTunes, one simple way to do it is via third-party application software. A quite wonderful tool in this regard is the Dr.Fone - Screen Unlock tool. It lets its users remove multiple types of locks from screens on several different devices. Using an external tool saves users from various kinds of troubles that may arise along the way.
The Dr.Fone program is a highly useful and recommended tool for unlocking phone screens. It supports a wide range of phone models and multiple brands, including Apple, Samsung, Xiaomi, Huawei, LG, etc. Users can easily remove screen locks of multiple kinds. In addition to that, Dr.Fone also:
- It saves a lot of time and effort for the users and does its job quickly.
- Supports many brands and all the latest versions of iOS and Android.
- Protects the data of consumers, making it a trusted source worldwide.
- It is relatively easy to use, with a user-friendly interface.
 safe & secure
To factory reset the iPad or Apple iPhone 14 without Apple ID using Dr.Fone, install the program on your computer, and proceed as mentioned below.
Step 1: Launch and Connect the Program to iPad or Apple iPhone 14
Launch the Dr.Fone Screen Unlock app on your computer and connect your iPad or Apple iPhone 14 with the help of a data or a USB cable.
Step 2: Choose Option
On the main interface of the program, you will see various options to choose from. Click on the “Screen Unlock” button visible there.

Step 3: Select Unlock Option
On the next screen, you will see multiple options. Choose the “Unlock Apple ID” one.

Step 4: Establish a Trusted Connection
Now, tap the “Trust” button on your iPad or Apple iPhone 14 to establish a trusted connection with the computer to proceed further.
Step 5: Reset iPad or Apple iPhone 14
Then, on your computer screen, click on “Unlock Now.” Confirm the action on the appearing dialogue box. Next, follow the instructions visible on the screen to reset your iPad or Apple iPhone 14.

Step 6: Remove Apple ID
Dr.Fone will begin the process of unlocking your iPad or Apple iPhone 14. Do not disconnect the iPad or Apple iPhone 14 during this process. Once the process is completed, reboot your iPad or Apple iPhone 14, and you shall be able to sign in with a new Apple ID.

safe & secure
Part 2: Factory Reset iPad or Apple iPhone 14 without iCloud Password
In case you are asking yourself if it is possible to reset your iPad or Apple iPhone 14 without an iCloud password, the answer is yes. If you want to learn how to factory reset an iPad or Apple iPhone 14 without an iCloud password, an easy way of doing so is with an iTunes or Finder.
For Mac users with macOS Catalina 10.15 or later, they can complete the process with Finder’s help. Windows users and macOS users with older versions can use iTunes. Before restoring the iPad or Apple iPhone 14 without an iCloud password, you are required to put it into Recovery mode. For that, you need to follow the steps provided as follows.
Step 1. Turn off your iPad or Apple iPhone 14
- On an iPad or Apple iPhone 14 with Face ID: Make sure your iPad or Apple iPhone 14 is not connected with your computer. Press and hold the Top and Volume Down button to allow the power slider to appear on the screen. Drag the slider to turn off the Apple iPhone 14 device.
- On an iPad or Apple iPhone 14 with Home Button: Make sure your iPad or Apple iPhone 14 is not connected to a computer. Press the Side or Top button to allow the power slider to enumerate on the screen. Once it is done, drag the slider to turn off the Apple iPhone 14 device.
Step 2. Enter Recovery mode
- On an iPad or Apple iPhone 14 with Face ID: Connect your device to a computer. Hold the Top button for leading into the recovery mode while connecting it with the computer.
- On an iPad or Apple iPhone 14 with a Home button: Connect your iPad or Apple iPhone 14 to your computer. Keep holding the Home button while connecting it with the computer until the recovery mode screen appears on the front.
Step 3. Open iTunes or Finder on the computer
Open iTunes and access your iPad or Apple iPhone 14 through the iPad or Apple iPhone 14’s icon present on the screen’s upper-left corner. With Finder on Mac, locate your iPad or Apple iPhone 14 in the sidebar of its window. Tap it.
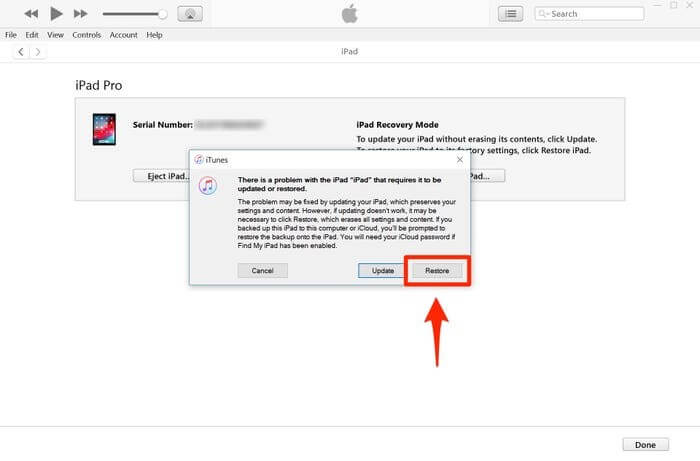
Step 4. Restore your iPad or Apple iPhone 14 and set it up
The screen displays an option of ‘Restore’ or ‘Update’ for the iPad or Apple iPhone 14. Tap on the option of ‘Restore’ to let the platform download the software into the iPad or Apple iPhone 14 within the recovery mode. Then set it up as a new device.
Part 3: How to Reset iPad or Apple iPhone 14 without Apple ID via the Settings App?
Another way of resetting your iPad or Apple iPhone 14 is via the Settings app present on your device. You can unlock a disabled iPad or Apple iPhone 14 or remove all data by executing a total wipe of the iPad or Apple iPhone 14 using Settings. However, before starting, please ensure that your iPad or Apple iPhone 14 is connected to the internet and the “Find My iPhone” feature is disabled on it. You will also need to know the passcode of your iPad or Apple iPhone 14 to proceed with this method.
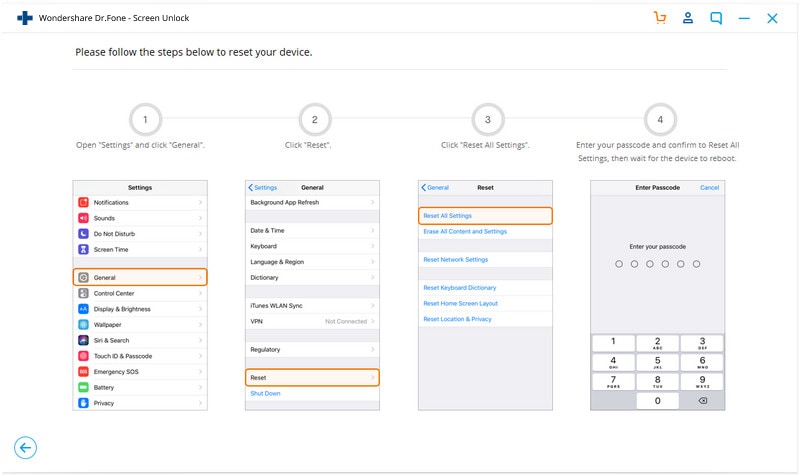
Once you have done all of that, follow the steps given below.
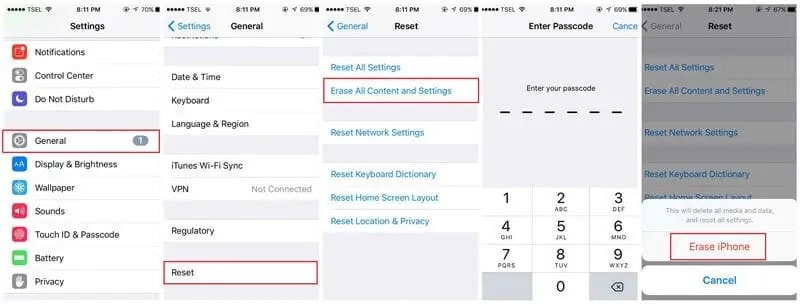
- Open “Settings” on your iPad or Apple iPhone 14.
- Go to “General.”
- Navigate to the “Reset” option and click on it.
- Select the “Erase All Content and Settings” option.
- Type in your passcode to confirm and proceed. This will wipe all the data on your iPad or Apple iPhone 14.
Based on the version of your iOS, you might be asked to enter your Apple ID password too. It will also ask for the Apple ID password if the “Find My iPhone” feature is enabled on your device. Hence, the process will not be successful without it, and your iPad or Apple iPhone 14 will go to Activation Lock. Therefore, Dr.Fone is a simple, recommended, and reliable way of resetting the iPad or Apple iPhone 14 without an Apple ID, saving much of the troubles.
Conclusion
There can be multiple reasons for resetting your iPad or Apple iPhone 14. Now you know how to factory reset the iPad or Apple iPhone 14 without Apple ID. You can follow any of the above-mentioned methods to get the desired results as best suited to your needs. Some might work, and some might not. The Dr.Fone – Screen Unlock tool is recommended, as it is the most efficient among all the other methods. Try it to get proficient outcomes.
safe & secure
What You Want To Know About Two-Factor Authentication for iCloud On your Apple iPhone 14
Hackers have stolen millions of iCloud credentials in the past and demanded Apple pay for a ransom. This is starting to become a thing of the past as Apple implemented two-factor authentication to secure your Apple ID.
However, it’s not always perfect, as sometimes you need to get past two-factor authentication on your iCloud for various reasons. That’s why this article will teach you how to set it up and bypass two-factor authentication on iCloud yourself if you need to. Read further to learn more.

Part 1: What Is Two-Factor Authentication for iCloud?
Not to be confused with Apple’s two-step authentication, the new and more secure two-factor authentication on iCloud introduces push notifications on your iOS device to keep your data safe. With Apple’s two unique ways to prove your identity, hackers will find it harder to access your personal and financial data.
Switching to two-factor authentication rather than two-step is becoming more common nowadays as security measures are more advanced. You can always switch your security measure at any point, but remember that two-factor authentication is now an essential way to keep your data safe.

Part 2: What Are the Benefits of Two-Factor Authentication?
Setting up two-factor authentication is a secure way to protect your device against unauthorized access. Adding another layer to your username and password highly reduces the chances of hackers obtaining your account.
Here are some of the benefits of activating two-factor authentication on your device.
- Improved security - A second form of identification aside from your password reduces the chance for someone to gain access to your information.
- Interconnectivity to mobile engagement - Two-factor authentication from businesses provides users with a stronger login system to ensure their information is safe in the digital world.
- Reduces Fraud - Due to the rise of identity theft in recent years, businesses risk losing trust, brand equity, and credibility. A secure authentication system adds a layer of protection to keep you secure.
Part 3: How To Set up Two-factor Authentication for iCloud?
If you haven’t set up two-factor authentication yet on your iCloud, here are the steps to activate it right now.
Step 1: On your Apple iPhone 14/iPad, go to Settings and tap your Apple ID profile at the top.

Step 2: Tap Password & Security and turn On Two-Factor Authentication.
Step 3: Enter a phone number to receive the two-factor code via an SMS or a phone call.
Step 4: Enter the 6-digit verification code received on your device and wait for the process the finish.
Note
You can turn off two-factor authentication within two weeks of enrollment. After that, it’s permanent.
Part 4: How To Turn Off Two-Factor Authentication on Your Apple iPhone 14?
As previously stated, once two-factor authentication is active on iCloud, you only have a two-week window to deactivate it again.
To get past two-factor authentication on iCloud, Go to Settings > your name > Password & Security. Tap Two-Factor Authentication and turn it Off again.
Meanwhile, here are the steps to learn how to bypass 2-step verification on iCloud on the web.
Step 1: Go to the Apple ID sign-in page and log in with your Apple ID.
Step 2: Click Sign-In and Security > Account Security.

Step 3: Click Turn Off Two-Step Verification. Answer a security question you’ve set up previously to finish the process.
Part 5: Is It Possible to Bypass Two-Factor Authentication for iCloud?
If you’re wondering how to bypass two-factor authentication on iCloud, the answer is no, you can’t. However, if you don’t have access to your trusted device, you can have a code sent to your trusted phone number via an SMS or an automated phone call to prove to Apple that you own the iCloud account.
If this is impossible, you should request account recovery to regain access to your account.
The easiest way to prevent this issue is by adding another phone number to your Apple ID so you’ll always have a backup. Here’s how.
Step 1: On your Apple iPhone 14, go to Settings and tap on your Apple ID > Password & Security.
Step 2: Tap Edit and choose to Add a Trusted Phone Number. You’ll have to enter your device’s passcode to continue.

Step 3: Enter your new phone number. Select a way to receive a verification code via sms or phone call and tap Send.
Step 4: Enter the verification code and wait for the process to finish.
Bonus Tips: Forgot Your iCloud Password? Here’s What To Do
Using special programs like Dr.Fone can help you recover your iOS device if you forget your iCloud password.
Dr.Fone’s key features are:
- Removes all types of iPhone locks such as Apple ID password, Face ID, Touch ID, and more.
- Bypass iCloud activation lock.
- Unlock your Apple iPhone 14 without carrier restrictions.
- Remove MDM profile / bypass MDM lock without data loss.
Here’s how to use Dr.Fone if you forget your iCloud password.
Step 1: Download and install Dr.Fone .
Step 2: Click Screen Unlock on the main program window. On the next screen, click Bypass Activate Lock.

Step 3: Click Start to initiate the process of unlocking your Apple iPhone 14 without an iCloud password.

Note
Your iPhone will need to be jailbroken before bypassing it using Dr.Fone.
After step 3, there are two possible outcomes for GSM and CDMA iPhone devices.
- If you own a GSM device, the unlocking will do no harm to your iOS device, and you can enjoy your Apple iPhone 14 as usual.
- If the Apple iPhone 14 is CDMA, you won’t be able to use the Apple iPhone 14 device for phone calls, cellular data, and iCloud of your new Apple ID.
Conclusion
Turning on your iCloud’s two-factor authentication is necessary for today’s high-tech society. It ensures your information is always secure and minimizes the risk of getting hacked or having your account stolen. Once two-factor is active on your Apple ID, Apple provides you with a two-week window to deactivate it if you change your mind.
Meanwhile, if you forgot your iCloud and have a hard time recovering your account, you can try using dedicated programs like Dr.Fone to unlock your iOS device in a few steps.
Bypass iCloud Activation Lock with IMEI Code On your Apple iPhone 14
The iCloud IMEI Unlock method requires you to have your Apple iPhone 14 IMEI number before proceeding with the iCloud lock removal process. When it comes to bypassing the activation lock, the IMEI code plays a very significant role as we’re going to see as we proceed.
In this article, I’m going to elaborate on how you can easily bypass the iCloud activation lock with the help of the iCloud IMEI unlock.
Part 1: Basic Information about IMEI
1. Understanding the IMEI Code
The International Mobile Equipment Identity (IMEI) code/number is a highly unique identifying 15-digit number that distinguishes one mobile device from the other. This IMEI number is present in each and every phone regardless of the make or model. It plays an imperative role since it can be used to unlock locked mobile devices, track lost devices, and at the same time, lock a stolen mobile device remotely.

2. How to Find Your IMEI Code
How to find your IMEI code depends on a number of factors such as your phone make, the model as well as the company behind your device. In most cases, you can find the code on your mobile device just under the battery casing, on the SIM Card tray, and in some situations, on the inside part of the bottom phone cover. If by chance, you still can’t locate your code, I would highly advise you to dial *#06# on your phone dial pad. This prompt dial-up happens to be the universal method used by each and every mobile company to locate the unique 15-digit IMEI number.
You can try to find your IMEI code through the other two methods: check it on your device, via iTunes or Finder, and package box.
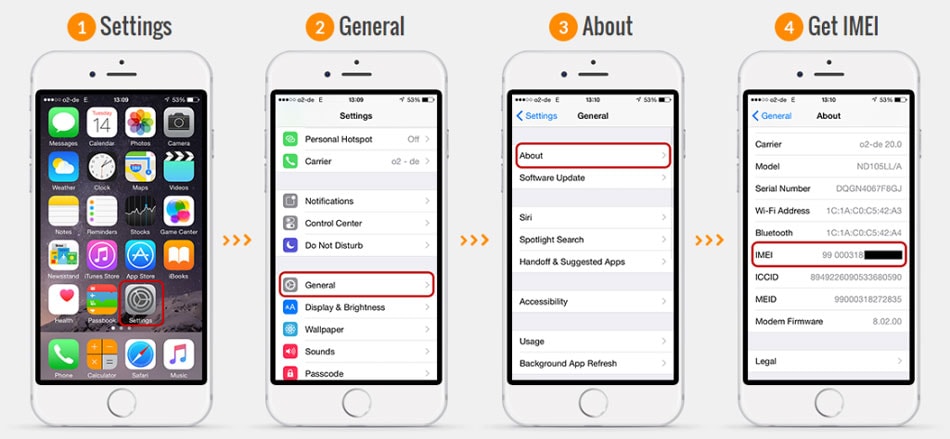
Method 1: On your Apple iPhone 14 device, directly go to Settings>General>About. Then you can find your IMEI code below.
Method 2: Click the “Device” icon in iTunes to access the “Summary” tab. To find the IMEI number on your Apple iPhone 14, tap “Phone Number” under your device name or navigate to the Apple iPhone 14 device model.

Method 3: For Finder, locate your device from the left panel. Ensure that you’re on the “General” tab, then select “Phone Number” below your device name or model to locate the IMEI number.

Method 4: Retrieve the original box or packaging in which your device came when you purchased it. On the outside of the box, a label or sticker might include various details about the Apple iPhone 14 device. Look for a section specifically mentioning the IMEI number. The IMEI number and other device details are typically printed on a label or sticker.

3. iCloud IMEI Check for iPhone
For you to access and use iCloud, you need to check IMEI iCloud to retrieve or confirm your unique IMEI code. For you to unlock your iCloud account or lock it swiftly, I would highly advise you to have this 15-digit code with you on a piece of paper. Each and every iPhone device comes with an iCloud account that is distinguished by this unique number. If your iCloud account is locked, the first thing you need to do is to go through the iCloud IMEI check process to retrieve your code. You can do this by using the methods mentioned in part 1.2.
Part 2: How to Bypass iCloud Activation with IMEI Free?
Many third-party services claim to offer solutions to bypass iCloud activation using the IMEI number. These services propose to unlock iCloud activation by altering or manipulating the IMEI number. They promise a free and swift solution to bypass iCloud activation. Follow these steps to bypass iCloud activation using IMEI:
Step 1. Begin with finding your device’s IMEI number. You can do it by using the *#06# code. Otherwise, you can get it from the phone box or in iPhone “Settings.”

Step 2. Now access a reliable iCloud Activation lock bypassing via IMEI number service. One example is IMEIUnlockSIM , where you can use the IMEI number to bypass the iCloud Activation lock.

This relevant service is typically provided by third-party companies and is not officially endorsed by Apple. It’s important to note that the legitimacy and reliability of such services can vary. Keep in mind that using unofficial unlocking services may come with risks, and it’s essential to research and choose a reputable provider if you decide to pursue this option. Additionally, be cautious about potential scams and ensure that you fully understand the terms and conditions of any service you use.
Part 3: How to Bypass iCloud Activation without IMEI Code?
Are you looking for a way to bypass the iCloud Activation lock without an IMEI code? Wondershare Dr.Fone provides a solution for unlocking iPhone, iPad, and iPod touch without a passcode. It is capable of removing various types of lock screens, which include your device’s passcode, Touch ID, and Face ID locks. Moreover, it can bypass the iCloud activation lock and Apple ID without requiring a password.
Additionally, it can bypass MDM (Mobile Device Management) and screen time settings without causing data loss. This software is compatible with iOS 17/iPadOS 17 and iPhone 15.
Key Features of Wondershare Dr.Fone
- It operates through a simple 3-step process, making it user-friendly.
- You can use the Dr.Fone - Screen Unlock (iOS) without the need for any technical expertise.
- Dr.Fone has the capability to disable the iTunes backup encryption setting without causing data loss.
Steps to Bypass iCloud Activation without IMEI Code via Wondershare Dr.Fone
You need to perform the following basic steps to bypass the iCloud Activation lock:
For iOS/iPadOS 12.0~14.8.1
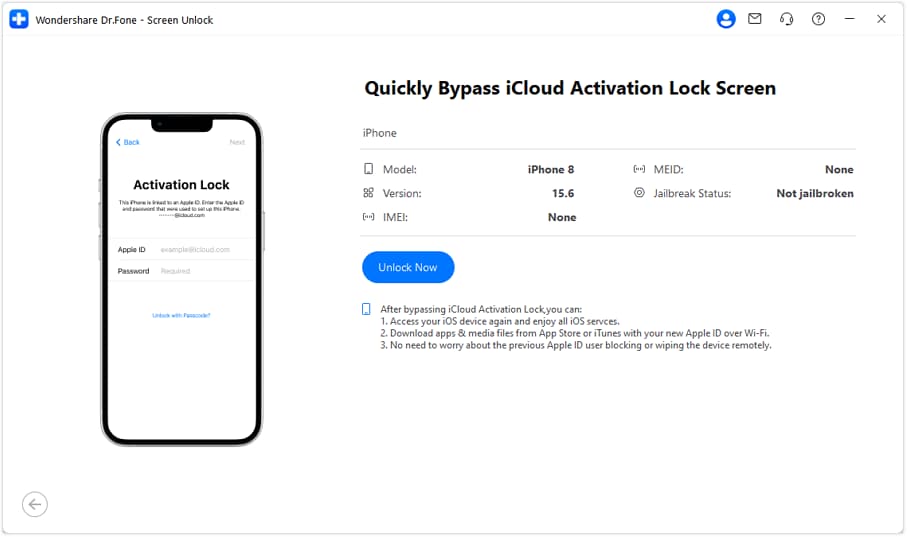
Step 1: Access iCloud Activation Lock Removal
Install the newest Wondershare Dr.Fone on your computer and open it. Go to “Toolbox,” then choose “Screen Unlock” and select “iOS.” Next, pick “iCloud Activation Lock Removal” and click “Start” to initiate the unlocking process. Connect your iOS device using a USB cable when prompted. The window will display progress and move to the next step.
Step 2: Navigate To and Tap Unlock Now
Now, you need to check whether your device is GSM or CDMA. Bypassing the iCloud Activation lock on GSM devices doesn’t affect the Apple iPhone 14 device functions. On the other hand, CDMA devices will lose the ability to be used for cellular purposes. Tap “Unlock Now,” and if you are unlocking a CDMA device, you will be presented with a warning prompt. Click “Got It” to agree to the warning and proceed further.
Step 3: Jailbreak Your Device and Complete the Process
Following this, follow the on-screen instructions to jailbreak your iDevice. Once you confirm that your iOS device has been successfully jailbroken, the process initiates automatically to remove the Activation Lock. The progress is indicated by a bar displayed on the screen. Upon completion of the process, a message will appear in the window indicating the conclusion.

For iOS 15.0~16.3
Step 1: Navigate to the Unlock Now Screen
Launch Dr.Fone, tap “Toolbox,” and access “Screen Unlock” to proceed. On the following screen, choose “iOS” and follow it by tapping “iCloud Activation Lock Removal.” Next, make sure your device is connected to a computer, and on Dr.Fone, tap “Unlock Now.”
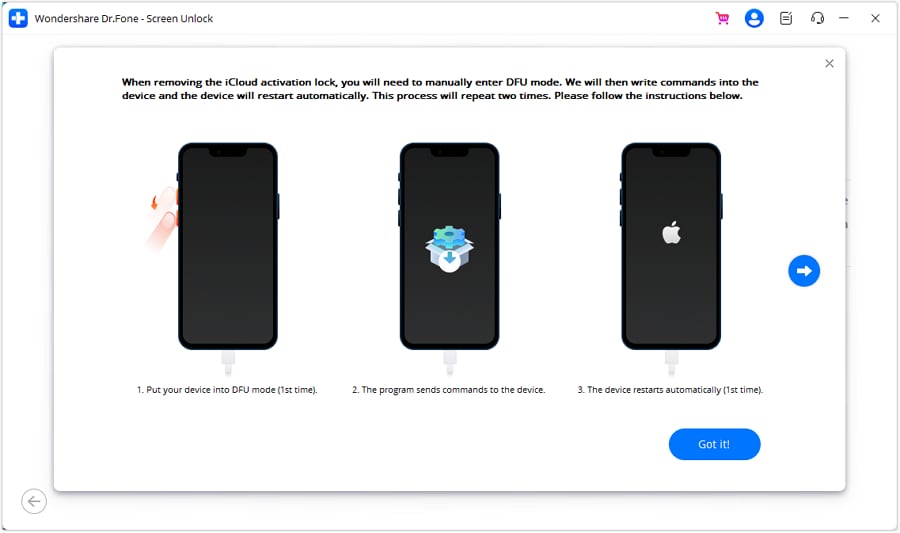
Step 2: Put Your iOS Device into DFU Mode
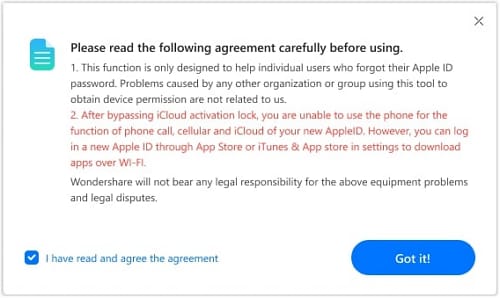
Afterward, a message will pop up, cautioning the user about the process. Read through the details and checkmark the “I have read and agree” option. Tap “Got It” to proceed and follow the on-screen instructions to put the iOS device in DFU Mode. After the first attempt, the program will command the Apple iPhone 14 device to restart. Click the right arrow to proceed to the further step-by-step procedures.
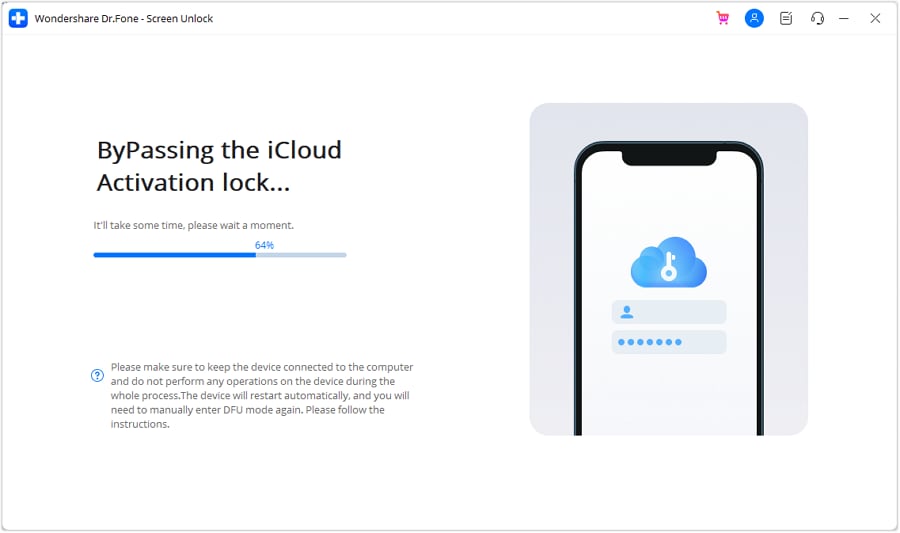
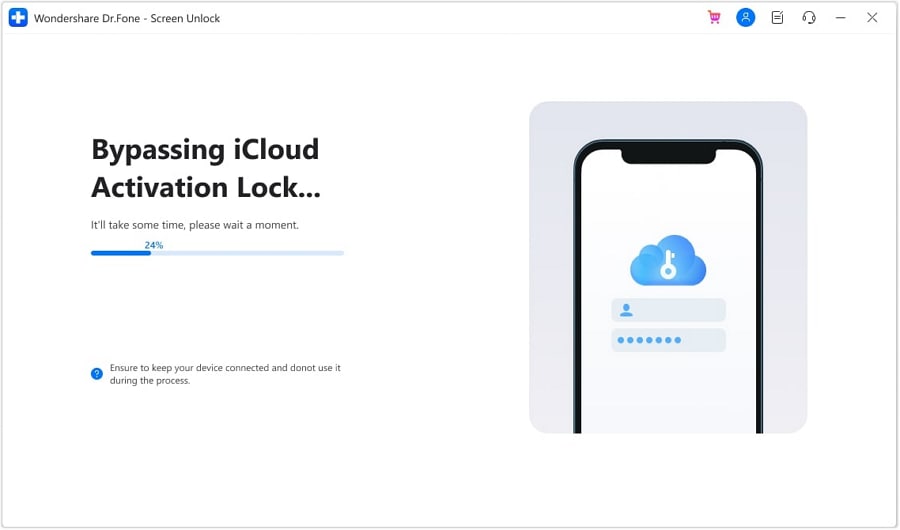
Step 3: Complete the Bypass Process of the iCloud Activation Lock
Then, repeat the steps to place the iOS device in DFU Mode for the second time. Once completed, the program will activate the Apple iPhone 14 device, unlocking it. Finally, select “Got It!” to finish the process. Afterward, the computer screen will begin the iCloud Activation Lock removal process. Once finished, a completion message will appear where you need to click ‘Done.’
For iOS/iPadOS 16.4~16.6
Step 1: Connect Your Device to Dr.Fone and Jailbreak It
Dr.Fone offers a straightforward approach for iPhone or iPad users to remove the iCloud Activation Lock for iOS/iPadOS 16.4~16.6. It automatically retrieves and jailbreak your device without manual steps or external jailbreak tools.
Step 2: Commence and Complete the iCloud Activation Lock Bypass Process
Once the Apple iPhone 14 device is jailbroken, Dr.Fone will commence the removal of the Activation Lock and exhibit a progress bar. Once the process finishes, a completion message will appear on the window. Simply click the ‘Done’ button to finalize the unlocking of the Activation Lock.
Bonus Tip: One-click Solution to Bypass iCloud Password without IMEI Code
Not just IMEI, you may also wish to bypass the iCloud account that is linked to the Apple iPhone 14 device as well. To do this, you can take the assistance of Dr.Fone - Screen Unlock (iOS) and follow a simple stepwise process. Ideally, the application is used to remove the lock screen of an iOS device, but it can also help you bypass an iCloud account. But, you need to unlock your device once in the process. If you are ready, just follow these steps to learn how to bypass the iCloud lock on your phone.
Dr.Fone - Screen Unlock (iOS)
Unlock Apple ID Without Password.
- Intuitive instructions to unlock iPhone without the passcode.
- Removes the iPhone’s lock screen, and Apple ID whenever it is disabled.
- Works for all models of iPhone, iPad, and iPod touch.
- Fully compatible with the latest iOS.


4,008,669 people have downloaded it
Step 1: To start with, simply connect your Apple iPhone 14 to the system and launch the Dr.Fone - Screen Unlock (iOS) application from it. From its home, you need to pick the option to unlock an Apple account.
Step 2: Now, simply enter the passcode on your phone to unlock it and tap on the “Trust” button when you get a new connection prompt on it.

Step 3: As your device would be detected, click on the “Unlock Now” button, and agree to the following warning message. Enter the displayed code to verify as the process will erase the existing data on your phone.
Step 4: Afterward, just unlock your Apple iPhone 14 and go to its Settings > General > Reset. From here, you can choose to reset all device settings.
Step 5: That’s it! Once the Apple iPhone 14 device restarts with its default settings, the application will take the needed steps to bypass its iCloud account. Kindly be patient and wait as Dr.Fone would complete the process.
Step 6: In the end, you will be notified when the unlock process is completed. You can now safely remove your device and access it without any iCloud account restrictions.

Some of the methods that have been listed above require little skills and time to bypass the activation lock. Also, the amount of cash required is minimal as compared to other methods, which can be quite expensive and complicated for some users. Dr.Fone - Screen Unlock (iOS) is a better solution that will take you a long way in terms of iPhone and iCloud use compared to others, and hence you should never be worried just because you can’t access your iCloud account.

Also read:
- [New] In 2024, Advanced Strategies to Transform Your Snaps Into Boomers
- [New] In 2024, Top 8 YouTube Ranks Elevating Your Content with Premier Applications
- [Updated] 2024 Approved Is M1 Suitability for Professional Editing Confirmed?
- [Updated] In 2024, Paving Way to Success Premier Video Gatherings (Post-VidCon)
- 2024 Approved Get HD Quality Facebook Videos on PC/Mobile
- Best Ways to Bypass iCloud Activation Lock from iPhone SE/iPad/iPod
- Comprehensive TCL 50S425 Roku TV (50) Analysis: Discovering Value in a Premium 4K Viewing Experience - 2019 Edition
- Effective Solutions Every Time Your iPhone Loses Wi-Fi Connection
- How to Unlock Apple ID Activation Lock On iPhone XS?
- In 2024, A Comprehensive Guide to iCloud Unlock On Apple iPhone 14 Pro Max Online
- In 2024, Latest Guide on iPad 2/3 and iPhone 12 mini iCloud Activation Lock Bypass
- In 2024, Mastering YouTube Sounds - 4 Top Budget-Friendly Apps
- In 2024, Unlocking an iCloud Locked iPad and iPhone 15 Pro Max
- New Multiple Ways How To Remove iCloud Activation Lock On your iPhone X
- The Ultimate Guide to Unlocking Apple Watch Or Apple iPhone 13 Pro Max from iCloud
- Ultimate Guide from Apple iPhone XS Max iCloud Activation Lock Bypass
- Windows 11 GUID區塊數據恢復入門解說:一次性深度了解
- Title: How to Factory Reset iPad or iPhone 14 without iCloud Password or Apple ID?
- Author: Lydia
- Created at : 2024-10-17 19:07:27
- Updated at : 2024-10-20 20:00:45
- Link: https://activate-lock.techidaily.com/how-to-factory-reset-ipad-or-iphone-14-without-icloud-password-or-apple-id-by-drfone-ios/
- License: This work is licensed under CC BY-NC-SA 4.0.