How to Remove Find My iPhone without Apple ID From your iPhone 13?
How to Remove Find My iPhone without Apple ID On your Apple iPhone 13?
While ensuring protection from theft, iPhone offers a wide variety of tools that helps users find their lost iPhone without any discrepancy. Unlike other smartphone developing companies, Apple ensures a far more impressive structure in locating a lost device than any other security protocol. However, certain users wish to configure their security settings from scratch or remove the existing protocols on a certain device. This article provides a detailed guide on removing Find My iPhone without Apple ID through a series of mechanisms and multiple techniques involving several platforms.
Part 1. Remove Find My iPhone without Apple ID with Dr.Fone - Screen Unlock
Dr. Fone - Screen Unlock (iOS) commemorates an impressive feature set with the provisions of executing tasks within a few steps. Out of the many mechanisms that you may have gone through or heard of, third-party platforms provide you with the most dedicated and efficient services to remove different security protocols from your device. These platforms, known for executing such tasks through the automated structure, can prove effective and cognitive for Apple users in retrieving their smartphones. While understanding the excessive number of platforms in the market, the article provides a very effective platform that helps you cover all dynamics of removing Find My iPhone without an Apple ID. Many reasons should tempt you into adopting Dr. Fone as your primary choice in turning off Find My iPhone without the aid of an Apple ID.
- Fixes all solutions involving disabled iTunes or Apple Accounts.
- Removes the lock-screen password with no hurdles.
- Compatible with the latest iOS and works across all models of iPhone, iPad, and iPod Touch.
Dr.Fone - Screen Unlock
Remove Find My iPhone with no Apple ID without Hassle.
- Unlock an iPhone whenever the passcode is forgotten.
- Save your Apple iPhone 13 quickly from the disabled state.
- Free your sim out of any carrier worldwide.
- Works for all models of iPhone, iPad, and iPod touch.
- Fully compatible with the latest iOS.


3981454 people have downloaded it
As you get to know more about Dr. Fone, it is necessary to understand the systematic execution of the process that would efficiently remove the Find My iPhone from your Apple Device.
Step 1: Download, Install and Launch
You need to download the platform across your desktop and install it successfully. After installation, launch the platform and select the “Screen Unlock” tool from the home window present on your front.

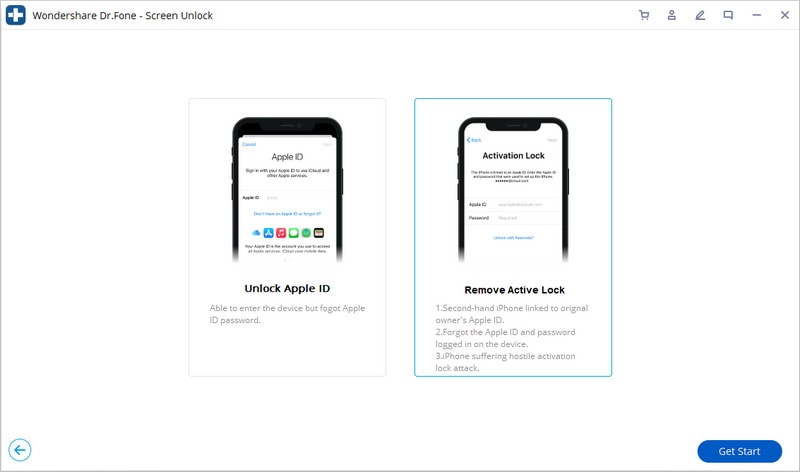
Step 2: Select Remove Active Lock
You need to select the “Unlock Apple ID“ option on the new screen on your front.

Choose the “Remove Apple ID“ option to lead towards the original process of removing Apple iD.
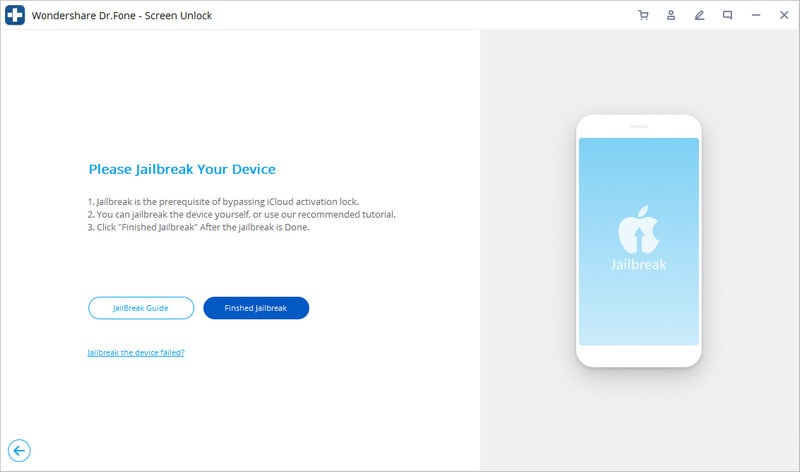
Step 3: Jailbreak your Apple iPhone 13
Jailbreak your Apple iPhone 13 on your Windows computer.
Step 4: Confirm the Apple iPhone 13 device information
Dr.Fone detects the jailbroken device and displays the Apple iPhone 13 device information. Confirm it.
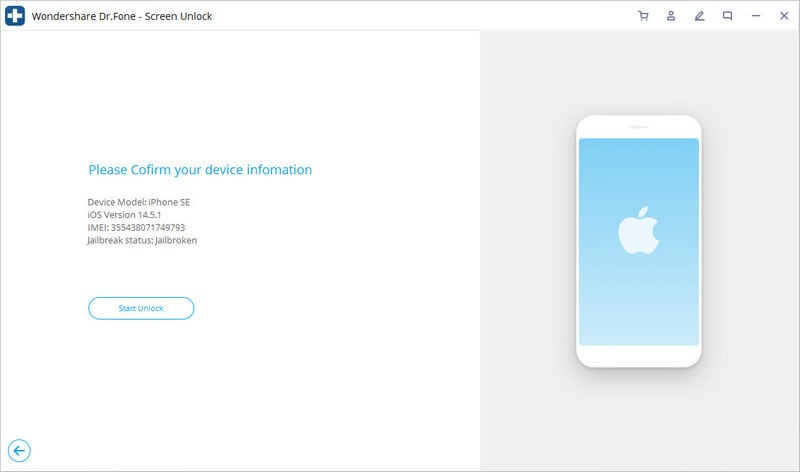
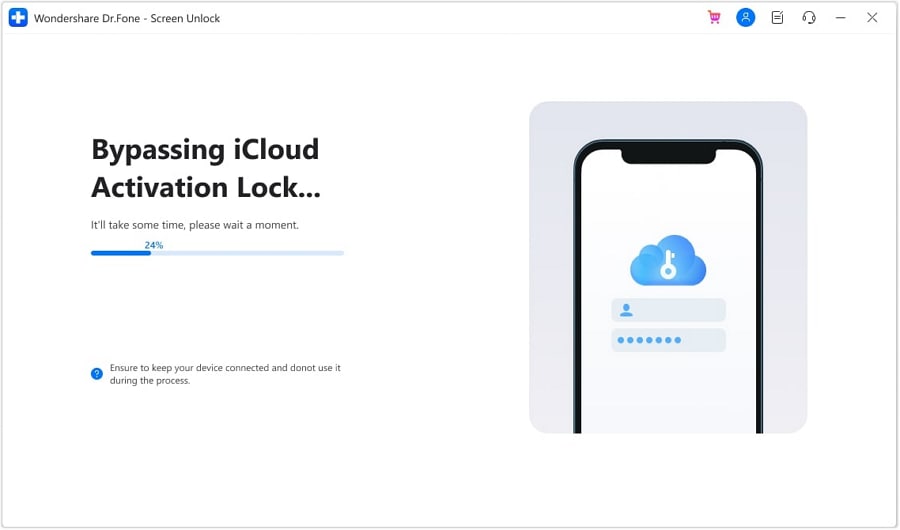
Step 5: Start to remove
It starts to remove. Over completion of the activation lock removal, the platform displays a prompt message on the desktop. The Find, My iPhone, will also be removed.
Part 2. Remove find my iPhone by recovering Apple ID
Another method that can come in quite handy is by consuming the iForgot website for Apple ID recovery. You can consider removing it with the aid of the Apple ID. For this, the iForgot website provides you with the perfect environment for execution. The platform helps you in recovering the password to your ID by following the steps declared below.
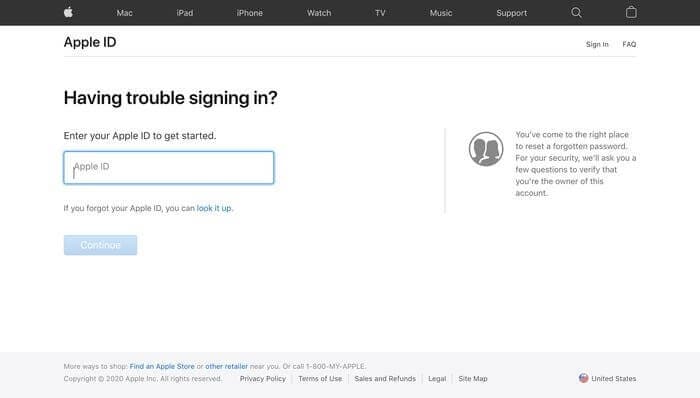
Step 1: Open the Apple ID page on your browser and tap on the option of “Forgot Apple ID or Password” to redirect yourselves to a new link.

Step 2: On the new window, provide your Apple ID along with the assorted phone number and tap “Continue.”
Step 3: A notification will be sent across the Apple iPhone 13 devices connected across the Apple ID, offering you to reset your password. Access the link to change the password by following the on-screen steps. This successfully changes the password of your Apple ID.
Once you are done saving and securing the credentials of your Apple ID, you need to proceed toward removing the Find My iPhone service by following the steps offered as follows:
On your Apple iPhone 13: Open the Settings of your device and tap “iCloud” to proceed. Select the option of “Find My iPhone” and set it to “Off.” Provide the Apple ID password for the listed account and tap “Turn Off” to conclude.
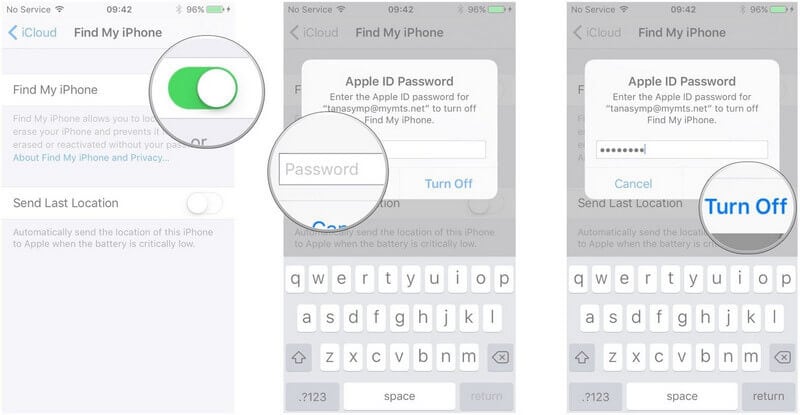
Note: After you turn off the Find My iPhone services, the Activation Lock is automatically disabled.
Part 3. Remove find my iPhone with Apple support
Another approach that can be taken into consideration is by accessing Apple Support. Contacting Apple Support can be listed as one of the most prolific and conventional methods adopted to retrieve credentials and remove appropriate services readily consumed. However, to enjoy such easy services, you need to have a claim over the Apple iPhone 13 device. It would be both horrendous and confusing to contact Support if you have not had any control over the Apple iPhone 13 device in the past years. This method might be quite easy and cost less to execute; however, you cannot cover Apple devices bought through secondhand vendors. Furthermore, by following the steps described, it is up to the Support to decide on the case and provide you with appropriate results. Few details need to be covered before contacting the Support. By calling them, they would require the following details, at most.
- The Apple AppleCare agreement number
- The device’s serial number
- The phone’s receipt
By providing the following details, Apple Support may help you remove the Find My iPhone across your device and helps you configure your device easily.

Part 4. Is it possible to remove the activation lock if it’s a secondhand iPhone?
Normally, it is up to the previous user with his Apple ID to provide you with the appropriate credentials to remove the activation lock across the Apple iPhone 13 device. For such cases, you need to contact the user himself and explain the reasons for coming up with such a situation. One easy way of confirming the credentials is by going to the locality of the user himself. With this, the phone is just a restart away, followed by the standard activation procedures that would help you remove the Activation Lock across your device.
It isn’t easy to follow these steps if you do not own the Apple iPhone 13 device and can’t contact the owner. Under such circumstances, you have to use a third-party program. Dr.Fone - Screen Unlock (iOS) is one of the best programs to remove an iCloud activation lock.
Conclusion
The article has explained a very comprehensive set of features and tools that can be efficiently consumed to remove the Activation Lock across an iPhone for removing the Find My iPhone settings. The mechanisms stated can provide you with the appropriate execution if followed properly. For this, you need to follow the guide to understand all the dynamics involved in the system.
What You Want To Know About Two-Factor Authentication for iCloud On your Apple iPhone 13
Hackers have stolen millions of iCloud credentials in the past and demanded Apple pay for a ransom. This is starting to become a thing of the past as Apple implemented two-factor authentication to secure your Apple ID.
However, it’s not always perfect, as sometimes you need to get past two-factor authentication on your iCloud for various reasons. That’s why this article will teach you how to set it up and bypass two-factor authentication on iCloud yourself if you need to. Read further to learn more.

Part 1: What Is Two-Factor Authentication for iCloud?
Not to be confused with Apple’s two-step authentication, the new and more secure two-factor authentication on iCloud introduces push notifications on your iOS device to keep your data safe. With Apple’s two unique ways to prove your identity, hackers will find it harder to access your personal and financial data.
Switching to two-factor authentication rather than two-step is becoming more common nowadays as security measures are more advanced. You can always switch your security measure at any point, but remember that two-factor authentication is now an essential way to keep your data safe.

Part 2: What Are the Benefits of Two-Factor Authentication?
Setting up two-factor authentication is a secure way to protect your device against unauthorized access. Adding another layer to your username and password highly reduces the chances of hackers obtaining your account.
Here are some of the benefits of activating two-factor authentication on your device.
- Improved security - A second form of identification aside from your password reduces the chance for someone to gain access to your information.
- Interconnectivity to mobile engagement - Two-factor authentication from businesses provides users with a stronger login system to ensure their information is safe in the digital world.
- Reduces Fraud - Due to the rise of identity theft in recent years, businesses risk losing trust, brand equity, and credibility. A secure authentication system adds a layer of protection to keep you secure.
Part 3: How To Set up Two-factor Authentication for iCloud?
If you haven’t set up two-factor authentication yet on your iCloud, here are the steps to activate it right now.
Step 1: On your Apple iPhone 13/iPad, go to Settings and tap your Apple ID profile at the top.

Step 2: Tap Password & Security and turn On Two-Factor Authentication.
Step 3: Enter a phone number to receive the two-factor code via an SMS or a phone call.
Step 4: Enter the 6-digit verification code received on your device and wait for the process the finish.
Note
You can turn off two-factor authentication within two weeks of enrollment. After that, it’s permanent.
Part 4: How To Turn Off Two-Factor Authentication on Your Apple iPhone 13?
As previously stated, once two-factor authentication is active on iCloud, you only have a two-week window to deactivate it again.
To get past two-factor authentication on iCloud, Go to Settings > your name > Password & Security. Tap Two-Factor Authentication and turn it Off again.
Meanwhile, here are the steps to learn how to bypass 2-step verification on iCloud on the web.
Step 1: Go to the Apple ID sign-in page and log in with your Apple ID.
Step 2: Click Sign-In and Security > Account Security.

Step 3: Click Turn Off Two-Step Verification. Answer a security question you’ve set up previously to finish the process.
Part 5: Is It Possible to Bypass Two-Factor Authentication for iCloud?
If you’re wondering how to bypass two-factor authentication on iCloud, the answer is no, you can’t. However, if you don’t have access to your trusted device, you can have a code sent to your trusted phone number via an SMS or an automated phone call to prove to Apple that you own the iCloud account.
If this is impossible, you should request account recovery to regain access to your account.
The easiest way to prevent this issue is by adding another phone number to your Apple ID so you’ll always have a backup. Here’s how.
Step 1: On your Apple iPhone 13, go to Settings and tap on your Apple ID > Password & Security.
Step 2: Tap Edit and choose to Add a Trusted Phone Number. You’ll have to enter your device’s passcode to continue.

Step 3: Enter your new phone number. Select a way to receive a verification code via sms or phone call and tap Send.
Step 4: Enter the verification code and wait for the process to finish.
Bonus Tips: Forgot Your iCloud Password? Here’s What To Do
Using special programs like Dr.Fone can help you recover your iOS device if you forget your iCloud password.
Dr.Fone’s key features are:
- Removes all types of iPhone locks such as Apple ID password, Face ID, Touch ID, and more.
- Bypass iCloud activation lock.
- Unlock your Apple iPhone 13 without carrier restrictions.
- Remove MDM profile / bypass MDM lock without data loss.
Here’s how to use Dr.Fone if you forget your iCloud password.
Step 1: Download and install Dr.Fone .
Step 2: Click Screen Unlock on the main program window. On the next screen, click Bypass Activate Lock.
Step 3: Click Start to initiate the process of unlocking your Apple iPhone 13 without an iCloud password.

Note
Your iPhone will need to be jailbroken before bypassing it using Dr.Fone.
After step 3, there are two possible outcomes for GSM and CDMA iPhone devices.
- If you own a GSM device, the unlocking will do no harm to your iOS device, and you can enjoy your Apple iPhone 13 as usual.
- If the Apple iPhone 13 is CDMA, you won’t be able to use the Apple iPhone 13 device for phone calls, cellular data, and iCloud of your new Apple ID.
Conclusion
Turning on your iCloud’s two-factor authentication is necessary for today’s high-tech society. It ensures your information is always secure and minimizes the risk of getting hacked or having your account stolen. Once two-factor is active on your Apple ID, Apple provides you with a two-week window to deactivate it if you change your mind.
Meanwhile, if you forgot your iCloud and have a hard time recovering your account, you can try using dedicated programs like Dr.Fone to unlock your iOS device in a few steps.
Ultimate Guide on Apple iPhone 13 iCloud Activation Lock Bypass
The Apple iPhone 13’s iCloud unlock is an absolute need for each client of a locked smartphone who needs to give a second life to their iDevice. You could have bought a pre-owned iPhone from another person or failed to remember your Apple ID credentials. Circumstances can be unique, yet the process is something very similar.
You want to bypass Apple iPhone 13 Activation Lock as quickly as possible. Furthermore, there are numerous ways for Apple iPhone 13 iCloud bypass! Typically, a user enters the credentials of the iCloud account to which the Apple iPhone 13 is connected and becomes unlocked immediately.
However, this fast strategy is good just for the first owner. If you don’t know about the iCloud account connected to your account, keep following this guide to bypass Apple iPhone 13.
Part 1:3 Useful Ways to bypass Apple iPhone 13 iCloud activation lock
1. Remove activation lock with the previous device owner
The first thing you can attempt to bypass Apple iPhone 13 is to contact the person you bought this device from. Ask the seller about other Apple ID details so you can enter them on the activation lock screen.
Likewise, you can ask the seller (the previous owner) to enter the details all by himself. This way, you won’t get embarrassed by asking them about such crucial details regarding their account.
This method applies if the owner lives nearby and you can meet face to face. In particular, they must still remember their Apple account password. It is a very straightforward approach to bypassing Apple iPhone 13 since it doesn’t require any technical knowledge. Moreover, you don’t need to run the extra mile by paying for unlocking service since you can attempt this method for free.
So, if you are into this method, follow the given steps:
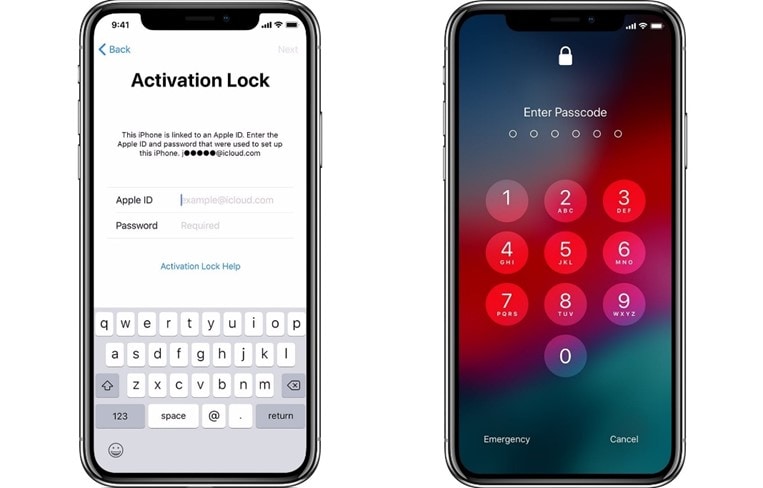
Step 1. Enter the Apple ID details on the activation lock screen when it shows up.
Step 2. After removing the activation lock, unpair any Apple accessory connected to your Apple iPhone 13.
Step 3. Log out of iTunes, App Store, and iCloud.
Step 4. At last, erase all content and settings of your device from the Settings application. Explore the General tab and click Reset > Erase All Content and Settings.
2. Use iCloud DNS Bypass
iCloud DNS Bypass is to bypass an iCloud activation lock by manipulating the DNS server. In particular, it means redirecting the activation process of your Apple iPhone 13 from Apple servers to some other servers for confirmation.
Why Use iCloud DNS Bypass?
When you purchase a second-hand Apple iPhone 13, you might find that the phone has an activated lock. Before you can set up your Apple iPhone 13, the phone will request the Apple server to activate it. The method for getting around this lock is entering the correct Apple ID.
iCloud DNS bypass proves beneficial when you want to bypass Apple iPhone 13 but know nothing about the past owner. It’s likewise effective if you can’t recall your iCloud credentials.
Pros of iCloud DNS Bypass:
- You can physically change the DNS address in WIFI settings.
- If it works, you can use various features and applications on your Apple iPhone 13/7.
Steps to Bypass Activation Lock via DNS:
The steps in DNS Bypass iCloud Activation are basic; here is how to bypass Apple iPhone 13:
Step 1. When you switch on your Apple iPhone 13, pick your preferred language and region from the menu.
Step 2. Click “Continue” to enter the WiFi settings page. Whenever requested to connect, search for the “I” symbol near the WiFi tab.
Step 3. Presently, disconnect the WiFi, go to “Connection Settings,” and snap “Forget this Network.”
Step 4. Click the “I” and enter a DNS server IP address to bypass the iCloud activation lock. You can browse yours according to your area:
USA: 104.154.51.7
- South America: 35.199.88.219
- Europe: 104.155.28.90
- Asia: 104.155.220.58
- Australia and Oceania: 35.189.47.23
- Different Regions: 78.100.17.60
Step 5. Presently, click the “Back” choice on the left half of your screen. Turn on WiFi, select your WiFi from the rundown, and enter your password.
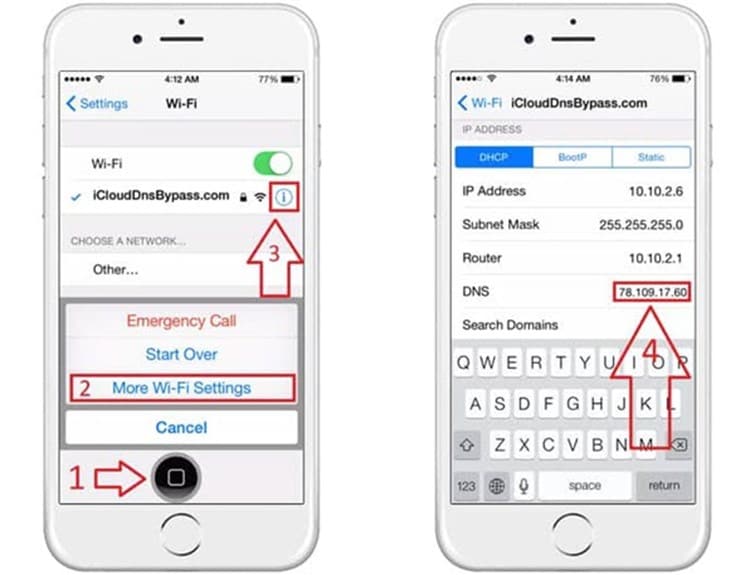
Step 6. Click “Next Page” and snap “Back” to enter the iCloud bypass screen.
Step 7. Set up your apps and use your Apple iPhone 13/7 as you like.
3. Dr.Fone - Screen Unlock (iOS)
The easiest way is to use an expert activation lock bypass tool to stop the issue. This method doesn’t require you to be technical or learn new concepts. You only need to search for the best available tool in the market and download it. You can do the rest of the job by just following the guidelines given by the software company.
Therefore, we recommend you use Dr.Fone Scree Unlock to bypass Apple iPhone 13. Dr.Fone is a professional tool with multiple iOS options. It can unlock the screen lock, Google FRP lock, and activation lock in a matter of minutes.
Dr.Fone - Screen Unlock (iOS)
Bypass Apple iPhone 13 iCloud Activation Lock Without Hassle!
- Simple, click-through, process.
- Unlock screen passwords from all iPhones and iPads or bypass the activation lock.
- No tech knowledge is required, everybody can handle it.
- Support most iPhone/iPad/iPod Touch and most iOS versions fully!
4,395,217 people have downloaded it
Many software require jailbreak before bypassing the IOS activation lock, but Wondershare Dr.Fone Screen Unlock (IOS) stands out for the solution without jailbreak. If your device is between iOS 12.0 to 16.3, follow the steps provided below. To bypass the activation lock, follow a few easy steps and adhere to the guidelines. Moreover, you don’t need to worry about device security while using this program. It is the best tool available for all Apple iPhone 13/7 users who wish to remove the iCloud lock without delay. The steps below will guide you on how you can use this tool for Apple iPhone 13 iCloud bypass:
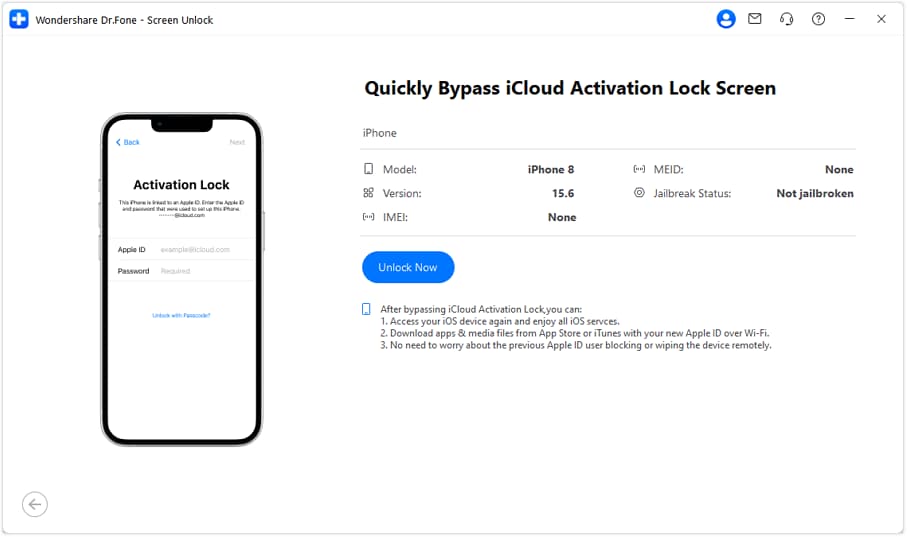
Step 1: Launch Wondershare Dr.Fone and go to Toolbox>Screen Unlock>IOS.
Step 2: Connect your device to the computer and select “iCloud Activation Lock Removal”.

Step 3: Click Unlock Now button on the pop-up window.
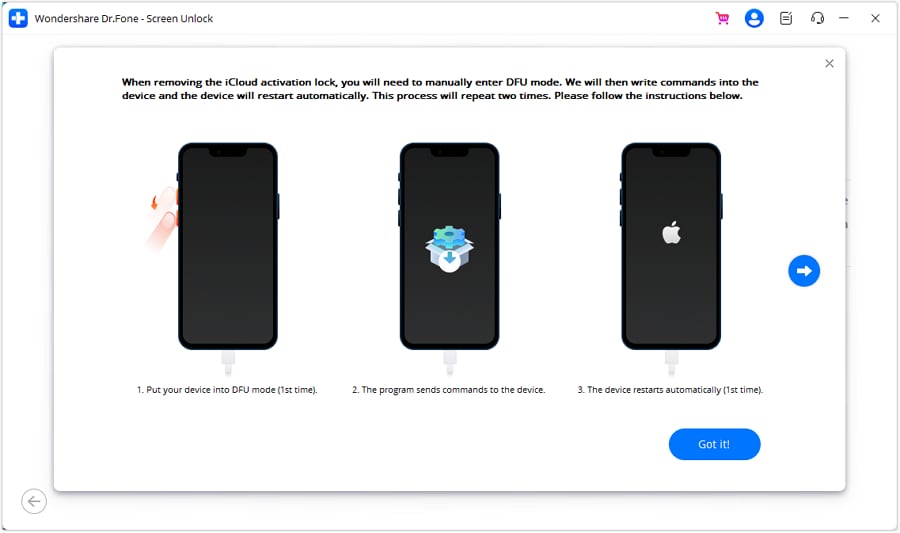
Step 4: You will see a prompt show up. Read the details carefully and checkmark “I have read and agree the agreement”. Tapping “Got it!” button.
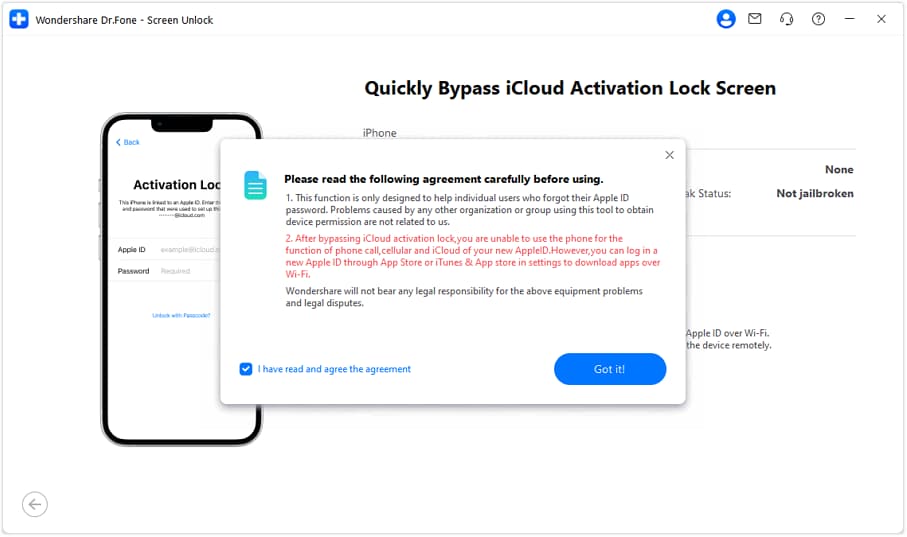
Step 5: Put iDevice in DFU Mode for the first time: the program will send a command to the Apple iPhone 13 device and it will restart.
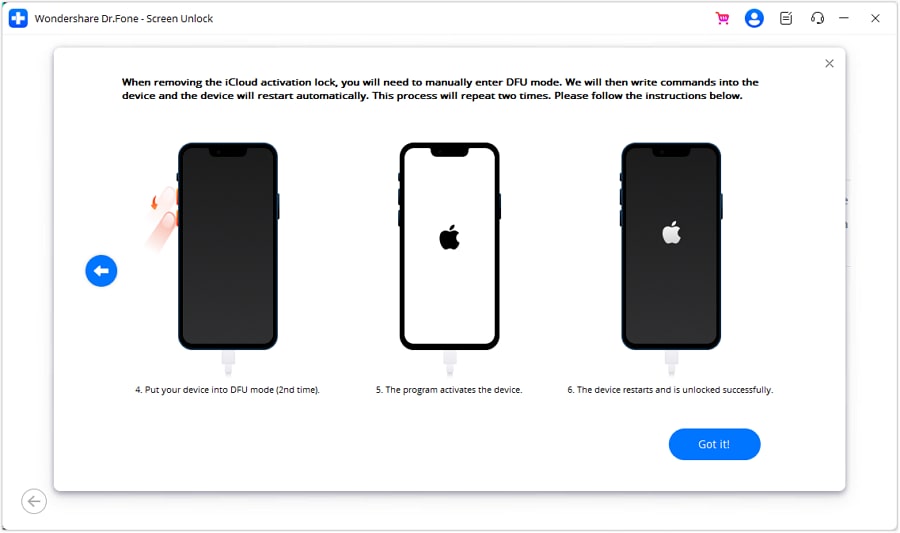
Step 6: Then you need to put the Apple iPhone 13 device in DFU mode for the second time. When it’s done, the program will activate the Apple iPhone 13 device.
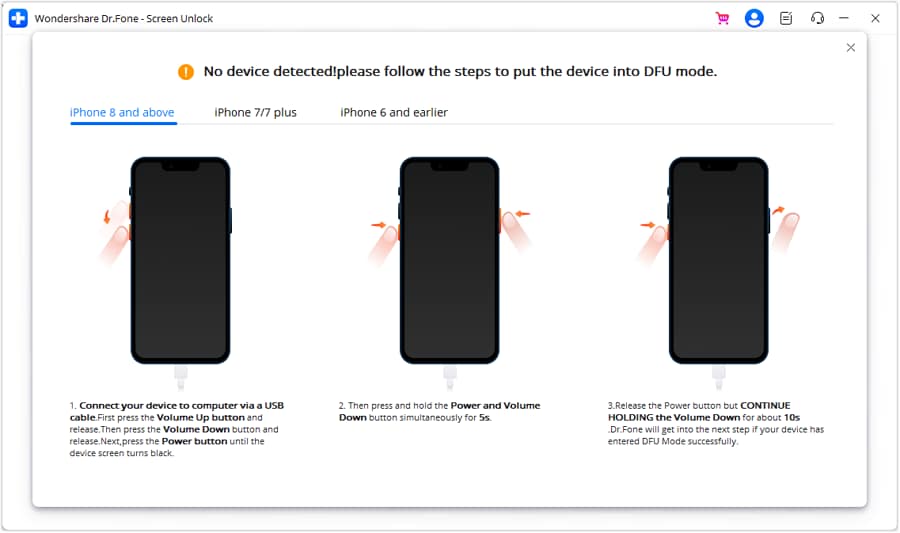
Step 7: If your device is not detected by the platform, follow the on-screen instructions to put their iOS device in DFU Mode.
Step 8: Once the Apple iPhone 13 device has been processed under the DFU Mode, the computer’s screen will start displaying the removal of the iCloud Activation Lock. When it’s done, click Done in the next window.
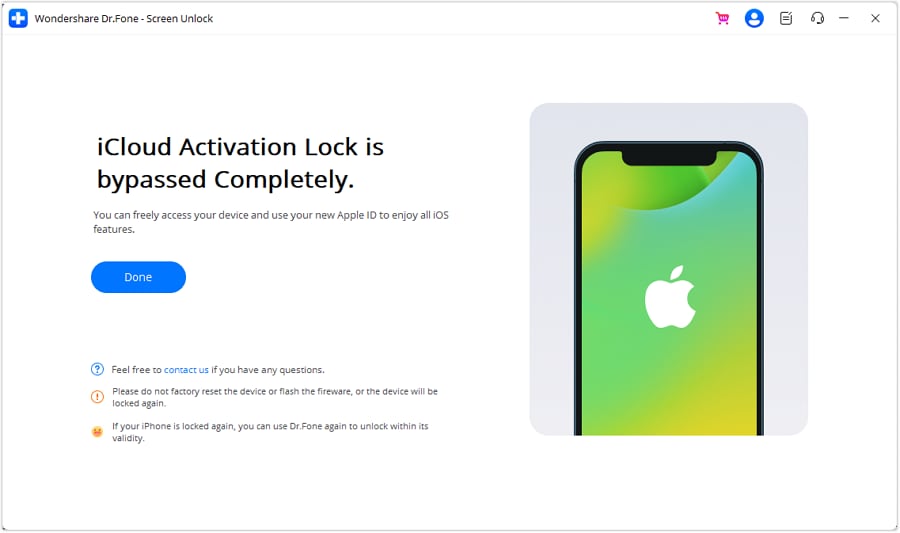
Your iPhone will start like a default phone without any activation lock. You can access and utilize the Apple iPhone 13 now. Possibly, remember that you can’t utilize your new Apple ID’s phone call, cellular, and iCloud feature after that process.
Part 2: FAQs
1. What is Find My?
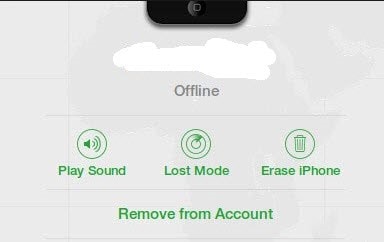
The Find My feature is an incredible method for keeping your Apple iPhone 13 from getting lost, as it permits you to find and lock it, regardless of whether you have it. For instance, when Find My iPhone is initiated, you can see where your Apple iPhone 13 is. You might use it to show your location to others or play a sound on your lost device, making it easier to find.
To utilize this feature, you need to initiate this feature on your device and utilize a PC or another phone to find, reset or lock your lost iPhone. If you’re selling your Apple iPhone 13 or gifting it to someone else, you should first switch off the Find My feature. It becomes very awkward for the next user if the past owner’s Find My iPhone feature is still activated.
2. How to turn off Find My?
If you want to reset your Apple iPhone 13 to erase every one of the data and return it to its default condition, Apple expects you to switch off Find My in advance. Also, experts at the Apple store frequently expect you to switch it off before they can repair it.
Switching it off will not erase any of your data, so you don’t have to stress over that. It’ll simply make it difficult to track down your Apple iPhone 13 on a map when lost.
The best way to switch off the Find My feature is very direct. The following steps will tell you how to make it happen:
- Open the Settings of your Apple iPhone 13 and tap your name or profile.
- Explore the “Find My” option and go for “Find My iPhone.”
- If the Find My iPhone feature is initiated, the toggle button on top of the page should be green. Switch the “Find My iPhone” toggle key to turn it off.
- Enter your Apple ID details.
- Affirm your activity, and that’s all you need to turn this feature off.
3. Can I bypass iOS Devices like iPad or iPods?
Yes, you can bypass the activation lock on iPhones like iPad and iPods. However, the method is a bit different regarding Apple Watches.
The Bottom Line
We hope you are now in a position to bypass Apple iPhone 13 activation lock. This guide mentions the best methods you can employ to bypass this issue, but we all know each method has its pros and cons. Even if no other method works in your case, Dr.Fone - Screen Unlock (iOS) will still help you. This tool is built to provide safe iOS unlocking solutions for our readers.
Also read:
- [Updated] 2024 Approved FileFixers Experts Evaluation
- [Updated] IPhone Night Scene Mastery Guide
- 2024 Approved Comprehensive Guide to Trusted Sites for Youtube Tones
- 2024 Approved Exclusive Guide to the Best 10 Vector Images Online
- 4 Things You Must Know About Apple iPhone SE (2022) Activation Lock
- Configuring Automatic Windows Defender Scans: A Guide by YL Software Experts
- Easy Fixes How To Recover Forgotten iCloud Password On your Apple iPhone 12
- Easy Fixes How To Recover Forgotten iCloud Password On your iPhone 7
- In 2024, 3 Effective Ways to Bypass Activation Lock from iPhone 11 Pro Max
- In 2024, Bypass iCloud Activation Lock with IMEI Code From your Apple iPhone XS Max
- In 2024, Easy Tutorial for Activating iCloud on iPhone 6 Plus Safe and Legal
- In 2024, How to Successfully Bypass iCloud Activation Lock on iPhone 14 Pro Max
- In 2024, Unlocking Your FB Social Media Treasures
- Prevent Cross-Site Tracking on Realme C53 and Browser | Dr.fone
- Resolución Efectiva Para Clientes De Unidades Synology Que Se Quedan Atascados Durante El Proceso De Actualización
- Title: How to Remove Find My iPhone without Apple ID From your iPhone 13?
- Author: Lydia
- Created at : 2024-12-02 16:15:38
- Updated at : 2024-12-06 16:03:12
- Link: https://activate-lock.techidaily.com/how-to-remove-find-my-iphone-without-apple-id-from-your-iphone-13-by-drfone-ios/
- License: This work is licensed under CC BY-NC-SA 4.0.