
How To Remove iCloud From Apple iPhone 7 Smoothly
How To Remove iCloud On Apple iPhone 7 Smoothly
Unlock the full potential of your Apple iPhone 7 by mastering the art of removing iCloud effortlessly! In today’s digital landscape, understanding how to remove iCloud from iPhone is paramount. Whether you’ve forgotten your password, purchased a used device, or are switching Apple IDs, this guide has you covered.
Dive in and see how this article simplifies the process, providing a simple, step-by-step roadmap. Explore the common scenarios that make iCloud removal essential and prepare to manage your Apple iPhone 7 experience seamlessly. Take control of your Apple iPhone 7 effortlessly and explore a world of possibilities with this article’s step-by-step approach.
Part I. What Causes People To Remove iCloud From iPhone?
In the vast Apple ecosystem, iCloud stands as a vital component, connecting your Apple iPhone 7 to a world of seamless data synchronization. However, situations arise where removing iCloud from the iPhone becomes paramount.
What Is iCloud?
At its core, iCloud is Apple’s cloud storage service, fostering the effortless sharing and syncing of data across Apple devices. It’s the magic behind photos, contacts, and notes seamlessly appearing on all your gadgets.
Significance of iCloud
iCloud ensures a harmonious experience, keeping your digital life in sync. From photos to app data, it’s the invisible thread weaving through your Apple devices, making your Apple iPhone 7 an integral part of your digital world.

Reasons To Remove iCloud From iPhone
Understanding these scenarios lays the foundation for your journey into the step-by-step guide on effective iCloud removal without compromising data integrity.
- Forgotten Passwords
Users often find themselves in a bind when forgetting iCloud passwords, necessitating removal.
- Device Handovers
Purchasing a used iPhone or receiving one as a gift may prompt the need to remove the previous owner’s iCloud for a personalized experience.
- Changing Apple IDs
Switching to a new Apple ID might require the removal of the old iCloud association.
- Device Upgrades or Downgrades
Moving to a new iPhone or downgrading to an older model may trigger iCloud removal for a seamless transition.
- Enhanced Security Measures
Some users use iCloud removal as a security measure, particularly when abandoning the Apple ecosystem.
Learning these common reasons allows you to know more about your device before removing iCloud from your Apple iPhone 7. Now, get ready to learn how to erase iCloud from an iPhone. The next section will feature several methods to help you confidently manage your Apple iPhone 7.
Part II. How Do You Remove iCloud From iPhone
Now that you’ve discovered the reasons behind iCloud removal, let’s dive into the practical aspects. In this section, you’ll walk through various methods, ensuring you have the knowledge to make informed decisions. From traditional settings to online tools and advanced desktop solutions, this article has got you covered.
Traditional Method: Remove iCloud From Settings
Follow these simple steps to remove iCloud from your Apple iPhone 7 without any fuss:
- Step 1: Open Settings on your Apple iPhone 7.
- Step 2: Tap your Apple ID at the top of the screen.
- Step 3: Scroll down and select Sign Out. You will then be prompted to enter your Apple ID password to proceed.
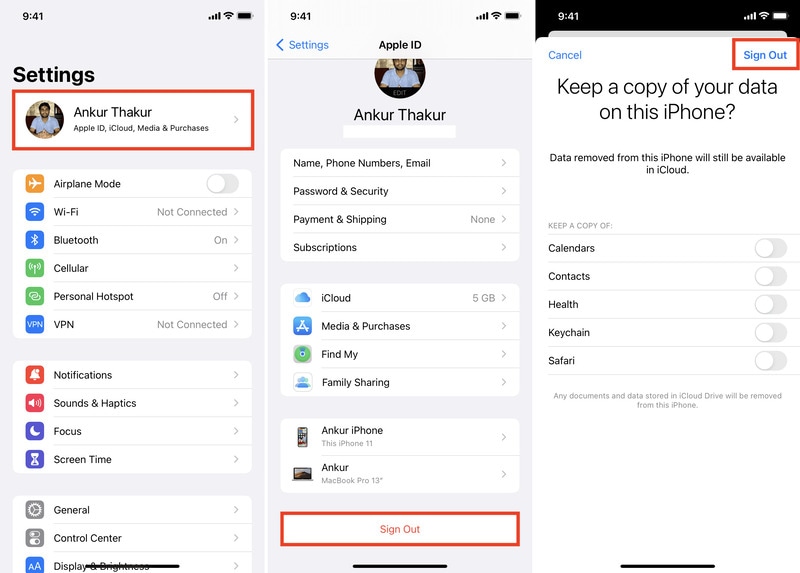
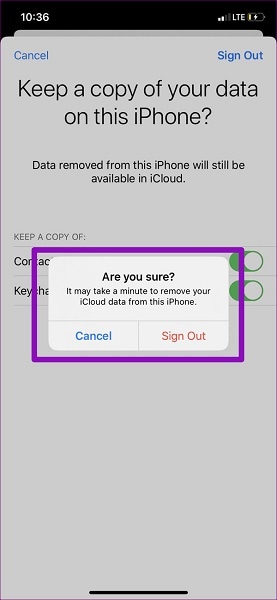
- Step 4: You will then be asked, “**Are you sure?**”. If you’ve decided to proceed, tap Sign Out.
This conventional approach ensures a smooth transition while safeguarding your data. However, there are multiple concerns by iPhone users saying that this method failed to work on their devices. In that case, feel free to explore more methods laid out below.
Contact Apple Support
When in doubt, seek help from the experts. Contact Apple Support for personalized guidance on iCloud removal. They’re equipped to handle various scenarios, providing assistance tailored to your specific needs.
- For specific requests, you may start your request online on their Get Support
- You may also visit Apple Support for quick replies, product tutorials, self-help tips, manuals, and technical publications.
- For legal concerns, you may visit their Contact Legal
Remove iCloud From iPhone Online
You can find several iCloud removal online tools on your web browser. However, even though online tools claim to simplify the process, you must tread carefully before you use them. Many are unreliable or even harmful. If you choose this route, research thoroughly, ensuring legitimacy. Watch out for scams, and consider reviews from trusted sources.
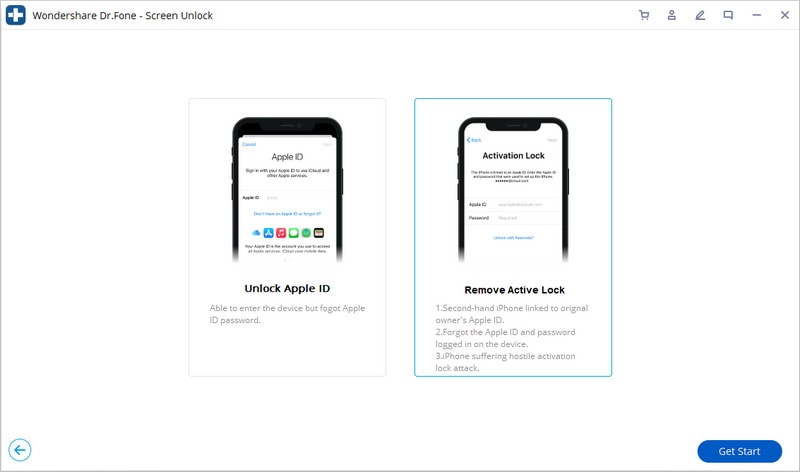
Remove iCloud Using a Desktop Tool: Dr.Fone - Screen Unlock (iOS)
If you’ve tried the methods mentioned above but still can’t remove iCloud from an iPhone, it’s time to explore a much safer and more efficient method – a reliable desktop tool. A desktop tool allows you to fulfill the process effortlessly. It’s so easy to use that you can get started without any prior professional knowledge.
With just a few clicks, you can remove iCloud from your Apple iPhone 7 even without your password. And in such a scenario, Wondershare Dr.Fone - Screen Unlock is the finest option. Say goodbye to iCloud-related challenges and embrace the simplicity and effectiveness of Dr.Fone - Screen Unlock (iOS). Reclaim control over your Apple iPhone 7, enjoying the freedom to confidently manage your iCloud accounts.

Key Features and Advantages
Unlocking the potential of your Apple iPhone 7 has never been easier, thanks to Dr.Fone - Screen Unlock (iOS). This powerful desktop tool is designed with simplicity and effectiveness in mind, offering a seamless solution to iCloud removal. Here’s a closer look at the whole toolkit’s key features and benefits:
- **No Apple ID Password Needed.**Even if you’ve forgotten your Apple ID password, Dr.Fone - Screen Unlock (iOS) provides a hassle-free solution, eliminating the need for complex password retrieval.
- **Security Assurance.**Fone prioritizes the security of your data. The iCloud removal process is designed to safeguard your personal information throughout.
- **Ease of Use.**Designed with user-friendliness in mind, Dr.Fone simplifies the complex task of iCloud removal. No technical expertise is needed. With a few clicks, anyone can navigate through the process effortlessly.
- **High Success Rate.**Boasting a remarkable success rate, Dr.Fone - Screen Unlock (iOS) is a reliable solution for effectively removing iCloud accounts from iPhones.
- **Versatile Compatibility.**Whether you’re using the latest iPhone or an older version, Dr.Fone caters to a wide range of iOS devices, ensuring accessibility for all users.
- **Quick and Efficient.**Save time and effort with Dr.Fone’s swift iCloud removal process. You can liberate your Apple iPhone 7 from previous iCloud associations within just a few clicks.
- **Risk-Free Operation.**Fone - Screen Unlock (iOS) is designed with user safety in mind. The tool minimizes risks associated with iCloud removal, providing a secure and efficient operation.
Step-by-Step Guide Using Dr.Fone – Screen Unlock (iOS)
The guide below will help you remove iCloud from your Apple iPhone 7 easily. Follow these instructions carefully and make your device operational:
- Step 1: Launch Wondershare Dr.Fone on your PC. Then, activate the iOS feature by going to Toolbox > Screen Unlock > iOS. To remove Apple ID, go to the next window and look for the option to Remove AppleID among the choices.

- Step 2: The following screen will display the connection status of the iDevice when it is linked to your PC. Choose the Unlock Now button to proceed.
- Step 3: After this, the platform will inquire about the Apple ID via a series of questions before granting access. Examine your iOS device to see if it has a screen lock feature. Be sure your iDevice has a screen lock enabled before selecting Yes.

- Step 4: The next step is to check if Two-Factor Authentication is enabled on all your iOS devices. If it’s not already on, toggle it on and click Yes to proceed with unlocking the Apple ID.
- Step 5: Once you’ve confirmed these choices, you’ll see a screen with instructions for entering Recovery Mode on your iDevice. If it doesn’t work, select Try DFU Mode in the screen’s bottom-left corner and follow the steps corresponding to your iOS version. To continue with the unlocking process, follow the instructions that will be displayed.

- Step 6: The next screen will show you the Apple iPhone 7 device’s details after entering Recovery Mode. Now that you have the Device Model, all you have to do is choose the System Version and hit the Start button. On the other hand, pick the details by hand and go forward if there are recognition discrepancies.

- Step 7: The download of the corresponding iOS firmware begins, and the progress is shown on the following screen. If the firmware download is taking too long for your platform, you can directly download it by clicking the Copy button to copy the link.
- Step 8: The following screen will show details of the firmware after it has been confirmed by the platform after its download. To proceed with unlocking your Apple ID, click the Unlock Now button.

- Step 9: To proceed, a confirmation window will pop up and ask for a code. To begin, input the code and then click Unlock. You can see how far along the process of unlocking Apple ID is on the screen that follows. Do not allow the gadget to become disconnected in any way.

- Step 10: After the Apple ID is unlocked, the screen will ask you to finish the process. If your Apple ID has been unlocked, you can finish by clicking the Done button. If that isn’t the case, you may use the Try Again button to start over.

Conclusion
iCloud removal doesn’t have to be a daunting task. Mastering how to remove iCloud from an iPhone is about choosing the method that aligns with your needs. From the traditional settings to the safety of Apple Support and the caution required for online tools, the choice is yours. Dr.Fone - Screen Unlock (iOS) emerges as the optimal solution for those seeking simplicity, effectiveness, and independence.
It’s time to regain control over your Apple iPhone 7, unlocking new possibilities effortlessly. Share this guide with fellow users, and don’t forget to leave feedback. Unlock the potential, share the knowledge, and enjoy a seamless iPhone experience!
How to Remove Find My iPhone without Apple ID On your Apple iPhone 7?
While ensuring protection from theft, iPhone offers a wide variety of tools that helps users find their lost iPhone without any discrepancy. Unlike other smartphone developing companies, Apple ensures a far more impressive structure in locating a lost device than any other security protocol. However, certain users wish to configure their security settings from scratch or remove the existing protocols on a certain device. This article provides a detailed guide on removing Find My iPhone without Apple ID through a series of mechanisms and multiple techniques involving several platforms.
Part 1. Remove Find My iPhone without Apple ID with Dr.Fone - Screen Unlock
Dr. Fone - Screen Unlock (iOS) commemorates an impressive feature set with the provisions of executing tasks within a few steps. Out of the many mechanisms that you may have gone through or heard of, third-party platforms provide you with the most dedicated and efficient services to remove different security protocols from your device. These platforms, known for executing such tasks through the automated structure, can prove effective and cognitive for Apple users in retrieving their smartphones. While understanding the excessive number of platforms in the market, the article provides a very effective platform that helps you cover all dynamics of removing Find My iPhone without an Apple ID. Many reasons should tempt you into adopting Dr. Fone as your primary choice in turning off Find My iPhone without the aid of an Apple ID.
- Fixes all solutions involving disabled iTunes or Apple Accounts.
- Removes the lock-screen password with no hurdles.
- Compatible with the latest iOS and works across all models of iPhone, iPad, and iPod Touch.
Dr.Fone - Screen Unlock
Remove Find My iPhone with no Apple ID without Hassle.
- Unlock an iPhone whenever the passcode is forgotten.
- Save your Apple iPhone 7 quickly from the disabled state.
- Free your sim out of any carrier worldwide.
- Works for all models of iPhone, iPad, and iPod touch.
- Fully compatible with the latest iOS.

3981454 people have downloaded it
As you get to know more about Dr. Fone, it is necessary to understand the systematic execution of the process that would efficiently remove the Find My iPhone from your Apple Device.
Step 1: Download, Install and Launch
You need to download the platform across your desktop and install it successfully. After installation, launch the platform and select the “Screen Unlock” tool from the home window present on your front.
Step 2: Select Remove Active Lock
You need to select the “Unlock Apple ID“ option on the new screen on your front.

Choose the “Remove Apple ID“ option to lead towards the original process of removing Apple iD.
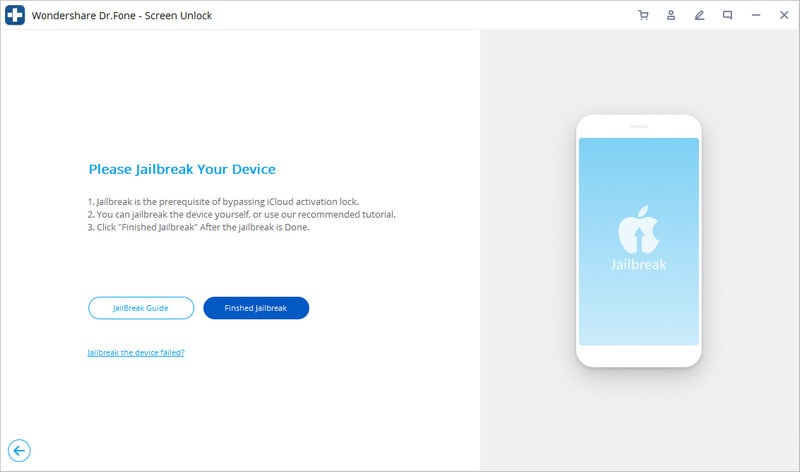
Step 3: Jailbreak your Apple iPhone 7
Jailbreak your Apple iPhone 7 on your Windows computer.
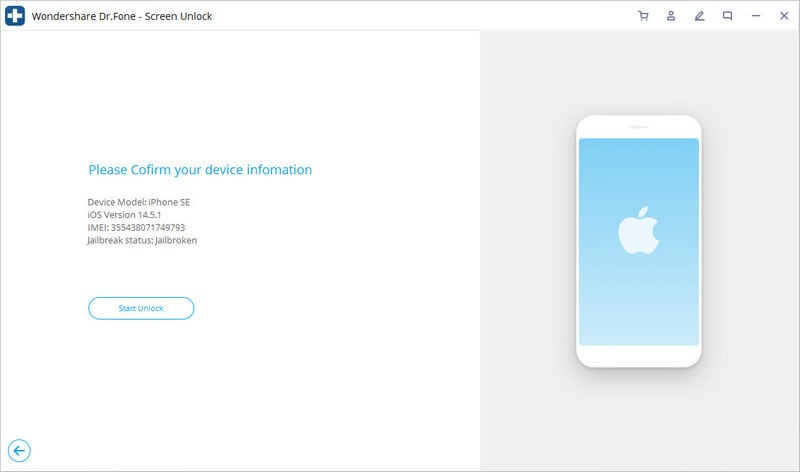
Step 4: Confirm the Apple iPhone 7 device information
Dr.Fone detects the jailbroken device and displays the Apple iPhone 7 device information. Confirm it.
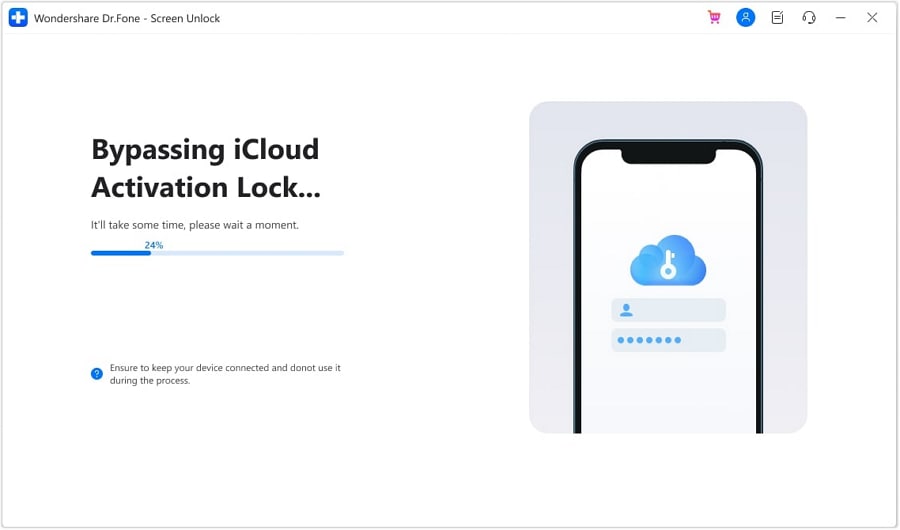
Step 5: Start to remove
It starts to remove. Over completion of the activation lock removal, the platform displays a prompt message on the desktop. The Find, My iPhone, will also be removed.
Part 2. Remove find my iPhone by recovering Apple ID
Another method that can come in quite handy is by consuming the iForgot website for Apple ID recovery. You can consider removing it with the aid of the Apple ID. For this, the iForgot website provides you with the perfect environment for execution. The platform helps you in recovering the password to your ID by following the steps declared below.
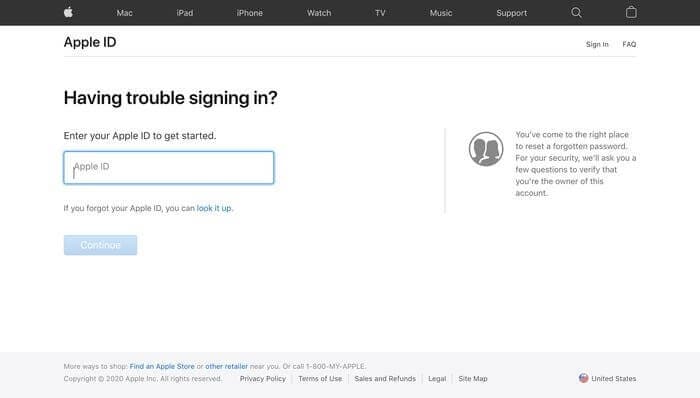
Step 1: Open the Apple ID page on your browser and tap on the option of “Forgot Apple ID or Password” to redirect yourselves to a new link.

Step 2: On the new window, provide your Apple ID along with the assorted phone number and tap “Continue.”
Step 3: A notification will be sent across the Apple iPhone 7 devices connected across the Apple ID, offering you to reset your password. Access the link to change the password by following the on-screen steps. This successfully changes the password of your Apple ID.
Once you are done saving and securing the credentials of your Apple ID, you need to proceed toward removing the Find My iPhone service by following the steps offered as follows:
On your Apple iPhone 7: Open the Settings of your device and tap “iCloud” to proceed. Select the option of “Find My iPhone” and set it to “Off.” Provide the Apple ID password for the listed account and tap “Turn Off” to conclude.
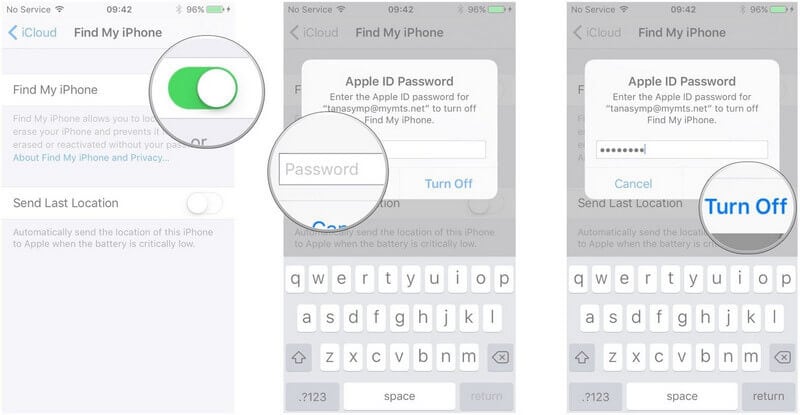
Note: After you turn off the Find My iPhone services, the Activation Lock is automatically disabled.
Part 3. Remove find my iPhone with Apple support
Another approach that can be taken into consideration is by accessing Apple Support. Contacting Apple Support can be listed as one of the most prolific and conventional methods adopted to retrieve credentials and remove appropriate services readily consumed. However, to enjoy such easy services, you need to have a claim over the Apple iPhone 7 device. It would be both horrendous and confusing to contact Support if you have not had any control over the Apple iPhone 7 device in the past years. This method might be quite easy and cost less to execute; however, you cannot cover Apple devices bought through secondhand vendors. Furthermore, by following the steps described, it is up to the Support to decide on the case and provide you with appropriate results. Few details need to be covered before contacting the Support. By calling them, they would require the following details, at most.
- The Apple AppleCare agreement number
- The device’s serial number
- The phone’s receipt
By providing the following details, Apple Support may help you remove the Find My iPhone across your device and helps you configure your device easily.

Part 4. Is it possible to remove the activation lock if it’s a secondhand iPhone?
Normally, it is up to the previous user with his Apple ID to provide you with the appropriate credentials to remove the activation lock across the Apple iPhone 7 device. For such cases, you need to contact the user himself and explain the reasons for coming up with such a situation. One easy way of confirming the credentials is by going to the locality of the user himself. With this, the phone is just a restart away, followed by the standard activation procedures that would help you remove the Activation Lock across your device.
It isn’t easy to follow these steps if you do not own the Apple iPhone 7 device and can’t contact the owner. Under such circumstances, you have to use a third-party program. Dr.Fone - Screen Unlock (iOS) is one of the best programs to remove an iCloud activation lock.
Conclusion
The article has explained a very comprehensive set of features and tools that can be efficiently consumed to remove the Activation Lock across an iPhone for removing the Find My iPhone settings. The mechanisms stated can provide you with the appropriate execution if followed properly. For this, you need to follow the guide to understand all the dynamics involved in the system.
Unlock Your Device: iCloud DNS Bypass Explained and Tested, Plus Easy Alternatives On Apple iPhone 7
Have you bought a used iPhone or iPad with an active iCloud Activation Lock? Or perhaps you have an Apple device but cannot remember your iCloud password? Without activating iCloud, you cannot utilize locked devices in either scenario.
You might try contacting Apple customer service, but they won’t be able to assist you without user identification directly. Even after the Apple iPhone 7 device has been authenticated, you will still be bombarded with inquiries, and they may even want the original iOS device payment receipt.
One of the greatest free solutions to prevent these issues is to unlock your Apple iPhone utilizing iCloud DNS Bypass. Read on to know more in this iCloud DNS Bypass Guide.
Part 1: How Can We Use iCloud DNS Bypass for iOS Devices?
After a factory reset or restoration, every time you set up your iOS device, it will send an activation request to Apple’s servers. Apple responds to your request and displays your device’s status.
Additionally, if the Find My iPhone feature of your device is enabled, an iCloud Activation Lock screen will appear and prompt you for your iCloud account login information. The iCloud DNS Bypass can assist you if you forget your login information (Apple ID or password) or purchase a used device with an iCloud lock activated. It is a free approach to unlocking iCloud.
The readable names are transformed into numerical IP addresses via the Domain Name System (DNS). To launch the program, it makes use of a DNS server that serves as a host.

Use DNS to get around iCloud Server IP Address
You may first just ignore the iCloud DNS on your Apple iPhone 7 or iPad. The procedure is easy. Remember that the process must be completed by inserting the SIM card into your Apple iPhone 7.
Step 1. Turn on your Apple iPhone 7, then configure it according to the on-screen instructions.
Step 2. Select your language and nation. Click Continue to access the Wi-Fi settings screen after that.
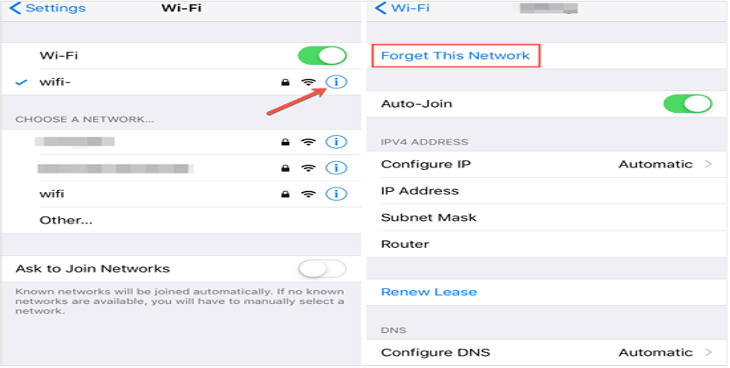
Step 3. If prompted, click the I icon next to the Wi-Fi area.
Step 4. Click Connection Settings > Forget this Network to disconnect from the Wi-Fi network.
Step 5. When asked for a DNS server IP address, tap the I symbol to unlock the iCloud activation lock. Here is a list of places for your information:
USA: 104.154.51.7
155.28.90 Europe
Africa: 35.199.88.219
Asia: 104.155.220.58
189.47.23 Australia and Oceania
It is 78.100.17.60 on other continents.
Step 6. Turn on Wi-Fi and select the Wi-Fi network you wish to connect to by tapping the Back button on the left side of the screen. Enter your passcode after that.
Step 7. When you click Next Page > Back, the iCloud bypass page will appear.
Step 8. Use your device and configure your apps.
Use iCloud DNS Bypass Crash
- Step 1. The procedures below will help you delete iCloud after DNS bypass if you cannot utilize some features on your Apple iPhone 7.
- Step 2. Tap Menu > Applications after attempting the aforementioned technique.
- Step 3. To restart your smartphone, scroll down and tap the Crash option.
- Step 4. Select “Language and Country” > Select a Wi-Fi network, click Home, More Wi-Fi Settings, Configure Proxy, and then Manual.
- Step 5. In the Server section, delete the existing HTTP address before entering 30 different emojis. Type 8888 into the Port area, then click Save at the top.
- Step 6. To access the Unlock screen, tap Back > Next. To unlock the Apple iPhone 7 device, press the Home button.
- Step 7. When the Home screen appears, tap the Language choice.
Part 2: The Best iCloud DNS Bypass Alternatives to Unlock Your Apple iPhone 7/iPad/iPod Touch (Easy and Efficient)
Only if you bought a secondhand iPhone with an activation lock or want to restore the Apple iPhone 7 device but forgot that Find My iPhone was ever turned on do you need Dr.Fone - Screen Unlock (iOS) . Dr.Fone - Screen Unlock (iOS) is the most promising and user-friendly product of its sort currently available. With the help of this application, you can simply fix the iCloud activation issue. You don’t need to be an expert in utilizing the application because it is simple and intuitive.
Using Dr.Fone - Screen Unlock, you can get rid of the iCloud activation lock. Launch Dr.Fone and choose “Remove Active Lock” and “Unlock Apple ID” to unlock your iCloud. It still works if you have a used iPad or iPhone.
Dr.Fone - Screen Unlock (iOS)
Remove iCloud Activation lock without Password in Minutes
- Remove Apple ID/iCloud Account efficiently.
- Save your Apple iPhone 7 quickly from the disabled state.
- Free your sim out of any carrier worldwide.
- Bypass iCloud activation lock and enjoy all iCloud services
- Works for all models of iPhone, iPad, and iPod touch.
- Fully compatible with the latest iOS.
4,008,671 people have downloaded it
Here’s a step-by-step guide on how to use it
Step 1. Installing Dr.Fone on your smartphone and selecting Screen Unlock from the available options are the first steps in the procedure. You will note that there is a “iCloud Activation Lock Removal” option, among others, when you first use the Screen Unlock function. Simply clicking on it is all that is required.

Step 2. Before the bypassing process, please tape “Start”.

Step 3. After reaching the ‘Start’ page, Your Apple iPhone 7’s specific information will be detected to determine the appropriate operation process. Ensure that the data cable is properly connected during this process. Jailbreaking is required for iOS devices running 12.0 to 14.8.1, but for iOS 15.0 to 16.3, simply enter DFU mode twice and proceed to unlock. For detailed instructions on unlocking, you can visit this detailed guide about iCloud Activation Lock Removal.
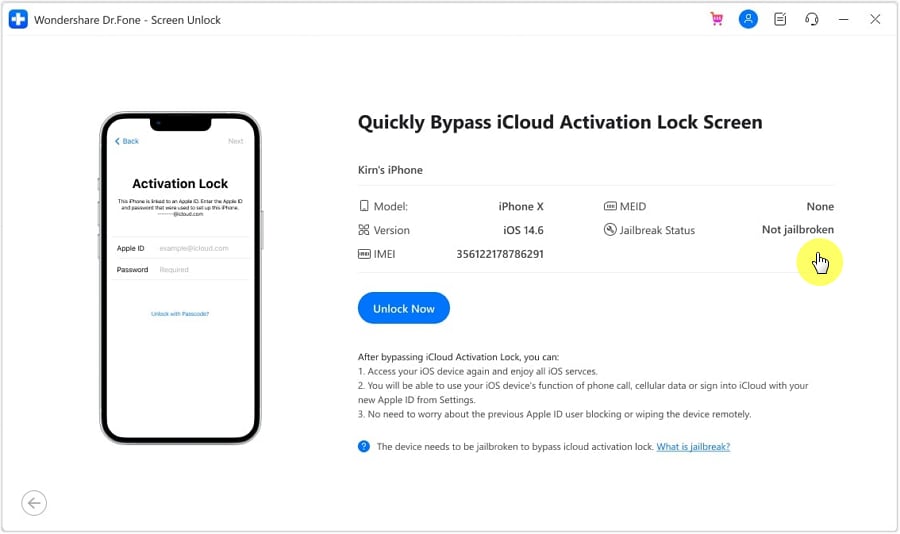
Step 4. Now we’re bypassing the activation lock, soon your Apple iPhone 7 will work without the activation lock.
Part 3: FAQs
1. When Do We Require iCloud DNS Bypass?
We require it when our carrier locks our phone or when we buy a used phone and cannot use it because of an iCloud activation lock. The use of iCloud DNS bypass enables temporary access to the features and functionality of an iCloud-locked device. Domain Name Server, or DNS for short, serves the function of converting your domain names into IP addresses.
2. What Can iCloud DNS Bypass Do for Us?
When you need an urgent functioning solution for a locked iPhone, using iCloud DNS bypass is helpful since it gives you temporary access to all the features and configuration of an iCloud-restricted device. DNS, or domain name server, converts your domain names into IP addresses.
3. What are the Pros & Cons of iCloud DNS Bypass
This approach can be helpful, but it does have advantages and pitfalls of its own. These advantages and disadvantages are broken down as follows:
Pros
- You may use it without installing any software on the Apple iPhone 7 device, since you can do it in the Wi-Fi settings.
- The internet, camera, and games can all be used after the gadget has been engaged, making it simple to access.
- Utilizing this approach is cost-free.
Cons
- This technique only partially unlocks the Apple iPhone 7 device and represents a hack.
- The iCloud DNS bypassing technique has occasionally been reported as not working by users.
Conclusion
Now you have read all about iCloud DNS bypass, what is iCloud bypass DNS, whether DNS bypass is free, and how to iPhone DNS bypass, it is time to implement all the solutions and bear in mind that all DNS Bypass solutions are 100% free. Dr.Fone - Screen Unlock (iOS) is also a great tool to bypass screen lock, even if you don’t have any tech skills.
- Title: How To Remove iCloud From Apple iPhone 7 Smoothly
- Author: Lydia
- Created at : 2024-07-14 20:27:14
- Updated at : 2024-07-15 20:27:14
- Link: https://activate-lock.techidaily.com/how-to-remove-icloud-from-apple-iphone-7-smoothly-by-drfone-ios/
- License: This work is licensed under CC BY-NC-SA 4.0.