
In 2024, How to Factory Reset iPad or iPhone 8 Plus without iCloud Password or Apple ID?
How to Factory Reset iPad or Apple iPhone 8 Plus without iCloud Password or Apple ID?
If you are an iPad or Apple iPhone 8 Plus owner and are looking to reset your iPad or Apple iPhone 8 Plus without knowing the passcode, you do not need to worry anymore. Most gadget owners already know how to factory reset their phones. But in cases where you have forgotten your Apple ID password or passcode and want to reset your iPad or Apple iPhone 8 Plus, it can be done via various ways and techniques. Here, we shall discuss a few of them.
In this article, you shall find multiple ways by which you can effectively factory reset iPad or Apple iPhone 8 Plus without iCloud password and get a clean slate to work on. A factory reset will wipe all the data off of your iPad or Apple iPhone 8 Plus, so be mindful of that. The methods are all quite simple yet effective in producing the desired result. Without further ado, let us begin!
Part 1: How to Factory Reset iPad or Apple iPhone 8 Plus without Apple ID by Removing Apple ID?
If you wish to factory reset the iPad or Apple iPhone 8 Plus without an Apple ID password or iTunes, one simple way to do it is via third-party application software. A quite wonderful tool in this regard is the Dr.Fone - Screen Unlock tool. It lets its users remove multiple types of locks from screens on several different devices. Using an external tool saves users from various kinds of troubles that may arise along the way.
The Dr.Fone program is a highly useful and recommended tool for unlocking phone screens. It supports a wide range of phone models and multiple brands, including Apple, Samsung, Xiaomi, Huawei, LG, etc. Users can easily remove screen locks of multiple kinds. In addition to that, Dr.Fone also:
- It saves a lot of time and effort for the users and does its job quickly.
- Supports many brands and all the latest versions of iOS and Android.
- Protects the data of consumers, making it a trusted source worldwide.
- It is relatively easy to use, with a user-friendly interface.
 safe & secure
To factory reset the iPad or Apple iPhone 8 Plus without Apple ID using Dr.Fone, install the program on your computer, and proceed as mentioned below.
Step 1: Launch and Connect the Program to iPad or Apple iPhone 8 Plus
Launch the Dr.Fone Screen Unlock app on your computer and connect your iPad or Apple iPhone 8 Plus with the help of a data or a USB cable.
Step 2: Choose Option
On the main interface of the program, you will see various options to choose from. Click on the “Screen Unlock” button visible there.

Step 3: Select Unlock Option
On the next screen, you will see multiple options. Choose the “Unlock Apple ID” one.

Step 4: Establish a Trusted Connection
Now, tap the “Trust” button on your iPad or Apple iPhone 8 Plus to establish a trusted connection with the computer to proceed further.
Step 5: Reset iPad or Apple iPhone 8 Plus
Then, on your computer screen, click on “Unlock Now.” Confirm the action on the appearing dialogue box. Next, follow the instructions visible on the screen to reset your iPad or Apple iPhone 8 Plus.

Step 6: Remove Apple ID
Dr.Fone will begin the process of unlocking your iPad or Apple iPhone 8 Plus. Do not disconnect the iPad or Apple iPhone 8 Plus during this process. Once the process is completed, reboot your iPad or Apple iPhone 8 Plus, and you shall be able to sign in with a new Apple ID.

safe & secure
Part 2: Factory Reset iPad or Apple iPhone 8 Plus without iCloud Password
In case you are asking yourself if it is possible to reset your iPad or Apple iPhone 8 Plus without an iCloud password, the answer is yes. If you want to learn how to factory reset an iPad or Apple iPhone 8 Plus without an iCloud password, an easy way of doing so is with an iTunes or Finder.
For Mac users with macOS Catalina 10.15 or later, they can complete the process with Finder’s help. Windows users and macOS users with older versions can use iTunes. Before restoring the iPad or Apple iPhone 8 Plus without an iCloud password, you are required to put it into Recovery mode. For that, you need to follow the steps provided as follows.
Step 1. Turn off your iPad or Apple iPhone 8 Plus
- On an iPad or Apple iPhone 8 Plus with Face ID: Make sure your iPad or Apple iPhone 8 Plus is not connected with your computer. Press and hold the Top and Volume Down button to allow the power slider to appear on the screen. Drag the slider to turn off the Apple iPhone 8 Plus device.
- On an iPad or Apple iPhone 8 Plus with Home Button: Make sure your iPad or Apple iPhone 8 Plus is not connected to a computer. Press the Side or Top button to allow the power slider to enumerate on the screen. Once it is done, drag the slider to turn off the Apple iPhone 8 Plus device.
Step 2. Enter Recovery mode
- On an iPad or Apple iPhone 8 Plus with Face ID: Connect your device to a computer. Hold the Top button for leading into the recovery mode while connecting it with the computer.
- On an iPad or Apple iPhone 8 Plus with a Home button: Connect your iPad or Apple iPhone 8 Plus to your computer. Keep holding the Home button while connecting it with the computer until the recovery mode screen appears on the front.
Step 3. Open iTunes or Finder on the computer
Open iTunes and access your iPad or Apple iPhone 8 Plus through the iPad or Apple iPhone 8 Plus’s icon present on the screen’s upper-left corner. With Finder on Mac, locate your iPad or Apple iPhone 8 Plus in the sidebar of its window. Tap it.
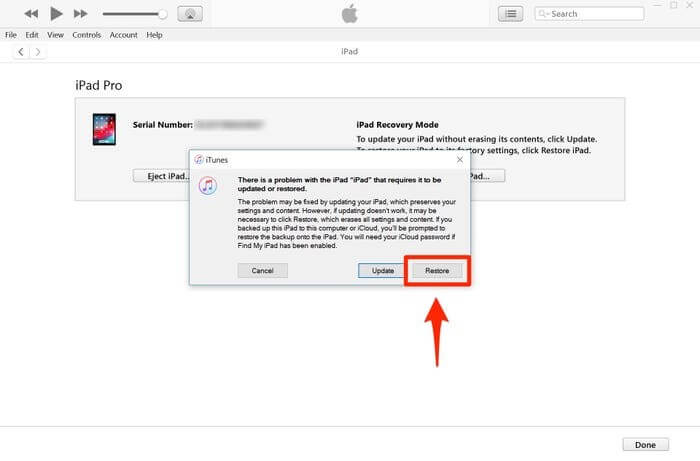
Step 4. Restore your iPad or Apple iPhone 8 Plus and set it up
The screen displays an option of ‘Restore’ or ‘Update’ for the iPad or Apple iPhone 8 Plus. Tap on the option of ‘Restore’ to let the platform download the software into the iPad or Apple iPhone 8 Plus within the recovery mode. Then set it up as a new device.
Part 3: How to Reset iPad or Apple iPhone 8 Plus without Apple ID via the Settings App?
Another way of resetting your iPad or Apple iPhone 8 Plus is via the Settings app present on your device. You can unlock a disabled iPad or Apple iPhone 8 Plus or remove all data by executing a total wipe of the iPad or Apple iPhone 8 Plus using Settings. However, before starting, please ensure that your iPad or Apple iPhone 8 Plus is connected to the internet and the “Find My iPhone” feature is disabled on it. You will also need to know the passcode of your iPad or Apple iPhone 8 Plus to proceed with this method.
Once you have done all of that, follow the steps given below.
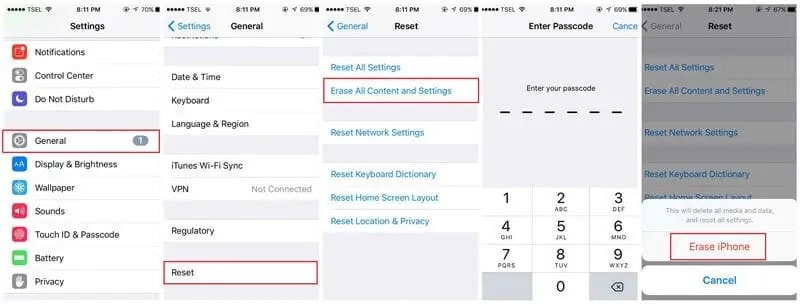
- Open “Settings” on your iPad or Apple iPhone 8 Plus.
- Go to “General.”
- Navigate to the “Reset” option and click on it.
- Select the “Erase All Content and Settings” option.
- Type in your passcode to confirm and proceed. This will wipe all the data on your iPad or Apple iPhone 8 Plus.
Based on the version of your iOS, you might be asked to enter your Apple ID password too. It will also ask for the Apple ID password if the “Find My iPhone” feature is enabled on your device. Hence, the process will not be successful without it, and your iPad or Apple iPhone 8 Plus will go to Activation Lock. Therefore, Dr.Fone is a simple, recommended, and reliable way of resetting the iPad or Apple iPhone 8 Plus without an Apple ID, saving much of the troubles.
Conclusion
There can be multiple reasons for resetting your iPad or Apple iPhone 8 Plus. Now you know how to factory reset the iPad or Apple iPhone 8 Plus without Apple ID. You can follow any of the above-mentioned methods to get the desired results as best suited to your needs. Some might work, and some might not. The Dr.Fone – Screen Unlock tool is recommended, as it is the most efficient among all the other methods. Try it to get proficient outcomes.
safe & secure
The Most Effective Ways to Bypass Apple iPhone 8 Plus Activation Lock
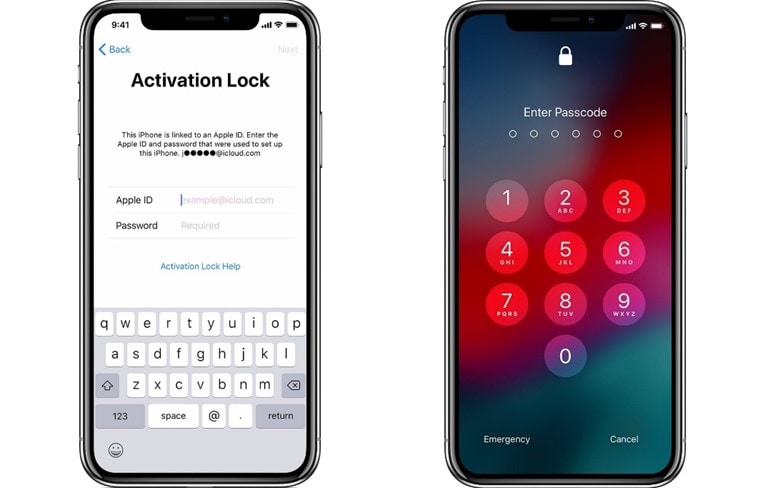
Activation lock enables when you enable the Find My feature on your iDevices. This feature securely stores your connected device to Apple’s activation servers. You will see an activation window on your Apple iPhone 8 Plus when you reset your device. However, to remove the iPad activation lock, you first need to enter the connected account.
Still, there are times you might need to know how to bypass Apple iPhone 8 Plus Activation Lock. Perhaps you may fail to remember your iCloud credentials, or the screen isn’t responsive. Most frequently, a phone is second-hand or gifted, and the first user forgets to remove it from their iCloud account.
Whatever your reason, we’ll walk you through Apple iPhone 8 Plus iCloud bypass. Also, we will give you the best tools available in the market for your case.
Part 1: 5 Best Ways to Bypass Apple iPhone 8 Plus Activation Lock
1. Ask the previous device owner for Apple ID and passcode
For an iPhone activation lock bypass, you’ll require a couple of data:
The owner’s Apple ID email and secret word. If you want to know how to bypass Activation Lock on iPhone or iPad, it’s frequently just about as straightforward as signing into the Apple iPhone 8 Plus device. It would help if you had the Apple ID credentials of the past owner.
The owner’s four or six-digit passcodes. You might see the passcode screen instead of the activation lock if a device isn’t deleted.
The following steps show the way to bypass Apple iPhone 8 Plus activation lock:
- Turn on your phone and follow the on-screen prompts to set up the Apple iPhone 8 Plus device (language, WiFi, and so forth.)
- When you see the “Sign In with Apple ID” screen, enter the Appl ID credentials of the previous owner.
- With the correct credentials given, the process can proceed.
- On the other hand, if you see the passcode screen, you can type it and set up the Apple iPhone 8 Plus device without Apple ID.
With the Apple iPhone 8 Plus device fully set up, access your device’s Settings and sign out of the iCloud account. You can now make one more ID and sign into it.
2. Remotely bypass activation lock by the previous owner
The Apple iPhone 8 Plus iCloud bypass is likewise possible through iCloud. This method is helpful when the phone owner isn’t with you and can’t sign into their Apple ID. You’ll require their Apple ID details, and they might have to verify the login activity through a different device.
Yet iCloud is a great choice for remotely bypassing a device from a client’s Apple ID. The steps below will guide the owner on how they can remotely bypass Apple iPhone 8 Plus through iCloud:
- Visit the official iCloud website, i.e., iCloud.com, through a web browser.
- Sign in with the Mac ID details (Note: If you are performing these steps, the owner might have to verify your login is real through an iPhone or iPad related to their ID).
- Select the “Find iPhone” symbol (Note: This is the “Find My” feature; Apple hasn’t changed the name on iCloud.com. However, it works for all Apple devices).
- On the guide, select the blue spot related to the Apple iPhone 8 Plus you want to sign into.
- Select the “Erase iPhone” option.
- Pick the “Remove from Account” option.

3. iForgot website to reset Apple ID and passcode
- Go to Apple’s iForgot site, enter your Apple ID credentials, and tap Continue.
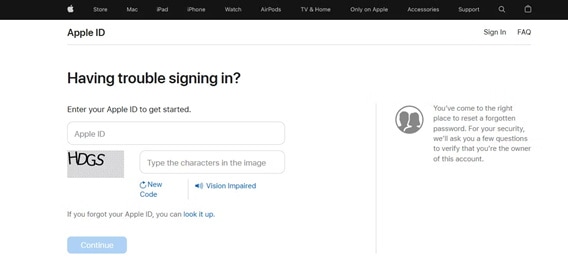
- Apple shows phone numbers related to the Apple ID (the numbers are covered up, and just the last two digits can be seen). Enter the mobile number associated with your Apple ID and snap the Continue button.
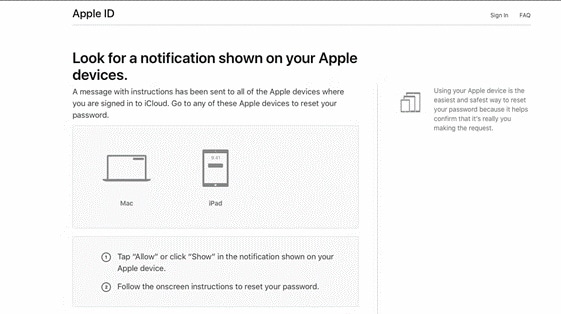
- Likewise, with a two-factor authentication login, a popup window appears on your devices. A list of all your connected Apple devices shows on the site. Click “Allow” in the Reset Password section to bypass the lock.
- Enter your device password or macOS passcode and snap Continue.
- Please create a new password, retype it in the Verify field, and click Next or Change. Your password will now be different. You might have to retype it on various devices.
4. Use iCloud DNS Bypass
This technique requires a SIM card and requests that you change your DNS settings. But this strategy takes care of Apple iPhone 8 Plus bypass for many users. However, it tends to be complicated for non-technical users. Also, it requests that you change the DNS settings, which can cause issues for your different settings. This technique is very tricky, yet all at once, not hard. Let’s check it out:
- On the Apple iPhone 8 Plus device’s setup, pick the country you’re currently in.
- On the Wi-Fi network screen, tap the “I” icon.
- Select “More Wi-Fi Settings” (Note: You can’t be associated with the web while playing out these steps, and the Apple iPhone 8 Plus device must have the SIM card installed.)
- Select the “I” icon once more.
- Enter one of the below IP addresses in the “DNS” section (according to your region):
North America: 104.154.51.7
Asia: 104.155.220.58
Europe: 104.155.28.90
South America: 35.199.88.219
Other regions: 78.100.17.60
- Select the “back” button on the upper left of the screen.
- Pick your Wi-Fi network from the different networks available on your screen. Then enter your Wi-Fi code to connect.
- On the following screen, select the “Back” option. The next screen that shows is the Apple iPhone 8 Plus iCloud bypass screen.
5. Use Dr.Fone - Screen Unlock (iOS)
You can’t remove the Apple iPhone 8 Plus activation lock without Mac ID credentials. If you use an activation bypass program to bypass the lock, you will effectively unlock it. Therefore, if your device is in any circumstances above, you want an expert tool.
Wondershare Dr.Fone - Screen Unlock (iOS) is one such hassle-free and proficient program to bypass the activation lock on Apple iPhone 8 Pluss.
As one of the most well-known tools, Dr.Fone would be the best answer for Apple iPhone 8 Plus iCloud bypass. This software is not difficult to work with. You can easily bypass the iCloud iPhone and utilize your device in a matter of moments. It is viable with all the most recent iPhone devices. Likewise, it additionally helps you with removing the Find My iPhone option.
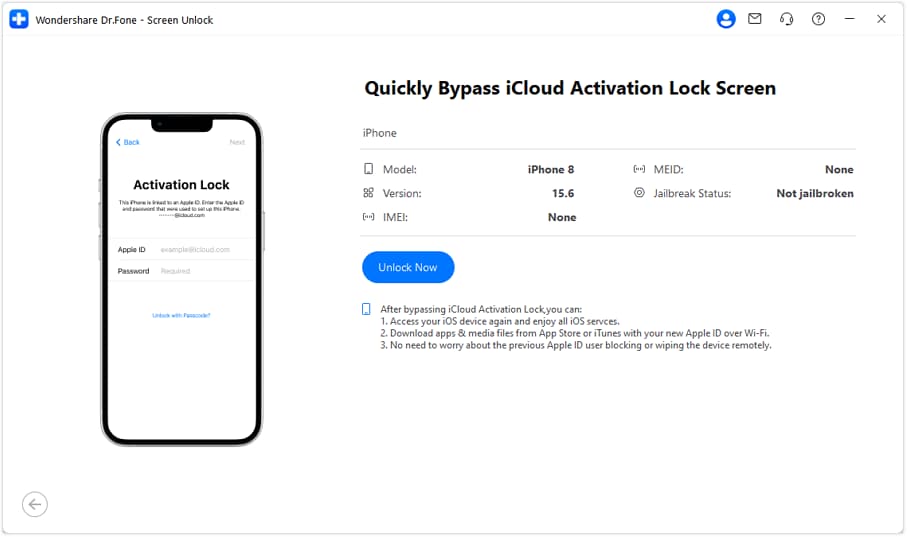
Step 1: Download Wondershare Dr.Fone and launch it. Go to Toolbox > Screen Unlock > IOS and then connect your Apple iPhone 8 Plus to the computer and select “iCloud Activation Lock Removal”.

Step 2: In the next window, click Unlock Now button.
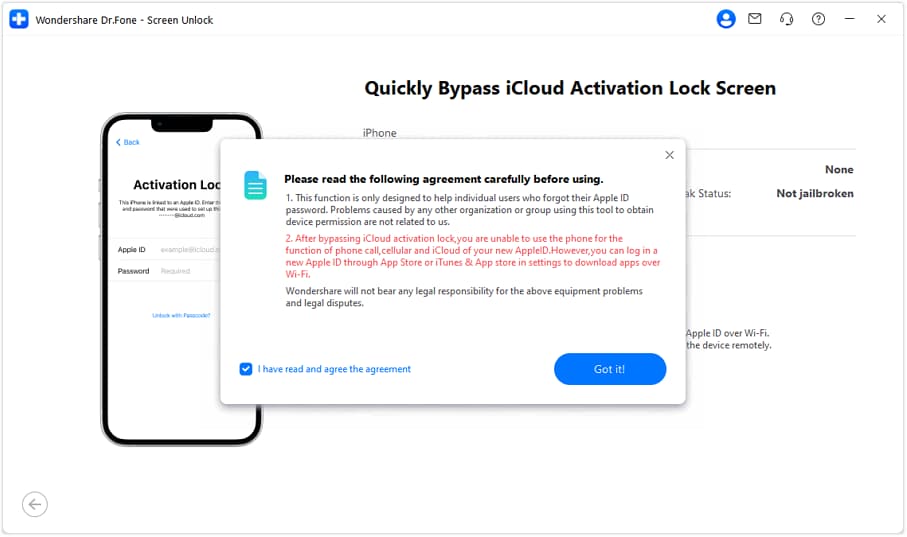
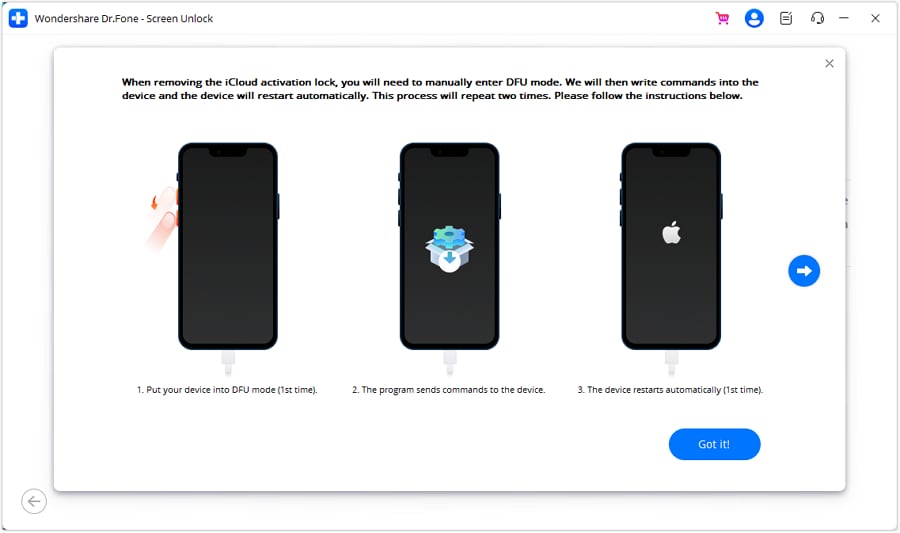
Step 3: You will see a prompt appear, and please read the details, and checkmark “I have read and agree the agreement”. Tapping the “Got it!” button.
Step 4: Put iDevice in DFU Mode for the first time and the program will send a command to the Apple iPhone 8 Plus device and it will restart.
Step 5: Then you need to put the Apple iPhone 8 Plus device in DFU mode for the second time. When it’s done, the program will activate the Apple iPhone 8 Plus device.
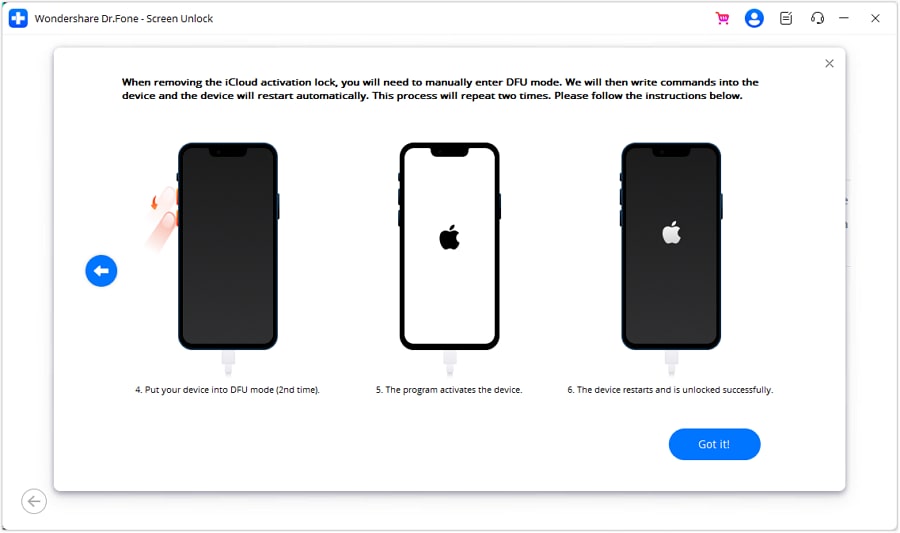
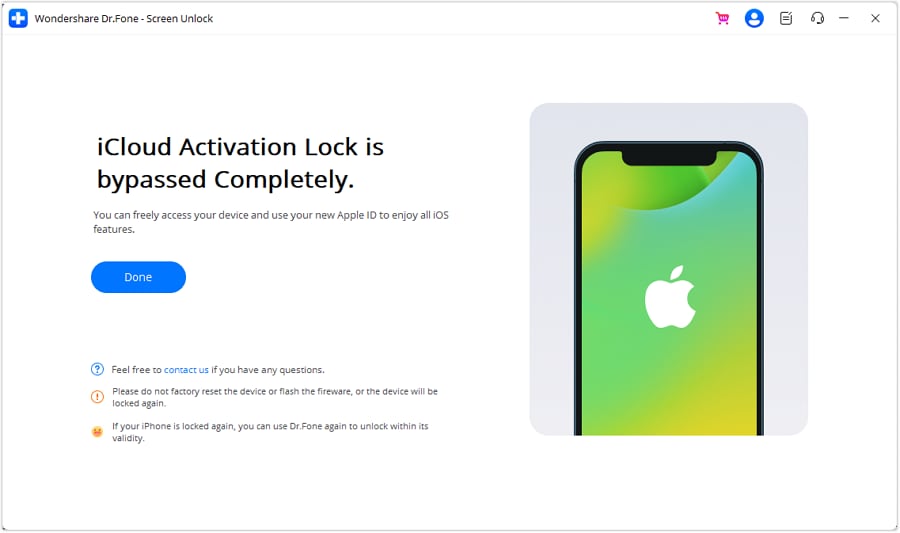
Step 6: Once the Apple iPhone 8 Plus device has been processed under the DFU Mode, the computer’s screen will start displaying the removal of the iCloud Activation Lock. When it’s done, click Done in the next window.
Part 2: FAQs
1. What can iCloud activation lock do for us?
Activation Lock assists you with keeping your device secure, regardless of whether it’s in the wrong hands. Moreover, it can increase your possibility of recovering the Apple iPhone 8 Plus device. Regardless of whether you delete your device remotely, the activation lock can keep on stopping anybody from reactivating your device without your consent.
However, you should keep the Find My feature enabled. Also, it would help if you remember your Apple ID credentials.
With WatchOS 2, the activation lock can safeguard your Apple Watch. What’s more, macOS Catalina or later and Mac PCs with the Apple T2 or Apple Silicon chip can utilize the activation lock to keep your computer safe.
2. Can all iPad/iPod/Apple Watch/Mac activation locks be bypassed?
As mentioned above, one can remove the activation lock with a few simple steps. Moreover, if none of these methods work, Dr.Fone is still there for the rescue. You can use their advanced tools to unlock all locks on your Apple iPhone 8 Plus, iPad, iPod, or Apple watches.
3. How to turn off Find My?
- Open the Apple iPhone 8 Plus Settings and tap your name.
- Explore “Find My” and go to “Find My iPhone”.
- If Find My iPhone is enabled, the toggle button on top of the page should be green. Switch the button to turn it off.
- Enter your Mac ID password to confirm, and you’re ready.
Conclusion
That is all on the best methods for Apple iPhone 8 Plus iCloud bypass. Even though it’s very baffling to run over such issues on your Apple iPhone 8 Plus, multiple routes are available to assist you in bypassing the activation lock. Here we discussed all reliable and easy ways, and our best suggestion for you is to attempt Dr.Fone - Screen Unlock (iOS) .
Best Ways to Bypass iCloud Activation Lock on Apple iPhone 8 Plus/iPad/iPod
Apple puts importance on making sure that all the Apple iPhone 8 Plus users’ data and records are kept in tight and secured storage. Make sure that the only person that can access it is the owner of the mobile. However, there will be challenges if you have bought a used iPhone and if the owner has not logged out of his account on that phone. If you are in this situation, then you will need to either contact the previous owner or be locked out of your phone. The first one is a tedious option, and the latter would be the least one that we would want to happen.
There are, however, various ways how you can bypass the iCloud Activation Lock without having to contact its previous owner. We will share with you the different ways that you can do it on your own and remove the automated lock and continue using your phone leisurely.
Part 1: What Causes iCloud Activation lock?
The iCloud Activation Lock is a great feature that Apple has added to the “Find My iPhone” application which helps prevent other people aside from yourself from accessing your phone and files. Activating your iCloud Activation lock can be done in just a few steps, and this could even be done remotely if your phone is not within your reach. This is a great feature if you are a victim of theft and would like to remotely lock your phone to be sure that it cannot be accessed by the thief or anyone else.
You can follow the steps below to remotely lock your device:
- Step 1: Open the “Find My iPhone” on your browser while locking your phone remotely.
- Step 2: Log in with your credentials. Make sure it is the same credentials you use for iCloud.
- Step 3: Under the Apple iPhone 8 Plus devices’ list, you can look and tap for the text that says “Lost Mode”.
- Step 4: From there, you can tap on actions, then choose to either tap on “Lost Mode” or “Erase Phone”.
Learn about all the solutions to unlock iPhone quickly through the video below:
If you forget the Activation Lock on your iDevice and fail to access it, you must bypass iCloud Activation Lock. This can be executed with the help of Dr.Fone - Screen Unlock (iOS), an exceptional iCloud unlock tool. Read on for detailed steps on various ways to bypass iCloud Activation Lock or click the Download button below to try it free!
Part 2: 3 Ways to Bypass iCloud Activation Lock on iPhone/iPad with iOS 16
Now you know how an iCloud Activation Lock works and how to remotely lock your phone in case of theft. However, what if you still want to be able the bypass the iCloud Activation Lock but are unable to contact the first owner for their credentials? There are multiple ways that you can do that, and we will share the ways with you below:
Method 1: Removing the Apple iPhone 8 Plus device from the First Owner’s iCloud
Probably one of the easiest and fastest ways to bypass the activation lock is by contacting the owner to remove the Apple iPhone 8 Plus device that you have from their iCloud. If you can still make contact with them, you can try this option and reach out to them.
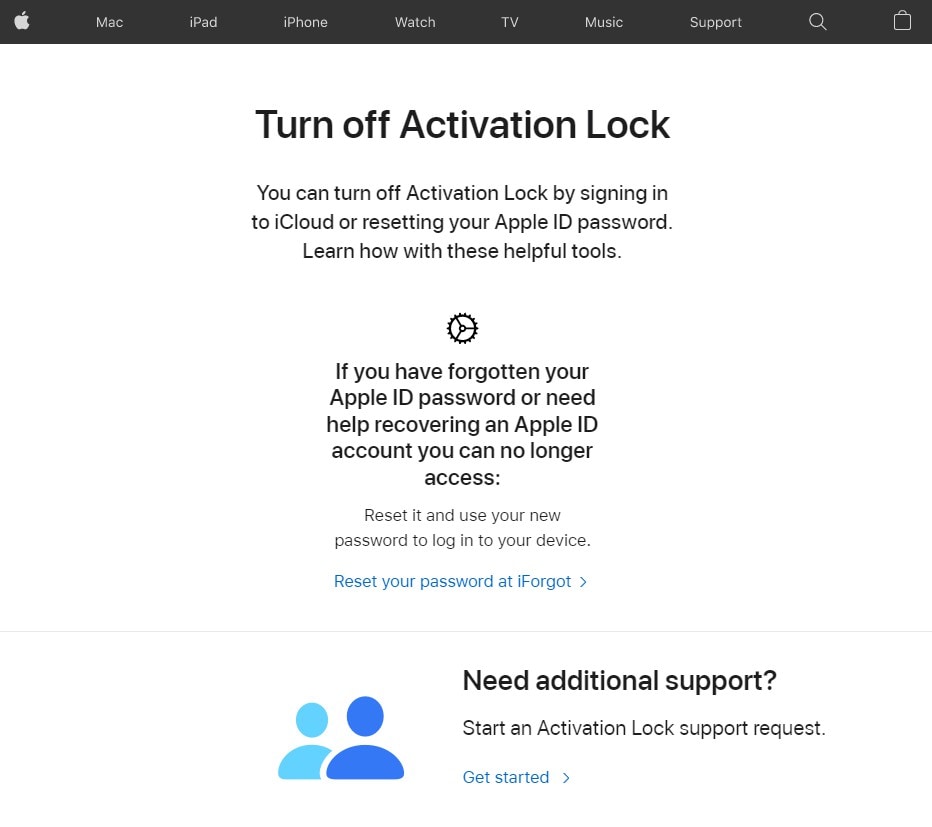
Method 2: Contact Apple to Remove The Activation Lock
If you cannot contact the previous owner, you can then reach out to Apple directly and provide proof that you have inherited or purchased the Apple iPhone 8 Plus device. Documents such as receipts and death certificates if inherited, then you can reach out to their support team to unlock your device.
Method 3: Unlock your device using DNS
Instead of bypassing Apple directly, you can try to bypass the DNS server, and you can do this by following the steps below:
- Step 1: Restart your device.
- Step 2: Go through the process of setting up until you come across the “Choose Wi-Fi Network”.
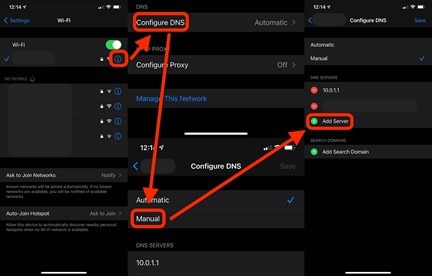
- Step 3: Then choose “More Wi-Fi settings” and tap on “I”.
- Step 4: Choose “Configure DNS” and select “Manual”.
- Step 5: From there, choose “+Add server” then choose the address as per your location below and click “Save”.
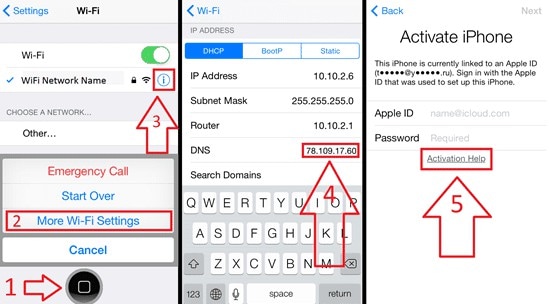
- USA: 104.154.51.7
- Europe: 104.155.28.90
- Asia: 104.155.220.58
- Africa, Australia, and other locations: 78.109.17.60
- Step 6: Select “Ask to Join Networks” and enter the password then click on “Join”.
- Step 7: When it tries to activate, you can tap on the back button and proceed to set up the Apple iPhone 8 Plus device as usual.
Part 3: The Fastest Way to Remove iCloud Activation Lock on iOS/iPadOS 12.0 - 16.6 Without Password
Now, if you want to bypass the activation lock on your own and without the need for a password, you can try Dr.Fone - Screen Unlock (iOS) . This program helps unlock activation locks on iPhone (5S-X), iPad (3-7), and iPod touch (6-7) running iOS 12.0-16.6. Now you can remove iCloud activation lock on iPhone/iPad/iPod Touch without jailbreak by using Dr.Fone.
Dr.Fone - Screen Unlock (iOS)
Bypass iCloud Activation Lock on iPhone/iPad/iPod Without Hassle.
- Bypass iCloud activation lock and enjoy all iCloud services.
- Simple, click-through, no tech knowledge is required, everybody can handle it.
- Compatible with iPhone, iPad, and iPod touch.

- Expert team with over 17 years of expertise & has helped over 50 million users.

4,395,218 people have downloaded it
Step 1: Log in Wondershare Dr.Fone and click Toolbox on the homepage. Then select Screen Unlock > iOS. Initiate the removal of the iCloud Activation Lock and click the Unlock Now button.
Step 2: Confirm the prompt on the next window and continue the process by tabbing “Got it!”
Step 3: Start to put device in DFU mode for the first time. During this process, the program will send a demand to the Apple iPhone 8 Plus device.
Step 4: Put your device in DFU Mode for the Second Time. If your device is not detected by the platform, follow the on-screen instructions to put their iOS device in DFU Mode.
Step 5: Once the Apple iPhone 8 Plus device has been processed under the DFU Mode, the computer’s screen will start displaying the removal of the iCloud Activation Lock. When it’s done, click Done in the next window.
For detailed guide: please check our official guide .
Conclusion
We hope that the tips that we shared will help you to remove the iCloud Activation lock on your phone without having to contact the previous owner or even need any password. For an efficient and effortless solution, you can utilize “Dr. Fone - Screen Unlock (iOS) ” which just needs you to connect your phone to your laptop and in just a few taps. We understand how frustrating it can be to have to contact other people just to be able to use your phone. Follow our methods, and you will be able to use your phone right away.
Also read:
- [New] 2024 Approved Initiatives to Enhance Your Podcast's RSS Feeds
- [New] In 2024, Yuneec Typhoon H Exposed Drone Review in Detail
- [Updated] In 2024, Make Music Accessible with a Well-Designed YouTube Playlist
- Easy Fix for Non-Connecting AirPods on Laptops - Latest Tips & Techniques (202E)
- Effective Ways To Fix Checkra1n Error 31 On iPhone XS Max
- Fix Cannot Paste the Data Error in Microsoft Excel 2010
- How to Bypass iCloud Lock on Apple iPhone 7 Plus
- In 2024, 3 Easy Methods to Unlock iCloud Locked iPhone 11 Pro Max/iPad/iPod
- In 2024, A How-To Guide on Bypassing Apple iPhone 14 Pro Max iCloud Activation Lock
- In 2024, How To Bypass iCloud By Checkra1n Even From Apple iPhone 6s Plus If Youve Tried Everything
- In 2024, How To Bypass iCloud By Checkra1n Even On Apple iPhone 15 Pro Max If Youve Tried Everything
- In 2024, The 10 Best Tools to Bypass iCloud Activation Lock From iPhone 6s Plus You Should Try Out
- In 2024, Ultimate Guide on Apple iPhone 8 iCloud Activation Lock Bypass
- Le Prophète | Free Book
- Mouse Mastery: Latency-Free Windows Experience
- Solving Streaming Issues: Paramount+ Won't Launch on Amazon Firestick?
- YL Software for Easy Device Integration: Adding New Printers to Your Network
- Title: In 2024, How to Factory Reset iPad or iPhone 8 Plus without iCloud Password or Apple ID?
- Author: Lydia
- Created at : 2025-01-25 22:50:54
- Updated at : 2025-01-31 22:14:57
- Link: https://activate-lock.techidaily.com/in-2024-how-to-factory-reset-ipad-or-iphone-8-plus-without-icloud-password-or-apple-id-by-drfone-ios/
- License: This work is licensed under CC BY-NC-SA 4.0.