
In 2024, How To Remove iCloud On iPhone 13 Smoothly
How To Remove iCloud On Apple iPhone 13 Smoothly
Unlock the full potential of your Apple iPhone 13 by mastering the art of removing iCloud effortlessly! In today’s digital landscape, understanding how to remove iCloud from iPhone is paramount. Whether you’ve forgotten your password, purchased a used device, or are switching Apple IDs, this guide has you covered.
Dive in and see how this article simplifies the process, providing a simple, step-by-step roadmap. Explore the common scenarios that make iCloud removal essential and prepare to manage your Apple iPhone 13 experience seamlessly. Take control of your Apple iPhone 13 effortlessly and explore a world of possibilities with this article’s step-by-step approach.
Part I. What Causes People To Remove iCloud From iPhone?
In the vast Apple ecosystem, iCloud stands as a vital component, connecting your Apple iPhone 13 to a world of seamless data synchronization. However, situations arise where removing iCloud from the iPhone becomes paramount.
What Is iCloud?
At its core, iCloud is Apple’s cloud storage service, fostering the effortless sharing and syncing of data across Apple devices. It’s the magic behind photos, contacts, and notes seamlessly appearing on all your gadgets.
Significance of iCloud
iCloud ensures a harmonious experience, keeping your digital life in sync. From photos to app data, it’s the invisible thread weaving through your Apple devices, making your Apple iPhone 13 an integral part of your digital world.
Reasons To Remove iCloud From iPhone
Understanding these scenarios lays the foundation for your journey into the step-by-step guide on effective iCloud removal without compromising data integrity.
- Forgotten Passwords
Users often find themselves in a bind when forgetting iCloud passwords, necessitating removal.
- Device Handovers
Purchasing a used iPhone or receiving one as a gift may prompt the need to remove the previous owner’s iCloud for a personalized experience.
- Changing Apple IDs
Switching to a new Apple ID might require the removal of the old iCloud association.
- Device Upgrades or Downgrades
Moving to a new iPhone or downgrading to an older model may trigger iCloud removal for a seamless transition.
- Enhanced Security Measures
Some users use iCloud removal as a security measure, particularly when abandoning the Apple ecosystem.
Learning these common reasons allows you to know more about your device before removing iCloud from your Apple iPhone 13. Now, get ready to learn how to erase iCloud from an iPhone. The next section will feature several methods to help you confidently manage your Apple iPhone 13.
Part II. How Do You Remove iCloud From iPhone
Now that you’ve discovered the reasons behind iCloud removal, let’s dive into the practical aspects. In this section, you’ll walk through various methods, ensuring you have the knowledge to make informed decisions. From traditional settings to online tools and advanced desktop solutions, this article has got you covered.
Traditional Method: Remove iCloud From Settings
Follow these simple steps to remove iCloud from your Apple iPhone 13 without any fuss:
- Step 1: Open Settings on your Apple iPhone 13.
- Step 2: Tap your Apple ID at the top of the screen.
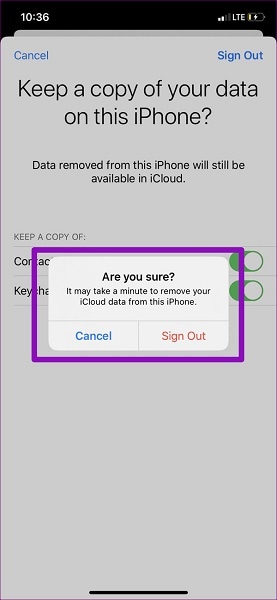
- Step 3: Scroll down and select Sign Out. You will then be prompted to enter your Apple ID password to proceed.
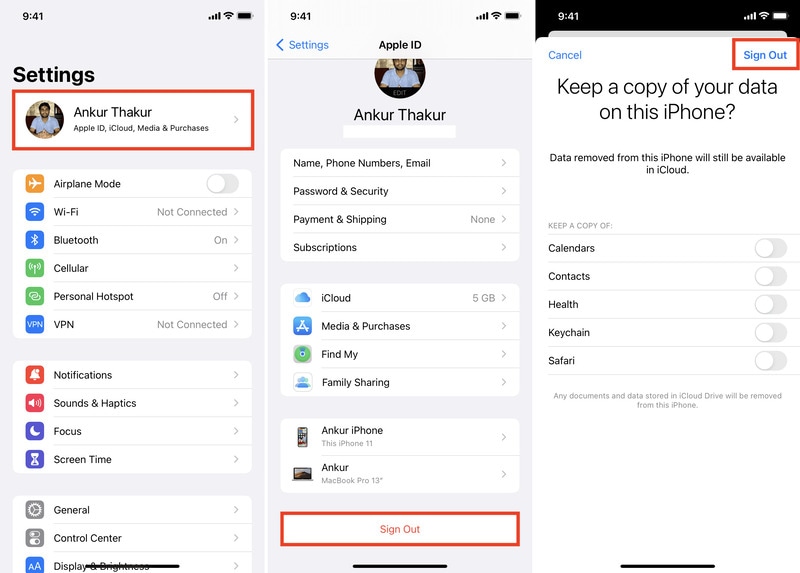
- Step 4: You will then be asked, “**Are you sure?**”. If you’ve decided to proceed, tap Sign Out.
This conventional approach ensures a smooth transition while safeguarding your data. However, there are multiple concerns by iPhone users saying that this method failed to work on their devices. In that case, feel free to explore more methods laid out below.
Contact Apple Support
When in doubt, seek help from the experts. Contact Apple Support for personalized guidance on iCloud removal. They’re equipped to handle various scenarios, providing assistance tailored to your specific needs.
- For specific requests, you may start your request online on their Get Support
- You may also visit Apple Support for quick replies, product tutorials, self-help tips, manuals, and technical publications.
- For legal concerns, you may visit their Contact Legal
Remove iCloud From iPhone Online
You can find several iCloud removal online tools on your web browser. However, even though online tools claim to simplify the process, you must tread carefully before you use them. Many are unreliable or even harmful. If you choose this route, research thoroughly, ensuring legitimacy. Watch out for scams, and consider reviews from trusted sources.
Remove iCloud Using a Desktop Tool: Dr.Fone - Screen Unlock (iOS)
If you’ve tried the methods mentioned above but still can’t remove iCloud from an iPhone, it’s time to explore a much safer and more efficient method – a reliable desktop tool. A desktop tool allows you to fulfill the process effortlessly. It’s so easy to use that you can get started without any prior professional knowledge.
With just a few clicks, you can remove iCloud from your Apple iPhone 13 even without your password. And in such a scenario, Wondershare Dr.Fone - Screen Unlock is the finest option. Say goodbye to iCloud-related challenges and embrace the simplicity and effectiveness of Dr.Fone - Screen Unlock (iOS). Reclaim control over your Apple iPhone 13, enjoying the freedom to confidently manage your iCloud accounts.

Key Features and Advantages
Unlocking the potential of your Apple iPhone 13 has never been easier, thanks to Dr.Fone - Screen Unlock (iOS). This powerful desktop tool is designed with simplicity and effectiveness in mind, offering a seamless solution to iCloud removal. Here’s a closer look at the whole toolkit’s key features and benefits:
- **No Apple ID Password Needed.**Even if you’ve forgotten your Apple ID password, Dr.Fone - Screen Unlock (iOS) provides a hassle-free solution, eliminating the need for complex password retrieval.
- **Security Assurance.**Fone prioritizes the security of your data. The iCloud removal process is designed to safeguard your personal information throughout.
- **Ease of Use.**Designed with user-friendliness in mind, Dr.Fone simplifies the complex task of iCloud removal. No technical expertise is needed. With a few clicks, anyone can navigate through the process effortlessly.
- **High Success Rate.**Boasting a remarkable success rate, Dr.Fone - Screen Unlock (iOS) is a reliable solution for effectively removing iCloud accounts from iPhones.
- **Versatile Compatibility.**Whether you’re using the latest iPhone or an older version, Dr.Fone caters to a wide range of iOS devices, ensuring accessibility for all users.
- **Quick and Efficient.**Save time and effort with Dr.Fone’s swift iCloud removal process. You can liberate your Apple iPhone 13 from previous iCloud associations within just a few clicks.
- **Risk-Free Operation.**Fone - Screen Unlock (iOS) is designed with user safety in mind. The tool minimizes risks associated with iCloud removal, providing a secure and efficient operation.
Step-by-Step Guide Using Dr.Fone – Screen Unlock (iOS)
The guide below will help you remove iCloud from your Apple iPhone 13 easily. Follow these instructions carefully and make your device operational:
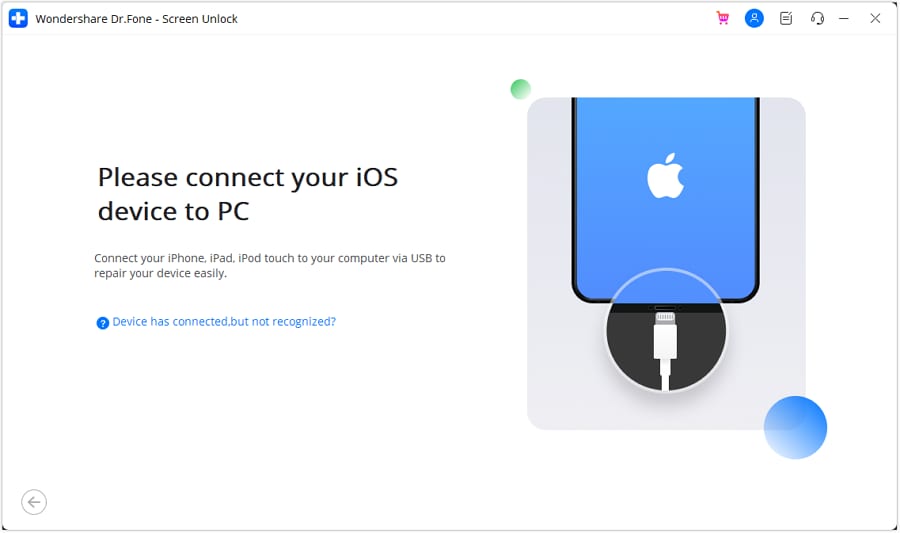
- Step 1: Launch Wondershare Dr.Fone on your PC. Then, activate the iOS feature by going to Toolbox > Screen Unlock > iOS. To remove Apple ID, go to the next window and look for the option to Remove AppleID among the choices.

- Step 2: The following screen will display the connection status of the iDevice when it is linked to your PC. Choose the Unlock Now button to proceed.
- Step 3: After this, the platform will inquire about the Apple ID via a series of questions before granting access. Examine your iOS device to see if it has a screen lock feature. Be sure your iDevice has a screen lock enabled before selecting Yes.

- Step 4: The next step is to check if Two-Factor Authentication is enabled on all your iOS devices. If it’s not already on, toggle it on and click Yes to proceed with unlocking the Apple ID.
- Step 5: Once you’ve confirmed these choices, you’ll see a screen with instructions for entering Recovery Mode on your iDevice. If it doesn’t work, select Try DFU Mode in the screen’s bottom-left corner and follow the steps corresponding to your iOS version. To continue with the unlocking process, follow the instructions that will be displayed.

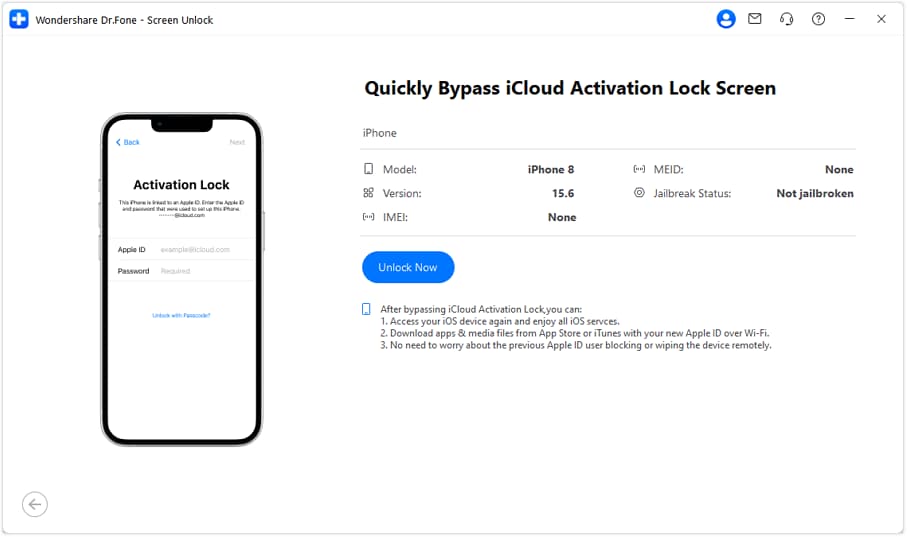
- Step 6: The next screen will show you the Apple iPhone 13 device’s details after entering Recovery Mode. Now that you have the Device Model, all you have to do is choose the System Version and hit the Start button. On the other hand, pick the details by hand and go forward if there are recognition discrepancies.

- Step 7: The download of the corresponding iOS firmware begins, and the progress is shown on the following screen. If the firmware download is taking too long for your platform, you can directly download it by clicking the Copy button to copy the link.
- Step 8: The following screen will show details of the firmware after it has been confirmed by the platform after its download. To proceed with unlocking your Apple ID, click the Unlock Now button.

- Step 9: To proceed, a confirmation window will pop up and ask for a code. To begin, input the code and then click Unlock. You can see how far along the process of unlocking Apple ID is on the screen that follows. Do not allow the gadget to become disconnected in any way.

- Step 10: After the Apple ID is unlocked, the screen will ask you to finish the process. If your Apple ID has been unlocked, you can finish by clicking the Done button. If that isn’t the case, you may use the Try Again button to start over.

Conclusion
iCloud removal doesn’t have to be a daunting task. Mastering how to remove iCloud from an iPhone is about choosing the method that aligns with your needs. From the traditional settings to the safety of Apple Support and the caution required for online tools, the choice is yours. Dr.Fone - Screen Unlock (iOS) emerges as the optimal solution for those seeking simplicity, effectiveness, and independence.
It’s time to regain control over your Apple iPhone 13, unlocking new possibilities effortlessly. Share this guide with fellow users, and don’t forget to leave feedback. Unlock the potential, share the knowledge, and enjoy a seamless iPhone experience!
Latest Guide on iPad 2/3 and Apple iPhone 13 iCloud Activation Lock Bypass
Nowadays, many purchase a used iPhone instead of a fresh, out-of-the-box new one. Nonetheless, they often face the activation lock screen issue on the Apple iPhone 13 device once they buy them. This case will probably happen because the Apple iPhone 13 device stays connected with the past owner’s iCloud account.
It becomes difficult to remove a connected iCloud account without the owner entering the credentials. However, we’ve discovered a few potential ways to bypass iPad 2/3 and Apple iPhone 13. Also, we will introduce you to the best and expert bypass tool available in the market. Therefore, we strongly suggest you stay with us and download Dr.Fone - Screen Unlock. It is safe during the process. So, how about we begin?
Explore four practical methods to bypass the iCloud Activation Lock on your iPad 2/3 and Apple iPhone 13. These solutions help you regain access to your device and its features, enabling you to enjoy your iPad without any restrictions.
Method 1. Get Apple ID and password from the previous owner
The first procedure in this article is to get some information about the iCloud ID. To bypass iPad 3 activation lock, ensure you get the correct Mac ID credentials. If you are not the Apple iPhone 13 device user, you must request the past user to give you the credentials.
However, this strategy may not help you as you know that iCloud has all the individual data about the client. Therefore, no one will want to give them to another person. So, you will be left without a response. So, we could never recommend you focus on this strategy. However, provided with the details, you can disable the Find My feature and remove the activation lock. Here’s how:
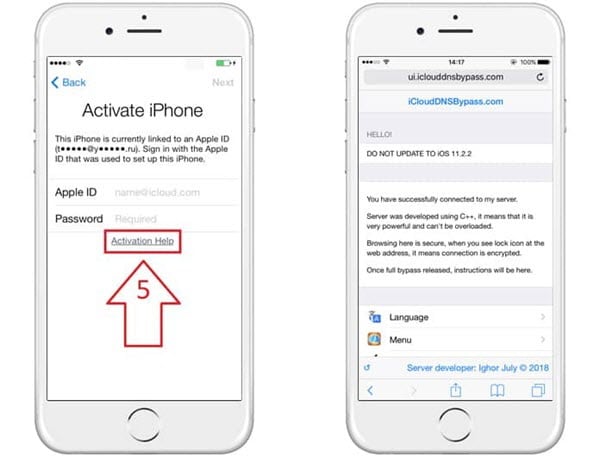
Step 1. Enter the Apple ID and password on the activation lock screen to get to the Apple iPhone 13 device.
Step 2. On your iPad, go to the “Settings” application and sign out the Mac ID. Please search for your name on the top and tap on it.
- If you have iOS 10.2 or older, go to “iCloud” and sign out.
- If you have iOS 10.3 or later variants, press your name from the settings app and click “Sign Out.”
Step 3. It will request the password to your Apple account. Enter it and turn the iPad off. When done, you will not go over the activation lock screen again, and that’s how you bypass iPad 2 activation lock.
Method 2. Ask the previous owner for the lock removal
If the previous owner failed to do this before selling the iPad to you, this shouldn’t cause an issue. But it might be a problem if they have sold you a stolen phone and don’t have the remotest clue about the Apple ID.
You don’t need to worry about the iPad activation lock if it’s a genuine phone. The past user can remotely wipe out the iPad Apple account without having the phone in their control by following these steps:
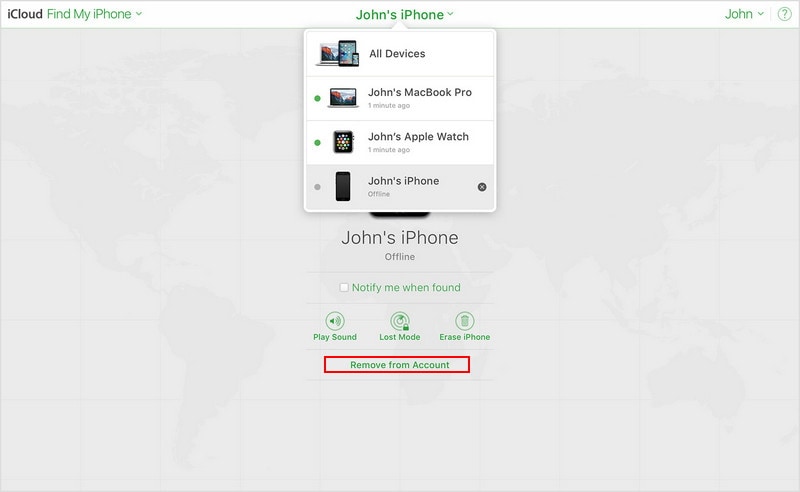
Step 1. Explore the appleid.apple.com site from a web browser and sign in with your Apple ID details.
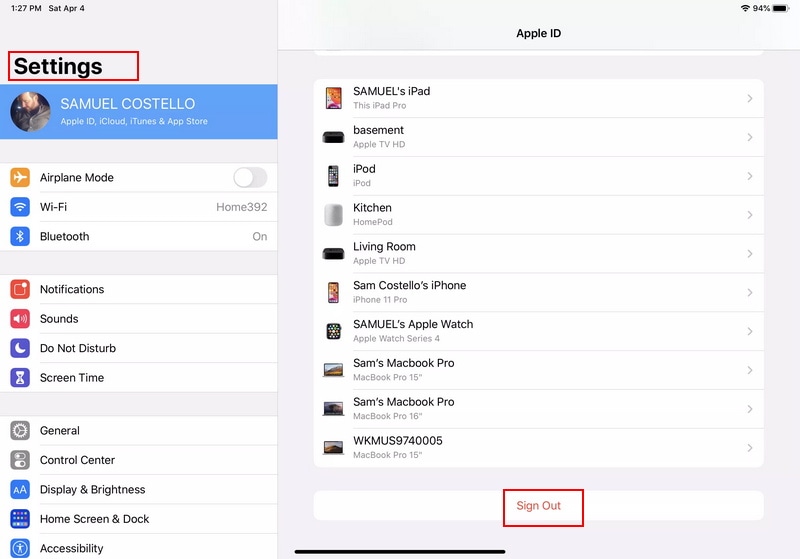
Step 2. Click the Apple iPhone 13 devices tab to see every one of the connected iDevices.
Step 3. Pick your iPad model from the list of devices.
Step 4. Then, at that point, click the “Remove from Account” button to get it unlocked. That’s how you can perform the iPad 2/3 and Apple iPhone 13 iCloud bypass.
Method 3. Use DNS Bypass
iCloud DNS bypass proves useful when you want to unlock a second-hand iPad and know practically nothing about the past user. It’s likewise productive if you can’t find your iCloud username or password. The steps in DNS iPad 2 iCloud bypass are basic; here are the steps.
Step 1. When you switch on your device, pick your preferred language and region from the menu.
Step 2. Click “Continue” to enter the Wi-Fi settings page. Whenever requested to connect to Wi-Fi, search for the “I” logo near the Wi-Fi tab.
Step 3. Presently, disconnect the Wi-Fi, go to “Connection Settings,” and snap “Forget this Network.”
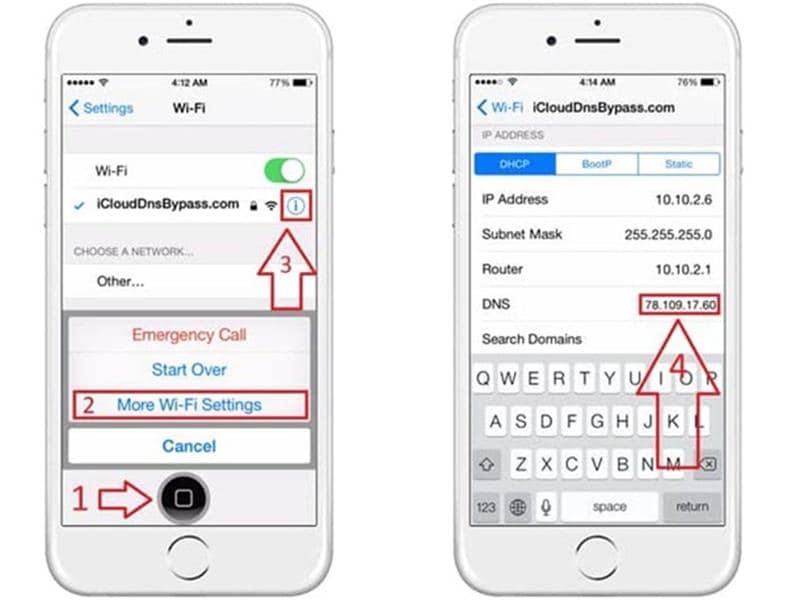
Step 4. Click the “I” and enter a DNS server IP address to bypass the iCloud activation lock. You can browse the rundown underneath as indicated by your area:
- USA: 104.154.51.7
- South America: 35.199.88.219
- Europe: 104.155.28.90
- Asia: 104.155.220.58
- Australia and Oceania: 35.189.47.23
- Other regions of the world: 78.100.17.60
Step 5. Click the “Back” button on the left half of your screen. Turn on Wi-Fi, select the correct network, and enter the passcode.
Step 6. Click “Next Page” and tap the “Back” button to enter the iCloud bypass screen.
Step 7. You can now set up your applications and utilize your device.
Method 4. Seek Help from Apple Support
If there are no choices for contacting the past owner of the iPad, you can ask Apple backing to assist you with the iPad 2/3 and Apple iPhone 13 iCloud bypass. That may not be a simple process, but if you have the expected documents (for individuals who got verification of the purchase from the seller), Apple will be willing to help you.
One way to bypass the Find My iPhone activation lock from your iPad without the owner is to introduce proof of purchase to the Apple support group. When you give this to Apple, they can confirm the first owner of the phone and afterward can assist you with the iPad 2 iCloud bypass. After confirmation of purchase, they might request different documents, like one of your ID cards.
If you purchased the phone from your family member or somebody who has died, then your other choice to remove the lock is to show their death certificate to Apple. Apple will then, at that point, check the files and could unlock the iPad for you.
In the two cases, it depends on Apple to conclude whether they are happy with your files and if they might want to bypass iPad 2/3 and Apple iPhone 13 lock.
Part 2: Bypass iPad 4 to iPad 7 iCloud Activation with Easy
You can’t remove the iPad 4 to iPad 7 activation lock without Mac ID credentials, yet you can bypass it with an expert activation bypass tool. After using the activation bypass tool on your iPad, you will effectively unlock it and use it.
Suppose your device is in any of the circumstances above. In that case, you’ll have to figure out the right tool to bypass the activation lock screen. Wondershare Dr.Fone - Screen Unlock , an iCloud activation lock bypass tool, is one such effective program for you. It is a simple method for reactivating Apple devices. It helps if you can’t utilize a second-hand iPhone, fail to remember the iCloud password, or need to reset yours without logging out Apple ID. With this software, you can bypass iPad 4 to iPad 7 activation lock.
Step 1. Install the Dr.Fone program on your PC and choose Screen Unlock.
Step 2. Pick “Bypass Activate Lock.”

Note: The Bypass Activate Lock feature is compatible with iPhone 5S to iPhone X, iPad 4 to iPad 7, and iPod touch 7 to iPod touch 9 running iOS 12.0 to iOS 14.8.1.
Step 3. To bypass iPad activation lock, this is the “Start” page for this process.

Step 4. The activation lock will disappear in a flash. Presently your iPad has no activation lock.

Your iPad will begin with practically no activation lock. You can access and utilize the iPad now. For more detailed steps, you can read the detailed guide of unlocking icloud activation lock with Drfone Dr.Fone
Part 3: FAQs
What is an activation lock?
It is a component intended to prevent any other individual from utilizing your Apple iPhone 13, iPad, or iPod contact, once it’s consistently lost or taken. Activation Lock turns on naturally when you turn on the Find My feature on your device.
Can I remove the activation lock by hard reset?
A hard reset doesn’t remove the activation lock from the Apple iPhone 13 device. For instance, if a phone is hard reset with the Google account signed in, the phone will, in any case, request you to enter the account credentials once turned back on.
How to remove the activation lock when I have my Apple ID and password?
You can unlock your device the same way as the previous owner would do remotely, as stated above. So, when you have the iCloud account credentials, you can follow our steps, and your iPad will unlock.
Conclusion
Many reasons can compel you to bypass iPad activation Lock without a past user. This article discusses how to remove the iPad activation lock with the assistance of iCloud or settings from iDevices. However, if you don’t have the Mac ID credentials of your iPad, you will require help from a third-party tool that can bypass iPad activation lock. Check Dr.Fone - Screen Unlock out, as it can easily assist you in bypassing the activation lock.
How To Fix Apple iPhone 13 Could Not Be Activated/Reached Issue
Are you struggling with your Apple iPhone 13’s activation? The Apple iPhone 13 activation process is crucial for seamless functionality, but encountering issues like ‘iPhone could not be activated’ can be frustrating. In this guide, you’ll learn how to simplify the process of iPhone activation, shedding light on common problems that users face.
From understanding error messages to the significance of swift resolutions, this article has got you covered. Let’s navigate through these activation errors to ensure your Apple iPhone 13 is activated smoothly. Because when it comes to your device, prompt problem-solving is the key to a hassle-free experience.

Part I. Explanation To Common Apple iPhone 13 Activation Errors
Are you greeted with puzzling messages like “iPhone could not be activated” when setting up your device? Let’s demystify these common errors and get your Apple iPhone 13 up and running smoothly.

A. Common Apple iPhone 13 Error Messages
Check out below the most common error messages iPhone users might encounter:
- “iPhone could not be activated”
This message often pops up during a hiccup in the activation process. It could be due to various reasons, but fear not – solutions are within reach.
- “Activation server cannot be reached”
Imagine your Apple iPhone 13 trying to connect to the activation server but facing hurdles. This error signifies a connection issue, hindering the activation process.
- “Activation lock server cannot be reached”
This error may sound complex, but it often boils down to a connectivity glitch with the activation lock server. Discover straightforward steps to address this and unlock the activation process.
B. Causes Behind These Errors
Now learn about the causes behind these reasons by reading below:
- Activation Information Issues
Sometimes, the activation information your Apple iPhone 13 receives may be incorrect or incomplete. This could be due to a typo in your Apple ID or an issue with iCloud credentials. We’ll guide you through double-checking and correcting these details.
- Server-Related Problems
Your iPhone communicates with servers during activation. If there’s a hiccup in this interaction – for instance, the activation server or activation lock server cannot be reached – it can result in errors. We’ll explore troubleshooting steps to ensure seamless server connectivity.
Understanding these common errors and their causes is the first step to resolving them. In the next sections, you’ll delve deeper into troubleshooting methods and practical solutions to activate your Apple iPhone 13 without a hitch. Stay tuned for a hassle-free iPhone experience!
Part II. How To Fix iPhone Activation Errors
So, you’ve encountered the frustrating activation information showing the “iPhone could not be activated” message. No worries! Let’s dive into practical solutions that will have your Apple iPhone 13 activated in no time. Follow these easy troubleshooting methods, and say goodbye to activation problems.

Checking Network Connectivity
First things first – ensure your Apple iPhone 13 is well-connected to the internet. Activate Wi-Fi or cellular data and try the activation process again. A stable connection is the cornerstone of a successful activation.
Verifying Apple ID and iCloud Credentials
Activation errors might stem from a small typo or a forgotten detail. Double-check your Apple ID and iCloud credentials. Confirm that you’re using the correct email and password. Accurate information is key to a smooth activation.
Ensuring Server Availability
Activation involves communication with servers. If the activation server or activation lock server cannot be reached, your Apple iPhone 13 may face hurdles. Confirm that Apple’s servers are up and running smoothly. You can do this by checking Apple’s system status page online.
Following these straightforward steps addresses common activation glitches. But what if the issue persists? In the next section, you will be introduced to an effective tool that goes beyond traditional troubleshooting methods. Stay tuned to discover a hassle-free way to unlock your Apple iPhone 13’s full potential!
Part III. Still Facing Errors? Your Lifesaver: Dr.Fone - Screen Unlock (iOS)
Despite your best efforts, some iPhone activation issues persist, leaving you stuck in frustration. When traditional troubleshooting falls short, it’s time to introduce a reliable ally: Wondershare Dr.Fone - Screen Unlock (iOS). This tool emerges as a lifesaver, offering a seamless solution to activation challenges.
Dr.Fone - Screen Unlock (iOS) is not just a tool; it’s a lifeline for those struggling with persistent activation errors. Tested and trusted, it goes beyond conventional methods, ensuring you regain access to your device effortlessly.
Key Features and Benefits
These key features and benefits below collectively contribute to making Dr.Fone - Screen Unlock (iOS) a comprehensive tool for addressing various iPhone-related challenges.
- Dr.Fone - Screen Unlock (iOS) is compatible with a large number of iPhone models, ensuring that users with different devices can benefit from its features.
- The tool prioritizes the security and privacy of user data. It employs advanced encryption protocols to safeguard sensitive information during the unlocking process.
- Beyond activation issues, Dr.Fone - Screen Unlock (iOS) can handle various other scenarios, such as unlocking a forgotten passcode, bypassing the Apple ID, and recovering data from disabled devices.
- **No Data Loss.**One of the standout features is its ability to unlock the Apple iPhone 13 device without causing any data loss. Users can regain access to their iPhones without compromising their valuable information.
- **Time Efficiency.**Fone - Screen Unlock (iOS) offers a quick and efficient solution. Users can save time compared to troubleshooting methods that may take longer without guaranteed results. Dr.Fone efficiently activates your Apple iPhone 13, putting the control back in your hands.
- **Risk Mitigation.**The tool minimizes the risk associated with attempting various troubleshooting methods. It provides a straightforward and less risky alternative to ensure successful iPhone activation.
- **Intuitive Interface.**Fone boasts an intuitive and user-friendly interface, making it accessible to individuals with varying levels of technical expertise. Users can navigate through the unlocking process seamlessly.
- **Reliable Results.**Count on Dr. Fone’s proven track record. It’s a reliable choice when traditional troubleshooting methods fall short.
Step-by-Step Guide
Learn how to use Dr.Fone – Screen Unlock (iOS) as an alternative tool to fix iPhone activation errors. The method provided below will not require jailbreaking the phone and supports devices running on iOS 15.0 to 16.3 (iPhone 6/6 Plus, iPhone 6S/6S Plus, iPhone 7/7 Plus, iPhone 8/8 Plus, iPhone X).
- Step 1: Get the most recent version of Wondershare Dr.Fone installed on your computer, then run the program. Navigate to Toolbox, click Screen Unlock, then select iOS. In the next screen, choose iCloud Activation Lock Removal.
- Step 2: When prompted, choose Start to begin unlocking the Activation Lock on your iOS device.
- Step 3: You will be asked to connect your iOS device to a USB cable while propagating into the corresponding function. The window will show the status as you connect the Apple iPhone 13 device and will immediately bring you to the next screen.
- Step 4: Once on the next screen, double-check all the information related to the iOS device and click the Unlock Now option.
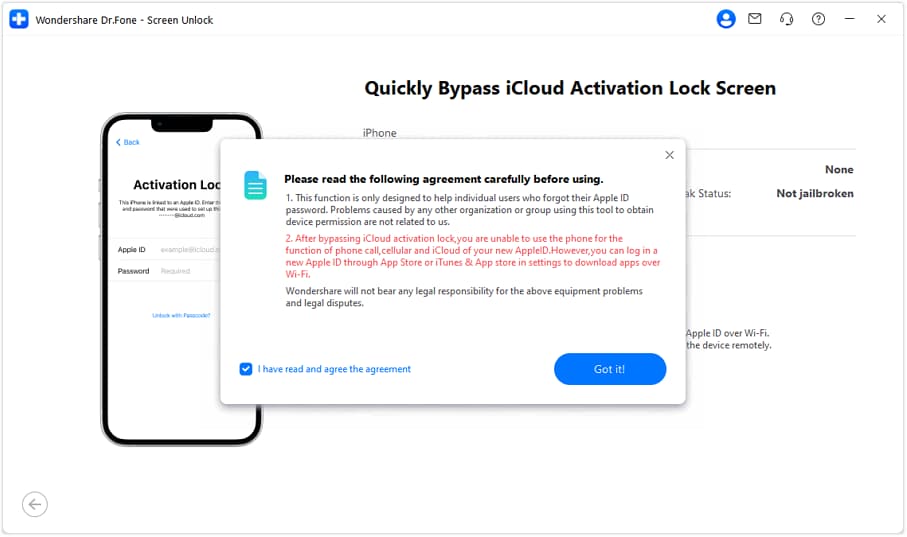
- Step 5: The next step is for a warning prompt to show up on the screen, indicating that the user should be aware of the procedure. Please read the agreement carefully and indicate your agreement by checking the appropriate box. Click the Got It! button to proceed.
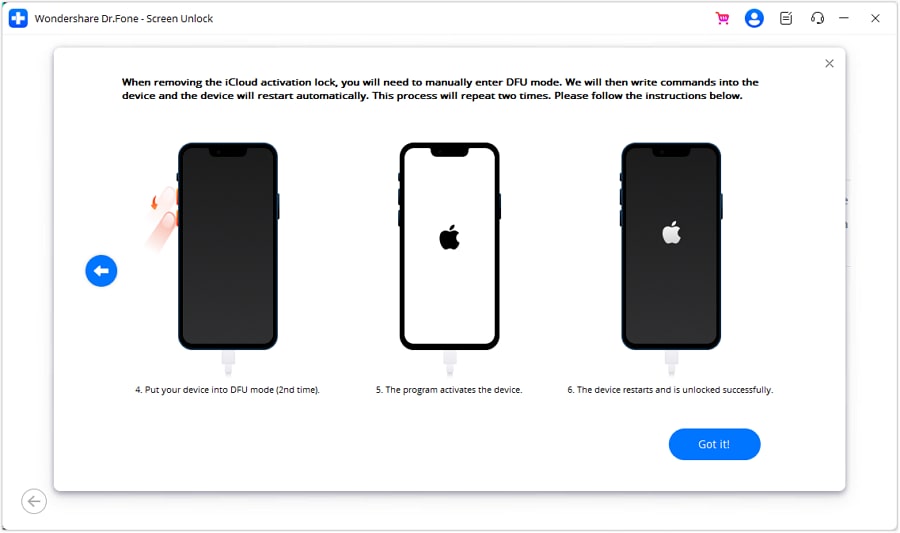
- Step 6: Follow the on-screen prompts to enter DFU Mode on your iOS device. Upon initialization of the Apple iPhone 13 device in DFU Mode, the program initiates a restart process by sending a command to the Apple iPhone 13 device. Press the “right arrow” to proceed.
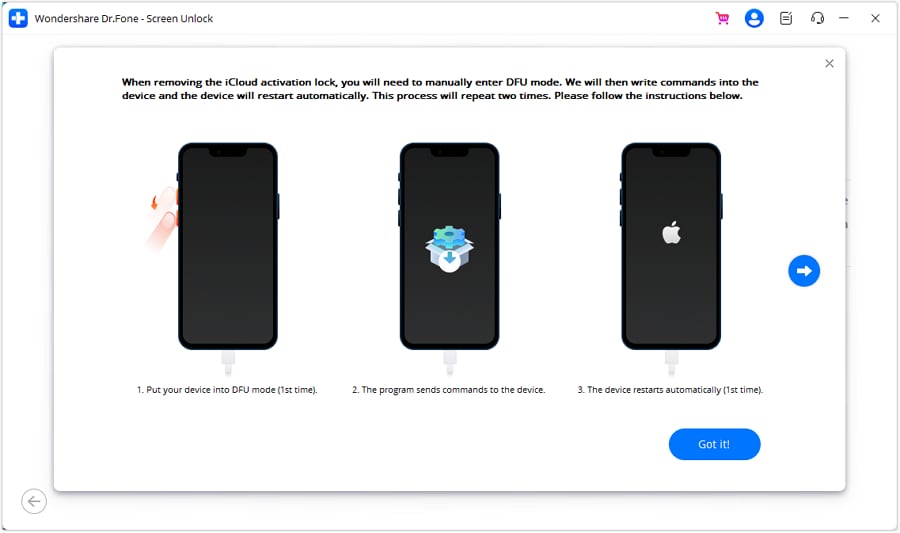
- Step 7: Continue to set the iOS device to DFU Mode for the second time. As a result, the program activates and unlocks the gadget. When it is finished, click the Got It! button to finish.
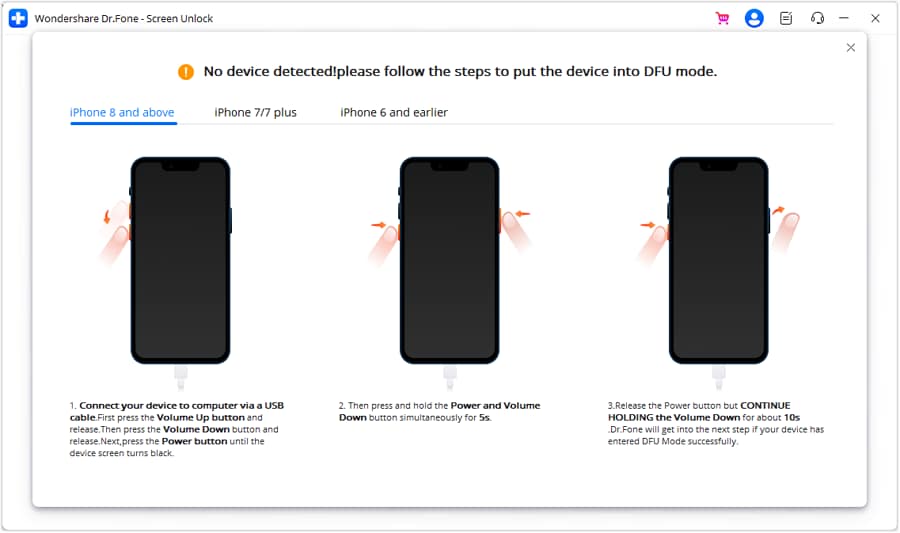
- Step 8: When the platform does not recognize a device, users must follow the on-screen instructions to enter DFU Mode on their iOS device.
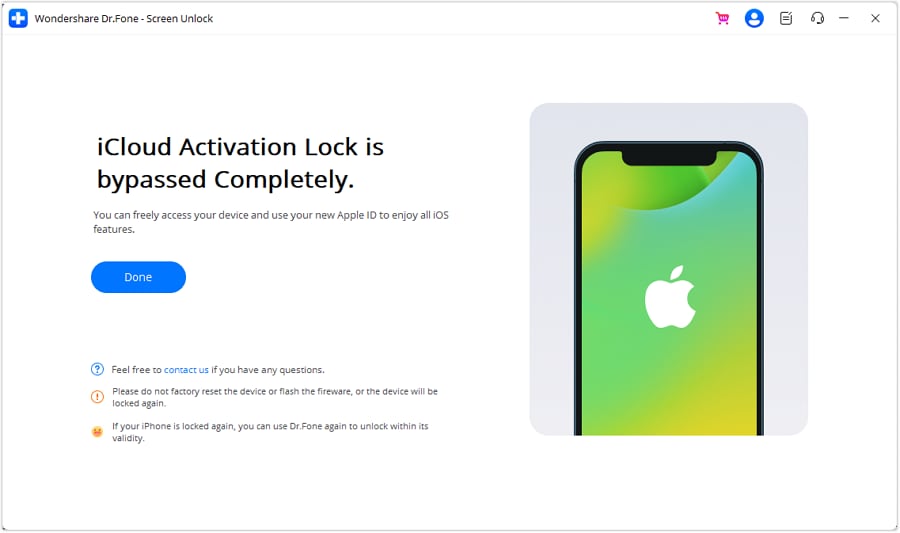
- Step 9: After the Apple iPhone 13 device has been processed in DFU Mode, you will be able to see the iCloud Activation Lock being removed from your computer’s screen. The screen will show a completion message once it’s done. To complete the process of removing the iCloud Activation Lock, click Done.
Dr.Fone - Screen Unlock (iOS) simplifies the complex journey of iPhone activation, providing a reliable and efficient alternative. It’s the key to unlocking your device’s full potential when conventional methods fall short. In the next section, you’ll learn how to check if your Apple iPhone 13 has finally been activated.
Bonus: How Do I Know if My iPhone Is Activated?
Wondering if you have resolved your iPhone’s “can’t be activated” issue? Let’s check the clues and ensure your device is ready for action. Here are simple indicators to confirm your Apple iPhone 13’s activation status:

- Check Cellular or Network Connectivity in Settings
Navigate to your Apple iPhone 13’s Settings menu. Head to “Cellular” or “Mobile Data” and ensure it’s switched on. A lit icon signals active connectivity. If using Wi-Fi, look for the Wi-Fi symbol at the top – a strong connection is a green light for activation success.
- Apple ID and iCloud Integration
Activation relies on accurate Apple ID and iCloud details. Confirm these in Settings under “Apple ID” or “iCloud.” Ensure your email and password match the ones used during setup. A synced Apple ID ensures seamless integration, marking your Apple iPhone 13 as officially activated.
- Absence of Activation Prompts
A surefire sign of a successfully activated iPhone is the absence of activation prompts. Once activated, your Apple iPhone 13 should smoothly transition from the initial setup screen to your home screen without any prompts asking for activation details.
Why Does Activation Matter?
Activation is the key to unlocking your Apple iPhone 13’s full potential. It ensures you can make calls, send messages, and enjoy all your device’s features. You can confirm whether your Apple iPhone 13 is activated and ready for action by checking these simple indicators.
Conclusion
In the maze of iPhone activation, you’ve decoded common errors and provided simple fixes. Especially for the ‘iPhone could not be activated’ issue, you now have the solutions to resolve it. And for a fuss-free fix, consider Dr.Fone - Screen Unlock (iOS) – your activation hero.
Swift solutions matter, ensuring you experience your Apple iPhone 13’s full potential. Don’t let activation glitches hinder your Apple iPhone 13 experience; unlock its full potential today! Choose Dr.Fone and embrace seamless activation. Because in the Apple iPhone 13 world, a timely resolution is the key to a smooth digital experience.
Tips: Are you searching for a powerful Screen Unlock tool? No worries as Dr.Fone is here to help you. Download it and start a seamless unlock experience!
Also read:
- [Updated] 2024 Approved YouTube's Celebrated Click-It Achievements
- [Updated] The Complete Guide to Video Editing in Windows 8 Movie Maker
- 2024 Approved Compelling iPhone Photo & Video Applications (8/7/X)
- Achieve Loud and Clear Sounds: Tips for Enhancing Volume in Windows 11
- AI Image Blending for Smooth Transitions & Improved Frames Per Second (FPS)
- Best Ways to Bypass iCloud Activation Lock on Apple iPhone 7/iPad/iPod
- Effortless Driver Installation for Lenovo X1 Carbon: Windows 7, 10, and 11 Supported
- How to Successfully Bypass iCloud Activation Lock from iPhone SE
- In 2024, 3 Effective Ways to Unlock iCloud Account Without Password From iPhone XS
- In 2024, A How-To Guide on Bypassing Apple iPhone 13 Pro Max iCloud Activation Lock
- In 2024, Bypass iCloud Activation Lock with IMEI Code From your iPhone 12 mini
- In 2024, Bypass iCloud Activation Lock with IMEI Code On Apple iPhone 14 Pro Max
- In 2024, Effective Ways To Fix Checkra1n Error 31 From Apple iPhone 11 Pro
- In 2024, Latest Guide on iPad 2/3 and iPhone 11 Pro iCloud Activation Lock Bypass
- In 2024, Mastering the Art of Channel Creation on YouTube
- In-Depth Evaluation of Madden 19: Excellent Options Yet Sense of Fatigue
- Step-by-Step Tutorial: Amplifying Your Soundscape with Windows 10
- Title: In 2024, How To Remove iCloud On iPhone 13 Smoothly
- Author: Lydia
- Created at : 2024-12-02 16:50:52
- Updated at : 2024-12-06 17:29:12
- Link: https://activate-lock.techidaily.com/in-2024-how-to-remove-icloud-on-iphone-13-smoothly-by-drfone-ios/
- License: This work is licensed under CC BY-NC-SA 4.0.