In 2024, The Ultimate Guide to Bypassing iCloud Activation Lock from iPhone 7 Plus

The Ultimate Guide to Bypassing iCloud Activation Lock on Apple iPhone 7 Plus
For many iPhone users, the dreaded iCloud activation lock can be an unnerving barrier to getting the most out of their devices. Whether you’ve encountered it after purchasing a second-hand iPhone, or you’ve simply forgotten your login credentials, this lock demands attention and often a bit of digital gymnastics to unlock. This comprehensive guide is for you, equipped with detailed instructions on various methods to bypass the iCloud activation lock on your Apple iPhone 7 Plus.
If you’re ready to take back control of your device, read on. We’ll walk you through the process step by step and arm you with the knowledge to access your smartphone’s full potential.
Part 1: How to bypass iCloud activation on iPhone through the DNS method?
This method is one of the oldest tricks in the guide, and while it still works for some users with specific models and iOS versions, it doesn’t guarantee universal success. Here’s a brief overview of how to proceed:

In the activation window, press the home button and then select Wi-Fi settings and then tap on the ‘I’ bonded by a circle. Now it’s time to remove the existing DNS server and put a custom one in motion. Now, let’s follow the steps below to bypass iCloud activation on iPhone.
How to bypass iCloud activation lock?
Step 1: Start the Setup Process
Turn on your Apple iPhone 7 Plus and start the setup process until you reach the page where you’re asked to connect to a Wi-Fi network.
Step 2: Select a Custom DNS Server
When prompted to connect to a Wi-Fi network and input a password, select “i” on your Apple iPhone 7 Plus screen, which will take you to a menu with network details. Tap “Configure DNS” and choose “Manual”.
Enter a DNS server address based on your geographic location:
- For USA/North America, enter 104.154.51.7
- For Europe, enter 104.155.28.90
- For Asia, enter 104.155.220.58
- For any other area, enter 78.109.17.60
Step 3: Proceed with iCloud Bypass
Return to Wi-Fi settings and select your desired network. You might need to enter a password, but instead, you can skip this step and continue. Your Apple iPhone 7 Plus will try to activate with these new settings and may allow you to bypass the activation lock.
Video Guide: How to bypass iCloud activation through DNS?
Note: The DNS method is an experimental and non-guaranteed way to bypass the iCloud activation lock. It is worth trying if you prefer not to use third-party tools, but be prepared for the possibility that it may not work for your specific device or iOS version.
Tips: During iCloud, we use it most for data backup to avoid data loss. But if you can’t access your iCloud, maybe you are supposed to back up your iPhone data to the computer .
Part 2: How to bypass iCloud activation on iPhone with a smart tool? [iOS 12.0~16.6]
A fast and safe tool to unlock locked iCloud
While talking about a suitable tool to bypass iCloud activation, missing out on Dr.Fone - Screen Unlock (iOS) doesn’t make any sense as it is the most trusted and loved tool by millions of users. Available for Windows and Mac operating systems, it offers an extremely easy process to make the work of bypassing iCloud done. Many other tools don’t hesitate to make false promises, but Wondershare has always managed to upkeep the security and trust of the users and does what it says. Let us bring you closer to this iCloud bypass tool.
Dr.Fone - Screen Unlock
Unlock iPhone, iPad, and iPod touch screen and Activation lock within minutes
- Easy for the users to unlock locked iCloud by providing a really easy interface.
- Exceptional speed for unlocking i.e., works in less than a minute.
- Compatible with iPhone 5S to iPhone X, iPad 4 to iPad 7, and iPod touch 7 to iPod touch 9 running iOS 12.0 to iOS 16.6.
- Effectively remove the Apple iPhone 7 Plus lock screen without the passcode.
3981454 people have downloaded it
Check out the following guide to know how to use this tool to bypass iCloud activation in detail.
Bypass iCloud activation on iPhone with Dr.Fone
Step 1: Click the “Download Now” button above to download Dr.Fone on your computer
Connect your Apple iPhone 7 Plus to the system and launch the Dr.Fone. From its home, select the ‘Screen Unlock’ section.
Just choose the feature ‘iCloud Activation Lock Removal’ to unlock the Activation lock of an iOS device to continue.
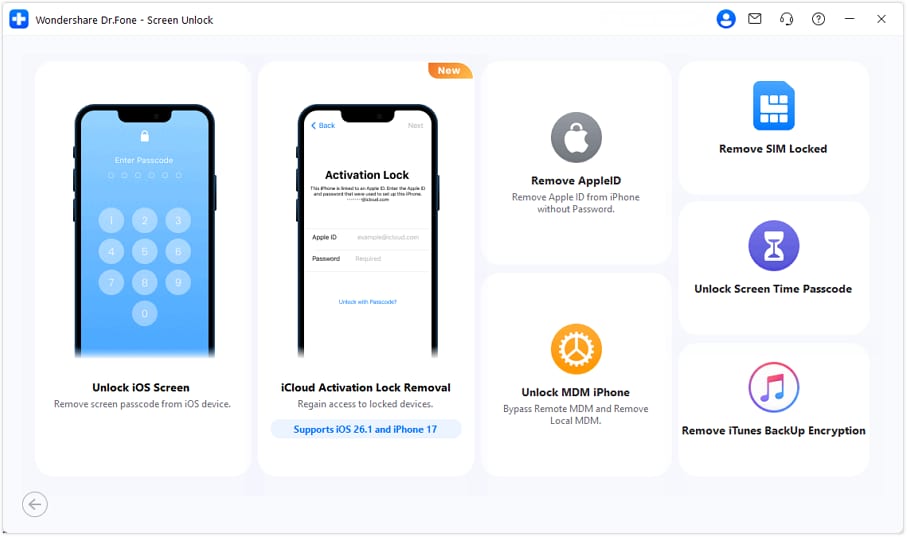
Step 2: Confirm device information
You will see your device information. Click ‘Unlock Now’ after confirming all device details are correct.
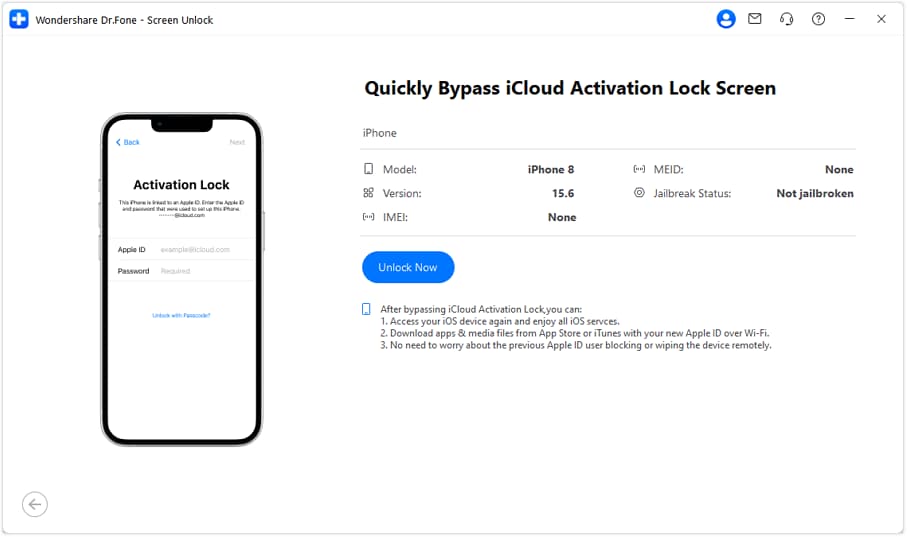
Step 3: Put your Apple iPhone 7 Plus into DFU mode or jailbreak your Apple iPhone 7 Plus properly
For iPhone users running iOS 15.316.3, to bypass the iCloud activation lock, you need to follow the instruction you will see to put your device into DFU mode. For iPhone users running iOS 12.014.8.1 or iOS 16.4~16.6, you should follow textual guidelines for jailbreaking your Apple iPhone 7 Plus .
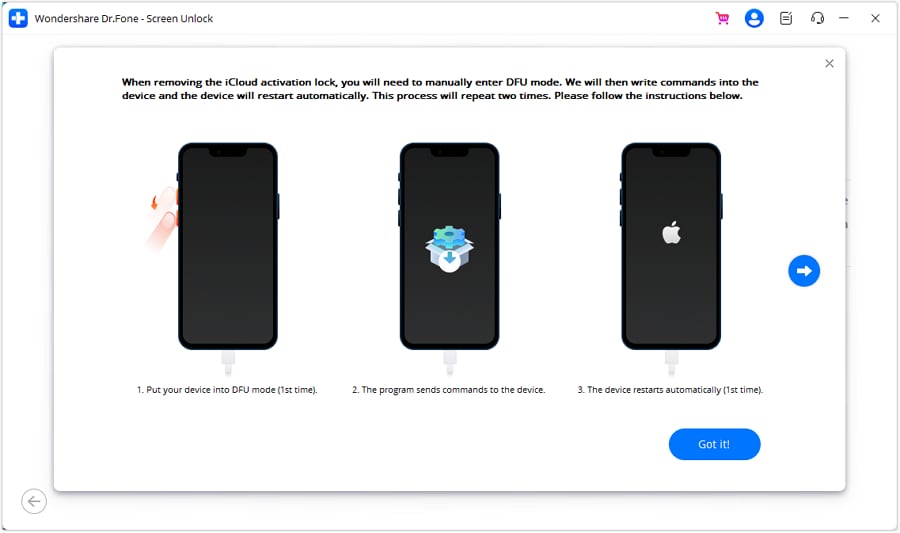
Step 4: Remove iCloud activation lock successfully
Dr.Fone will bypass activation lock automatically after your device is in DFU mode. Wait patiently to complete the bypass process.
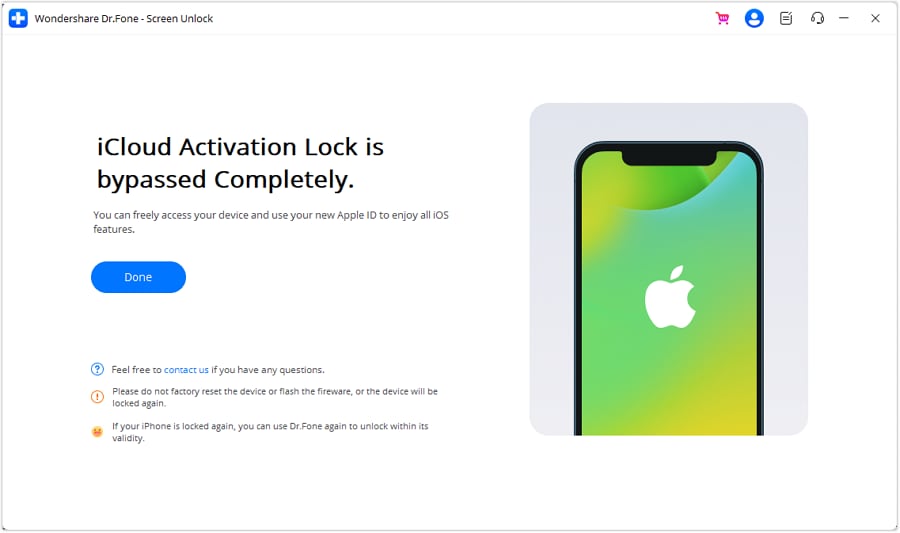
Dr.Fone - Screen Unlock (iOS) provides a hassle-free experience, consistently working across multiple iPhone models and iOS versions. It ensures that you can bypass the activation lock without password .
An optional tool to bypass iCloud activation lock
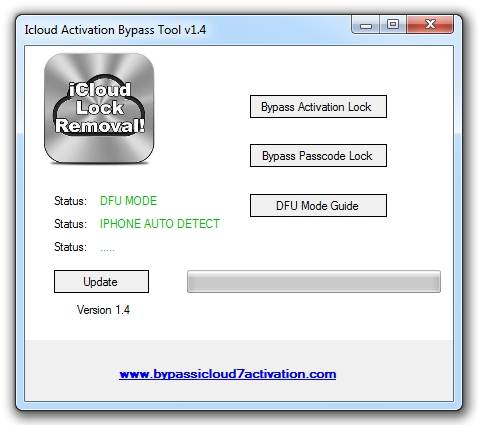
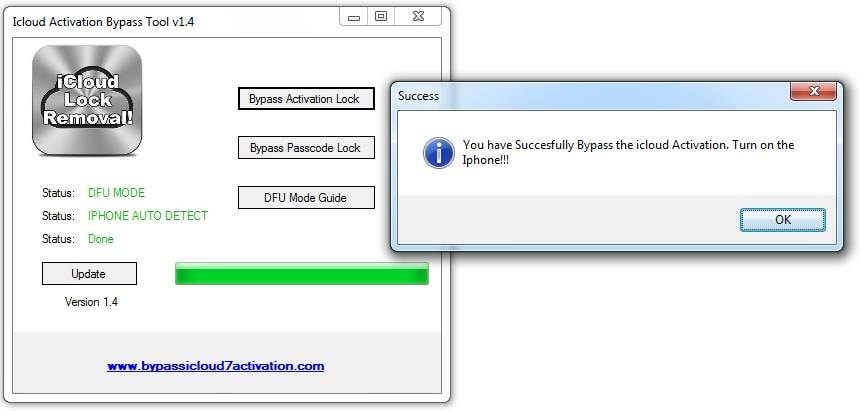
There are a limited number of functional tools available that can come in handy in bypassing the iCloud activation for your Apple iPhone 7 Plus or iPad. One of the names is ‘iCloud activation bypass tool version 1.4’. The tool’s name abides by what it says and is a really easy tool to use.
Below are the steps to bypass iCloud activation by using this tool.
Download and install the program on your desktop.
Launch the application and connect your Apple iPhone 7 Plus or iPad via the USB cable to your desktop.

The tool will now scan your device and reads its IMEI number.
Click on the ‘Bypass Activation Lock’ button and patiently wait for the procedure to be completed. The tool, with the help of your devices IMEI code will connect to the Apple servers from where it will terminate and delete all linked iCloud accounts of your device.
Once the process is complete, disconnect your phone and reboot it. You will notice that the iCloud lock has been permanently removed and hence no prior activation is required to use the Apple iPhone 7 Plus device.
Tips: If you’d like to know more about iCloud bypass tools, you can just read this article: Top 8 iCloud Bypass Tools .
Part 3: How to bypass iCloud activation on iOS 11 devices?
Starting with iOS 11, Apple has introduced a bizarre bug in their Activation mechanism that allows you to bypass iCloud activation completely (with SIM card working) in certain conditions. The bug relies on the passcode activation method and requires Second Factor Authentication (2FA) to be enabled on the account to which the Apple iPhone 7 Plus device is locked. As of iOS 11, the passcode activation option appears for the iCloud Locked devices if 2FA is on.
The bug allows a user to input a false passcode “0000” or “0000” if the requirement is for a 6-digit passcode a few times, then leave the Apple iPhone 7 Plus device to rest for ~1 hour, so that the session with the Apple Activation Server (albert.apple.com) expires. After that, the user would input the false passcode a few more times and the Apple iPhone 7 Plus device will skip the activation part, essentially disabling Find My iPhone server-side.
A video tutorial on how to apply this method can be followed here:
Note: You can only follow this tutorial on iOS 13/.x. iOS 10 and iOS 9 versions do not have the “Activate with passcode” option. Apple has patched this bug on the newer firmware, so it is recommended to try on iOS 11.1.1 and lower.
If 2FA is not enabled in the account, you will not see the “Activate with Passcode” option under the Username and Password fields. Instead, you will see an option called “Activation Help”.
Part 4: How to erase data remotely from your lost iPhone?
If your Apple iPhone 7 Plus is lost or stolen, one of the first steps you should take is to erase the data remotely. This not only protects your personal information but also removes the activation lock.
Note: Before proceeding, one should know that once all the data is erased from your Apple iPhone 7 Plus, you will no longer be able to use ‘Find my iPhone’ and all your data will be erased.
Steps to erase data remotely from your lost iPhone
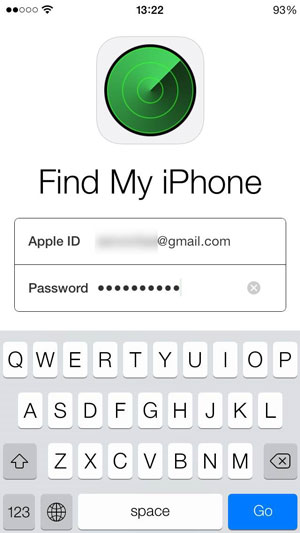
Launch Find My iPhone on any iOS device and enter your account credentials. You can use any iOS device for this procedure.

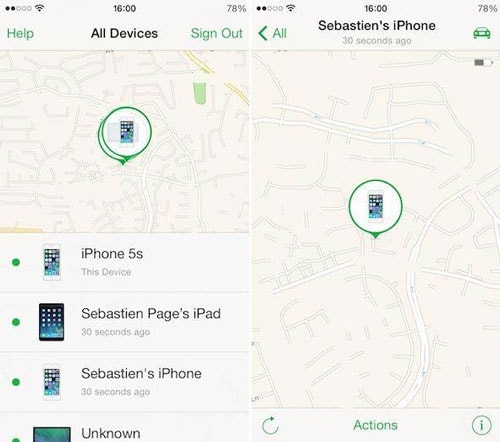
Once you log in, you’ll be able to view all the Apple iPhone 7 Plus devices linked to your account. Select the Apple iPhone 7 Plus device you wish to erase.
Please note that your device will be viewable only if the Find my iPhone feature is on your lost device and is active.

Tap on the actions button on the bottom and tap on erasing.

You will be asked for confirmation to erase your lost iPhone and will then require you to fill in your account credentials for one last time.


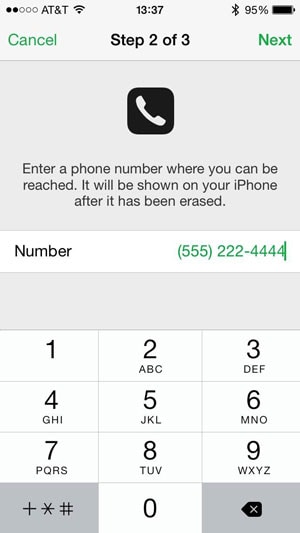
Now you will require to fill in a contact number that would appear on your lost iPhone along with a suitable message. This way, a generous person could get in contact with you to help you retrieve your Apple iPhone 7 Plus.

Once the required information is obtained, the erasing of data will start and you’ll be notified when it completes.
Video Guide
It’s pretty easy to keep your iCloud account safe if you know the simple tricks. Whether you are using iCloud on your Apple iPhone 7 Plus or any other Apple device, following these steps will ensure that your information is kept secure. And it’s really easy to bypass iCloud activation!
Part 5: How to unlock iCloud on activated iPhone / iPad / iPod?
How to remove iCloud activation lock for all iOS 13/12/11/x, iPhones 100%, and lower-version devices?
Here is how:
1. Download first the customized iTunes backup without iCloud (“Find my iPhone” should be turned OFF).
2. Connect your locked device to iTunes. Then follow the instructions in the video below, and you can add a new iCloud ID account and use the Apple iPhone 7 Plus or iPad as normal.
Note: This method will not remove iCloud from the Apple server. If you check your IMEI, you still have iCloud ON. This method, however, will remove iCloud from the local device iPhone / iPad / iPod.
Besides, Apple only offers 5GB of free storage for each iCloud account. If your iCloud storage is full or getting close, you will get annoying popups every day. You can follow these 14 simple hacks to fix iCloud storage full on your Apple iPhone 7 Plus/iPad.
Conclusion
Unlocking your Apple iPhone 7 Plus from the iCloud activation lock requires patience, precision, and tech-savviness. Choose a method that suits your comfort and device specifics: DNS servers, tools like Dr.Fone - Screen Unlock (iOS) , or Apple’s support. Evaluate methods, watch out for scams, and trust reliable solutions. The journey to an iCloud-free iPhone may have twists, but many have succeeded—so can you. This guide aims to help you reclaim your Apple iPhone 7 Plus’s functionality and demystify iCloud locks. Remember, patience, research, and the right approach are key.
How to Factory Reset iPad or Apple iPhone 7 Plus without iCloud Password or Apple ID?
If you are an iPad or Apple iPhone 7 Plus owner and are looking to reset your iPad or Apple iPhone 7 Plus without knowing the passcode, you do not need to worry anymore. Most gadget owners already know how to factory reset their phones. But in cases where you have forgotten your Apple ID password or passcode and want to reset your iPad or Apple iPhone 7 Plus, it can be done via various ways and techniques. Here, we shall discuss a few of them.
In this article, you shall find multiple ways by which you can effectively factory reset iPad or Apple iPhone 7 Plus without iCloud password and get a clean slate to work on. A factory reset will wipe all the data off of your iPad or Apple iPhone 7 Plus, so be mindful of that. The methods are all quite simple yet effective in producing the desired result. Without further ado, let us begin!
Part 1: How to Factory Reset iPad or Apple iPhone 7 Plus without Apple ID by Removing Apple ID?
If you wish to factory reset the iPad or Apple iPhone 7 Plus without an Apple ID password or iTunes, one simple way to do it is via third-party application software. A quite wonderful tool in this regard is the Dr.Fone - Screen Unlock tool. It lets its users remove multiple types of locks from screens on several different devices. Using an external tool saves users from various kinds of troubles that may arise along the way.
The Dr.Fone program is a highly useful and recommended tool for unlocking phone screens. It supports a wide range of phone models and multiple brands, including Apple, Samsung, Xiaomi, Huawei, LG, etc. Users can easily remove screen locks of multiple kinds. In addition to that, Dr.Fone also:
- It saves a lot of time and effort for the users and does its job quickly.
- Supports many brands and all the latest versions of iOS and Android.
- Protects the data of consumers, making it a trusted source worldwide.
- It is relatively easy to use, with a user-friendly interface.

To factory reset the iPad or Apple iPhone 7 Plus without Apple ID using Dr.Fone, install the program on your computer, and proceed as mentioned below.
Step 1: Launch and Connect the Program to iPad or Apple iPhone 7 Plus
Launch the Dr.Fone Screen Unlock app on your computer and connect your iPad or Apple iPhone 7 Plus with the help of a data or a USB cable.
Step 2: Choose Option
On the main interface of the program, you will see various options to choose from. Click on the “Screen Unlock” button visible there.

Step 3: Select Unlock Option
On the next screen, you will see multiple options. Choose the “Unlock Apple ID” one.

Step 4: Establish a Trusted Connection
Now, tap the “Trust” button on your iPad or Apple iPhone 7 Plus to establish a trusted connection with the computer to proceed further.
Step 5: Reset iPad or Apple iPhone 7 Plus
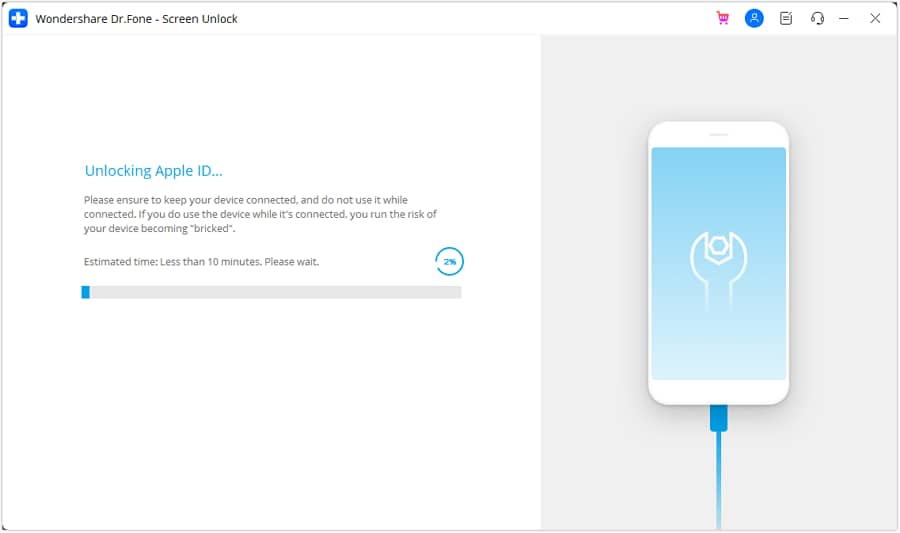
Then, on your computer screen, click on “Unlock Now.” Confirm the action on the appearing dialogue box. Next, follow the instructions visible on the screen to reset your iPad or Apple iPhone 7 Plus.

Step 6: Remove Apple ID
Dr.Fone will begin the process of unlocking your iPad or Apple iPhone 7 Plus. Do not disconnect the iPad or Apple iPhone 7 Plus during this process. Once the process is completed, reboot your iPad or Apple iPhone 7 Plus, and you shall be able to sign in with a new Apple ID.

Part 2: Factory Reset iPad or Apple iPhone 7 Plus without iCloud Password
In case you are asking yourself if it is possible to reset your iPad or Apple iPhone 7 Plus without an iCloud password, the answer is yes. If you want to learn how to factory reset an iPad or Apple iPhone 7 Plus without an iCloud password, an easy way of doing so is with an iTunes or Finder.
For Mac users with macOS Catalina 10.15 or later, they can complete the process with Finder’s help. Windows users and macOS users with older versions can use iTunes. Before restoring the iPad or Apple iPhone 7 Plus without an iCloud password, you are required to put it into Recovery mode. For that, you need to follow the steps provided as follows.
Step 1. Turn off your iPad or Apple iPhone 7 Plus
- On an iPad or Apple iPhone 7 Plus with Face ID: Make sure your iPad or Apple iPhone 7 Plus is not connected with your computer. Press and hold the Top and Volume Down button to allow the power slider to appear on the screen. Drag the slider to turn off the Apple iPhone 7 Plus device.
- On an iPad or Apple iPhone 7 Plus with Home Button: Make sure your iPad or Apple iPhone 7 Plus is not connected to a computer. Press the Side or Top button to allow the power slider to enumerate on the screen. Once it is done, drag the slider to turn off the Apple iPhone 7 Plus device.
Step 2. Enter Recovery mode
- On an iPad or Apple iPhone 7 Plus with Face ID: Connect your device to a computer. Hold the Top button for leading into the recovery mode while connecting it with the computer.
- On an iPad or Apple iPhone 7 Plus with a Home button: Connect your iPad or Apple iPhone 7 Plus to your computer. Keep holding the Home button while connecting it with the computer until the recovery mode screen appears on the front.
Step 3. Open iTunes or Finder on the computer
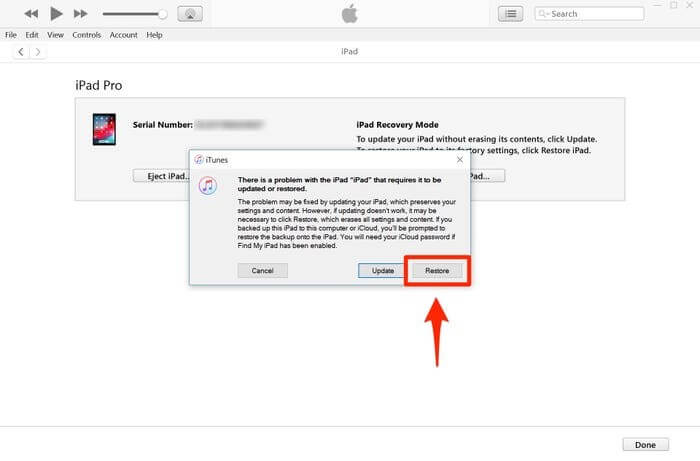
Open iTunes and access your iPad or Apple iPhone 7 Plus through the iPad or Apple iPhone 7 Plus’s icon present on the screen’s upper-left corner. With Finder on Mac, locate your iPad or Apple iPhone 7 Plus in the sidebar of its window. Tap it.
Step 4. Restore your iPad or Apple iPhone 7 Plus and set it up
The screen displays an option of ‘Restore’ or ‘Update’ for the iPad or Apple iPhone 7 Plus. Tap on the option of ‘Restore’ to let the platform download the software into the iPad or Apple iPhone 7 Plus within the recovery mode. Then set it up as a new device.
Part 3: How to Reset iPad or Apple iPhone 7 Plus without Apple ID via the Settings App?
Another way of resetting your iPad or Apple iPhone 7 Plus is via the Settings app present on your device. You can unlock a disabled iPad or Apple iPhone 7 Plus or remove all data by executing a total wipe of the iPad or Apple iPhone 7 Plus using Settings. However, before starting, please ensure that your iPad or Apple iPhone 7 Plus is connected to the internet and the “Find My iPhone” feature is disabled on it. You will also need to know the passcode of your iPad or Apple iPhone 7 Plus to proceed with this method.
Once you have done all of that, follow the steps given below.
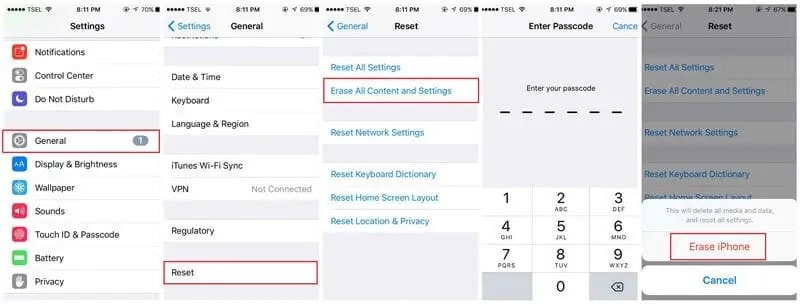
- Open “Settings” on your iPad or Apple iPhone 7 Plus.
- Go to “General.”
- Navigate to the “Reset” option and click on it.
- Select the “Erase All Content and Settings” option.
- Type in your passcode to confirm and proceed. This will wipe all the data on your iPad or Apple iPhone 7 Plus.
Based on the version of your iOS, you might be asked to enter your Apple ID password too. It will also ask for the Apple ID password if the “Find My iPhone” feature is enabled on your device. Hence, the process will not be successful without it, and your iPad or Apple iPhone 7 Plus will go to Activation Lock. Therefore, Dr.Fone is a simple, recommended, and reliable way of resetting the iPad or Apple iPhone 7 Plus without an Apple ID, saving much of the troubles.
Conclusion
There can be multiple reasons for resetting your iPad or Apple iPhone 7 Plus. Now you know how to factory reset the iPad or Apple iPhone 7 Plus without Apple ID. You can follow any of the above-mentioned methods to get the desired results as best suited to your needs. Some might work, and some might not. The Dr.Fone – Screen Unlock tool is recommended, as it is the most efficient among all the other methods. Try it to get proficient outcomes.

iCloud Unlocker Download: Unlock iCloud Lock for your Apple iPhone 7 Plus
In the digital era, an iCloud account serves as a crucial tool for Apple users to store and synchronize data seamlessly. However, there are instances where users may find themselves locked out due to forgotten passwords or other reasons. In such situations, finding a secure and effective unlocking method becomes paramount. Bypassing or unlocking the iCloud lock entails some few steps which ought to be followed correctly if the code in question is to be removed properly. In this article, we’re going to take a look at three very different yet similar in action iCloud unlock methods.
The iCloud Unlocker download method brings together the downloading and installation of an iCloud lock removal software that makes it easy to bypass the iCloud lock. Though they’re contrasting in one way or the other, these methods are similar in that they both function by removing the iCloud lock feature.
Part 1: Do I Have to Download iCloud Unlocker to Unlock iCloud Account?
When it comes to unlocking the iCloud lock, many people have often wondered whether it’s possible to bypass the iCloud activation lock without necessarily downloading an iCloud unlocking software. The truth of the matter is the fact that you can bypass the iCloud lock without necessarily downloading any type of software. This has been made possible by the presence of online unlocking companies that bypass the iCloud lock.
Part 2: iCloud Unlocker Download- iCloud Remover
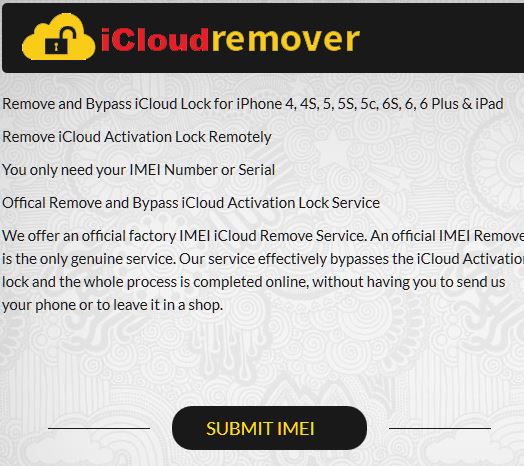
You can easily unlock iCloud account using an online method that requires you to download the iCloud unlocking software. One such method is by using the iCloud Remover software. The software functions by bypassing the iCloud activation lock and unlock iCloud lock. The time required to remove the iCloud lock depends on the make or model of your device. In general, the process takes about 3-5 business days. All you need to enjoy this service is to either submit your IMEI number to the company or download the program from their website. With this method, you can bypass iCloud lock on iPhone 4, 4S, 5, 5S, 5c and iPad devices.
Steps to Unlock iCloud using iCloud Remover
Step 1: Log into the Site
The first and foremost thing to do is to visit this website, http://icloudremover.org/index.html . On its interface, you’ll be in a position to see the “Download” icon located at the top-right side of your screen. It’s from this option that you will be able to download the iCloud remover software. The company, however, recommends users to first and foremost send their IMEI numbers to them so that they can confirm whether the locked device is compatible with their software or not.
Step 2: Unlock iCloud Lock
Once the company has received your IMEI, they’ll email you with your device model, purchase date, warranty, and carrier lock. If your device is compatible with their method, they’ll email you containing a new email address/account and password required to remove the iCloud lock. You’ll use this information to either go through the iCloud remover download process or simply remove the iCloud lock using the details sent to you.
Cons
-At $145 for the services, some users may find this method way too expensive for an iCloud unlocking service.
-You need to download the software to enjoy its services.
If you are not the type of person who wants an iCloud remover download to bypass the iCloud lock, simply turn over to the next point where you’ll get the opportunity to know how to bypass the iCloud lock without necessarily using a downloaded software.
Part 3: Unlock iCloud Lock without Download
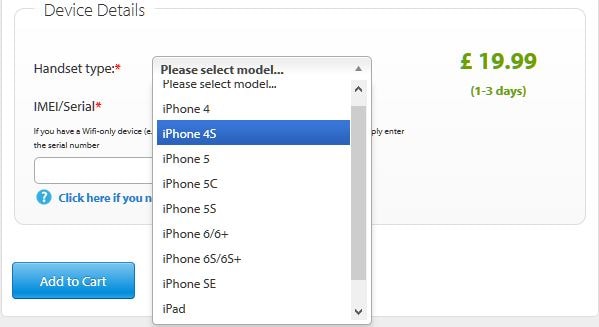
The Official iPhone Unlock method happens to be the best unlock iCloud lock method that requires no software whatsoever to bypass the iCloud lock. With this method, all you need is an active internet connection, your unique IMEI number, a valid payment option and your Apple iPhone 7 Plus or iPad make or model. You only need to spend about £19.99 ($27.00) to get your iCloud lock bypassed, unlike in our first method. The waiting period usually varies from one device to another. However, the optimum time falls between 1-3 business days.
How to bypass iCloud Activation Lock
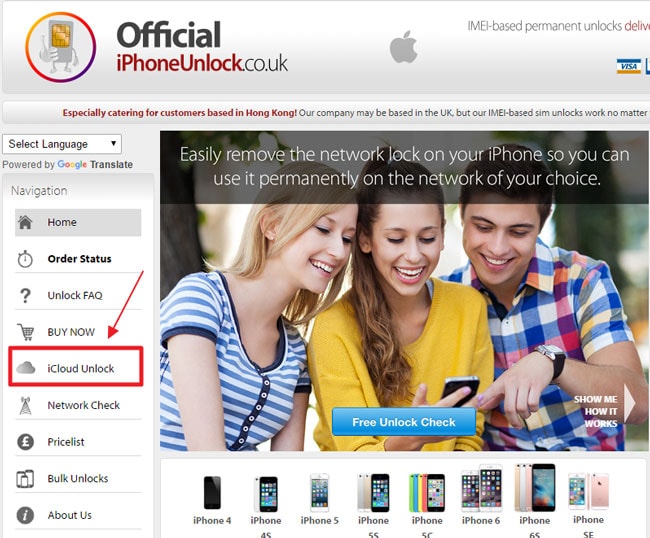
Step 1: Visit Official iPhone Unlock Website
Visit Official iPhoneUnlock website and select “iCloud Unlock”.
Enter your handset type and IMEI number in the spaces provided and click on the “Add to Cart” icon.
Step 2: Add Contact Details
Once you have clicked on the “Add to Cart” icon, a new page with an email option under the “Contact Details” will open up. Add your valid email address in the space provided. Be sure to insert a valid email, as it will be used to communicate with you the moment your Apple iPhone 7 Plus iCloud Lock has been bypassed.
Step 3: Pay Options
With your valid email submitted, you will be requested to enter your payment details. Simply choose between Visa, MasterCard, and American Express and click on the “Pay with Credit or Debit Card” icon. Once you have confirmed your payments details, a confirmation email will be sent to your designated email address. After three (3) business days, you’ll receive an email confirming that the iCloud lock has been bypassed successfully. From that point, you can comfortably use your device as you please.
Part 4: Unlock iCloud Account Without Password
Dr.Fone - Screen Unlock (iOS) stands out as a professional and powerful iOS unlocking tool. Designed to cater to the specific needs of Apple users, this tool provides a seamless solution for unlocking iCloud accounts without requiring the input of a password. Whether you’ve forgotten your password or encountered other issues leading to an account lockout, Dr.Fone - Screen Unlock (iOS) aims to simplify the unlocking process.
Dr.Fone - Screen Unlock
Remove iCloud Account without Password in Minutes
- Remove Apple ID/iCloud Account efficiently.
- Save your Apple iPhone 7 Plus quickly from the disabled state.
- Free your sim out of any carrier worldwide.
- Bypass iCloud activation lock and enjoy all iCloud services
- Works for all models of iPhone, iPad, and iPod touch.
- Fully compatible with the latest iOS.

4,008,670 people have downloaded it
How to Use Dr.Fone - Screen Unlock (iOS)

- Step 1. Begin by downloading and installing Dr.Fone on your computer. Follow the on-screen instructions for a smooth installation process.
- Step 2. Use a USB cable to connect your iOS device to the computer. Launch and select “Screen Unlock” from the main interface.
- Step 3. Once your device is connected, choose the “Unlock Apple ID” option. The tool will guide you through the process, and you will be prompted to trust the computer on your device.
- Step 4. Follow the on-screen instructions to unlock your iCloud account. Dr.Fone will initiate the unlocking process, and once completed, your iCloud account will be accessible without the need for a password.
Conclusion
From the methods mentioned above, it’s easy to see that it only takes a matter of days to unlock the iCloud account or to completely remove the stubborn iCloud lock. The diversity of both methods allows you to easily pick and use the best method that suits your preferences. Regardless of whether you want to download iCloud remover, or you simply want to go for an easy-to-use and pocket-friendly online platform, the fact remains that both of these methods have got you covered.
The iCloud unlocker download method though effective requires a lot of time to go through it and don’t forget the amount of money used to get it working. On the other hand, what I like about our second method is the fact that it’s more efficient and easy to use. With it, I don’t have to go through the tiring and complex downloading process, since the company itself bypasses the lock and renders My Apple iPhone 7 Plus usable.
Also read:
- [New] In 2024, Impressive Book Trails Presented
- [Updated] Ultimate Visual Upgrade Mastery of Video Enhancer Version 2.2
- Conversor De Vídeo Gratuito On-Line: Formatos AMV E Avi Para Video, Tudo Facilitado Pelo Movavi
- How To Bypass Activation Lock On Apple Watch Or iPhone 15 Pro Max?
- In 2024, 3 Effective Ways to Unlock iCloud Account Without Password From iPhone 6s
- In 2024, Bypass iCloud Activation Lock with IMEI Code From your Apple iPhone 14
- In 2024, How To Remove iCloud From Apple iPhone 15 Pro Max Smoothly
- The Right Moment: When to Reset Your PS5 Device
- Top-Empfohlene Kostenlose Software Zum Schutz Ihres Windows 11 Systems
- Ultimate Guide to Choosing a Premium VPN on Your iPhone - Featuring In-Depth Reviews From Professionals
- Title: In 2024, The Ultimate Guide to Bypassing iCloud Activation Lock from iPhone 7 Plus
- Author: Lydia
- Created at : 2025-02-25 13:59:48
- Updated at : 2025-03-03 20:03:34
- Link: https://activate-lock.techidaily.com/in-2024-the-ultimate-guide-to-bypassing-icloud-activation-lock-from-iphone-7-plus-by-drfone-ios/
- License: This work is licensed under CC BY-NC-SA 4.0.
