
In 2024, Ultimate Guide from Apple iPhone 7 Plus iCloud Activation Lock Bypass

Ultimate Guide on Apple iPhone 7 Plus iCloud Activation Lock Bypass
The Apple iPhone 7 Plus’s iCloud unlock is an absolute need for each client of a locked smartphone who needs to give a second life to their iDevice. You could have bought a pre-owned iPhone from another person or failed to remember your Apple ID credentials. Circumstances can be unique, yet the process is something very similar.
You want to bypass Apple iPhone 7 Plus Activation Lock as quickly as possible. Furthermore, there are numerous ways for Apple iPhone 7 Plus iCloud bypass! Typically, a user enters the credentials of the iCloud account to which the Apple iPhone 7 Plus is connected and becomes unlocked immediately.
However, this fast strategy is good just for the first owner. If you don’t know about the iCloud account connected to your account, keep following this guide to bypass Apple iPhone 7 Plus.
Part 1:3 Useful Ways to bypass Apple iPhone 7 Plus iCloud activation lock
1. Remove activation lock with the previous device owner
The first thing you can attempt to bypass Apple iPhone 7 Plus is to contact the person you bought this device from. Ask the seller about other Apple ID details so you can enter them on the activation lock screen.
Likewise, you can ask the seller (the previous owner) to enter the details all by himself. This way, you won’t get embarrassed by asking them about such crucial details regarding their account.
This method applies if the owner lives nearby and you can meet face to face. In particular, they must still remember their Apple account password. It is a very straightforward approach to bypassing Apple iPhone 7 Plus since it doesn’t require any technical knowledge. Moreover, you don’t need to run the extra mile by paying for unlocking service since you can attempt this method for free.
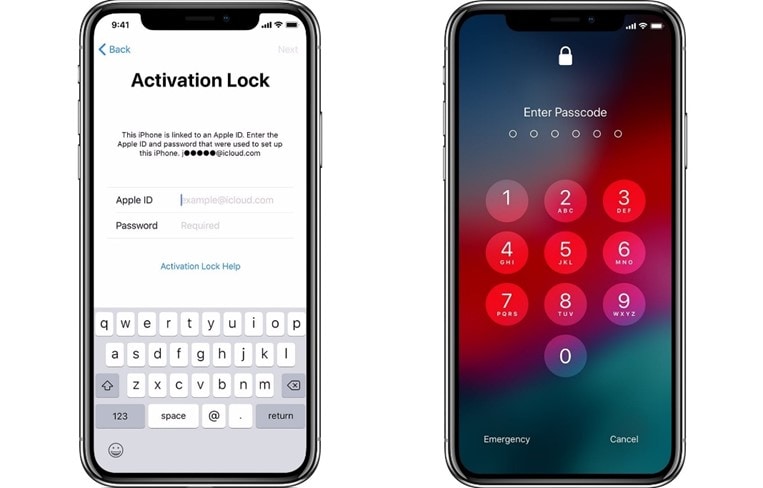
So, if you are into this method, follow the given steps:
Step 1. Enter the Apple ID details on the activation lock screen when it shows up.
Step 2. After removing the activation lock, unpair any Apple accessory connected to your Apple iPhone 7 Plus.
Step 3. Log out of iTunes, App Store, and iCloud.
Step 4. At last, erase all content and settings of your device from the Settings application. Explore the General tab and click Reset > Erase All Content and Settings.
2. Use iCloud DNS Bypass
iCloud DNS Bypass is to bypass an iCloud activation lock by manipulating the DNS server. In particular, it means redirecting the activation process of your Apple iPhone 7 Plus from Apple servers to some other servers for confirmation.
Why Use iCloud DNS Bypass?
When you purchase a second-hand Apple iPhone 7 Plus, you might find that the phone has an activated lock. Before you can set up your Apple iPhone 7 Plus, the phone will request the Apple server to activate it. The method for getting around this lock is entering the correct Apple ID.
iCloud DNS bypass proves beneficial when you want to bypass Apple iPhone 7 Plus but know nothing about the past owner. It’s likewise effective if you can’t recall your iCloud credentials.
Pros of iCloud DNS Bypass:
- You can physically change the DNS address in WIFI settings.
- If it works, you can use various features and applications on your Apple iPhone 7 Plus/7.
Steps to Bypass Activation Lock via DNS:
The steps in DNS Bypass iCloud Activation are basic; here is how to bypass Apple iPhone 7 Plus:
Step 1. When you switch on your Apple iPhone 7 Plus, pick your preferred language and region from the menu.
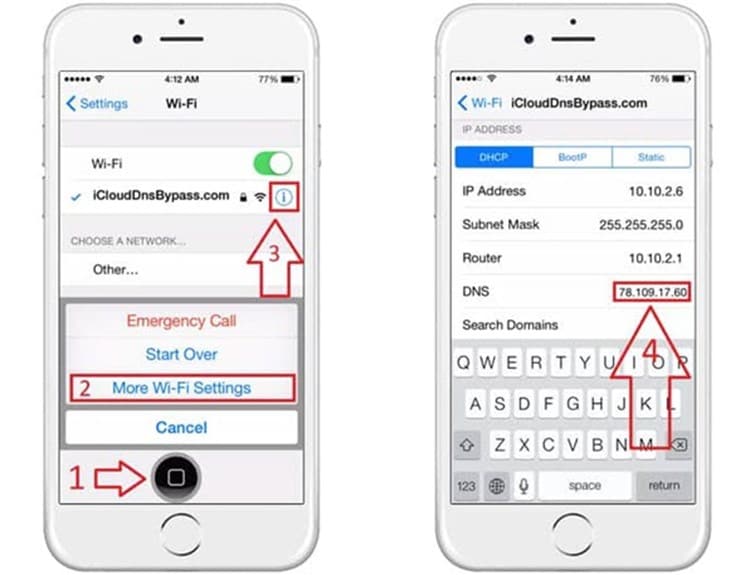
Step 2. Click “Continue” to enter the WiFi settings page. Whenever requested to connect, search for the “I” symbol near the WiFi tab.
Step 3. Presently, disconnect the WiFi, go to “Connection Settings,” and snap “Forget this Network.”
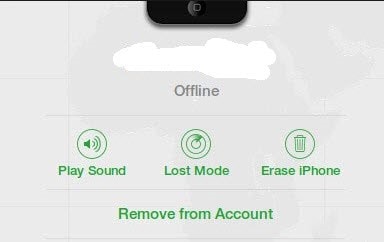
Step 4. Click the “I” and enter a DNS server IP address to bypass the iCloud activation lock. You can browse yours according to your area:
USA: 104.154.51.7
- South America: 35.199.88.219
- Europe: 104.155.28.90
- Asia: 104.155.220.58
- Australia and Oceania: 35.189.47.23
- Different Regions: 78.100.17.60
Step 5. Presently, click the “Back” choice on the left half of your screen. Turn on WiFi, select your WiFi from the rundown, and enter your password.
Step 6. Click “Next Page” and snap “Back” to enter the iCloud bypass screen.
Step 7. Set up your apps and use your Apple iPhone 7 Plus/7 as you like.
3. Dr.Fone - Screen Unlock (iOS)
The easiest way is to use an expert activation lock bypass tool to stop the issue. This method doesn’t require you to be technical or learn new concepts. You only need to search for the best available tool in the market and download it. You can do the rest of the job by just following the guidelines given by the software company.
Therefore, we recommend you use Dr.Fone Scree Unlock to bypass Apple iPhone 7 Plus. Dr.Fone is a professional tool with multiple iOS options. It can unlock the screen lock, Google FRP lock, and activation lock in a matter of minutes.
Dr.Fone - Screen Unlock (iOS)
Bypass Apple iPhone 7 Plus iCloud Activation Lock Without Hassle!
- Simple, click-through, process.
- Unlock screen passwords from all iPhones and iPads or bypass the activation lock.
- No tech knowledge is required, everybody can handle it.
- Support most iPhone/iPad/iPod Touch and most iOS versions fully!

4,395,217 people have downloaded it
Many software require jailbreak before bypassing the IOS activation lock, but Wondershare Dr.Fone Screen Unlock (IOS) stands out for the solution without jailbreak. If your device is between iOS 12.0 to 16.3, follow the steps provided below. To bypass the activation lock, follow a few easy steps and adhere to the guidelines. Moreover, you don’t need to worry about device security while using this program. It is the best tool available for all Apple iPhone 7 Plus/7 users who wish to remove the iCloud lock without delay. The steps below will guide you on how you can use this tool for Apple iPhone 7 Plus iCloud bypass:
Step 1: Launch Wondershare Dr.Fone and go to Toolbox>Screen Unlock>IOS.

Step 2: Connect your device to the computer and select “iCloud Activation Lock Removal”.
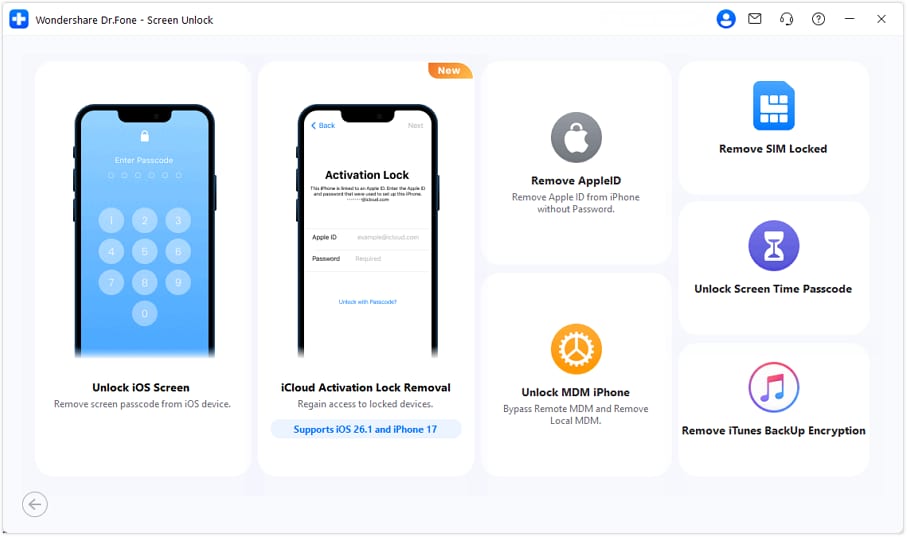
Step 3: Click Unlock Now button on the pop-up window.
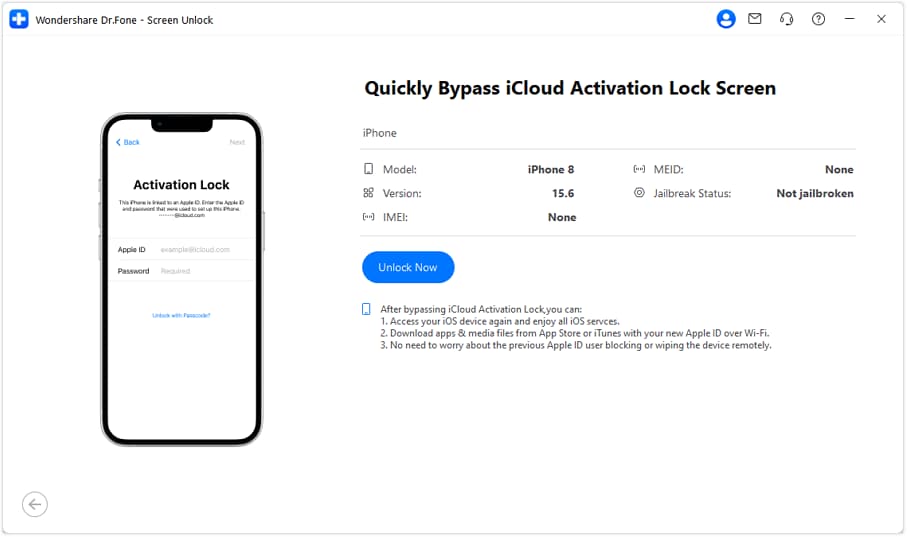
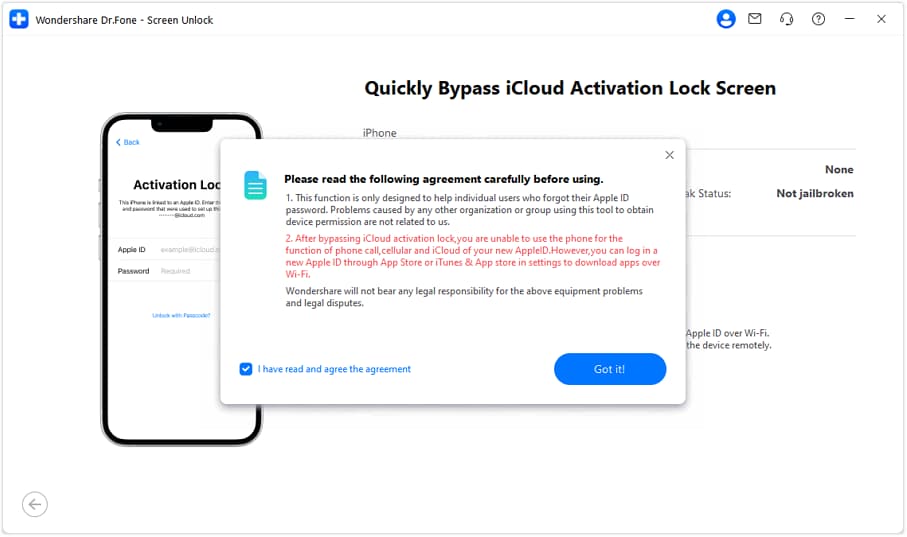
Step 4: You will see a prompt show up. Read the details carefully and checkmark “I have read and agree the agreement”. Tapping “Got it!” button.
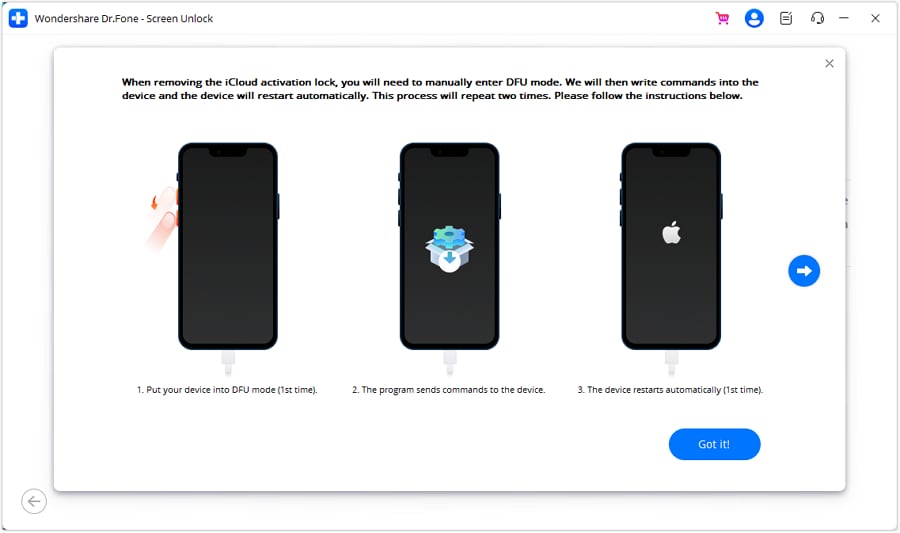
Step 5: Put iDevice in DFU Mode for the first time: the program will send a command to the Apple iPhone 7 Plus device and it will restart.
Step 6: Then you need to put the Apple iPhone 7 Plus device in DFU mode for the second time. When it’s done, the program will activate the Apple iPhone 7 Plus device.
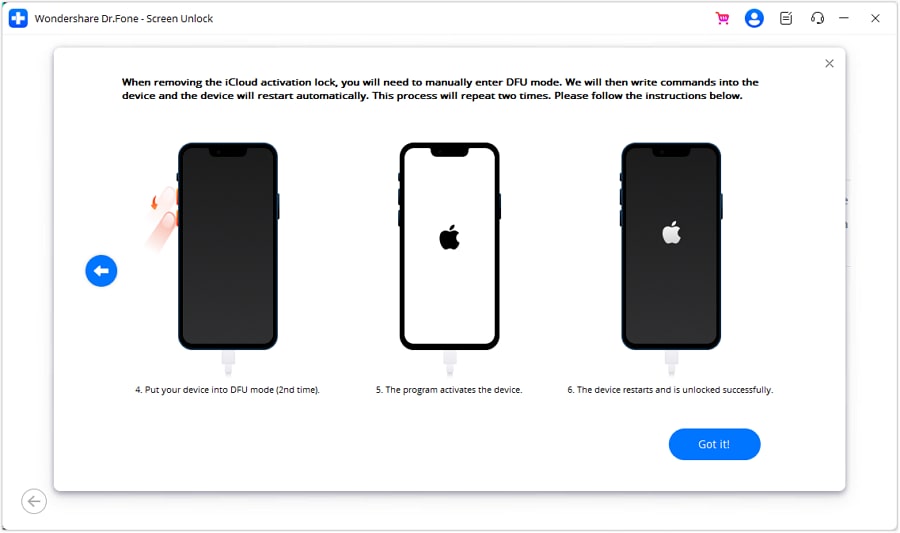
Step 7: If your device is not detected by the platform, follow the on-screen instructions to put their iOS device in DFU Mode.
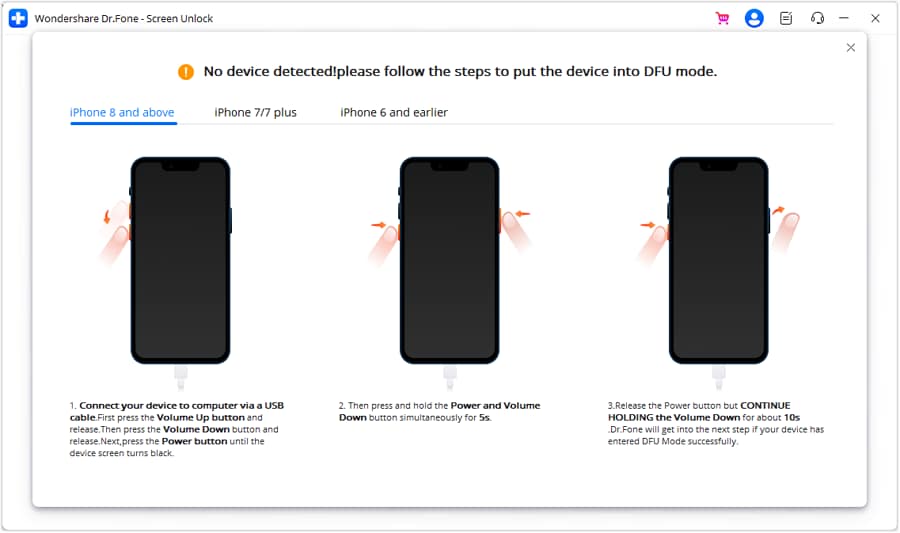
Step 8: Once the Apple iPhone 7 Plus device has been processed under the DFU Mode, the computer’s screen will start displaying the removal of the iCloud Activation Lock. When it’s done, click Done in the next window.
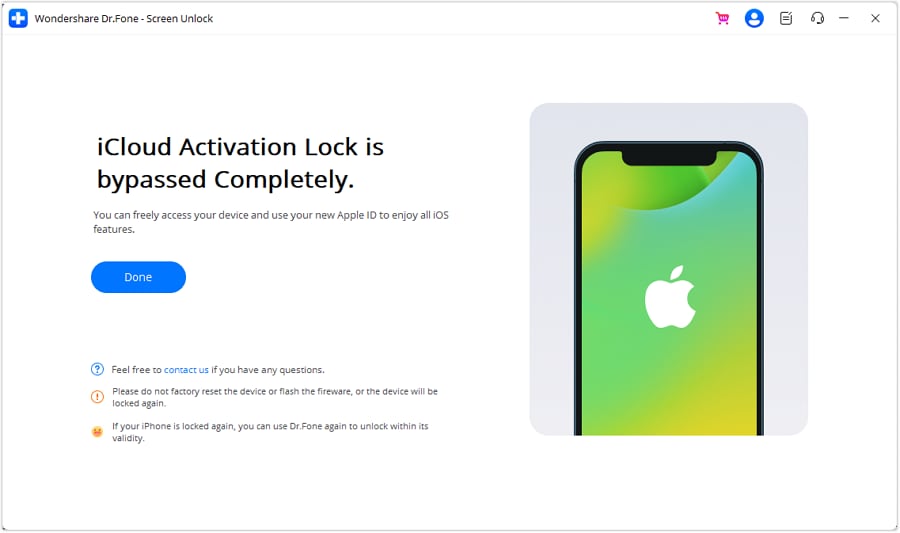
Your iPhone will start like a default phone without any activation lock. You can access and utilize the Apple iPhone 7 Plus now. Possibly, remember that you can’t utilize your new Apple ID’s phone call, cellular, and iCloud feature after that process.
Part 2: FAQs
1. What is Find My?
The Find My feature is an incredible method for keeping your Apple iPhone 7 Plus from getting lost, as it permits you to find and lock it, regardless of whether you have it. For instance, when Find My iPhone is initiated, you can see where your Apple iPhone 7 Plus is. You might use it to show your location to others or play a sound on your lost device, making it easier to find.
To utilize this feature, you need to initiate this feature on your device and utilize a PC or another phone to find, reset or lock your lost iPhone. If you’re selling your Apple iPhone 7 Plus or gifting it to someone else, you should first switch off the Find My feature. It becomes very awkward for the next user if the past owner’s Find My iPhone feature is still activated.
2. How to turn off Find My?
If you want to reset your Apple iPhone 7 Plus to erase every one of the data and return it to its default condition, Apple expects you to switch off Find My in advance. Also, experts at the Apple store frequently expect you to switch it off before they can repair it.
Switching it off will not erase any of your data, so you don’t have to stress over that. It’ll simply make it difficult to track down your Apple iPhone 7 Plus on a map when lost.
The best way to switch off the Find My feature is very direct. The following steps will tell you how to make it happen:
- Open the Settings of your Apple iPhone 7 Plus and tap your name or profile.
- Explore the “Find My” option and go for “Find My iPhone.”
- If the Find My iPhone feature is initiated, the toggle button on top of the page should be green. Switch the “Find My iPhone” toggle key to turn it off.
- Enter your Apple ID details.
- Affirm your activity, and that’s all you need to turn this feature off.
3. Can I bypass iOS Devices like iPad or iPods?
Yes, you can bypass the activation lock on iPhones like iPad and iPods. However, the method is a bit different regarding Apple Watches.
The Bottom Line
We hope you are now in a position to bypass Apple iPhone 7 Plus activation lock. This guide mentions the best methods you can employ to bypass this issue, but we all know each method has its pros and cons. Even if no other method works in your case, Dr.Fone - Screen Unlock (iOS) will still help you. This tool is built to provide safe iOS unlocking solutions for our readers.
How to jailbreak iCloud locked Apple iPhone 7 Plus
Jailbreaking is an act of removing different software restrictions imposed on your Apple iPhone 7 Plus by your operating system, in this case, iOS. Once such restrictions have been removed, you can download applications that were previously restricted by the Apple operating system. If you want to jailbreak iCloud locked iPhone, I have some methods which you can use to bypass these restrictions. What you should keep in mind is the fact that you first have to remove the iCloud lock and then jailbreak your Apple iPhone 7 Plus.
In this article, I’m going to painstakingly elaborate two (2) unique methods that you can use to jailbreak iCloud locked iPhone. The jailbreaking method you chose will depend on your preferences.
Part 1: Will Jailbreaking Remove iCloud lock?
Many people have always asked me if it’s possible to remove the iCloud lock with a jailbreak method. Well, the answer to this simple technological question is a definite NO, as we have seen in the introduction section, jailbreaking functions by removing any form of software (s) that may be restricting you from fully accessing your iDevice, but not removing the iCloud lock. In simple terms, jailbreaking will unlock your phone only after the lock has been removed by another method.
Part 2: Contact the Previous iPhone Owner
This method is only applicable to those people who bought the Apple iPhone 7 Plus from a second-hand shop or from a friend. If you bought an iCloud locked iPhone from a friend, the first thing you have to do is to contact them. In most cases, the seller is usually available to help you jailbreak the locked iPhone. Once you get in touch with the previous owner, ask them to follow the following steps to unlock the iCloud locked iPhone.
Sign in to the iCloud account> Go to “Find My Apple iPhone 7 Plus”> Select each and every device under this tab> click “Erase iPhone.” Up to this point, any information present in the phone will be deleted. Since we want to remove the previous account completely, we’ll proceed to the next step, which is to click the “Next” tab. Once we’ve done this, a new tab with “Remove Account” will emerge. Click on it to completely remove the previous iCloud account details.
Visit an Authorised Apple Store
You can jailbreak your locked iPhone by getting help from an authorized Apple specialist. The catch of using this method is the fact that you should be the original owner of the iPhone. What you need is your ID and the warranty if it’s still valid. As long as you have the required documents, these specialists will jailbreak your locked iPhone in a matter of minutes.
Part 3: How to Jailbreak iPhone
You can jailbreak your Apple iPhone 7 Plus device with the help of a jailbreaking software such as Pangu. Pangu gives you the opportunity to jailbreak your Apple iPhone 7 Plus and render it free for use. The following is a detailed step by step guide on how you can jailbreak your Apple iPhone 7 Plus.
Step 1: Download the Software
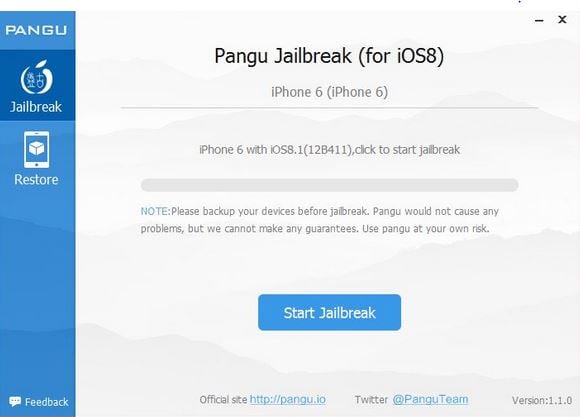
Visit the following website http://en.pangu.io/ and click on the “Download and Help” tab. A new page with the download option will open up. The entire download is about 21MB in size. With the file downloaded, install the program on your Mac and launch it. Its interface looks like the screenshot below.
Step 2: Connect iDevice
Switch OFF the “Find My Apple iPhone 7 Plus” feature and switch ON the “Aeroplane Mode.” Connect your Apple iPhone 7 Plus to your Mac using its USB cable and click on the “Start Jailbreak” tab to initiate the jailbreaking process.
Step 3: Confirmation
A new interface with a screen notification will open up. Carefully read the three steps before proceeding. If you are okay with the information, click on the “Already did” icon. The jailbreaking process will begin from this point.

Step 4: Jailbreak Complete
Your iPhone will reboot a number of times, which is normal. Once the process is done, you will get a “Jailbreak Succeeded” message and the Cydia icon display on your iDevice. Unplug your Apple iPhone 7 Plus and turn ON the “Find My Apple iPhone 7 Plus” feature. Set up your Apple iPhone 7 Plus using your new preferred details.
Part 4: Bypass iCloud Activation Lock offline with few clicks
To bypass jailbreak locked iPhone offline, you can rely on Dr.Fone - Screen Unlock (iOS). This tool comes with the power of unlocking the iPhone/iPad lock screen in minutes. Being compatible with all the iPhones, including the latest ones, the tool never disappoints users in removing iCloud lock with jailbreak devices. Let us know how to do this.
How to remove iCloud lock with Dr.Fone - Screen Unlock (iOS)
Step 1: Let the Program Downloaded
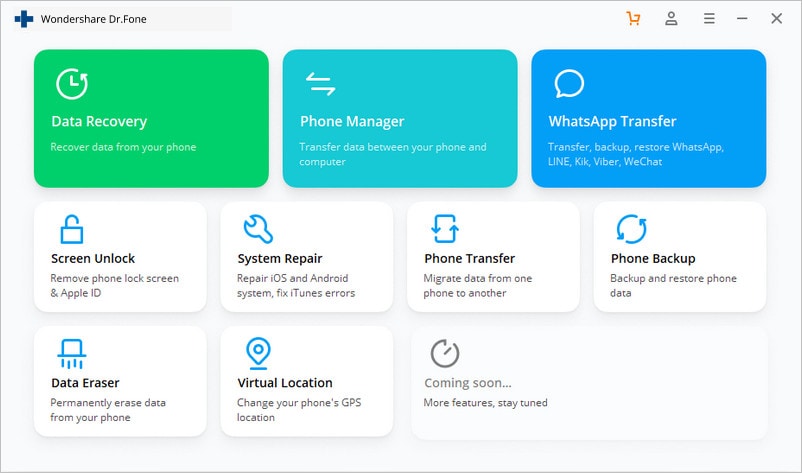
Begin to download the software and install it. Launch the program and click on the “Unlock” option on the main interface. Don’t forget to connect your Apple iPhone 7 Plus to the computer via the original lightning cord.
Step 2: Choose the Option
On the next screen, you need to press the “Unlock Apple ID” option.

Step 3: Just Key in Password
Now, you have to type in the screen password so that the scanning process becomes easier. Simply trust this computer to move further.

Step 4: Reset All Settings
You will now see the instructions on the screen. Follow those on your device to reset all settings. Reboot the Apple iPhone 7 Plus device right after this.

Step 5: Remove iCloud Lock
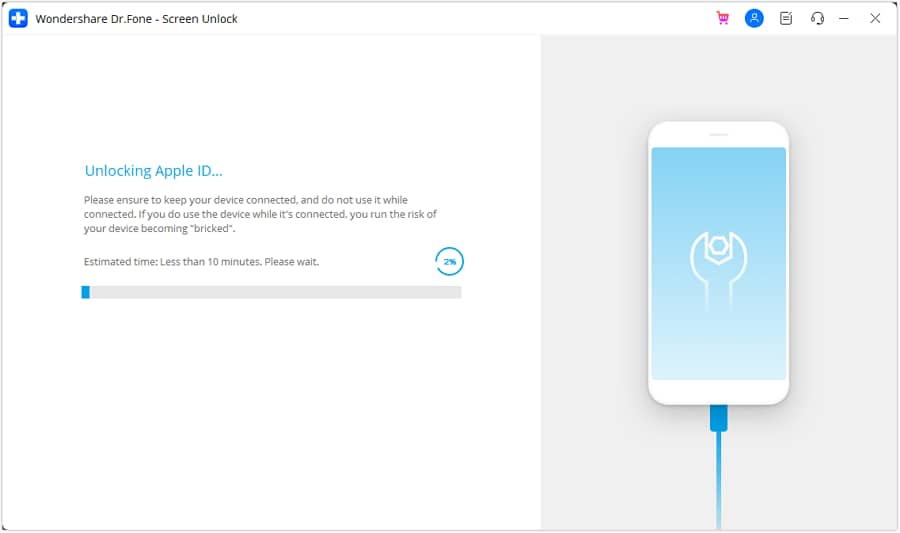
Upon the restarting of the Apple iPhone 7 Plus device, Dr.Fone will start to remove the iCloud lock, and you just need to wait till the process gets completed.
Step 6: Check the iCloud ID
Finally, you will get a new window. You are allowed to check if you have unlocked the iCloud ID successfully.

From the methods mentioned above, we can comfortably conclude that it’s easy to jailbreak iCloud locked iPhone. Regardless of the method you choose, jailbreaking a locked phone is as easy as formatting one, as long as the restrictive iCloud lock has been removed by a previous method, such as the one mentioned in part 3
Bypass Activation Lock On Apple iPhone 7 Plus - 4 Easy Ways
We can’t say when and where we can lose our iPhone, or someone can steal it from us. All we can do as a precaution is activate the Activation Lock on the screen so that you can save your precious data from being stolen. Activation Lock is a feature of Find My in iPhone that automatically turns on whenever Find My [device] is activated.
However, you may want Activation Lock removal because you are going to sell your Apple iPhone 7 Plus, and it is no longer needed. In such a situation, you need to be well-informed of the methods or techniques you can use to bypass the Activation Lock. This article will provide you with a basic understanding of Activation Lock and how you can remove it.
Part 1: What is Activation Lock?
Apple Find My [device] presents a single feature of Activation Lock that turns on impulsively whenever Find My [device] seems activated. The responsibility of these features is to ensure that the data available in your Apple iPhone 7 Plus is kept safe and secure and avoid reactivating the data even after erasing it.
Working of Activation Lock
Whenever the Apple Silicon or T2 security chip is activated in iPod, iPhone, iPad, Mac, or etc., the Apple iPhone 7 Plus device confirms that the Activation Lock is activated by contacting Apple. The time you set “Find My”, your Apple ID is securely stored and linked to the Apple iPhone 7 Plus device by Apple.
Part 2: How to Bypass the Activation Lock on iPhone or iPad
There are many scenarios that are considered as the most preferred professional methods adopted by the users for iPhone Activation Lock removal, are discussed below:
Method 1: Using iCloud.com
iCloud is one of the Apple services which is responsible for storing data like photos, passwords, notes, files, etc., and keeps the data up to date. It also provides you with a smooth transfer of data stored in it. The question is, how can we use iCloud to bypass the Activation Lock? The steps below will resolve our query by providing the required steps of solution:
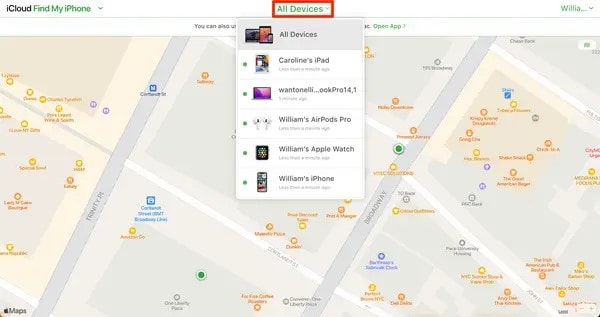
Step 1: Visit “iCloud.com” and enter the correct Apple ID and Password on the iCloud website. Now choose “Find iPhone’’ and select one of the Apple iPhone 7 Plus devices from all the Apple iPhone 7 Plus devices available on the top of the main screen.
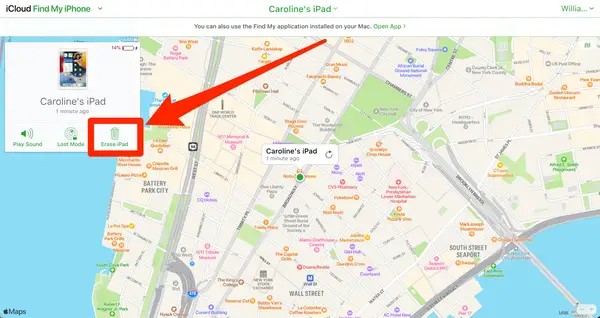
Step 2: Either click on “Erase iPhone” or “Erase iPad” and then again hit on the “Erase” choice to confirm your action. The website might ask for the Apple ID again from the Apple iPhone 7 Plus device’s owner.
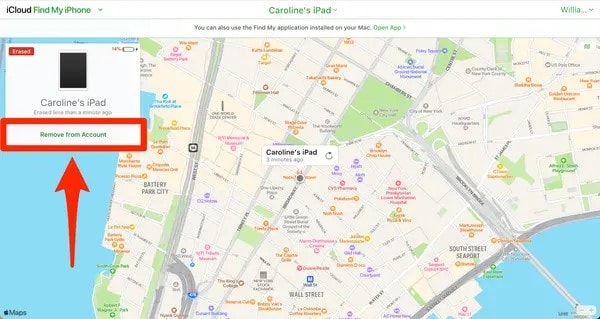
Step 3: You can then click on “Next” with your own choice if you want to leave a message or contact number on your device. After that, click on the button, “Remove from Account”.
Some pros and cons of using iCloud for Activation Lock removal are listed below so you can decide whether you are going to use this method or not:
Pros:
- It does not need any third-party tool or application to carry out the procedure.
- A user with basic knowledge can easily access and manage the whole process.
Cons:
- If you are not the Apple iPhone 7 Plus device owner, this method is not useful.
Method 2: Use iCloud DNS Bypass
The Domain Name System (DNS) transmits readable domains (names) into numerical IP addresses. Whereas iCloud DNS Bypass means we are bypassing the Activation Lock on iCloud by manipulating the DNS activation path, DNS server, and namely. You apply this method for iPhone Activation Lock removal by following the mentioned steps below:
Step 1: After switching on your device, select your “Country” and “Language” from the menu. Now, enter the settings page of WI-FI, tap on “Proceed” and look for the symbol “i” whenever you are asked to connect to the Wi-Fi.
Step 2: At that point, disconnect the internet connection and open the “Connection Settings,” then tap on the “Forget this network” choice. Now hit the “i” to bypass the iCloud Activation Lock and for this, enter a DNS server IP address. You can select one of them from the given list with respect to your location:
- For Europe, it is: 104.155.28.90
- For Asia, it is: 104.155.220.58
- For the USA, it is: 104.154.51.7
- For Australia and Oceania, it is: 35.189.47.23
- For South America, it is: 35.199.88.219
- For Europe, it is: 104.155.28.90
- And for other continents, it should be: 78.100.17.60
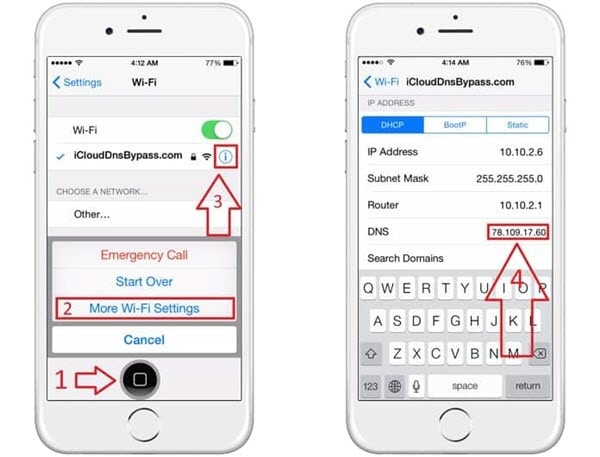
Step 3: Now, click on the “Back” option from the top left of the screen. After that, turn on the internet, choose the right network and enter your password.
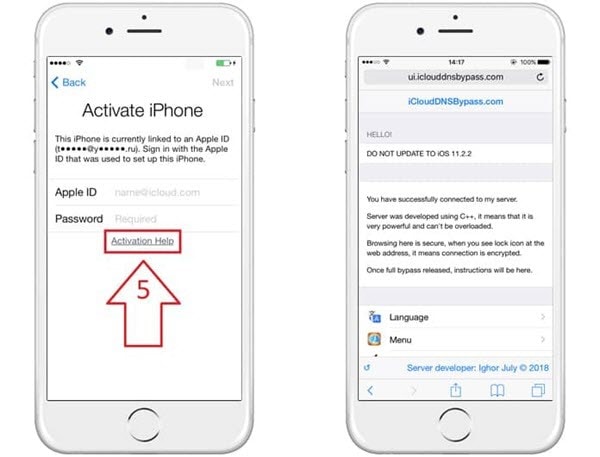
Step 4: Now, to enter the iCloud bypass screen, hit the “Next Page” and hit “Back”. Now you are free to set up your applications and use the Apple iPhone 7 Plus device in your own way.
Some pros and cons of using this method are listed below so you can decide whether you are going to use this method or not:
Pros:
- You can manually operate iCloud DNS Bypass from your Wi-Fi settings.
- It provides you with amazing functionalities and features for your Apple iPhone 7 Plus.
Cons:
It is hard for those clients who don’t understand technical things easily.
Method 3: Contact Apple Support
In case the above methods seem improper for your query, so you don’t have a lot of options left for you. Simply pick up your phone and contact Apple Support ; however, you should be the real owner of your device. Otherwise, they won’t let you do anything. You need to give them proof that you are the real owner by providing them with the Apple iPhone 7 Plus device’s MEID, serial number, and IMEI.
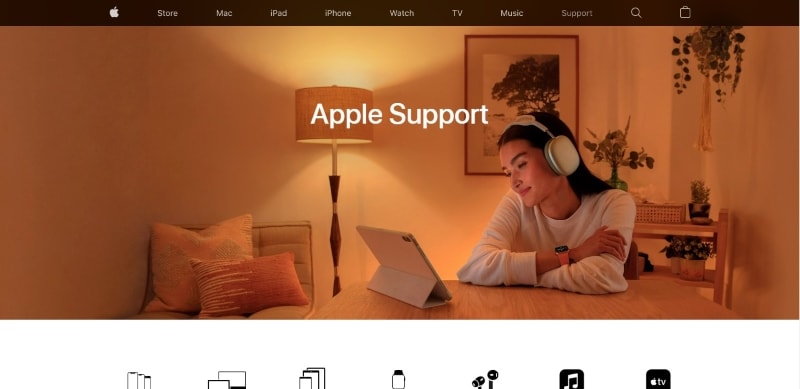
Check the mentioned pros and cons of using this method:
Pros:
- It is a costless and easiest approach to get help.
- You can remove the Activation Lock without any function limitation if you are the real owner of the Apple iPhone 7 Plus device. Using this method could also be in your favor or the other way around.
Cons:
You can’t get help from Apple support if you have purchased your Apple iPhone 7 Plus from secondhand vendors.
Method 4: Use Dr.Fone - Screen Unlock to Bypass Activation Lock
Dr.Fone is one of the best-known software applications that brings a complete solution for any complications in your Android or iOS mobile device. It supported all kinds of iOS mobile devices and versions from iPhone 5s to iPhone X and from iOS 9 to iOS 14.8 for bypassing Activation Lock. If you try to bypass the Activation Lock using Dr.Fone - Screen Unlock, then it will erase all your data.
Some other features of Wondershare Dr.Fone that show its efficiency and ability to overcome every arisen problem with a good solution:
Dr.Fone - Screen Unlock
Screen Unlock to Bypass Activation Lock
- Unlock Face ID, Touch ID, Apple ID without password.
- Bypass the iCloud activation lock without hassle.

- Remove iPhone carrier restrictions for unlimited usage.
- No tech knowledge required, Simple, click-through, process.
4,005,553 people have downloaded it
How to Jailbreak on Windows and Mac
Jailbreak on Mac and Windows should be the first thing you need to do when you are going to bypass the Activation Lock. As we know, many available tools in the market are not compatible with it. You should know what needs to be prepared before you jailbreak on Windows and Mac.
Jailbreak on Windows
The first thing you need to make sure of is that your computer runs on version 7 or above, and you have a USB flash drive with 2 GB capacity. After that, download the “checkn1x-amd64.iso “ and “WinRa1n2.0 .”
Jailbreak on Mac
To jailbreak iOS on Mac, download the “Checkra1n “ and then simply try to connect the Mac computer and the iOS device using a USB cable.
Step-by-Step Guide to Bypass Activation Lock
There are some steps that you need to follow in order to bypass the Activation Lock using Wondershare Dr.Fone. These steps are:
Step 1: Install and Download Dr.Fone, and Select Remove Active Lock
On your computer system, install and download Wondershare Dr.Fone and hit the “Screen Unlock” module from the main interface. Now go to the “Unlock Apple ID” option and then choose “Remove Active Lock”.

Step 2: Jailbreak and Confirm Device Information
Now jailbreak your Apple iPhone 7 Plus, and once it is done, a warning message will appear on the screen. You need to “Tick” the confirmation statement that you agree with the terms and conditions and click on the “Next” button. You are also required to confirm the information, like the Apple iPhone 7 Plus device model.
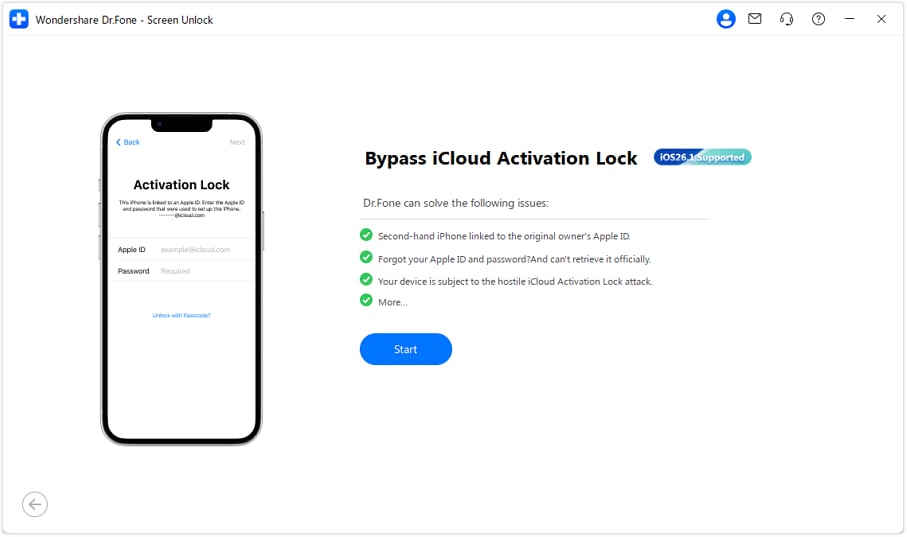
Step 3: Remove iCloud Activation Lock
Initiate the Activation Lock removal process, and it will convert the phone into a normal phone as it removes the Activation Lock without any password. It will be done in seconds, and now you are free from the Activation Lock.


Conclusion
In this article, we discussed the solutions for iPhone Activation Lock removal and how viewers can implement them if they are in need. We proposed the simplest methods, and one of them is using the Wondershare Dr.Fone - Screen Unlock (iOS) feature that can remove Activation Lock in seconds.
Also read:
- [New] Streamline Your YouTube Short Experience for 2024
- 15 Masterpieces That Defined Stop Motion Artistry
- Bypass iCloud Activation Lock with IMEI Code From Apple iPhone SE (2022)
- How to fix iCloud lock from your iPhone 13 mini and iPad
- In 2024, Full Guide to Fix iToolab AnyGO Not Working On Samsung Galaxy M54 5G | Dr.fone
- In 2024, How To Bypass iCloud By Checkra1n Even On Apple iPhone XS Max If Youve Tried Everything
- In 2024, Latest Guide on iPad 2/3 and iPhone 15 Plus iCloud Activation Lock Bypass
- Trending Platforms Clash A Look at TikTok & Snap's Features
- Ultimate Tutorial for 3D LUT Creators
- Title: In 2024, Ultimate Guide from Apple iPhone 7 Plus iCloud Activation Lock Bypass
- Author: Lydia
- Created at : 2025-02-26 11:09:27
- Updated at : 2025-03-04 04:54:24
- Link: https://activate-lock.techidaily.com/in-2024-ultimate-guide-from-apple-iphone-7-plus-icloud-activation-lock-bypass-by-drfone-ios/
- License: This work is licensed under CC BY-NC-SA 4.0.
