
In 2024, Unlock Your Device iCloud DNS Bypass Explained and Tested, Plus Easy Alternatives From iPhone 14 Plus
Unlock Your Device: iCloud DNS Bypass Explained and Tested, Plus Easy Alternatives On Apple iPhone 14 Plus
Have you bought a used iPhone or iPad with an active iCloud Activation Lock? Or perhaps you have an Apple device but cannot remember your iCloud password? Without activating iCloud, you cannot utilize locked devices in either scenario.
You might try contacting Apple customer service, but they won’t be able to assist you without user identification directly. Even after the Apple iPhone 14 Plus device has been authenticated, you will still be bombarded with inquiries, and they may even want the original iOS device payment receipt.
One of the greatest free solutions to prevent these issues is to unlock your Apple iPhone utilizing iCloud DNS Bypass. Read on to know more in this iCloud DNS Bypass Guide.
Part 1: How Can We Use iCloud DNS Bypass for iOS Devices?
After a factory reset or restoration, every time you set up your iOS device, it will send an activation request to Apple’s servers. Apple responds to your request and displays your device’s status.
Additionally, if the Find My iPhone feature of your device is enabled, an iCloud Activation Lock screen will appear and prompt you for your iCloud account login information. The iCloud DNS Bypass can assist you if you forget your login information (Apple ID or password) or purchase a used device with an iCloud lock activated. It is a free approach to unlocking iCloud.
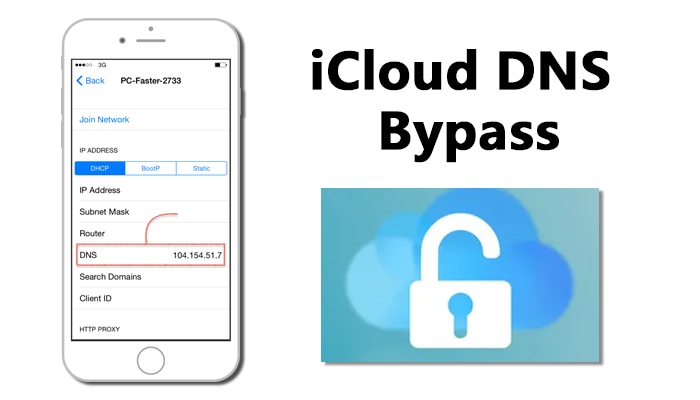
The readable names are transformed into numerical IP addresses via the Domain Name System (DNS). To launch the program, it makes use of a DNS server that serves as a host.
Use DNS to get around iCloud Server IP Address
You may first just ignore the iCloud DNS on your Apple iPhone 14 Plus or iPad. The procedure is easy. Remember that the process must be completed by inserting the SIM card into your Apple iPhone 14 Plus.
Step 1. Turn on your Apple iPhone 14 Plus, then configure it according to the on-screen instructions.
Step 2. Select your language and nation. Click Continue to access the Wi-Fi settings screen after that.
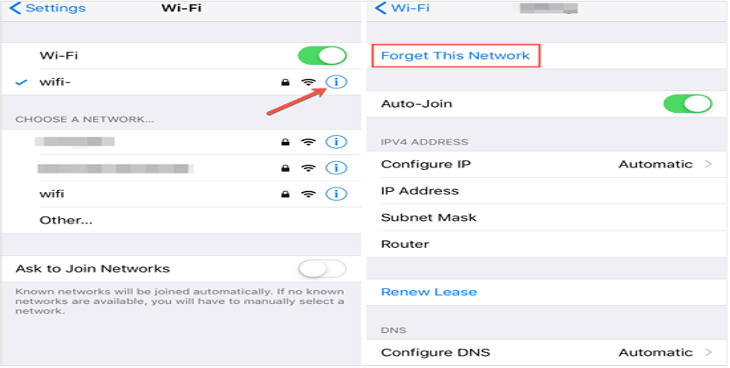
Step 3. If prompted, click the I icon next to the Wi-Fi area.
Step 4. Click Connection Settings > Forget this Network to disconnect from the Wi-Fi network.
Step 5. When asked for a DNS server IP address, tap the I symbol to unlock the iCloud activation lock. Here is a list of places for your information:
USA: 104.154.51.7
155.28.90 Europe
Africa: 35.199.88.219
Asia: 104.155.220.58
189.47.23 Australia and Oceania
It is 78.100.17.60 on other continents.
Step 6. Turn on Wi-Fi and select the Wi-Fi network you wish to connect to by tapping the Back button on the left side of the screen. Enter your passcode after that.
Step 7. When you click Next Page > Back, the iCloud bypass page will appear.
Step 8. Use your device and configure your apps.
Use iCloud DNS Bypass Crash
- Step 1. The procedures below will help you delete iCloud after DNS bypass if you cannot utilize some features on your Apple iPhone 14 Plus.
- Step 2. Tap Menu > Applications after attempting the aforementioned technique.
- Step 3. To restart your smartphone, scroll down and tap the Crash option.
- Step 4. Select “Language and Country” > Select a Wi-Fi network, click Home, More Wi-Fi Settings, Configure Proxy, and then Manual.
- Step 5. In the Server section, delete the existing HTTP address before entering 30 different emojis. Type 8888 into the Port area, then click Save at the top.
- Step 6. To access the Unlock screen, tap Back > Next. To unlock the Apple iPhone 14 Plus device, press the Home button.
- Step 7. When the Home screen appears, tap the Language choice.
Part 2: The Best iCloud DNS Bypass Alternatives to Unlock Your Apple iPhone 14 Plus/iPad/iPod Touch (Easy and Efficient)
Only if you bought a secondhand iPhone with an activation lock or want to restore the Apple iPhone 14 Plus device but forgot that Find My iPhone was ever turned on do you need Dr.Fone - Screen Unlock (iOS) . Dr.Fone - Screen Unlock (iOS) is the most promising and user-friendly product of its sort currently available. With the help of this application, you can simply fix the iCloud activation issue. You don’t need to be an expert in utilizing the application because it is simple and intuitive.
Using Dr.Fone - Screen Unlock, you can get rid of the iCloud activation lock. Launch Dr.Fone and choose “Remove Active Lock” and “Unlock Apple ID” to unlock your iCloud. It still works if you have a used iPad or iPhone.
Dr.Fone - Screen Unlock (iOS)
Remove iCloud Activation lock without Password in Minutes
- Remove Apple ID/iCloud Account efficiently.
- Save your Apple iPhone 14 Plus quickly from the disabled state.
- Free your sim out of any carrier worldwide.
- Bypass iCloud activation lock and enjoy all iCloud services
- Works for all models of iPhone, iPad, and iPod touch.
- Fully compatible with the latest iOS.


4,008,671 people have downloaded it
Here’s a step-by-step guide on how to use it
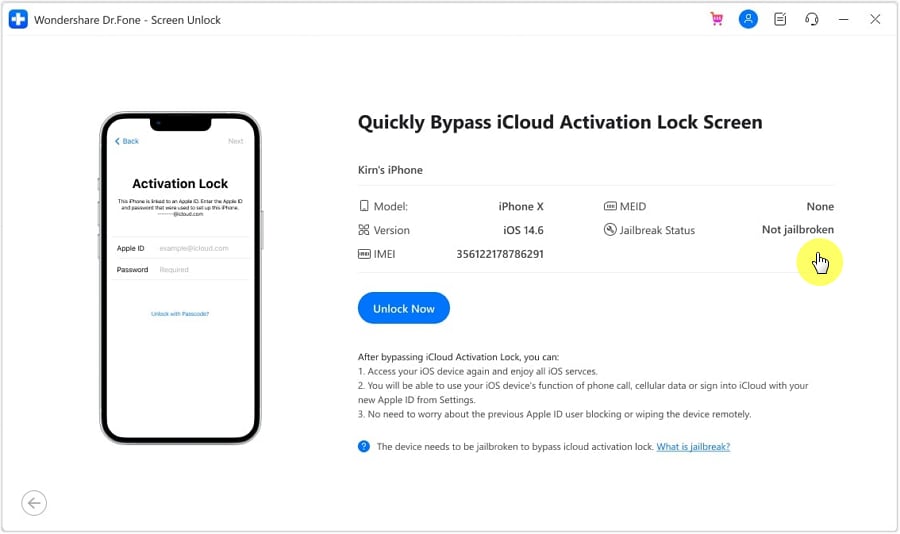
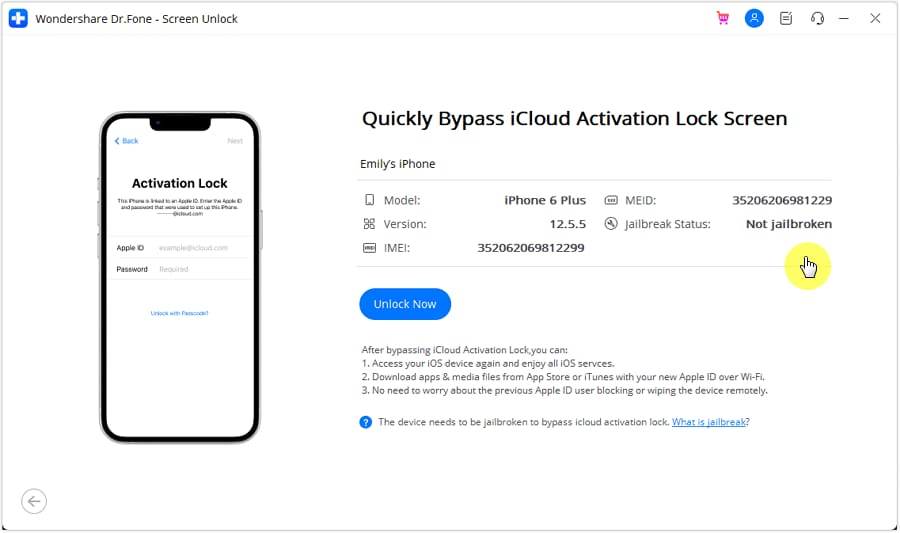
Step 1. Installing Dr.Fone on your smartphone and selecting Screen Unlock from the available options are the first steps in the procedure. You will note that there is a “iCloud Activation Lock Removal” option, among others, when you first use the Screen Unlock function. Simply clicking on it is all that is required.

Step 2. Before the bypassing process, please tape “Start”.

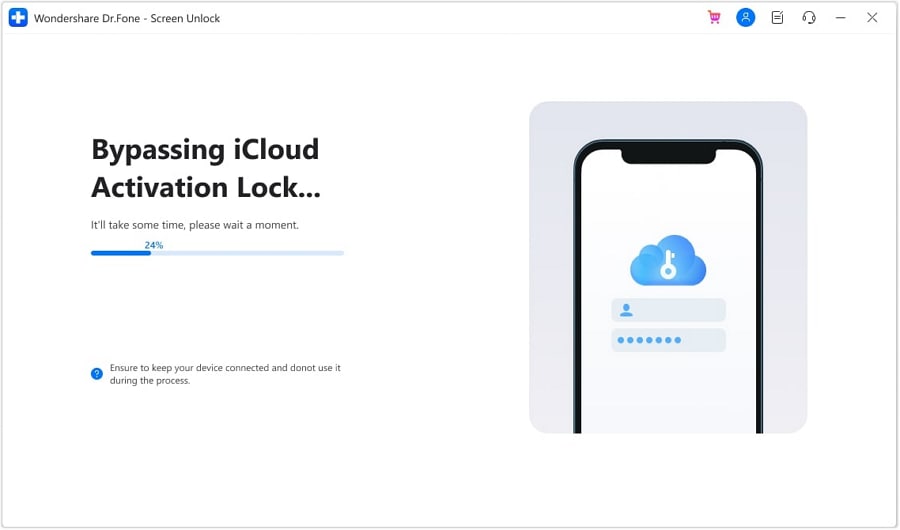
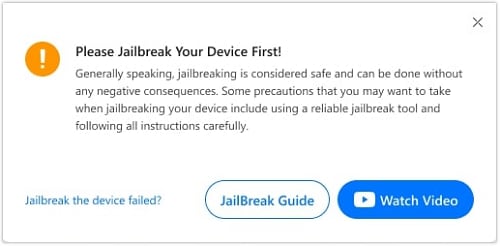
Step 3. After reaching the ‘Start’ page, Your Apple iPhone 14 Plus’s specific information will be detected to determine the appropriate operation process. Ensure that the data cable is properly connected during this process. Jailbreaking is required for iOS devices running 12.0 to 14.8.1, but for iOS 15.0 to 16.3, simply enter DFU mode twice and proceed to unlock. For detailed instructions on unlocking, you can visit this detailed guide about iCloud Activation Lock Removal.
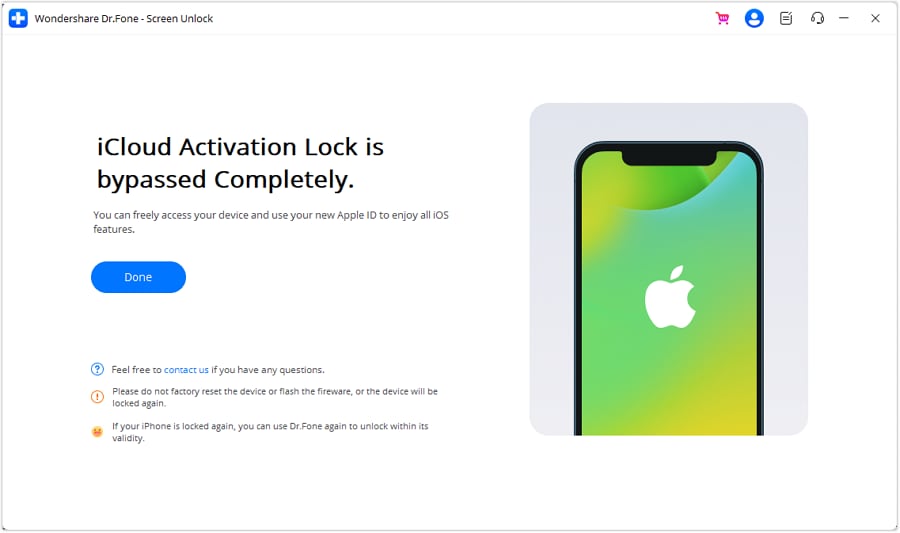
Step 4. Now we’re bypassing the activation lock, soon your Apple iPhone 14 Plus will work without the activation lock.
Part 3: FAQs
1. When Do We Require iCloud DNS Bypass?
We require it when our carrier locks our phone or when we buy a used phone and cannot use it because of an iCloud activation lock. The use of iCloud DNS bypass enables temporary access to the features and functionality of an iCloud-locked device. Domain Name Server, or DNS for short, serves the function of converting your domain names into IP addresses.
2. What Can iCloud DNS Bypass Do for Us?
When you need an urgent functioning solution for a locked iPhone, using iCloud DNS bypass is helpful since it gives you temporary access to all the features and configuration of an iCloud-restricted device. DNS, or domain name server, converts your domain names into IP addresses.
3. What are the Pros & Cons of iCloud DNS Bypass
This approach can be helpful, but it does have advantages and pitfalls of its own. These advantages and disadvantages are broken down as follows:
Pros
- You may use it without installing any software on the Apple iPhone 14 Plus device, since you can do it in the Wi-Fi settings.
- The internet, camera, and games can all be used after the gadget has been engaged, making it simple to access.
- Utilizing this approach is cost-free.
Cons
- This technique only partially unlocks the Apple iPhone 14 Plus device and represents a hack.
- The iCloud DNS bypassing technique has occasionally been reported as not working by users.
Conclusion
Now you have read all about iCloud DNS bypass, what is iCloud bypass DNS, whether DNS bypass is free, and how to iPhone DNS bypass, it is time to implement all the solutions and bear in mind that all DNS Bypass solutions are 100% free. Dr.Fone - Screen Unlock (iOS) is also a great tool to bypass screen lock, even if you don’t have any tech skills.
Apple iPhone 14 Plus iCloud Activation Lock Bypass
The iCloud lock is an element intended to save your Apple iPhone 14 Plus from missing, getting stolen, or being deleted. So, when you buy an iPhone, register it with an Apple ID, and set “Find My iPhone” to make it iCloud locked. That will make your device more secure.
However, each feature has its cons. It likewise can become problematic if you purchase a second-hand iPhone that is iCloud locked or fail to remember your iCloud details. You might end up staying with an iCloud lock screen. In such cases, you want to open an iCloud-locked device.
Therefore, this article will tell you the best Apple iPhone 14 Plus iCloud bypass techniques. It has both quicker and more permanent solutions to bypass Apple iPhone 14 Plus. So, keep following this article until the end to find a permanent solution for your Apple iPhone 14 Plus.
Part 1: What is iCloud Activation Lock in iPhone11/12?
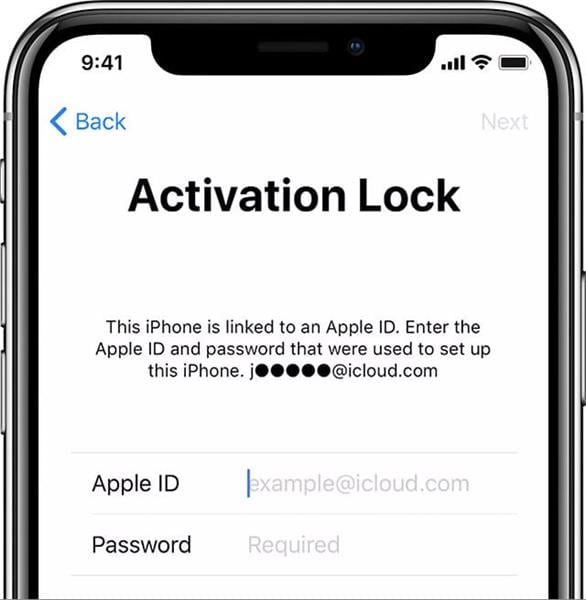
The iCloud Activation Lock is a security feature implemented by Apple on Apple iPhone 14 Plus and other iOS devices. It is designed to prevent unauthorized access to the Apple iPhone 14 Plus device by linking it to the owner’s Apple ID and iCloud account. When the Activation Lock is enabled, the Apple iPhone 14 Plus device requires the owner’s Apple ID and password to set up or restore the Apple iPhone 14 Plus device, making it difficult for thieves to use or sell stolen iPhones. The Activation Lock ensures the Apple iPhone 14 Plus device’s data remains secure and can only be accessed by the rightful owner.
Regardless of whether you erase your device, Activation Lock can keep on preventing anybody from reactivating your device without your consent. Regardless of whether your device is stolen, the other person will require either your device password or your Apple ID credentials to use the phone. Even if they try resetting your device through DFU mode, they will not have the option to reactivate and utilize it without Apple iPhone 14 Plus iCloud unlock.
However, it can create a problem for you if you’re the second owner of this device. So, if you bought this phone from someone else, you must remove the lock first. In such cases, you will need Apple iPhone 14 Plus iCloud bypass.
Part 2: How to Bypass Apple iPhone 14 Plus iCloud Activation Lock?
The iCloud Activation Lock is a security feature designed to protect iPhones from unauthorized use. However, if you find yourself with an Apple iPhone 14 Plus locked with iCloud Activation, there are a few methods you can try to bypass the lock. In this article, we will explore three methods: contacting the previous device owner for Apple ID and password, requesting remote removal of the lock, and utilizing the iCloud DNS Bypass method. Let’s dive into each method to help you regain access to your Apple iPhone 14 Plus.
Method 1. Contact the Previous Device Owner for Apple ID and Password
The first step in bypassing the iCloud Activation Lock is to reach out to the previous owner of the Apple iPhone 14 Plus and ask for their Apple ID and password. To bypass Apple iPhone 14 Plus, you need to have some data in hand:
- Bypassing the activation lock is pretty much easy. However, you need to have the Apple ID credentials of the seller if you’re the second owner.
- If a device doesn’t have the activation lock, you can see the password screen rather than the iCloud lock screen. In that case, ask the old user about the Apple iPhone 14 Plus passcode.
After getting this data, coming up next are the steps to perform Apple iPhone 14 Plus iCloud bypass:
- Step 1: Go to the Settings application on your iDevice.
- Step 2: Tap the Apple ID photo on this window. If the Apple iPhone 14 Plus device has a more up-to-date version of iOS, tap the iCloud option from the menu.
- Step 3: Now click the Sign Out option. You can sign in with your Apple account starting there forward.
- Step 4: Next, look down and click the Sign Out option. When asked, you need to enter the Apple account credentials of the first owner to toggle off the Find My feature.
However, if you see the Apple iPhone 14 Plus passcode, you can type it and set up the Apple iPhone 14 Plus device without the iCloud account.
With the Apple iPhone 14 Plus device set up, access your device’s Settings and sign out of the old ID. You can now make another one and sign into it.
Method 2. Contact the Previous Device Owner to Remove Activation Lock Remotely
If the iPhone’s first owner (seller) has forgotten to do this before selling it to you, it’s time to do it. It would help if you convinced the owner to remove the sold device from their iCloud account. They can even do that remotely by just visiting the iCloud webpage.
However, if they have sold you a stolen iPhone, you may be unable to remove the lock using this technique.
So, if it’s not a stolen device, you don’t need to worry about unlocking it. The owner can remotely control the Apple iPhone 14 Plus device and bypass Apple iPhone 14 Plus by following these steps:
- Step 1: Go to the appleid.apple.com site and sign in with the right iCloud account credentials.
- Step 2: Click the Apple iPhone 14 Plus devices tab to see all the connected iDevices.
- Step 3: Pick your Apple iPhone 14 Plus model from there.
- Step 4: Then, click Erase from Account to get it unlocked. It’s as simple as that.
Method 3. Use iCloud DNS Bypass
The third method involves using iCloud DNS Bypass, a technique that exploits a loophole in the iCloud Activation Lock system. iCloud DNS bypass is a temporary technique to access an iCloud-locked device’s features. DNS interprets your domains into IP addresses. After keying in a domain name, your DNS server takes you to that specific IP address on the internet. When you attempt to activate your Apple iPhone 14 Plus, your device connects with the DNS and the Mac servers. Someway, you can key in some domain name servers here, and they will take your device to that server.
How Can iCloud DNS Bypass Help You?
A DNS bypass can do plenty of things for you. You can unlock your device with it. When the Apple iPhone 14 Plus device unlocks, you can access applications internet and work smoothly on your costly device. It opens up most features of your Apple iPhone 14 Plus.
Limitations of this Features
When you use other ways to unlock the iCloud lock, it completely gets removed from your device, and you can utilize each feature. Unfortunately, that isn’t true with an iCloud DNS bypass server. If you utilize this technique, you can access specific features.
The steps in DNS Bypass iCloud Activation are very straightforward; here are the steps.
- Step 1: When you switch on your device, pick your LANGUAGE and COUNTRY from the menu.
- Step 2. Click “Proceed” to enter the Wi-Fi settings page. Whenever requested to connect with Wi-Fi, search for the “I” icon near the Wi-Fi tab.
- Step 3. Disconnect the Wi-Fi, go to “Connection Settings,” and snap “Forget this Network.”
- Step 4. Click the “I” icon and enter a DNS server IP address. You can browse the IP addresses below:

USA: 104.154.51.7
South America: 35.199.88.219
Europe: 104.155.28.90
Asia: 104.155.220.58
Australia and Oceania: 35.189.47.23
Other regions: 78.100.17.60
Step 5. Presently, click the “Back” choice on the left half of your screen, turn on Wi-Fi, select your network from there, and enter your code.
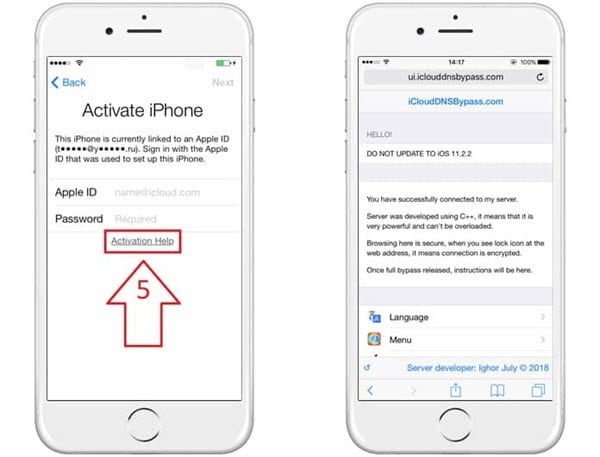
- Step 6. Click “Next Page” and snap “Back” to enter the iCloud bypass screen.
- Step 7. Your device will unlock, and you can access all its features now.
Bonus Tip: Bypass iCloud Activation Lock quickly with Dr.Fone - Screen Unlock (For iPhone 5S to iPhone X/SE 1 running iOS 12.0 to iOS 16.6)
Because of the limitations of iCloud DNS bypass and the cons of the other mentioned ways, many people tend to find a permanent solution to their issue. Therefore, we suggest you get an advanced tool to examine this matter.
Many tools are available online; however, recommending the best one is our responsibility. Therefore, we strongly advocate for Dr.Fone. Dr.Fone - Screen Unlock by Wondershare gives you a complete solution. But note that this Apple activation lock removal tool is for iPhone 5S to iPhone X/SE 1, iPad 4 to iPad 7, and iPod touch 7 to iPod touch 9 running iOS 12.0 to iOS 16.6.
It is an all-in-one iOS unlocking program that can assist you with iPhone iCloud unlock without an Apple account. It enables you to use your phone like a default one. It is portrayed as quick, straightforward, and reliable. Whether you get a second-hand iPhone trapped in the iCloud lock or don’t know about the Apple account, you can use this program to bypass iPhone 5s to iPhone X/SE 1.
Step-by-Step guide:
Step 1. Install the Dr.Fone program on your PC and choose the Screen Unlock tool. You will see “iCloud Activation Lock Removal” as the following picture shows.
Step 2. Begin your bypass process with this “Start” button interface.
Step 3. Jailbreak is the final and necessary step to finally bypass the activation lock on your Apple iPhone 14 Plus.
Step 4. When you see the progress bar moving, it means the activation lock will no longer exist on your Apple iPhone 14 Plus.
The whole process will remove the activation lock in a moment or two. Presently, your Apple iPhone 14 Plus will have no lock. You can access and utilize the Apple iPhone 14 Plus now.
The Bottom Line
Getting locked on the activation lock screen can be hectic and time-consuming if you don’t know what to do. Many of you might quit trying after surfing the internet for a solution and getting technical answers from inexperienced individuals. Therefore, we gathered this Apple iPhone 14 Plus iCloud bypass guide to help you understand the situation better.
Once you understand the issue, you can unlock it in minutes using Dr.Fone - Screen Unlock (iOS) by Wondershare. So don’t wait for a godly miracle to happen, and download Dr.Fone for a permanent answer to your queries.
A How-To Guide on Bypassing Apple iPhone 14 Plus iCloud Activation Lock
iCloud Activation Lock is a feature for Find My iPhone capability. You will need your Apple ID and its code to switch off the “Find My iPhone” feature when it is enabled. You may also need it to erase your data or reactivate and utilize your device. That is to say, iCloud Activation Lock keeps your device from getting into the wrong hands.
Regarding this security plan, if you purchased a second-hand iDevice with “Find My iPhone” enabled, you would be stuck after resetting it without a passcode. Therefore, the best way is to bypass Apple iPhone 14 Plus Activation Lock to utilize the phone. You can bypass the lock but can’t eliminate the Activation Lock by iTunes.
So, to dispose of the Activation Lock, here, we will provide the best ways possible for Apple iPhone 14 Plus iCloud bypass. All the solutions mentioned here are effective and work almost 100% of the time.
Part 1: 4 Quick Methods to Bypass Apple iPhone 14 Plus iCloud activation lock
Method 1. Ask the previous owner for Apple ID and passcode
The first thing you can do is to ask the previous owner for their Apple iCloud account credentials. You can use these details to open the account and use it for the Apple iPhone 14 Plus bypass.
However, it is the least suggested and least effective method. It is because asking someone about their account details is unethical. The iCloud account has a lot of personal information about the user. Therefore, no one will be willing to hand you the account credentials unless they are your close relatives.
Method 2. Ask the previous owner to bypass it (iCloud) remotely
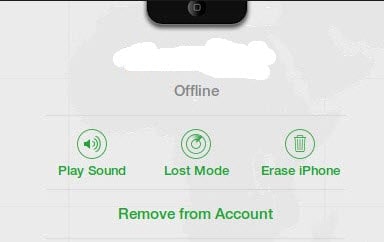
The best Apple iPhone 14 Plus bypass method is connecting with the past user and having them erase the Apple iPhone 14 Plus from their Apple ID. The previous user can enter their password on the Activation Lock screen or access iCloud. The following are the steps that the past user ought to follow:
- Sign in to iCloud.com and go to Find iPhone.
- Click “All Devices” from the top to open a rundown of the phones connected to their account. It will show all the phones connected to the iCloud account, regardless of whether it’s on the web. If this is a family account, it shows every accessory.
- Scroll down until you find the phone you need to eliminate. Click it.
- The site page will show a couple of choices for it. Click “Remove from Account” to disassociate it from iCloud.
Method 3. Use iCloud DNS Bypass
DNS represents the domain name and is a supportive method for bypassing the Apple iPhone 14 Plus activation lock. It controls the DNS server and redirects the authentication way of your phone. It assists you with the Apple iPhone 14 Plus iCloud bypass using these steps:
Step 1. Go to the Wi-Fi settings and click Configure IP. Then choose Manual and click “Add Server.”
Step 2. Click on the “i” and enter the DNS server IP according to your area, which is:
- USA: 104.154.51.7
- South America: 35.199.88.219
- Europe: 104.155.28.90
- Asia: 104.155.220.58
- Australia and Oceania: 35.189.47.23
- The rest: 78.100.17.60
Step 3. Go back and turn on Wi-Fi.
Step 4. Tap on Next Page and go back to bypass the lock.
Step 5. Set up the gadget according to your liking.
The downside of this strategy is that it is short-term. When you reboot your iOS gadget, the activation lock comes back up, and you’ll need to do it again. That can get irritating and wasteful.
Method 4. Dr.Fone - Screen Unlock (iOS)
As one of the most well-known and proficient iCloud Activation bypass software for iOS , Dr.Fone - Screen Unlock is the best way to bypass Apple iPhone 14 Plus Activation Lock.
As a complete iOS unlocking tool, Dr.Fone can satisfy your unlocking needs, regardless of whether your Apple iPhone 14 Plus is connected to an Apple ID, you want to eliminate your Apple ID, or you fail to remember your ID credentials. By utilizing its iCloud Activation Unlocker feature, you can bypass the lock without requiring an Apple ID.
Steps to Follow:
Step 1: Click Toolbox on the homepage of Wondershare Dr.Fone. Then click Screen Unlock > iOS.
Step 2: Initiate the iCloud Activation Lock Removal feature and tab the Start button. Read carefully and confirm the prompt on the next window. Continue the process by tabbing “**Got it!**”.
Step 3: If your Apple iPhone 14 Plus is not jailbroken, follow on-screen prompts to initiate the process. Opt for Jailbreak Guide for textual instructions.
Step 4: Once jailbroken, the computer’s screen will start displaying the removal of the iCloud Activation Lock. When it’s done, click Done in the next window.
You can watch the video below to get your Apple iPhone 14 Plus Cloud activation bypassed with Wondershare Dr.Fone
Part 2: What is Find My?
By all accounts, Apple’s Find My feature does what it says. If you lose your Apple iPhone 14 Plus, you can recognize its latest area using the iCloud Site, and you can make it play a sound.
Yet, Find My iPhone does substantially more! You can utilize it to find a missing Macintosh, iPad, iPod, and even AirPods. It also safeguards your data on the off chance a gadget is stolen. It even works with Family Sharing to find phones claimed by anybody in your family.
Part 3: How to Disable Find My?
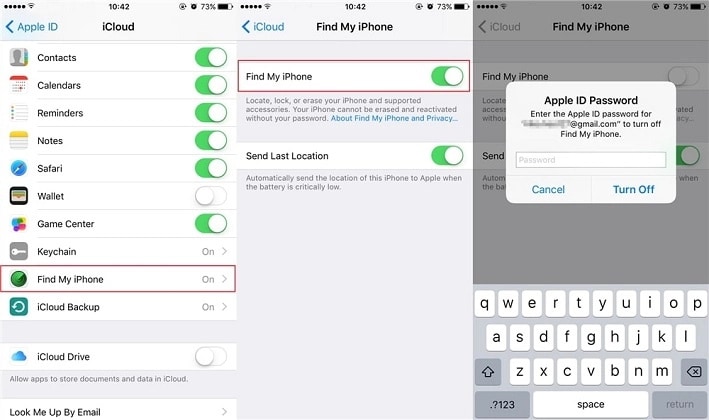
When you switch off Find My feature on your iDevice, the Activation Lock is naturally switched off. Here’s how:
- Go to Settings, click on your account (your account name) and click the “Find My” option on your iDevice.
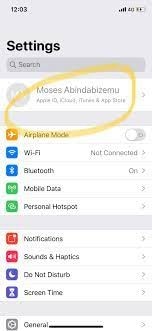
- Tap iCloud > Find My [iDevice], then switch it off.
Conclusion
Getting suck on the activation lock screen can be frustrating. Therefore, this Apple iPhone 14 Plus bypass guide tries to answer all your questions. We have listed several solutions to help you bypass Apple iPhone 14 Plus Activation lock. However, we strongly recommend Dr.Fone - Screen Unlock (iOS) as a fast and effective solution.
Also read:
- [New] Redefine Gaming Radeon's Latest Release for 2024
- [Updated] Shade Smarts Mastering the Art of Color Correction with Speed
- Effective Ways To Fix Checkra1n Error 31 On Apple iPhone 8 Plus
- How to Unlock iCloud lock on your iPhone 15 Plus and iPad?
- In 2024, A How-To Guide on Bypassing the iPhone 14 iCloud Lock
- In 2024, Effective Ways To Fix Checkra1n Error 31 On iPhone 6s
- In 2024, How to Unlock Oppo K11 5G PIN Code/Pattern Lock/Password
- In 2024, The Most Useful Tips for Pokemon Go Ultra League On Apple iPhone 6 Plus | Dr.fone
- In 2024, The Ultimate Guide to Unlocking Apple Watch Or iPhone 14 from iCloud
- Lösungsweg: Seagate DiscWizard Lässt Sich Nicht Mit Einer Festplatte Verbinden - Anleitung Zum Lösen Des Problems
- Restauración De Sistema Profesional AOMEI OneKey - Recupere Sin Esfuerzo Sus Archivos Y Partición
- The Long-Awaited Fix for Wolcen - Lords of Mayhem Is Here
- The Ultimate Guide to Bypassing iCloud Activation Lock on Apple iPhone 11 Pro
- Top VR Treadmills Review
- Troubleshooting Tips for Smooth Play in Halo Infinite - No More Stutters
- Title: In 2024, Unlock Your Device iCloud DNS Bypass Explained and Tested, Plus Easy Alternatives From iPhone 14 Plus
- Author: Lydia
- Created at : 2024-10-15 17:21:49
- Updated at : 2024-10-20 17:38:30
- Link: https://activate-lock.techidaily.com/in-2024-unlock-your-device-icloud-dns-bypass-explained-and-tested-plus-easy-alternatives-from-iphone-14-plus-by-drfone-ios/
- License: This work is licensed under CC BY-NC-SA 4.0.