
In 2024, What You Want To Know About Two-Factor Authentication for iCloud From your iPhone 14 Plus
What You Want To Know About Two-Factor Authentication for iCloud On your Apple iPhone 14 Plus
Hackers have stolen millions of iCloud credentials in the past and demanded Apple pay for a ransom. This is starting to become a thing of the past as Apple implemented two-factor authentication to secure your Apple ID.
However, it’s not always perfect, as sometimes you need to get past two-factor authentication on your iCloud for various reasons. That’s why this article will teach you how to set it up and bypass two-factor authentication on iCloud yourself if you need to. Read further to learn more.

Part 1: What Is Two-Factor Authentication for iCloud?
Not to be confused with Apple’s two-step authentication, the new and more secure two-factor authentication on iCloud introduces push notifications on your iOS device to keep your data safe. With Apple’s two unique ways to prove your identity, hackers will find it harder to access your personal and financial data.
Switching to two-factor authentication rather than two-step is becoming more common nowadays as security measures are more advanced. You can always switch your security measure at any point, but remember that two-factor authentication is now an essential way to keep your data safe.

Part 2: What Are the Benefits of Two-Factor Authentication?
Setting up two-factor authentication is a secure way to protect your device against unauthorized access. Adding another layer to your username and password highly reduces the chances of hackers obtaining your account.
Here are some of the benefits of activating two-factor authentication on your device.
- Improved security - A second form of identification aside from your password reduces the chance for someone to gain access to your information.
- Interconnectivity to mobile engagement - Two-factor authentication from businesses provides users with a stronger login system to ensure their information is safe in the digital world.
- Reduces Fraud - Due to the rise of identity theft in recent years, businesses risk losing trust, brand equity, and credibility. A secure authentication system adds a layer of protection to keep you secure.
Part 3: How To Set up Two-factor Authentication for iCloud?
If you haven’t set up two-factor authentication yet on your iCloud, here are the steps to activate it right now.
Step 1: On your Apple iPhone 14 Plus/iPad, go to Settings and tap your Apple ID profile at the top.

Step 2: Tap Password & Security and turn On Two-Factor Authentication.
Step 3: Enter a phone number to receive the two-factor code via an SMS or a phone call.
Step 4: Enter the 6-digit verification code received on your device and wait for the process the finish.
Note
You can turn off two-factor authentication within two weeks of enrollment. After that, it’s permanent.
Part 4: How To Turn Off Two-Factor Authentication on Your Apple iPhone 14 Plus?
As previously stated, once two-factor authentication is active on iCloud, you only have a two-week window to deactivate it again.
To get past two-factor authentication on iCloud, Go to Settings > your name > Password & Security. Tap Two-Factor Authentication and turn it Off again.
Meanwhile, here are the steps to learn how to bypass 2-step verification on iCloud on the web.
Step 1: Go to the Apple ID sign-in page and log in with your Apple ID.
Step 2: Click Sign-In and Security > Account Security.

Step 3: Click Turn Off Two-Step Verification. Answer a security question you’ve set up previously to finish the process.
Part 5: Is It Possible to Bypass Two-Factor Authentication for iCloud?
If you’re wondering how to bypass two-factor authentication on iCloud, the answer is no, you can’t. However, if you don’t have access to your trusted device, you can have a code sent to your trusted phone number via an SMS or an automated phone call to prove to Apple that you own the iCloud account.
If this is impossible, you should request account recovery to regain access to your account.
The easiest way to prevent this issue is by adding another phone number to your Apple ID so you’ll always have a backup. Here’s how.
Step 1: On your Apple iPhone 14 Plus, go to Settings and tap on your Apple ID > Password & Security.
Step 2: Tap Edit and choose to Add a Trusted Phone Number. You’ll have to enter your device’s passcode to continue.

Step 3: Enter your new phone number. Select a way to receive a verification code via sms or phone call and tap Send.
Step 4: Enter the verification code and wait for the process to finish.
Bonus Tips: Forgot Your iCloud Password? Here’s What To Do
Using special programs like Dr.Fone can help you recover your iOS device if you forget your iCloud password.
Dr.Fone’s key features are:
- Removes all types of iPhone locks such as Apple ID password, Face ID, Touch ID, and more.
- Bypass iCloud activation lock.
- Unlock your Apple iPhone 14 Plus without carrier restrictions.
- Remove MDM profile / bypass MDM lock without data loss.
Here’s how to use Dr.Fone if you forget your iCloud password.
Step 1: Download and install Dr.Fone .

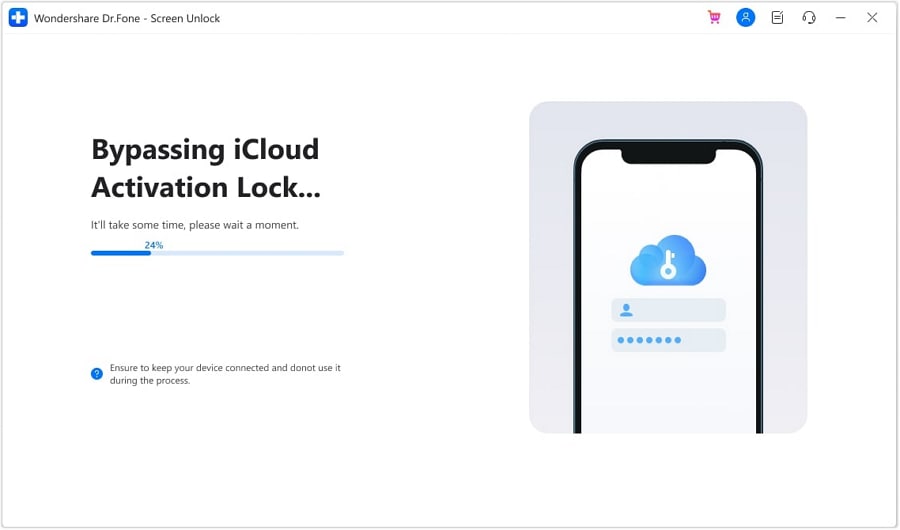
Step 2: Click Screen Unlock on the main program window. On the next screen, click Bypass Activate Lock.

Step 3: Click Start to initiate the process of unlocking your Apple iPhone 14 Plus without an iCloud password.

Note
Your iPhone will need to be jailbroken before bypassing it using Dr.Fone.
After step 3, there are two possible outcomes for GSM and CDMA iPhone devices.
- If you own a GSM device, the unlocking will do no harm to your iOS device, and you can enjoy your Apple iPhone 14 Plus as usual.
- If the Apple iPhone 14 Plus is CDMA, you won’t be able to use the Apple iPhone 14 Plus device for phone calls, cellular data, and iCloud of your new Apple ID.
Conclusion
Turning on your iCloud’s two-factor authentication is necessary for today’s high-tech society. It ensures your information is always secure and minimizes the risk of getting hacked or having your account stolen. Once two-factor is active on your Apple ID, Apple provides you with a two-week window to deactivate it if you change your mind.
Meanwhile, if you forgot your iCloud and have a hard time recovering your account, you can try using dedicated programs like Dr.Fone to unlock your iOS device in a few steps.
How to Delete iCloud Account with or without Password from your Apple iPhone 14 Plus/Windows/Mac
Apple only offers 5 GB of free storage for each iCloud account. If your iCloud storage is full or getting close, you will get annoying popups every day. You can follow these 14 simple hacks to fix iCloud storage full on your Apple iPhone 14 Plus/iPad.
In this article, we will be looking at how to delete/remove/unlock the iCloud account on different devices, even without a password. Let’s begin with how you can do this on your Apple iPhone 14 Plus or iPad!
 safe & secure
Solution 1: How to Unlock My iCloud Password with Dr.Fone? [Quick Fix]
With Dr.Fone, you can effortlessly bypass/remove/unlock your iCloud account lock within a few seconds.
Being the best and the most trusted tool in the market, Dr.Fone has the highest success rate. Moreover, this tool is absolutely compatible with the latest iOS version or with any iPhone/iPad. The process is as easy as the “1–2–3” thing.
Let’s get to know how to use Dr.Fone - Screen Unlock (iOS)!
Dr.Fone - Screen Unlock
Remove iCloud Account without Password in Minutes
- Remove Apple ID/iCloud Account efficiently.
- Save your Apple iPhone 14 Plus quickly from the disabled state.
- Free your sim out of any carrier worldwide.
- Bypass iCloud activation lock and enjoy all iCloud services
- Works for all models of iPhone, iPad, and iPod touch.
- Fully compatible with the latest iOS.


4,008,669 people have downloaded it
Here’s all that you need to do to remove the iCloud account lock with Dr.Fone - Screen Unlock (iOS) :
Step 1: Install Dr. Fone’s toolkit
Get on the browser and download the Dr.Fone - Screen Unlock. Install and launch it afterward. From the main screen interface of Dr.Fone, you need to opt for the “Screen Unlock” option.
Step 2: Get the Apple iPhone 14 Plus device to connect and boot in DFU mode
Now, you need to establish a firm connection between your device and the computer using the authentic lightning cable only, and then select the “Remove Apple ID” option.

Continue with selecting the Unlock Now button. If your device operates on iOS/iPadOS 11.4 or later, unlocking will result in data loss. For devices running iOS/iPadOS versions below 11.4 (exclusive), data will be retained after unlocking.

Following it, you will be asked to boot your device into DFU mode to proceed further. Follow the onscreen steps to get through the process to boot your device into DFU mode easily.

Step 3: Device Detected [Check device information]
As soon as your device boots into DFU mode, the program will automatically detect it and display the Apple iPhone 14 Plus device’s corresponding information over your screen. Double-check it and then hit the “Start” button to initiate downloading the latest compatible firmware version for your device.

Step 4: Remove the iCloud Account Lock
Lastly, when the firmware version is successfully downloaded, you need to hit on the “Unlock Now” button to get started with removing the iCloud account lock.

Wait for the process to complete. “Completely unlocked”, the iCloud account lock will no longer be there on your device.
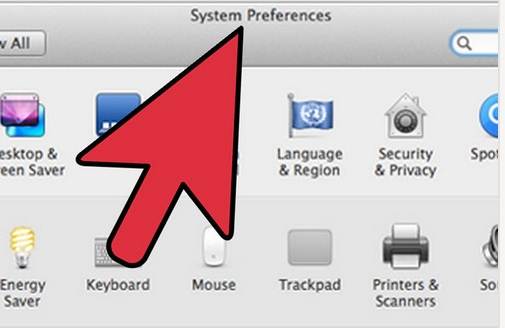
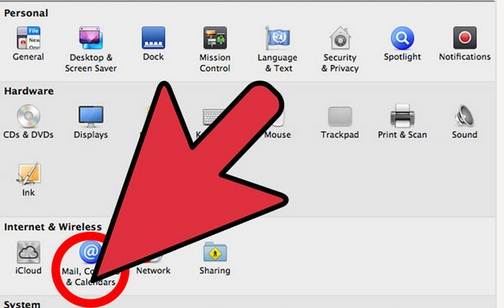
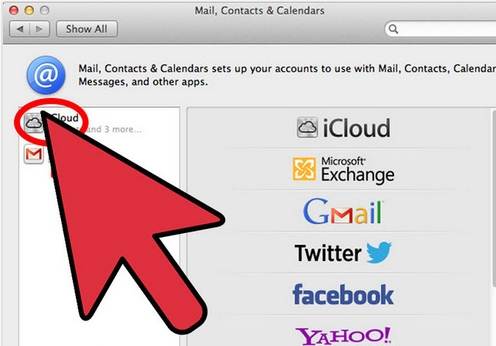
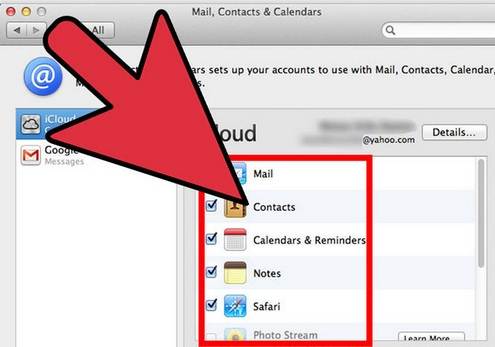
Solution 3: How to Disable iCloud on Mac?
If you need to disable iCloud on the Mac, follow these straightforward steps.
- Step 1. Click on the Apple Icon and then “System Preferences” from the Context menu.
- Step 2. In the System Preferences Window, click on “Mail, Contacts & Calendars”.
- Step 3. Choose iCloud from the left pane of the resultant window.
- Step 4. Check the box next to the App you want to disable or enable in the pane on the right.
Also Read: How to Reset iPhone Without Apple ID >>
Solution 4: How to Delete iCloud on Windows Computers?
If your iCloud account is on a Windows computer, and you want to remove it, here’s a step-by-step on how to easily do that. But before we get to the steps, you must have a backup for all your information on the iCloud.
Steps to remove iCloud on Windows computers
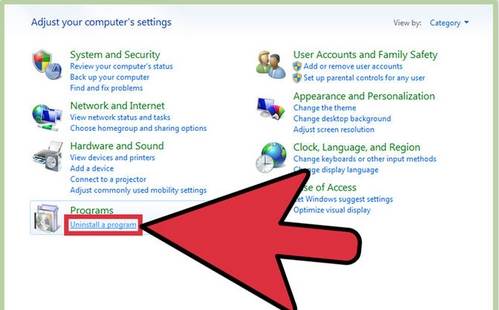
- Step 1. On your Windows PC, click on “Start” and the Control Panel. In the Control Panel, select “Uninstall a Program”.
- Step 2. Find iCloud in the List of programs on your computer.
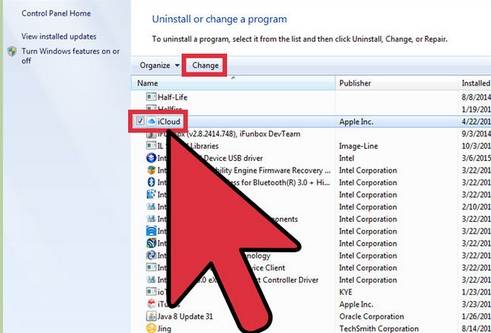
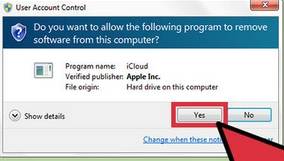
- Step 3. Select remove iCloud for Windows from this Computer when prompted. Then click on “Yes” to confirm the deletion, and then wait for the process to complete.


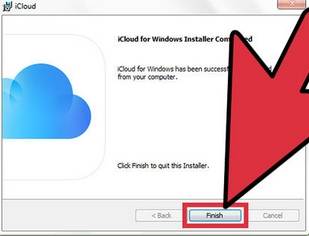
- Step 4. Click on “Yes” when the PC asks if you want iCloud to make changes to it. Once the process is complete, click on “Finish” and then manually restart your system.
Solution 5: Tips to Remove the iCloud Account Without a Password on iPhone?
The iCloud account is a great way for Apple users to sync their phone data, but you may need to remove your iCloud account for personal reasons. This is normal, but if you forgot your iCloud account’s password, how can you remove the iCloud account without a password on your Apple iPhone 14 Plus?
Steps to delete iCloud account on iPhone/iPad
In case you forgot the Apple iPhone 14 Plus password and want to remove the iCloud account without a password, here’s how to do it in simple steps.
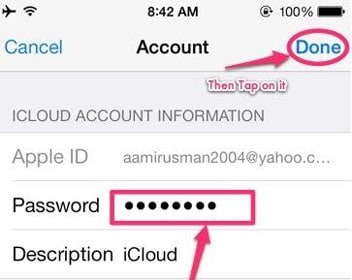
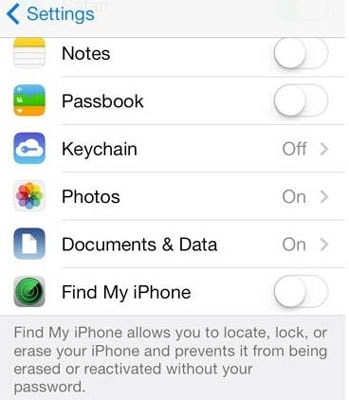
- Step 1. Go to the Settings app and find iCloud. Tap on it to open. When prompted for a password, enter any random number. Then tap on “Done”.
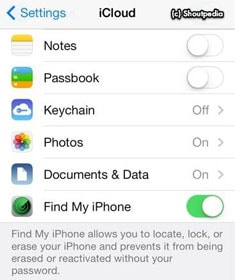
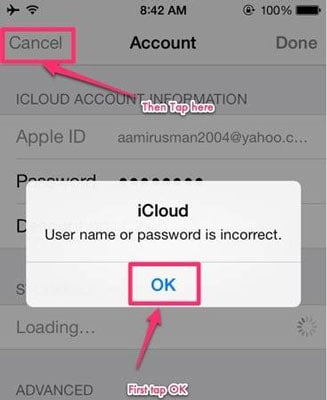
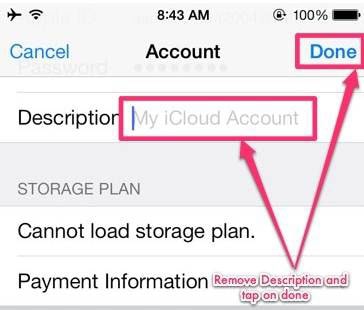
- Step 2. iCloud will tell you that the username and password you entered is incorrect. Click on “OK” and then “Cancel” to go back to the main iCloud page. After that, tap on Account again but this time, remove the description and then tap on “Done”.
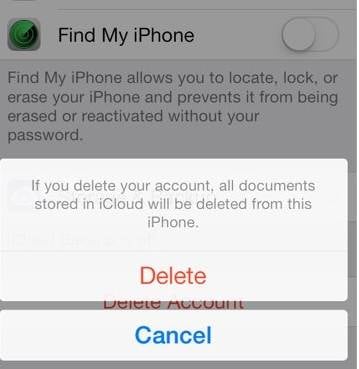
- Step 3. This time, you will be taken back to the main iCloud page without entering your password. You will also notice that the “Find my Phone” feature has been turned off automatically. Then scroll down and tap on Delete. You will be prompted to confirm the deletion, you can do by tapping on “Delete” again.
What if the above steps fail to remove the iCloud account without a passcode
If the above steps fail, you need to bypass iCloud activation before removing an iCloud account, since the passcode is forgotten. So, here I will share with you an iCloud removal website to unlock iCloud lock (remove iCloud account) permanently without a passcode.
Note: To be honest, this method cannot ensure a 100% success rate, but you can still give it a try anyway.
Steps to unlock your iCloud account online
- Step 1. Go to the Official iPhone unlock and click “iCloud Unlock” on the window’s left side.
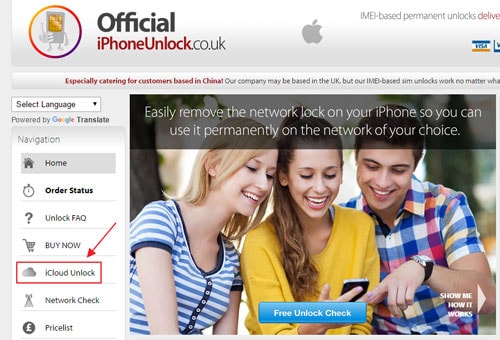
- Step 2. Select your Apple iPhone 14 Plus model and enter the IMEI code of your device. If you don’t know how to find your IMEI number, you can click the blue text “Click here if you need help finding your IMEI” below.

- Step 3. Then you can get a confirmation message that your iCloud will be unlocked in 1–3 days.
Conclusion
So, here you unlock your iCloud account. iCloud activation lock can be easily bypassed if you have the right tool. With the highest success rate of bypassing the iCloud activation lock, Dr.Fone - Screen Unlock (iOS) is what you are looking for. I hope it will be useful for you to bypass iCloud activation when confronting such kinds of problems.
A How-To Guide on Bypassing the Apple iPhone 14 Plus iCloud Lock
Have you bought a second-hand Apple iPhone 14 Plus, and it is iCloud locked? Or, do you own an Apple device yet have forgotten its iCloud credentials? Regardless of your issue, you can’t use the locked phone without Apple iPhone 14 Plus iCloud bypass. It is indeed a troublesome experience and can delay your work.
You might attempt to contact Apple support, yet they won’t help you directly without user confirmation. You will get many questions, and they might request the first iOS device payment receipt, even after the confirmation of the Apple iPhone 14 Plus device.
Therefore, we have compiled this Apple iPhone 14 Plus iCloud bypass guide to help users remove the activation lock. So, if you are facing these issues, stay with us till the end to find a solution.
- 1. Get Apple ID and password from the original device owner
- 2. Use DNS Bypass
- 3. Emergency Call
- 4. Dr.Fone - Screen Unlock

Part 1: 4 Efficient Methods to Bypass Apple iPhone 14 Plus iCloud Activation Lock
1. Get Apple ID and password from the original device owner
For an Apple iPhone 14 Plus iCloud bypass, you’ll require a couple of significant pieces of data:
- Bypassing the Activation Lock on iPhone is as straightforward as signing in to the Apple iPhone 14 Plus device. It would help if you had the Apple ID credentials of the previous owner.
- If a device doesn’t have the activation lock, you might see the passcode screen instead of the activation lock screen. Therefore, you should have the Apple iPhone 14 Plus passcode in mind.

After getting the required details, the following are the steps to perform Apple iPhone 14 Plus iCloud bypass:
- Step 1: Go to the Settings application on your Apple iPhone 14 Plus.
- Step 2: Tap the Apple ID photograph from the highest point of the screen. If the Apple iPhone 14 Plus device has a newer version of iOS, then, at that point, you should tap the iCloud choice.
- Step 3: Now tap the “Sign Out” button. You can sign in using your own Apple ID from that point onward.
- Step 4: Next, look down and tap the “Sign Out” choice. When asked, you should enter the Apple ID password of the past owner to disable the Find My iPhone choice.
On the other hand, if you see the lock screen passcode, you can type the passcode and set up the Apple iPhone 14 Plus device without the Apple ID.
With the Apple iPhone 14 Plus device completely set up, access your device’s Settings and sign out of the old Apple account. You can now make one more ID and Sign into it.
2. Use DNS Bypass
What is DNS?
Domain Name System (DNS) changes over the readable names into numeric IP addresses. It utilizes the DNS server as a host to run the app. If your device is iCloud locked, one good way is to change its activation path through the DNS strategy and send it from the first Apple server to the iCloud Bypass DNS server for validation.
You can change the IP server path from the Wi-Fi settings, even if the activation screen is sprung up and you can’t utilize the Apple iPhone 14 Plus device. You can enter the manual Wi-Fi setting and change the DNS address. This section focuses on how you can perform Apple iPhone 14 Plus iCloud bypass via DNS bypass.
Steps to Follow:
Note: Before performing the iCloud DNS bypass, ensure that your device has a SIM card embedded. This step is mandatory for this process to work.
- Step 1: Select your nation and language from the menu on the screen.
- Step 2: When you continue it, you will be coordinated to the Wi-Fi setting page, requesting that you connect with a WIFI connection. Search for the “I” icon close to the Wi-Fi network.
Note: If you don’t see the “I” icon close by, press the Home Button> More Wi-Fi Setting and search for it.
Step 3: You must disconnect the Wi-Fi. When you find the “I” icon, go to the settings tab and select the “Forget this Network” option.
Step 4: Click “I” and enter a DNS server to bypass iCloud Activation Lock as per your area, against the DNS tab. Pick one from the given IP addresses according to your region:
USA: 104.154.51.7
South America: 35.199.88.219
Europe: 104.155.28.90
Asia: 104.155.220.58
Australia and Oceania: 35.189.47.23
Other landmasses: 104.155.28.90
Step 5: After entering the IP address, tap the Back choice at the left of the screen. Now, turn on Wi-Fi, select the Wi-Fi network from the rundown and enter the code.
Step 6: You will see the next page choice; don’t click it and press “Back”. Now you are on the iCloud Bypass screen.

- Step 7: Look down the page, go to the menu and set up your applications, music, camera, and so forth.
3. Emergency Call
Utilizing the Emergency call strategy is another free Apple iPhone 14 Plus iCloud bypass method. It is among the clearest and speediest procedures to remove your iCloud account. The guidelines underneath will show you how to unlock your iCloud free by utilizing the Emergency Call technique:
- Step 1: Turn on your Apple iPhone 14 Plus. Select your preferred language and current region.
- Step 2: Now, on the iCloud activation screen, press the home button three times to begin on Voice Command and multiple times to close down.
- Step 3: Again push on a home button, and this time select Emergency Calls.
- Step 4: Now, you need to key in *#96274825*0000*1#. Then press the call button multiple times.
- Step 5: Then, you need to modify the last digit from 1 to 2 and repeatedly press the call button.
- Step 6: Perform this strategy once more. When you adhere to every one of the guidelines, press the back button, and turn around to the starting screen.
- Step 7: Now, just like you did before, select your language and country. After picking it, you will see the bypass screen.
4. Dr.Fone - Screen Unlock
How would I remove the past owner’s Mac ID from an iPhone? Removing the past user’s Apple ID from your iOS device could be difficult if you don’t know the Apple ID credentials. Yet, it is possible due to expert Apple ID bypass software.
If you’re searching for the fastest method for eliminating the activation lock on your Apple iPhone 14 Plus, look no further from Dr.Fone - Screen Unlock (iOS) . This expert program is extremely convenient when you can’t open your iOS device without a password, or you’re experiencing an activation issue. Dr.Fone is fit for rapidly unlocking/bypassing Apple ID from any iOS device. After the Apple iPhone 14 Plus iCloud bypass, you can use your Apple iPhone 14 Plus with no issues.
Step-by-step Guide:
Step 1. Install the Dr.Fone program to the computer and launch the Screen Unlock tool from the home page.
Step 2. Find the “iCloud Activation Lock Removal” button, click it and start to bypass the lock.

Step 3. Before bypassing the activation lock on your Apple iPhone 14 Plus/4s, here is the “Start”.
Step 4. Now you’re having an iPhone without the activation lock, you can prepare a new Apple ID for this device.
When arriving at this final page, the whole process is done.

Your iPhone will start normally. You can access and utilize all the features of your phone now. Remember that you can’t utilize your new account’s phone call, data, and iCloud features after bypassing them.
Part 2: FAQs
When do we need to bypass Apple iPhone 14 Plus activation lock?
If you have bought a used phone, and it shows the activation lock screen, you may need Apple iPhone 14 Plus iCloud bypass. The activation lock screen happens when you buy a phone from someone else, and they forget to remove the phone from their Apple ID.
Once the lock activates, you can’t reset and use different features of your phone. Therefore, the activation lock can be a troublesome experience for many. So, in such situations, you need to remove/bypass the activation lock through different techniques.
Note: Activation lock ensures the safety and prevents you from buying a stolen phone, which may create problems for you in the future.
What to do to turn off Find My?
- Open up the Settings menu.
- Select your name from the menu. Then select Find My choice.
- At the top of the following page, Tap Find My iPhone and flip the setting off.
- Enter your Apple ID credentials when asked and press “Turn Off”.
The Bottom Line
In this informative guide, we have listed the Apple iPhone 14 Plus iCloud bypass methods. However, if you don’t have the Mac ID credentials to initiate your Apple iPhone 14 Plus, you will require help from an expert program that can bypass the Apple iPhone 14 Plus activation lock. Therefore, we strongly suggest Dr.Fone - Screen Unlock (iOS) . Download the problem-free Dr.Fone activation lock bypass program to get rid of the lock on your Apple iPhone 14 Plus.
Also read:
- [New] 2024 Approved Twilight Portraiture Techniques Your Guide to Stunning Images
- [New] An Exhaustive Feature Analysis of Du Recorder for 2024
- [Updated] A Beginner's Approach to Adding Dates to Photographs
- [Updated] Essential Tips for Smooth Screen Sharing on Skype While Working From Home for 2024
- [Updated] In 2024, Accelerated Image Editing Your Path to Masterful Windows Photo Work
- [Updated] In 2024, Superior Smartphones That Dominate in Video Recording
- [Updated] Novice's Nook The Easiest MC Dwellings Explored for 2024
- Comprehensively Understanding Hands' Directive Controls for 2024
- Effective Ways To Fix Checkra1n Error 31 On iPhone 14 Pro
- Filmora's Top 10 for Seamless Image Transitions
- How to Unlock iCloud lock from your iPhone 12 Pro Max and iPad?
- In 2024, 4 Things You Must Know About iPhone 12 Pro Max Activation Lock
- In 2024, Bypass iCloud Activation Lock with IMEI Code On your iPhone 15 Pro
- In 2024, Easy Fixes How To Recover Forgotten iCloud Password On your Apple iPhone 15
- In 2024, How to Remove iPhone 13 Pro Max Activation Lock
- In 2024, Unlocking an iCloud Locked iPad and Apple iPhone 13
- What You Want To Know About Two-Factor Authentication for iCloud On your Apple iPhone XS Max
- Title: In 2024, What You Want To Know About Two-Factor Authentication for iCloud From your iPhone 14 Plus
- Author: Lydia
- Created at : 2024-10-19 19:25:22
- Updated at : 2024-10-20 19:11:17
- Link: https://activate-lock.techidaily.com/in-2024-what-you-want-to-know-about-two-factor-authentication-for-icloud-from-your-iphone-14-plus-by-drfone-ios/
- License: This work is licensed under CC BY-NC-SA 4.0.