
In 2024, What You Want To Know About Two-Factor Authentication for iCloud On your Apple iPhone 8 Plus
What You Want To Know About Two-Factor Authentication for iCloud On your Apple iPhone 8 Plus
Hackers have stolen millions of iCloud credentials in the past and demanded Apple pay for a ransom. This is starting to become a thing of the past as Apple implemented two-factor authentication to secure your Apple ID.
However, it’s not always perfect, as sometimes you need to get past two-factor authentication on your iCloud for various reasons. That’s why this article will teach you how to set it up and bypass two-factor authentication on iCloud yourself if you need to. Read further to learn more.

Part 1: What Is Two-Factor Authentication for iCloud?
Not to be confused with Apple’s two-step authentication, the new and more secure two-factor authentication on iCloud introduces push notifications on your iOS device to keep your data safe. With Apple’s two unique ways to prove your identity, hackers will find it harder to access your personal and financial data.
Switching to two-factor authentication rather than two-step is becoming more common nowadays as security measures are more advanced. You can always switch your security measure at any point, but remember that two-factor authentication is now an essential way to keep your data safe.

Part 2: What Are the Benefits of Two-Factor Authentication?
Setting up two-factor authentication is a secure way to protect your device against unauthorized access. Adding another layer to your username and password highly reduces the chances of hackers obtaining your account.
Here are some of the benefits of activating two-factor authentication on your device.
- Improved security - A second form of identification aside from your password reduces the chance for someone to gain access to your information.
- Interconnectivity to mobile engagement - Two-factor authentication from businesses provides users with a stronger login system to ensure their information is safe in the digital world.
- Reduces Fraud - Due to the rise of identity theft in recent years, businesses risk losing trust, brand equity, and credibility. A secure authentication system adds a layer of protection to keep you secure.
Part 3: How To Set up Two-factor Authentication for iCloud?
If you haven’t set up two-factor authentication yet on your iCloud, here are the steps to activate it right now.
Step 1: On your Apple iPhone 8 Plus/iPad, go to Settings and tap your Apple ID profile at the top.

Step 2: Tap Password & Security and turn On Two-Factor Authentication.
Step 3: Enter a phone number to receive the two-factor code via an SMS or a phone call.
Step 4: Enter the 6-digit verification code received on your device and wait for the process the finish.
Note
You can turn off two-factor authentication within two weeks of enrollment. After that, it’s permanent.
Part 4: How To Turn Off Two-Factor Authentication on Your Apple iPhone 8 Plus?
As previously stated, once two-factor authentication is active on iCloud, you only have a two-week window to deactivate it again.
To get past two-factor authentication on iCloud, Go to Settings > your name > Password & Security. Tap Two-Factor Authentication and turn it Off again.
Meanwhile, here are the steps to learn how to bypass 2-step verification on iCloud on the web.
Step 1: Go to the Apple ID sign-in page and log in with your Apple ID.
Step 2: Click Sign-In and Security > Account Security.

Step 3: Click Turn Off Two-Step Verification. Answer a security question you’ve set up previously to finish the process.
Part 5: Is It Possible to Bypass Two-Factor Authentication for iCloud?
If you’re wondering how to bypass two-factor authentication on iCloud, the answer is no, you can’t. However, if you don’t have access to your trusted device, you can have a code sent to your trusted phone number via an SMS or an automated phone call to prove to Apple that you own the iCloud account.
If this is impossible, you should request account recovery to regain access to your account.
The easiest way to prevent this issue is by adding another phone number to your Apple ID so you’ll always have a backup. Here’s how.
Step 1: On your Apple iPhone 8 Plus, go to Settings and tap on your Apple ID > Password & Security.
Step 2: Tap Edit and choose to Add a Trusted Phone Number. You’ll have to enter your device’s passcode to continue.

Step 3: Enter your new phone number. Select a way to receive a verification code via sms or phone call and tap Send.
Step 4: Enter the verification code and wait for the process to finish.
Bonus Tips: Forgot Your iCloud Password? Here’s What To Do
Using special programs like Dr.Fone can help you recover your iOS device if you forget your iCloud password.
Dr.Fone’s key features are:
- Removes all types of iPhone locks such as Apple ID password, Face ID, Touch ID, and more.
- Bypass iCloud activation lock.
- Unlock your Apple iPhone 8 Plus without carrier restrictions.
- Remove MDM profile / bypass MDM lock without data loss.
Here’s how to use Dr.Fone if you forget your iCloud password.
Step 1: Download and install Dr.Fone .

Step 2: Click Screen Unlock on the main program window. On the next screen, click Bypass Activate Lock.

Step 3: Click Start to initiate the process of unlocking your Apple iPhone 8 Plus without an iCloud password.

Note
Your iPhone will need to be jailbroken before bypassing it using Dr.Fone.
After step 3, there are two possible outcomes for GSM and CDMA iPhone devices.
- If you own a GSM device, the unlocking will do no harm to your iOS device, and you can enjoy your Apple iPhone 8 Plus as usual.
- If the Apple iPhone 8 Plus is CDMA, you won’t be able to use the Apple iPhone 8 Plus device for phone calls, cellular data, and iCloud of your new Apple ID.
Conclusion
Turning on your iCloud’s two-factor authentication is necessary for today’s high-tech society. It ensures your information is always secure and minimizes the risk of getting hacked or having your account stolen. Once two-factor is active on your Apple ID, Apple provides you with a two-week window to deactivate it if you change your mind.
Meanwhile, if you forgot your iCloud and have a hard time recovering your account, you can try using dedicated programs like Dr.Fone to unlock your iOS device in a few steps.
How to Bypass iCloud Lock on Apple iPhone 8 Plus
The iCloud Activation Lock works by automatically locking out anyone with the Apple iPhone 8 Plus in question. This is usually possible the moment the user activates the “Find My iPhone” security feature. Both the iCloud Activation Lock and the “Find My iPhone” features work hand in hand to ensure that whoever has the phone cannot access anything from the phone. The moment the Find My iPhone feature is activated; the iCloud Activation Lock is automatically activated.
Part 1: How To Bypass iCloud Activation Lock on Apple iPhone 8 Plus (Fast Solution)
Though Apple maintains that the iCloud activation lock is one of their most robust security features, it is a fact that this security feature can be unlocked and bypassed as easily as it was activated. One of the main methods on how to bypass iCloud lock on Apple iPhone 8 Plus with the latest iOS version is by using the Dr.Fone - Screen Unlock (iOS) method. It also works for the latest iPhone.
Dr.Fone - Screen Unlock (iOS)
Delete iCloud Account and activation lock
- Remove the 4-digit/6-digit passcode, Touch ID, and Face ID.
- Bypass iCloud activation lock.
- Remove mobile device management (MDM).
- A few clicks and the iOS lock screen are gone.
- Fully compatible with all iDevice models and iOS versions.
4,395,219 people have downloaded it
The following is a detailed step-by-step guide on how to bypass iCloud lock using Dr.Fone.
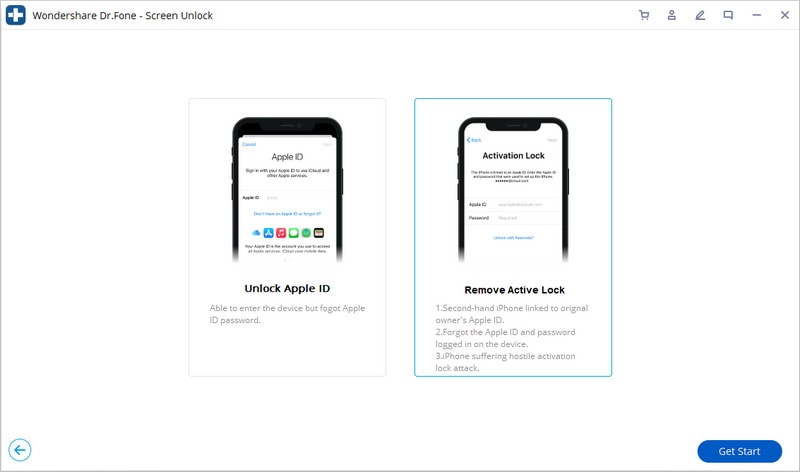
1: Download Dr.Fone and click on the “Screen Unlock” option.
2: Select Unlock Apple ID.
3: Click on the “Remove Active Lock” option.
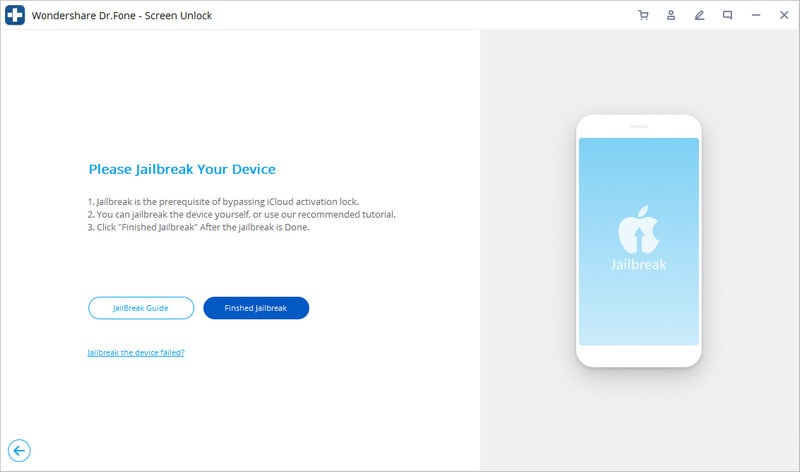
4: Jailbreak your Apple iPhone 8 Plus.
5: Start to unlock.
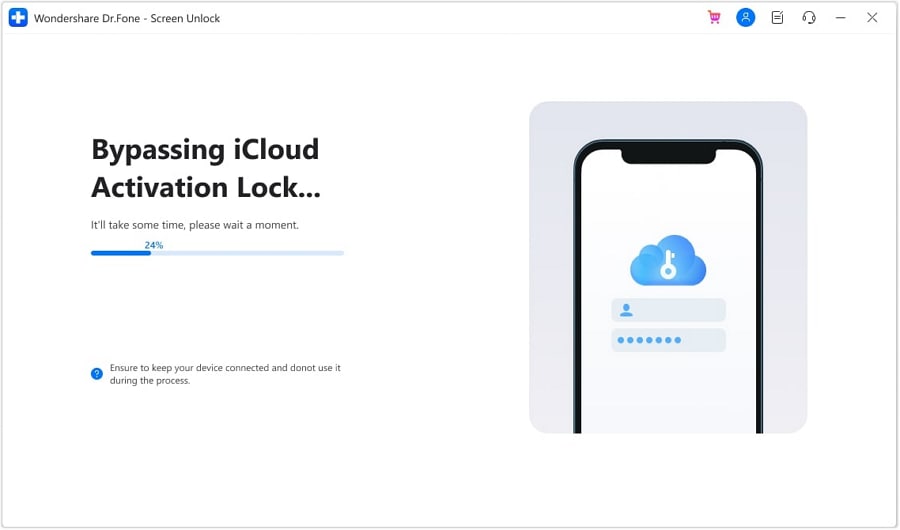
6: The unlocking process takes about 2-3 days. Once the iCloud lock has been bypassed, you will get an email informing you of the bypass.

Part 2: Bypass iCloud Lock on Apple iPhone 8 Plus via iPhoneIMEI.net
You can also employ the services of iPhoneIMEI.net to bypass the iCloud activation lock.
This is how to bypass iCloud lock on Apple iPhone 8 Plus using the iPhoneIMEI.net method.
1: Visit the iPhoneIMEI website and enter your Apple iPhone 8 Plus model as well as your IMEI in the spaces provided and click “Unlock Now”.

2: On your next step, you will be required to enter your payment and contact details.
3: With the payments done, you will receive a confirmation email informing you that the payment has been accepted.
Tip: The email will also contain the expected waiting period until the lock has been bypassed. In normal circumstances, expect to get an email confirming the lock bypass in a week’s time.
Part 3: How To Bypass iCloud Lock on Apple iPhone 8 Plus via the DNS Change Method
Apart from using a paid service to bypass iCloud lock on Apple iPhone 8 Plus, you can employ a simple free-to-use unlocking method. One such method is the DNS change process. With this approach, you don’t need to use any paid service, and neither do you have to wait for days for the lock to be bypassed.
Here’s how you can unlock and bypass the iCloud Activation Lock by using the DNS change method.
1: On your iCloud Activation interface, press the “Home” button and select the “WiFi” settings option.
2: On your WiFi settings, tap on the circled “I” icon. This action will open the DNS settings.

3: Enter the following DNS details depending on your location.

To those located in the USA/North America, enter 104.154.51.7. To those located in Europe, enter 104.155.28.90. To those in Asia and the rest of the world, enter 104.155.220.58 and 78.109.17.60 respectively.
4: Once you have entered the DNS digits, tap “Back” and finally tap on the “Done” option.
5: To temporarily bypass iCloud lock on Apple iPhone 8 Plus, tap on the “Activation Help” option. You will get a display message that reads “You have successfully connected to my server”.

6: Now tap on the “Menu” option. You will now be in a position to access features such as videos, games, iCloud Locked User Chats, and the internet.
The iCloud Activation Lock is no doubt a makeshift game-changer in the iOS platform. However, as robust and secure as it remains to be, it is no secret that this security feature can be bypassed if the right methods on how to bypass iCloud lock are employed. As seen in this article, regardless of whether you want to bypass iCloud lock on Apple iPhone 8 Plus by using the DNS change option, the Official iPhoneUnlock, or the iPhoneIMEI.net method, the fact remains that it is up to you to choose the preferred method to bypass iCloud lock when the need arises.
How To Fix Apple iPhone 8 Plus Could Not Be Activated/Reached Issue
Are you struggling with your Apple iPhone 8 Plus’s activation? The Apple iPhone 8 Plus activation process is crucial for seamless functionality, but encountering issues like ‘iPhone could not be activated’ can be frustrating. In this guide, you’ll learn how to simplify the process of iPhone activation, shedding light on common problems that users face.
From understanding error messages to the significance of swift resolutions, this article has got you covered. Let’s navigate through these activation errors to ensure your Apple iPhone 8 Plus is activated smoothly. Because when it comes to your device, prompt problem-solving is the key to a hassle-free experience.

Part I. Explanation To Common Apple iPhone 8 Plus Activation Errors
Are you greeted with puzzling messages like “iPhone could not be activated” when setting up your device? Let’s demystify these common errors and get your Apple iPhone 8 Plus up and running smoothly.

A. Common Apple iPhone 8 Plus Error Messages
Check out below the most common error messages iPhone users might encounter:
- “iPhone could not be activated”
This message often pops up during a hiccup in the activation process. It could be due to various reasons, but fear not – solutions are within reach.
- “Activation server cannot be reached”
Imagine your Apple iPhone 8 Plus trying to connect to the activation server but facing hurdles. This error signifies a connection issue, hindering the activation process.
- “Activation lock server cannot be reached”
This error may sound complex, but it often boils down to a connectivity glitch with the activation lock server. Discover straightforward steps to address this and unlock the activation process.
B. Causes Behind These Errors
Now learn about the causes behind these reasons by reading below:
- Activation Information Issues
Sometimes, the activation information your Apple iPhone 8 Plus receives may be incorrect or incomplete. This could be due to a typo in your Apple ID or an issue with iCloud credentials. We’ll guide you through double-checking and correcting these details.
- Server-Related Problems
Your iPhone communicates with servers during activation. If there’s a hiccup in this interaction – for instance, the activation server or activation lock server cannot be reached – it can result in errors. We’ll explore troubleshooting steps to ensure seamless server connectivity.
Understanding these common errors and their causes is the first step to resolving them. In the next sections, you’ll delve deeper into troubleshooting methods and practical solutions to activate your Apple iPhone 8 Plus without a hitch. Stay tuned for a hassle-free iPhone experience!
Part II. How To Fix iPhone Activation Errors
So, you’ve encountered the frustrating activation information showing the “iPhone could not be activated” message. No worries! Let’s dive into practical solutions that will have your Apple iPhone 8 Plus activated in no time. Follow these easy troubleshooting methods, and say goodbye to activation problems.

Checking Network Connectivity
First things first – ensure your Apple iPhone 8 Plus is well-connected to the internet. Activate Wi-Fi or cellular data and try the activation process again. A stable connection is the cornerstone of a successful activation.
Verifying Apple ID and iCloud Credentials
Activation errors might stem from a small typo or a forgotten detail. Double-check your Apple ID and iCloud credentials. Confirm that you’re using the correct email and password. Accurate information is key to a smooth activation.
Ensuring Server Availability
Activation involves communication with servers. If the activation server or activation lock server cannot be reached, your Apple iPhone 8 Plus may face hurdles. Confirm that Apple’s servers are up and running smoothly. You can do this by checking Apple’s system status page online.
Following these straightforward steps addresses common activation glitches. But what if the issue persists? In the next section, you will be introduced to an effective tool that goes beyond traditional troubleshooting methods. Stay tuned to discover a hassle-free way to unlock your Apple iPhone 8 Plus’s full potential!
Part III. Still Facing Errors? Your Lifesaver: Dr.Fone - Screen Unlock (iOS)
Despite your best efforts, some iPhone activation issues persist, leaving you stuck in frustration. When traditional troubleshooting falls short, it’s time to introduce a reliable ally: Wondershare Dr.Fone - Screen Unlock (iOS). This tool emerges as a lifesaver, offering a seamless solution to activation challenges.
Dr.Fone - Screen Unlock (iOS) is not just a tool; it’s a lifeline for those struggling with persistent activation errors. Tested and trusted, it goes beyond conventional methods, ensuring you regain access to your device effortlessly.
Key Features and Benefits
These key features and benefits below collectively contribute to making Dr.Fone - Screen Unlock (iOS) a comprehensive tool for addressing various iPhone-related challenges.
- Dr.Fone - Screen Unlock (iOS) is compatible with a large number of iPhone models, ensuring that users with different devices can benefit from its features.
- The tool prioritizes the security and privacy of user data. It employs advanced encryption protocols to safeguard sensitive information during the unlocking process.
- Beyond activation issues, Dr.Fone - Screen Unlock (iOS) can handle various other scenarios, such as unlocking a forgotten passcode, bypassing the Apple ID, and recovering data from disabled devices.
- **No Data Loss.**One of the standout features is its ability to unlock the Apple iPhone 8 Plus device without causing any data loss. Users can regain access to their iPhones without compromising their valuable information.
- **Time Efficiency.**Fone - Screen Unlock (iOS) offers a quick and efficient solution. Users can save time compared to troubleshooting methods that may take longer without guaranteed results. Dr.Fone efficiently activates your Apple iPhone 8 Plus, putting the control back in your hands.
- **Risk Mitigation.**The tool minimizes the risk associated with attempting various troubleshooting methods. It provides a straightforward and less risky alternative to ensure successful iPhone activation.
- **Intuitive Interface.**Fone boasts an intuitive and user-friendly interface, making it accessible to individuals with varying levels of technical expertise. Users can navigate through the unlocking process seamlessly.
- **Reliable Results.**Count on Dr. Fone’s proven track record. It’s a reliable choice when traditional troubleshooting methods fall short.
Step-by-Step Guide
Learn how to use Dr.Fone – Screen Unlock (iOS) as an alternative tool to fix iPhone activation errors. The method provided below will not require jailbreaking the phone and supports devices running on iOS 15.0 to 16.3 (iPhone 6/6 Plus, iPhone 6S/6S Plus, iPhone 7/7 Plus, iPhone 8/8 Plus, iPhone X).
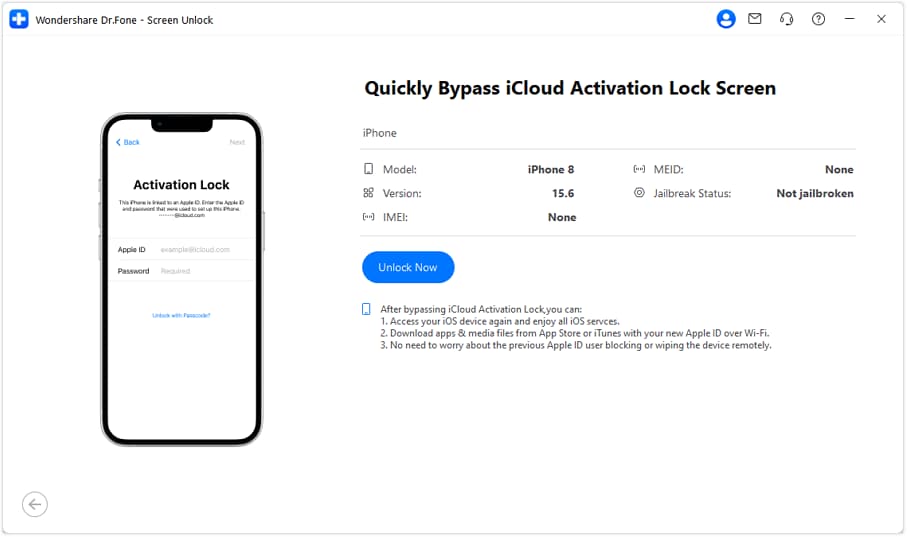
- Step 1: Get the most recent version of Wondershare Dr.Fone installed on your computer, then run the program. Navigate to Toolbox, click Screen Unlock, then select iOS. In the next screen, choose iCloud Activation Lock Removal.

- Step 2: When prompted, choose Start to begin unlocking the Activation Lock on your iOS device.
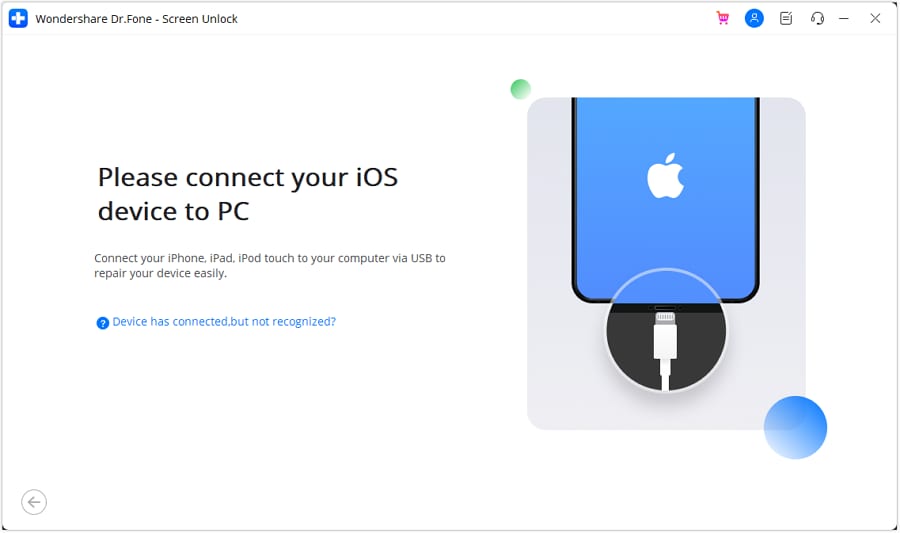
- Step 3: You will be asked to connect your iOS device to a USB cable while propagating into the corresponding function. The window will show the status as you connect the Apple iPhone 8 Plus device and will immediately bring you to the next screen.
- Step 4: Once on the next screen, double-check all the information related to the iOS device and click the Unlock Now option.
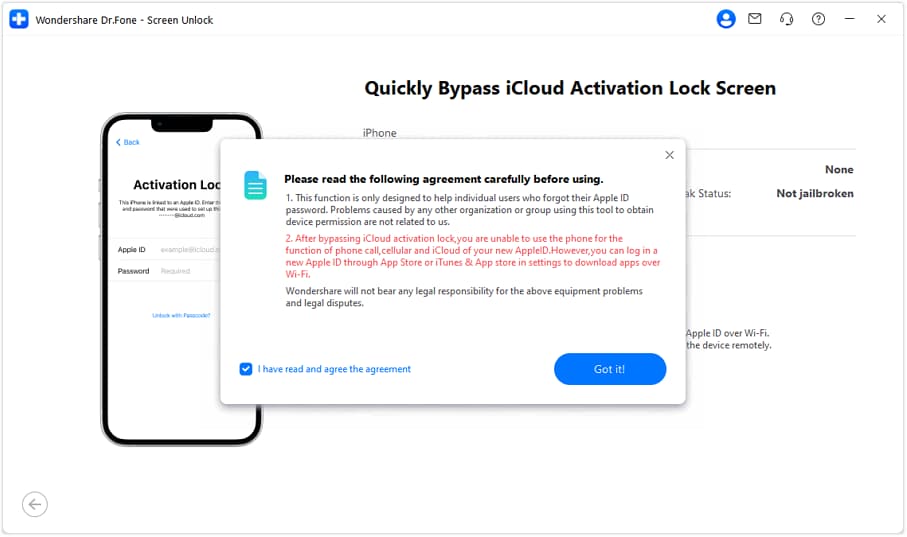
- Step 5: The next step is for a warning prompt to show up on the screen, indicating that the user should be aware of the procedure. Please read the agreement carefully and indicate your agreement by checking the appropriate box. Click the Got It! button to proceed.
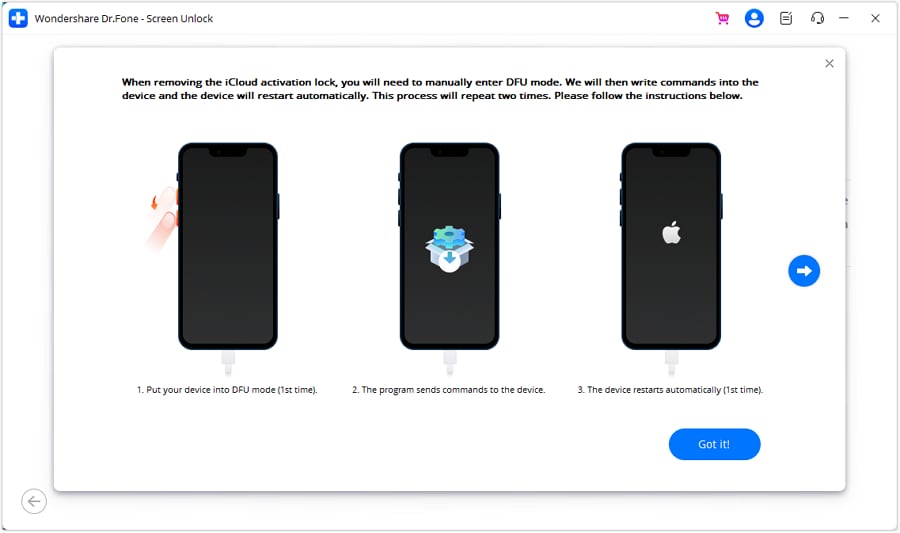
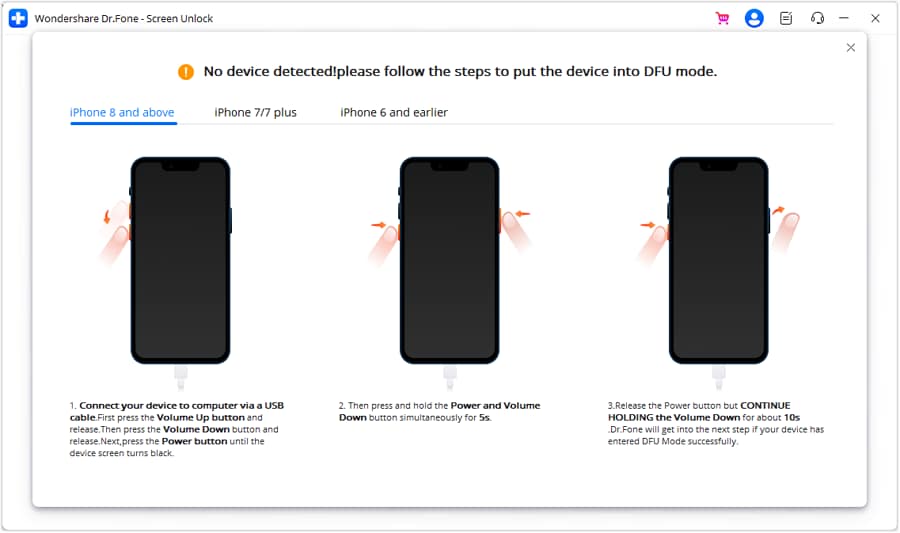
- Step 6: Follow the on-screen prompts to enter DFU Mode on your iOS device. Upon initialization of the Apple iPhone 8 Plus device in DFU Mode, the program initiates a restart process by sending a command to the Apple iPhone 8 Plus device. Press the “right arrow” to proceed.
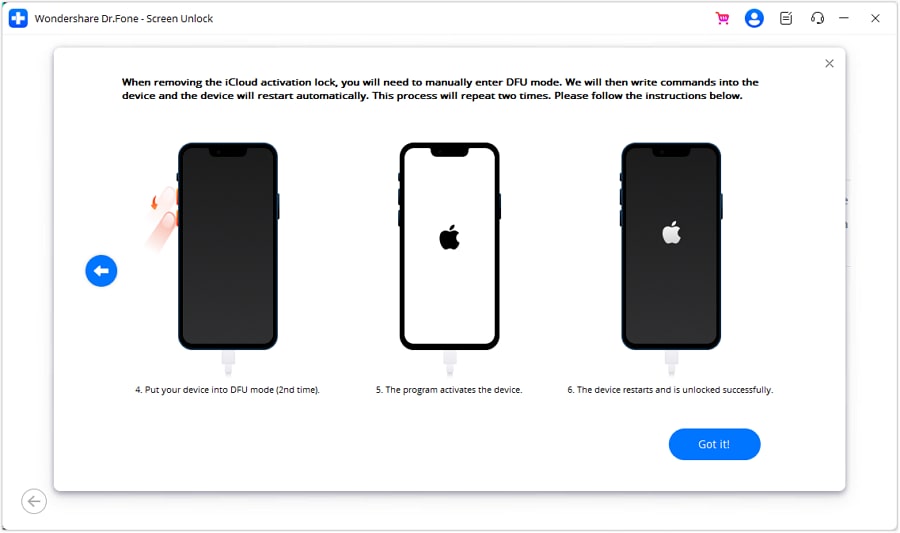
- Step 7: Continue to set the iOS device to DFU Mode for the second time. As a result, the program activates and unlocks the gadget. When it is finished, click the Got It! button to finish.
- Step 8: When the platform does not recognize a device, users must follow the on-screen instructions to enter DFU Mode on their iOS device.
- Step 9: After the Apple iPhone 8 Plus device has been processed in DFU Mode, you will be able to see the iCloud Activation Lock being removed from your computer’s screen. The screen will show a completion message once it’s done. To complete the process of removing the iCloud Activation Lock, click Done.
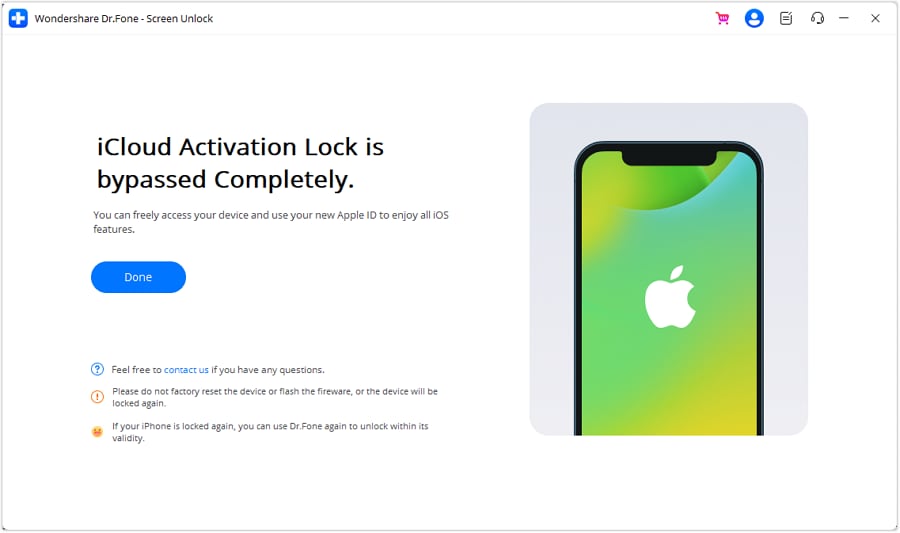
Dr.Fone - Screen Unlock (iOS) simplifies the complex journey of iPhone activation, providing a reliable and efficient alternative. It’s the key to unlocking your device’s full potential when conventional methods fall short. In the next section, you’ll learn how to check if your Apple iPhone 8 Plus has finally been activated.
Bonus: How Do I Know if My iPhone Is Activated?
Wondering if you have resolved your iPhone’s “can’t be activated” issue? Let’s check the clues and ensure your device is ready for action. Here are simple indicators to confirm your Apple iPhone 8 Plus’s activation status:

- Check Cellular or Network Connectivity in Settings
Navigate to your Apple iPhone 8 Plus’s Settings menu. Head to “Cellular” or “Mobile Data” and ensure it’s switched on. A lit icon signals active connectivity. If using Wi-Fi, look for the Wi-Fi symbol at the top – a strong connection is a green light for activation success.
- Apple ID and iCloud Integration
Activation relies on accurate Apple ID and iCloud details. Confirm these in Settings under “Apple ID” or “iCloud.” Ensure your email and password match the ones used during setup. A synced Apple ID ensures seamless integration, marking your Apple iPhone 8 Plus as officially activated.
- Absence of Activation Prompts
A surefire sign of a successfully activated iPhone is the absence of activation prompts. Once activated, your Apple iPhone 8 Plus should smoothly transition from the initial setup screen to your home screen without any prompts asking for activation details.
Why Does Activation Matter?
Activation is the key to unlocking your Apple iPhone 8 Plus’s full potential. It ensures you can make calls, send messages, and enjoy all your device’s features. You can confirm whether your Apple iPhone 8 Plus is activated and ready for action by checking these simple indicators.
Conclusion
In the maze of iPhone activation, you’ve decoded common errors and provided simple fixes. Especially for the ‘iPhone could not be activated’ issue, you now have the solutions to resolve it. And for a fuss-free fix, consider Dr.Fone - Screen Unlock (iOS) – your activation hero.
Swift solutions matter, ensuring you experience your Apple iPhone 8 Plus’s full potential. Don’t let activation glitches hinder your Apple iPhone 8 Plus experience; unlock its full potential today! Choose Dr.Fone and embrace seamless activation. Because in the Apple iPhone 8 Plus world, a timely resolution is the key to a smooth digital experience.
Tips: Are you searching for a powerful Screen Unlock tool? No worries as Dr.Fone is here to help you. Download it and start a seamless unlock experience!
Also read:
- [New] Godly Onslaught Ragnarok’s Day for 2024
- 2024 Approved Strategic Techniques to Amplify Your FB Giveaway Reach
- 3 Effective Ways to Unlock iCloud Account Without Password On iPhone 13
- In 2024, Bypass iCloud Activation Lock with IMEI Code On iPhone 13 Pro Max
- In 2024, How to Remove the Activation Lock On your iPad and Apple iPhone 14 without Apple Account
- In 2024, Mastering Android Screen Captures
- In 2024, Revolutionize Sessions with Pro-Zoom Conversion Hacks
- In 2024, The 10 Best Tools to Bypass iCloud Activation Lock On Apple iPhone SE (2020) You Should Try Out
- In 2024, The Best 8 VPN Hardware Devices Reviewed On Motorola Moto G14 | Dr.fone
- In 2024, The Ultimate Guide to Bypassing iCloud Activation Lock on iPhone 12 Pro Max
- Mastering Connectivity with Asus ROG Rapture GT-BE98 Pro: A 7-in-1 Wireless Router Showcase of Power & Flexibility
- New Multiple Ways How To Remove iCloud Activation Lock On your Apple iPhone X
- Step-by-Step Solutions to Cure Persistent Screen Ghosting Effects
- Title: In 2024, What You Want To Know About Two-Factor Authentication for iCloud On your Apple iPhone 8 Plus
- Author: Lydia
- Created at : 2025-01-29 01:34:53
- Updated at : 2025-02-01 00:10:37
- Link: https://activate-lock.techidaily.com/in-2024-what-you-want-to-know-about-two-factor-authentication-for-icloud-on-your-apple-iphone-8-plus-by-drfone-ios/
- License: This work is licensed under CC BY-NC-SA 4.0.