
iPhone 12 iCloud Activation Lock Bypass

Apple iPhone 12 iCloud Activation Lock Bypass
The iCloud lock is an element intended to save your Apple iPhone 12 from missing, getting stolen, or being deleted. So, when you buy an iPhone, register it with an Apple ID, and set “Find My iPhone” to make it iCloud locked. That will make your device more secure.
However, each feature has its cons. It likewise can become problematic if you purchase a second-hand iPhone that is iCloud locked or fail to remember your iCloud details. You might end up staying with an iCloud lock screen. In such cases, you want to open an iCloud-locked device.
Therefore, this article will tell you the best Apple iPhone 12 iCloud bypass techniques. It has both quicker and more permanent solutions to bypass Apple iPhone 12. So, keep following this article until the end to find a permanent solution for your Apple iPhone 12.
Part 1: What is iCloud Activation Lock in iPhone11/12?
The iCloud Activation Lock is a security feature implemented by Apple on Apple iPhone 12 and other iOS devices. It is designed to prevent unauthorized access to the Apple iPhone 12 device by linking it to the owner’s Apple ID and iCloud account. When the Activation Lock is enabled, the Apple iPhone 12 device requires the owner’s Apple ID and password to set up or restore the Apple iPhone 12 device, making it difficult for thieves to use or sell stolen iPhones. The Activation Lock ensures the Apple iPhone 12 device’s data remains secure and can only be accessed by the rightful owner.
Regardless of whether you erase your device, Activation Lock can keep on preventing anybody from reactivating your device without your consent. Regardless of whether your device is stolen, the other person will require either your device password or your Apple ID credentials to use the phone. Even if they try resetting your device through DFU mode, they will not have the option to reactivate and utilize it without Apple iPhone 12 iCloud unlock.
However, it can create a problem for you if you’re the second owner of this device. So, if you bought this phone from someone else, you must remove the lock first. In such cases, you will need Apple iPhone 12 iCloud bypass.
Part 2: How to Bypass Apple iPhone 12 iCloud Activation Lock?
The iCloud Activation Lock is a security feature designed to protect iPhones from unauthorized use. However, if you find yourself with an Apple iPhone 12 locked with iCloud Activation, there are a few methods you can try to bypass the lock. In this article, we will explore three methods: contacting the previous device owner for Apple ID and password, requesting remote removal of the lock, and utilizing the iCloud DNS Bypass method. Let’s dive into each method to help you regain access to your Apple iPhone 12.
Method 1. Contact the Previous Device Owner for Apple ID and Password
The first step in bypassing the iCloud Activation Lock is to reach out to the previous owner of the Apple iPhone 12 and ask for their Apple ID and password. To bypass Apple iPhone 12, you need to have some data in hand:
- Bypassing the activation lock is pretty much easy. However, you need to have the Apple ID credentials of the seller if you’re the second owner.
- If a device doesn’t have the activation lock, you can see the password screen rather than the iCloud lock screen. In that case, ask the old user about the Apple iPhone 12 passcode.
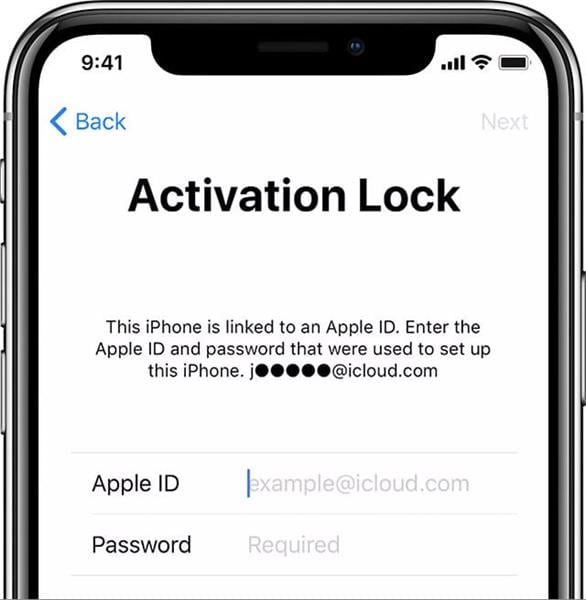
After getting this data, coming up next are the steps to perform Apple iPhone 12 iCloud bypass:
- Step 1: Go to the Settings application on your iDevice.
- Step 2: Tap the Apple ID photo on this window. If the Apple iPhone 12 device has a more up-to-date version of iOS, tap the iCloud option from the menu.
- Step 3: Now click the Sign Out option. You can sign in with your Apple account starting there forward.
- Step 4: Next, look down and click the Sign Out option. When asked, you need to enter the Apple account credentials of the first owner to toggle off the Find My feature.
However, if you see the Apple iPhone 12 passcode, you can type it and set up the Apple iPhone 12 device without the iCloud account.
With the Apple iPhone 12 device set up, access your device’s Settings and sign out of the old ID. You can now make another one and sign into it.
Method 2. Contact the Previous Device Owner to Remove Activation Lock Remotely
If the iPhone’s first owner (seller) has forgotten to do this before selling it to you, it’s time to do it. It would help if you convinced the owner to remove the sold device from their iCloud account. They can even do that remotely by just visiting the iCloud webpage.
However, if they have sold you a stolen iPhone, you may be unable to remove the lock using this technique.
So, if it’s not a stolen device, you don’t need to worry about unlocking it. The owner can remotely control the Apple iPhone 12 device and bypass Apple iPhone 12 by following these steps:
- Step 1: Go to the appleid.apple.com site and sign in with the right iCloud account credentials.
- Step 2: Click the Apple iPhone 12 devices tab to see all the connected iDevices.
- Step 3: Pick your Apple iPhone 12 model from there.
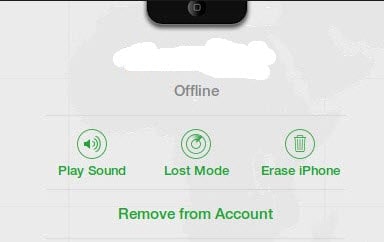
- Step 4: Then, click Erase from Account to get it unlocked. It’s as simple as that.
Method 3. Use iCloud DNS Bypass
The third method involves using iCloud DNS Bypass, a technique that exploits a loophole in the iCloud Activation Lock system. iCloud DNS bypass is a temporary technique to access an iCloud-locked device’s features. DNS interprets your domains into IP addresses. After keying in a domain name, your DNS server takes you to that specific IP address on the internet. When you attempt to activate your Apple iPhone 12, your device connects with the DNS and the Mac servers. Someway, you can key in some domain name servers here, and they will take your device to that server.
How Can iCloud DNS Bypass Help You?
A DNS bypass can do plenty of things for you. You can unlock your device with it. When the Apple iPhone 12 device unlocks, you can access applications internet and work smoothly on your costly device. It opens up most features of your Apple iPhone 12.
Limitations of this Features
When you use other ways to unlock the iCloud lock, it completely gets removed from your device, and you can utilize each feature. Unfortunately, that isn’t true with an iCloud DNS bypass server. If you utilize this technique, you can access specific features.
The steps in DNS Bypass iCloud Activation are very straightforward; here are the steps.
- Step 1: When you switch on your device, pick your LANGUAGE and COUNTRY from the menu.
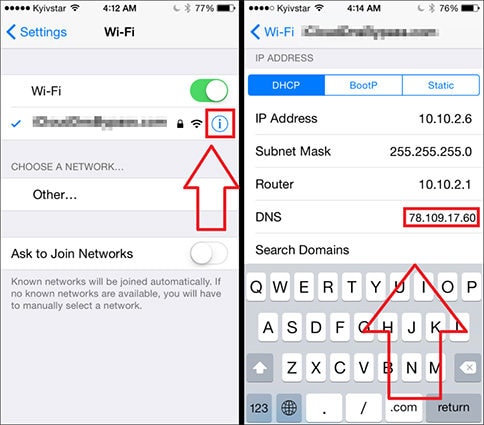
- Step 2. Click “Proceed” to enter the Wi-Fi settings page. Whenever requested to connect with Wi-Fi, search for the “I” icon near the Wi-Fi tab.
- Step 3. Disconnect the Wi-Fi, go to “Connection Settings,” and snap “Forget this Network.”
- Step 4. Click the “I” icon and enter a DNS server IP address. You can browse the IP addresses below:
USA: 104.154.51.7
South America: 35.199.88.219
Europe: 104.155.28.90
Asia: 104.155.220.58
Australia and Oceania: 35.189.47.23
Other regions: 78.100.17.60
Step 5. Presently, click the “Back” choice on the left half of your screen, turn on Wi-Fi, select your network from there, and enter your code.
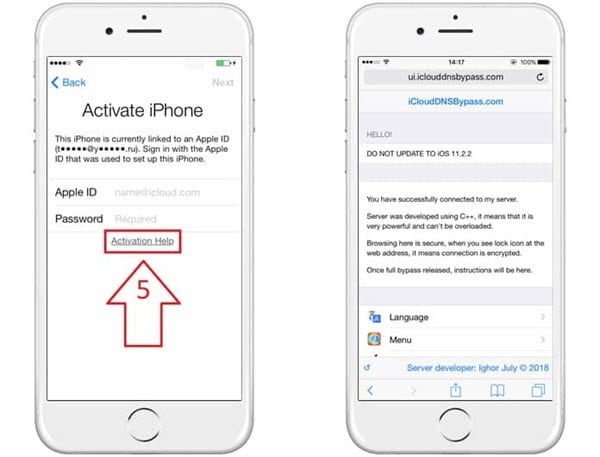
- Step 6. Click “Next Page” and snap “Back” to enter the iCloud bypass screen.
- Step 7. Your device will unlock, and you can access all its features now.
Bonus Tip: Bypass iCloud Activation Lock quickly with Dr.Fone - Screen Unlock (For iPhone 5S to iPhone X/SE 1 running iOS 12.0 to iOS 16.6)
Because of the limitations of iCloud DNS bypass and the cons of the other mentioned ways, many people tend to find a permanent solution to their issue. Therefore, we suggest you get an advanced tool to examine this matter.
Many tools are available online; however, recommending the best one is our responsibility. Therefore, we strongly advocate for Dr.Fone. Dr.Fone - Screen Unlock by Wondershare gives you a complete solution. But note that this Apple activation lock removal tool is for iPhone 5S to iPhone X/SE 1, iPad 4 to iPad 7, and iPod touch 7 to iPod touch 9 running iOS 12.0 to iOS 16.6.
It is an all-in-one iOS unlocking program that can assist you with iPhone iCloud unlock without an Apple account. It enables you to use your phone like a default one. It is portrayed as quick, straightforward, and reliable. Whether you get a second-hand iPhone trapped in the iCloud lock or don’t know about the Apple account, you can use this program to bypass iPhone 5s to iPhone X/SE 1.
Step-by-Step guide:
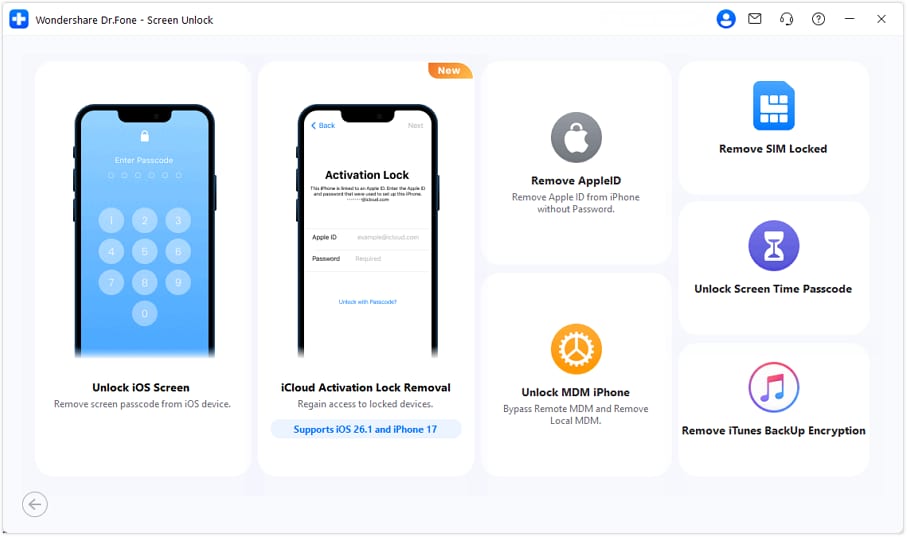
Step 1. Install the Dr.Fone program on your PC and choose the Screen Unlock tool. You will see “iCloud Activation Lock Removal” as the following picture shows.
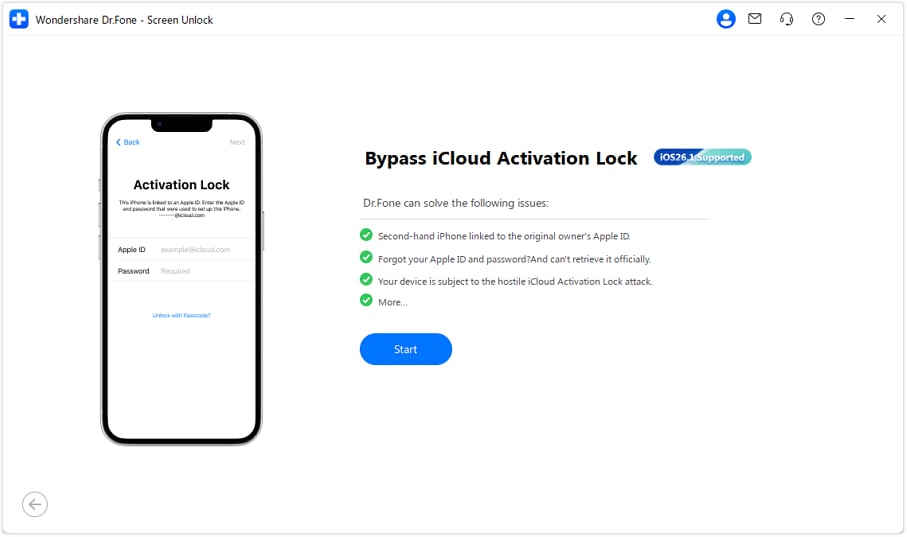
Step 2. Begin your bypass process with this “Start” button interface.
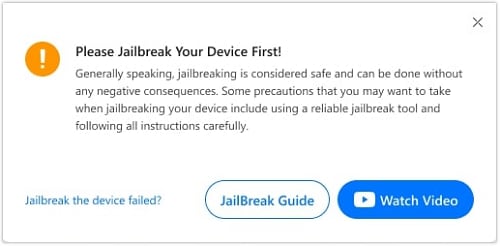
Step 3. Jailbreak is the final and necessary step to finally bypass the activation lock on your Apple iPhone 12.
Step 4. When you see the progress bar moving, it means the activation lock will no longer exist on your Apple iPhone 12.
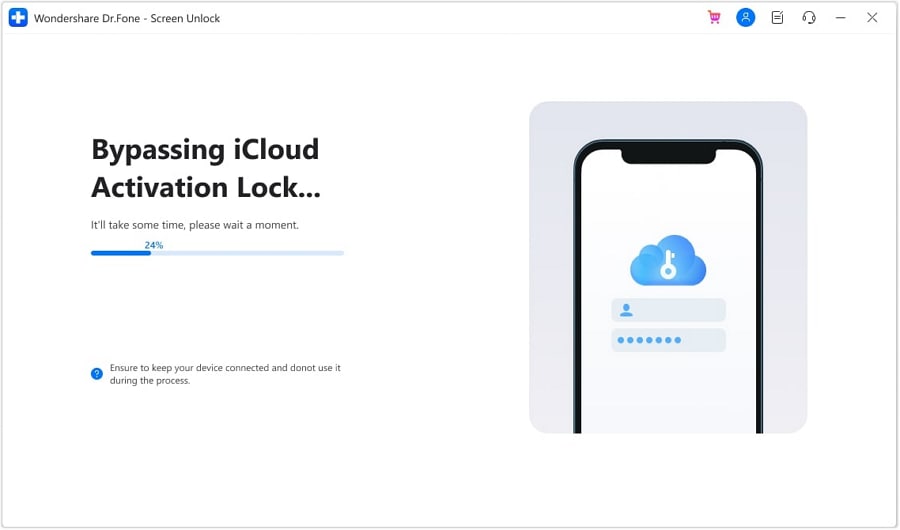
The whole process will remove the activation lock in a moment or two. Presently, your Apple iPhone 12 will have no lock. You can access and utilize the Apple iPhone 12 now.
The Bottom Line
Getting locked on the activation lock screen can be hectic and time-consuming if you don’t know what to do. Many of you might quit trying after surfing the internet for a solution and getting technical answers from inexperienced individuals. Therefore, we gathered this Apple iPhone 12 iCloud bypass guide to help you understand the situation better.
Once you understand the issue, you can unlock it in minutes using Dr.Fone - Screen Unlock (iOS) by Wondershare. So don’t wait for a godly miracle to happen, and download Dr.Fone for a permanent answer to your queries.
How to Remove the Activation Lock On your iPad and Apple iPhone 12 without Apple Account
Regarding buying an iPhone, not every person gets it from an Apple store. Numerous purchasers have decided to get used iPhones instead of new ones because of their expense budget. However, these phones accompany an iCloud activation lock as often as possible.
Without the Apple ID login and details, an iPhone can’t be reset or utilized by others. Accordingly, it helps the phone’s security and safeguards it from theft. You will require the earlier user’s ID and data, or Apple will do it for you. It can turn out to be a headache for many users.
This article will talk about the solutions for the issues that these activation locks cause. There are several ways of getting around the iPhone’s activation lock. In this article, they will be recorded from top to bottom for the clients. So keep following us to get your Apple iPhone 12 or iPad activation lock bypass code without Apple ID.
Part 1: 4 Methods to Remove Activation Lock without Apple ID
Dr.Fone - Screen Unlock
You can bypass the iCloud Activation Lock with Wondershare Dr.Fone - Screen Unlock if you fail to remember your Apple ID. It also works if you have bought an iCloud-locked gadget. Each of the different methods requires you to give some data. However, Dr.Fone unlocks the gadget and tackles the issue all alone. It is an easy and proficient method for unlocking your iOS. Here’s how:
Step 1. Introduce Dr.Fone to the program and choose Screen Unlock.

Step 2. Pick “Bypass Activate Lock.”

Step 3. Click “Start” option to begin the whole process.

Step 4. In this part, unlocking the activation lock will go with 2 consequences because of GSM and CDMA devices.
When you bypass successfully activation lock on GSM devices, you can still use your phone as usual.
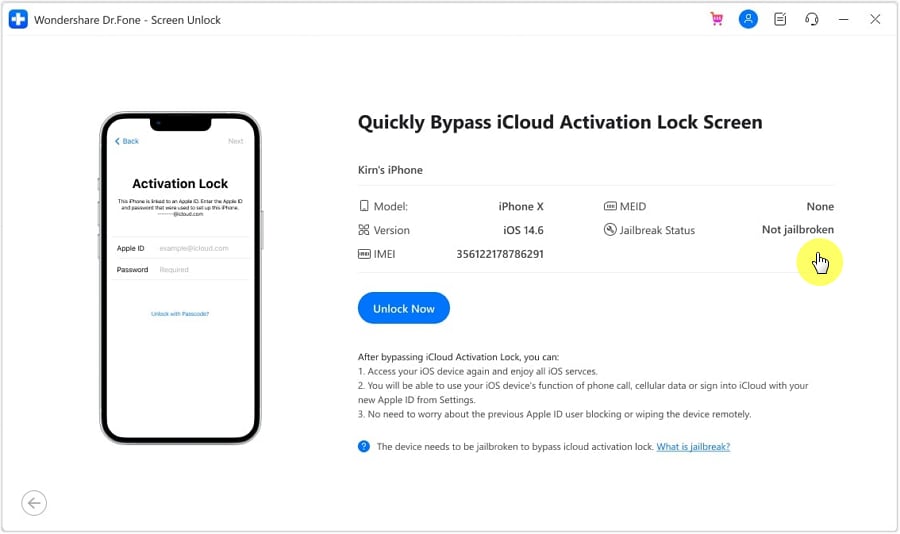
But for CDMA devices, when you bypass the activation lock, there will be no chance for phone calls and cellular data use. And other functions are still OK.
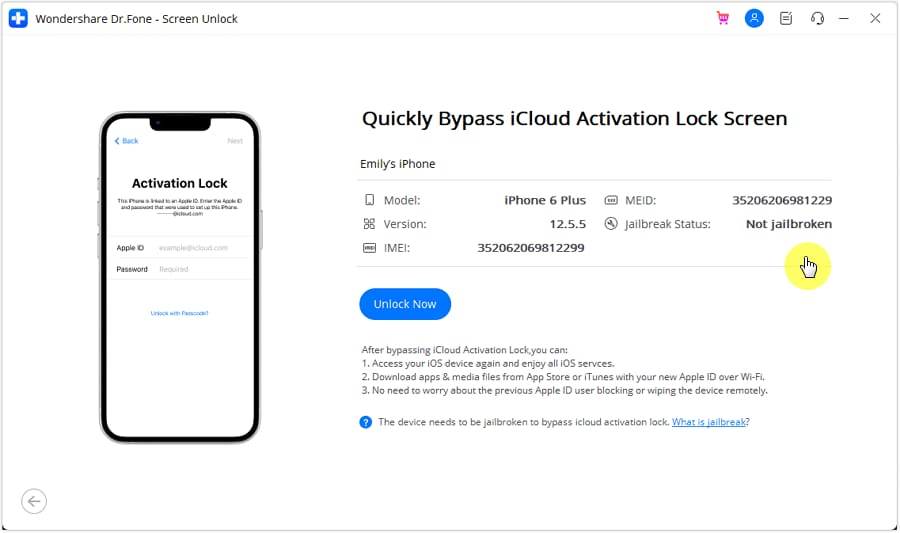
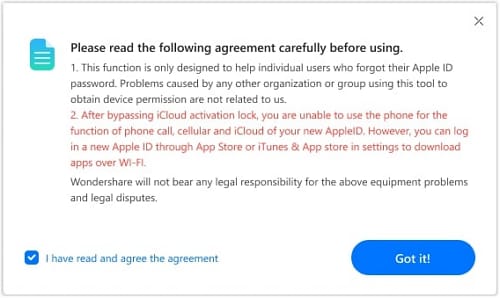
Step 5. Don’t forget to jailbreak your Apple iPhone 12. Without it, you cannot bypass the activation lock.

Step 6. Begin to eliminate and sit tight. The phone will become a normal phone with next to no lock after it eliminates the activation lock.

Step 7. The program will remove the activation lock in a moment or two. Presently your Apple iPhone 12 has no activation lock.

Ask the previous owner to remove it remotely
This approach requires the old user’s Apple account credentials. You should initially sign in to iCloud before utilizing this strategy to unlock the iPhone. You can also ask the old user to carry out this method. Ask the user to follow the steps below, and that’s how to remove activation lock without Apple ID:
- Go to the iCloud site from any gadget or PC. Sign in to iCloud your iCloud account.
- Pick the Find iPhone choice. Note: This is the Find My service; the name of this assistant on iCloud.com has not yet been changed, yet it is accessible on all Apple gadgets.
- To start, open the guide. Find and select the blue dot related to the Apple iPhone 12 you want to sign in to in this guide.
- Select Erase iPhone from the menu.
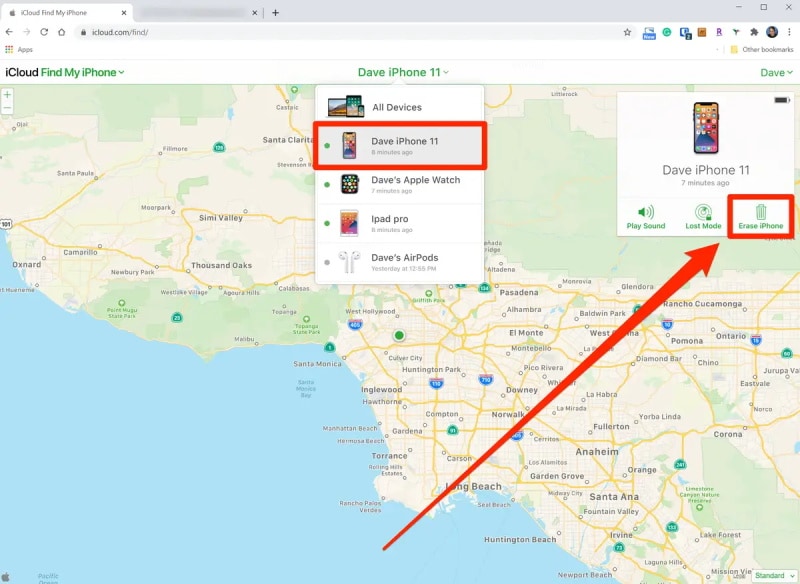
- At long last, pick “Erase from Account” from the dropdown menu.
Use DNS Bypass
You can likewise utilize DNS services to get around the activation lock. It is a, to some degree, interesting method. This approach is powerful, even though it isn’t dependable. Follow these steps to apply this fix:
- Select your country/district first while setting up your gadget.
- Select “More Wi-Fi settings” from the menu.
- Select the “I” choice on the following screen once more
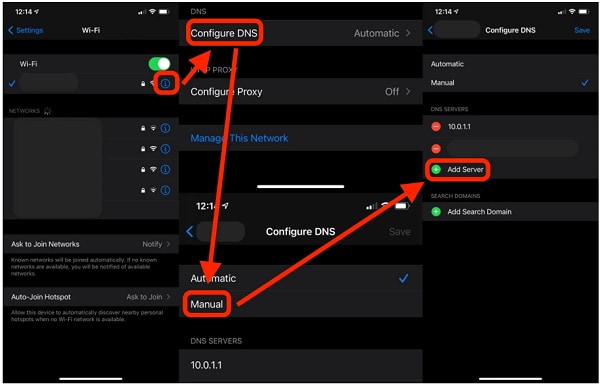
- Type one of the accompanying IP addresses in the “DNS” field.
North America: 104.154.51.7
Asia: 104.155.220.58
Europe: 104.155.28.90
South America: 35.199.88.219
Other Regions: 78.100.17.60
- To get back to the settings after that, select the “Back” choice in the upper left corner of the screen.
- Select your Wi-Fi network and enter your Wi-Fi code to connect.
- At long last, on the accompanying screen, tap “Back.”
Seek help from Apple support
If none of the mentioned strategies have worked for you, you can attempt to look for proficient help to resolve your concern. The Apple store authorities can settle every one of the issues and their solutions regarding iPhone lock.
However, before heading out to the Apple shop, ensure you have these data:
- You should bring your authentic verification of purchase with you.
- Make a meeting with the Apple shop staff before going. Make sure you have your copy of the confirmation files with you.
Part 2: FAQs
1. What is an activation lock?
Activation Lock assists you with keeping your phone secure, regardless of whether it’s in some wrong hands, and you can still recover it. Even if you erase your data from somewhere else, Activation Lock can keep on preventing anybody from reactivating your phone without your consent.
2. Is it legal to bypass the activation lock?
There are no unlawful ways of bypassing the Activation lock by the same token. Reset your Apple iPhone 12, drain the battery, switch on the iPhone, and press the Power button until the Apple symbol appears. Configure your location and install iTunes.
3. How do I remove the activation lock with Apple ID and password?
- On your Apple gadget, explore “Settings.”
- At the highest point of Settings, tap the Apple ID.
- Go to iCloud in the settings menu.
- Select the “Find my iPhone” choice from the menu.
- By tapping the button once, you can switch it off.
- Your Apple iPhone 12 will incite you for your password. You should enter your iCloud credentials to continue.
- In the textbox, type the password, and you are ready.
Conclusion
Activation locks can help users secure their phones from unwanted people. However, it can be frustrating if you don’t have the password to your phone’s Apple ID. Therefore, the methods in this article will help you with iPad activation lock bypass code without Apple ID. On top of that, Wondershare Dr.Fone can remove the lock for you in just a few minutes.
Effective Ways To Fix Checkra1n Error 31 On Apple iPhone 12
Apple distinguishes itself as a leading smartphone manufacturer by implementing rigorous security protocols. These measures pose challenges for users seeking to jailbreak their iOS devices. Such actions grant users the capability to remove the restrictions enforced by Apple on their devices.
Serving as the primary tool for this purpose, Checkra1n emerges as a popular choice. Nevertheless, similar to any other tool, Checkra1n may face a range of issues, among which Checkra1n Error 31 is notably notorious. This guide aims to help you address Checkra1n Error 31. Moreover, it will introduce a powerful alternative to Checkra1n jailbreak iOS devices.

Part 1. Figuring Out All Possible Reasons for Checkra1n Error 31
Understanding the reasons behind Checkra1n Windows Error 31 is essential in resolving this issue. The reason can relate to the software and hardware aspects of running Checkra1n. Here are some of the reasons why you are encountering Checkra1n error 31:
- Temporary Computer Issues: As Checkra1n is a computer-based tool, issues within your computer can cause the error code 31. These issues can be insufficient resources, compatibility issues, or temporary glitches.
- Mismatched Checkra1n Version: When jailbreaking an iOS device, you must use the right version of the tool. Using incompatible versions of Checkra1n can lead to issues such as error code 31.
- Issues with USB Connection: A major cause behind Checkra1n error 31is the unstable or faulty USB connections. If your device is not properly connected, it will lead to the failure of the jailbreak process.
- **Device Compatibility Issues:**Apple has introduced many measures to ensure that newer devices are hard to jailbreak. That’s why if you use the latest iOS device, there is a high chance it is incompatible with Checkra1n.
- **Security Software Interference:**In rare cases, the security or antivirus software installed on your system can interfere with the working of Checkra1n. Similarly, the Windows firewall can sometimes flag Checkra1n as a virus, disturbing the jailbreaking process.
Part 2: [Top Fixes] Resolve Checkra1n Error 31 to Jailbreak iOS Device
Encountering errors like Checkra1n jailbreak Error 31 is a typical occurrence in the jailbreaking process. Fortunately, there’s no cause for concern, as there are various solutions readily accessible to diagnose and address this particular error. Discussed below are the top 6 fixes to streamline your iOS jailbreaking process:
Fix 1. Wondershare Dr.Fone – Screen Unlock (iOS) Providing a Direct Jailbreaking Solution
While Checkra1n is widely employed for jailbreaking iOS devices, it has notable limitations. This is especially the case concerning compatibility with the latest iOS versions. Therefore, we recommend considering a dependable alternative like Wondershare Dr.Fone. It offers iOS users a user-friendly approach to conducting jailbreaks on their devices.
Working as a dependable companion for iPhone users, Dr.Fone simplifies the jailbreaking process. It especially benefits users grappling with iOS security locks, particularly iCloud activation locks. Notably, Dr.Fone stands out for its compatibility with the latest iOS 17 and iPhone 15 models.
Prominent Features of Wondershare Dr.Fone
- You can bypass all sorts of iOS screen locks, from passcodes to Face IDs.
- Besides unlocking iCloud Activation Lock, it is also an expert in removing SIM locks from the carriers.
- If you have forgotten your iTunes backup encryption password, Dr.Fone can remove it without causing data loss.
Steps To Bypass iCloud Activation Lock via Wondershare Dr.Fone
By combining Dr.Fone with the jailbreaking process, users can effectively bypass the iCloud Activation Lock. Detailed instructions are provided below to bypass the iCloud Activation Lock bypass using Dr.Fone:
- Step 1. Commence the Procedure by Activating Dr.Fone
Start by downloading and opening the latest edition of Wondershare Dr.Fone. After completing this step, go to the “Toolbox” section within Dr.Fone and click “Screen Unlock.” Choose “iOS” as your device type, and head to select the “iCloud Activation Lock Removal” option. Now, begin the procedure by selecting “Start” and ensure your device remains connected to the computer throughout this stage.

- Step 2. Jailbreak Your iOS Device
Now, proceed to check if your device is CDMA or GSM. A GSM device will remain the same after iCloud Activation Lock removal. On the other hand, a CDMA device will lose all cellular functionalities. After that, you need to tap “Unlock Now” and agree with the warning by tapping “Got it!” Afterward, you will need to jailbreak your device, for which follow these below-given steps:

- On a computer with Windows 7 or higher, download checkn1x-amd64.iso and rufus.exe. Connect a USB with at least 2 GB storage to the computer. Next, open the Rufus file and choose “checkn1x-amd64.iso” by clicking “Select.”
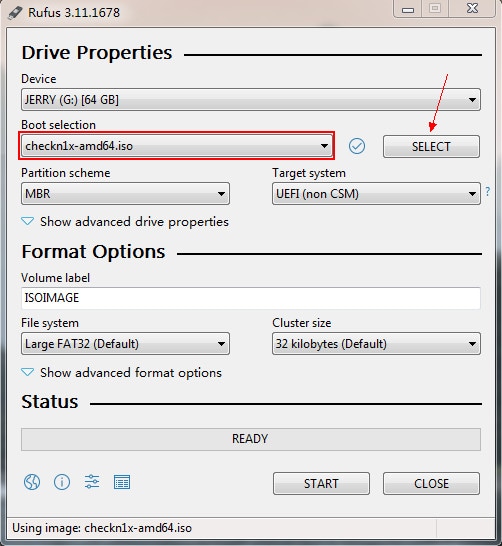
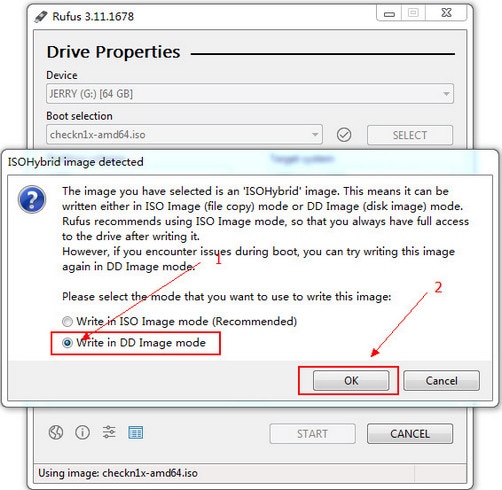
- Now, click “Start,” and on the pop-up window, choose “Write in DD Image Mode.” Then, click “OK” and wait for the process of writing image data to complete. Once completed, tap “Close” and restart your computer with the USB plug-in.
- Press the F12 or relative boot key to access the Boot Menu when the computer restarts. Within the “Boot Menu,” choose the USB and connect your iOS device to the computer. Now, use the arrow keys to move to the “Options” button and press Enter.
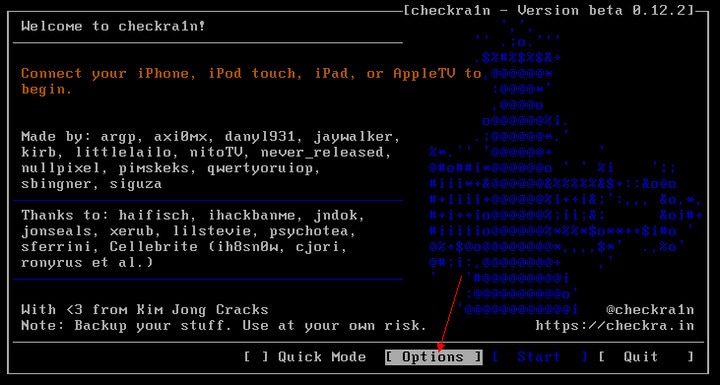
- You must now move to the “Allow untested iOS/iPadOS/tvOS versions” option and hit “Enter.” Follow it by moving to the “Skip All BPR Check” option and pressing “Enter” again. Afterward, move to the “Back” option and use “Enter” to return to the main screen.
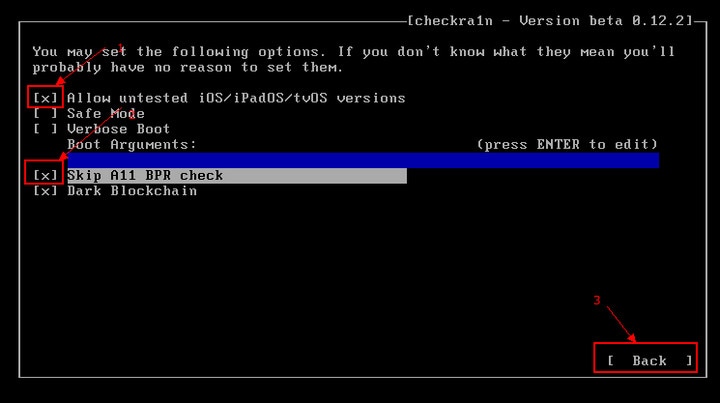
- Once back on the main screen, select “Start” to initiate jailbreaking. For CheckN1x to jailbreak your device, you need to put the Apple iPhone 12 device into DFU Mode. Now, tap “Next” to put your device into Recovery Mode.
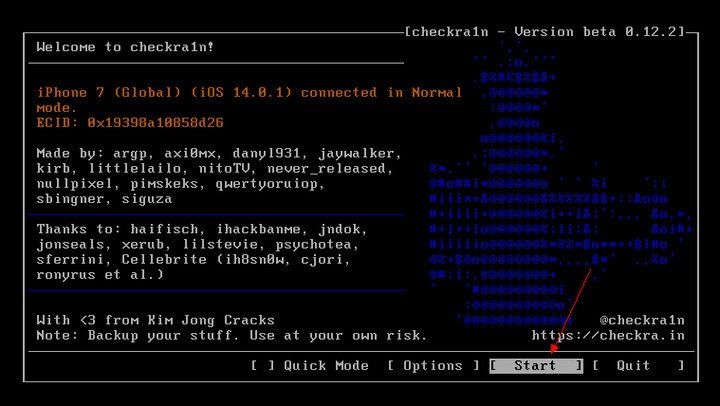
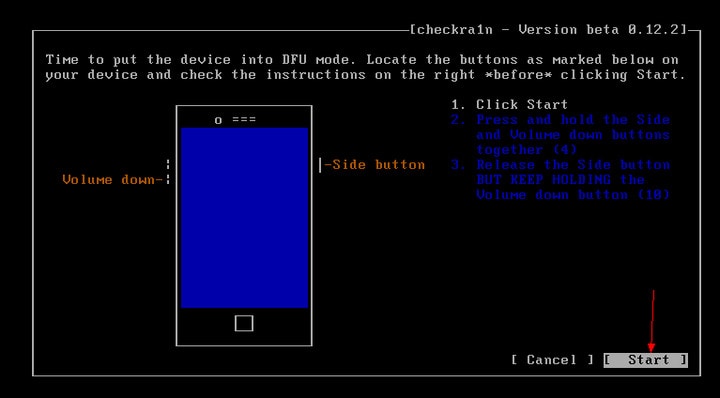
- Once your device is in Recovery Mode, tap “Start” and follow the on-screen guidelines to put it into DFU Mode. When your device enters DFU Mode, Checkn1x will automatically jailbreak it. Finally, select “Finish” and remove the USB to complete the process.
- Step 3. Complete the iOS Activation Lock Bypass Process
Removing the Activation Lock will start as soon as your device is jailbroken. You can follow the progress on the screen, and once it is complete, tap “Done” to conclude the process.

Fix 2. Try Restarting iOS or Computer Device
Sometimes, temporary glitches or bugs within your iOS device or computer can cause the Checkra1n Error 31. The most effective and simple solution in this case is to restart your devices. This simple process removes all temporary glitches and resets all processes. Here is how you can restart your iOS device and computer:
1. Windows PC
Instructions. Click the “Start” button on your Windows PC from the bottom left corner. Here, tap the “Power” icon and select “Restart.”

2. MacBook
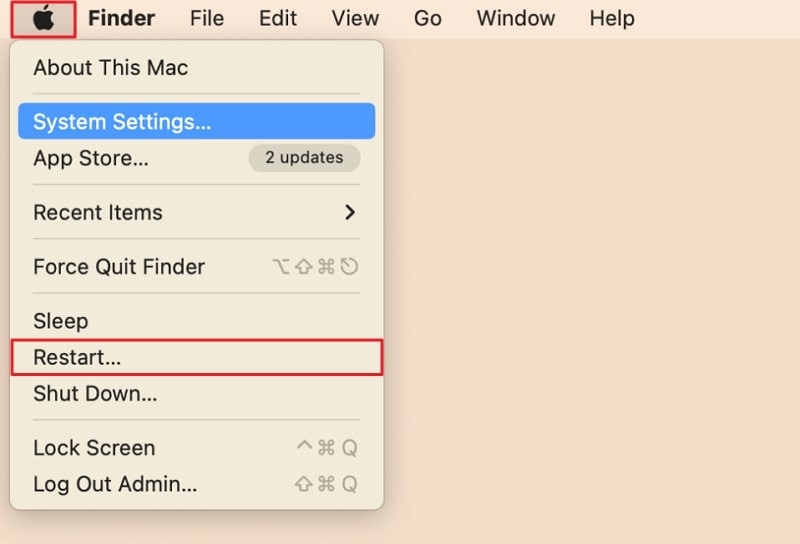
Instructions. When using a Mac, click the “Apple” logo from the top left corner. Press “Restart” from the drop-down menu to reboot your Mac.
3. iPhone/iPad
Instructions. Press the “Side” and any “Volume” buttons to access the Power Slider screen. Now, move the slider to the right to turn off your device. After waiting some time, press the “Side” button to turn on your iOS device.

Fix 3. Download New Checkra1n Version
Crucial for a successful jailbreak is carefully selecting the appropriate Checkra1n version. Compatibility varies across devices, making it essential to choose the version that suits your device. Error 31 issues are likely linked to the specific Checkra1n version in use. In such instances, the recommended solution is to experiment with alternative versions.

Fix 4. Install iOS Firmware From iTunes and Retry Jailbreaking
When encountering Checkra1n jailbreak, error 31 may be attributed to the iOS version on your device. In such cases, the optimal resolution involves reinstalling the iOS version through iTunes. Follow the steps below to personally choose the IPSW file and employ iTunes for the installation on your iOS device:
- Step 1. Access the ipsw.me website using a web browser and download the compatible IPSW file for your iOS device. Before installing, ensure that the “Find My” service is disabled.

- Step 2. Connect the iOS device to the computer and wait for iTunes/Finder to detect it once all requirements are satisfied. For instance, if you have a Mac with the operating system before macOS Catalina, access the “Summary” tab by clicking the Apple iPhone 12 device icon within iTunes. While holding the “Shift” key on Windows or the “Option” key on Mac, click “Restore iPhone.”

- Step 3. You will be asked to select the IPSW file. Choose the file you downloaded and follow the on-screen instructions to complete the installation process. Once complete, re-try the jailbreaking and see if error 31 is resolved.

Fix 5. Consider Using Other Options in Checkra1n
If the reason behind Checkra1n error 31 is the Apple iPhone 12 device incompatibility, Checkra1n provides an inbuilt way. When jailbreaking a device, Checkra1n allows you to select the “Untested versions” option. While employing this option, you can jailbreak the Apple iPhone 12 device with iOS versions still not tested for jailbreaking. Here is how you can select these options in an attempt to jailbreak your device:
Instructions. To get a clean start, reboot your computer and iOS device and launch the Checkra1n app. Now, click the “Options” and select the “Untested Versions” and “Safe Mode” options. Then, try jailbreaking your device and see if error 31 is resolved.

Fix 6. Try a Special Method While Using Checkra1n
At times, the solutions you are looking for can be found among the experiences of fellow users. We found a Reddit post in our search to find solutions to Checkra1n Error 31. In this post, a Reddit user explained a hack he had found to solve error 31 when jailbreaking using Checkra1n.
Remember that this hack includes a specific Checkra1n version and experience that specific user. While you can emulate the experience, the results aren’t guaranteed. Here is what that user tried for successful jailbreaking using Checkra1n:
- Step 1. Download and install the Checkra1n version 0.10.2 beta on your computer. Now, connect your Apple iPhone 12 to DFU Mode to the system. Initiate the jailbreaking process until the “Right before Trigger” option appears.

- Step 2. The user suggests you unplug the cable and re-plug it after waiting for 5 to 7 seconds. According to the user, this action should do the trick. To get out of DFU Mode, press and hold both buttons (Home + Lock) for 10 seconds and go on to release the home button.

Bonus. Jailbreak iOS Using Mac: A Simple Guide To Refer To
Looking for a tool to jailbreak an iOS device on a Mac? Wondershare Dr.Fone has you covered there, as it also provides a comprehensive guide to jailbreaking an iOS device from Mac. You will need to download the Checkra1n tool and a USB cable to connect your Apple iPhone 12. Once you have both, use the following steps to jailbreak your device from Mac:
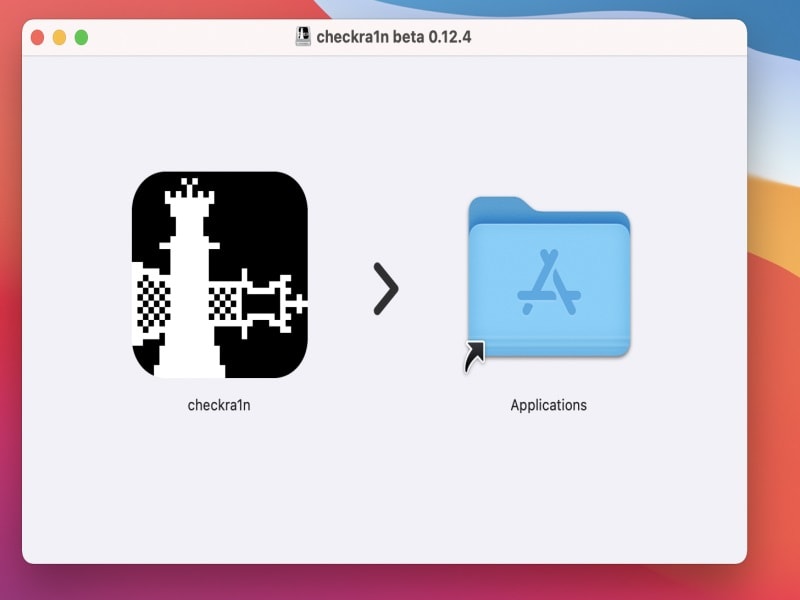
- Step 1. Begin by downloading the .dmg file of Checkra1n and installing it within your Mac’s applications. Now, link your iOS device to the Mac and go to Applications, click “Checkra1n,” and access “Contents.”
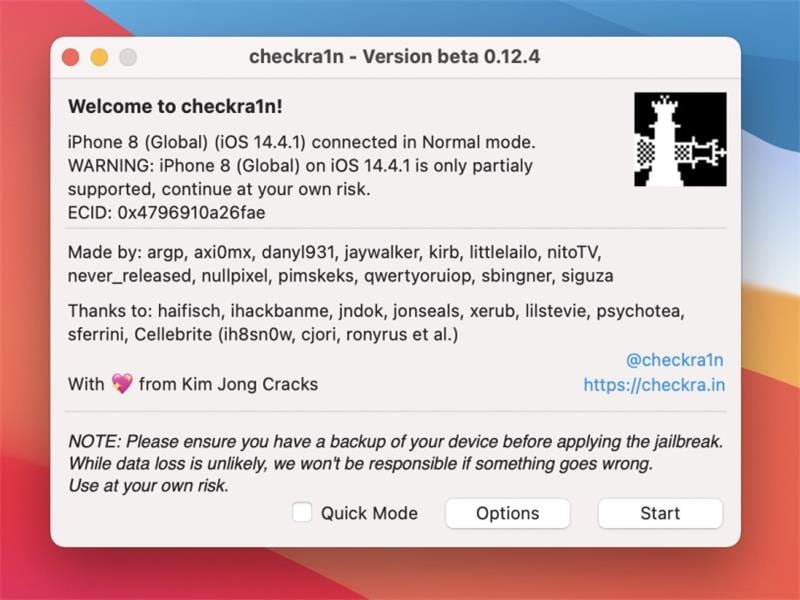
- Step 2. Tap “macOS” and go to “Checkra1n_gui Terminal file” to detect the Apple iPhone 12 device. Now, move ahead by tapping “Start,” you will be led to the screen with instructions for putting the Apple iPhone 12 device into DFU Mode.
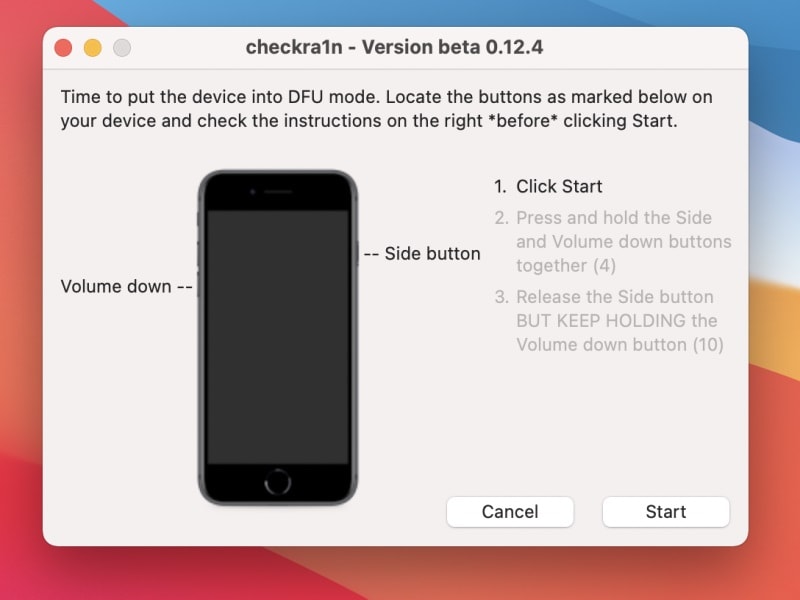
- Step 3. Tap “Next,” put your device into DFU Mode, and press “Start.” Once the Apple iPhone 12 device is in DFU Mode, the jailbreaking process will commence. When it is complete, and your device is jailbroken, tap “Done” to conclude the process.
Conclusion
In wrapping up this guide, those seeking to customize their iOS devices can turn to jailbreak. Checkra1n stands out as a favored option for this procedure, but dealing with Checkra1n Error 31 can be an irritating ordeal. The optimal solution is opting for an alternative, such as Wondershare Dr.Fone. This tool offers comprehensive textual and video guides, aiding users in successful jailbreaks.
Tips: Are you searching for a powerful Activation bypass tool? No worries as Dr.Fone is here to help you. Download it and start a seamless unlock experience!
Also read:
- [Updated] Seamlessly Integrate PIP on Microsoft Edge
- A Comprehensive Guide to iCloud Unlock From Apple iPhone 13 mini Online
- Aesthetic Desk Customization: Displaying 'This PC' Image
- Guía Integral: Maximizando El Uso De Windows File Recovery en El Sistema Operativo Windows 11
- In 2024, 3 Effective Ways to Bypass Activation Lock on Apple iPhone 8 Plus
- In 2024, Android Dominance Top 10 MOBA Games Showcase
- In 2024, How To Bypass iCloud Activation Lock On iPod and iPhone 8 Plus The Right Way
- In 2024, How to Remove Find My iPhone without Apple ID From your Apple iPhone 15 Pro Max?
- Maximizing Vids for Cash Comparing Dm & Yo Strategies for 2024
- Title: iPhone 12 iCloud Activation Lock Bypass
- Author: Lydia
- Created at : 2024-12-18 22:16:47
- Updated at : 2024-12-21 17:27:55
- Link: https://activate-lock.techidaily.com/iphone-12-icloud-activation-lock-bypass-by-drfone-ios/
- License: This work is licensed under CC BY-NC-SA 4.0.