
:max_bytes(150000):strip_icc():format(webp)/how-to-fix-it-when-reddit-apps-arent-working-f4c8fe50a9ff4c90a28e6a056b427208.jpg)
The Ultimate Guide to Bypassing iCloud Activation Lock from iPhone SE
The Ultimate Guide to Bypassing iCloud Activation Lock on Apple iPhone SE
For many iPhone users, the dreaded iCloud activation lock can be an unnerving barrier to getting the most out of their devices. Whether you’ve encountered it after purchasing a second-hand iPhone, or you’ve simply forgotten your login credentials, this lock demands attention and often a bit of digital gymnastics to unlock. This comprehensive guide is for you, equipped with detailed instructions on various methods to bypass the iCloud activation lock on your Apple iPhone SE.
If you’re ready to take back control of your device, read on. We’ll walk you through the process step by step and arm you with the knowledge to access your smartphone’s full potential.
Part 1: How to bypass iCloud activation on iPhone through the DNS method?
This method is one of the oldest tricks in the guide, and while it still works for some users with specific models and iOS versions, it doesn’t guarantee universal success. Here’s a brief overview of how to proceed:

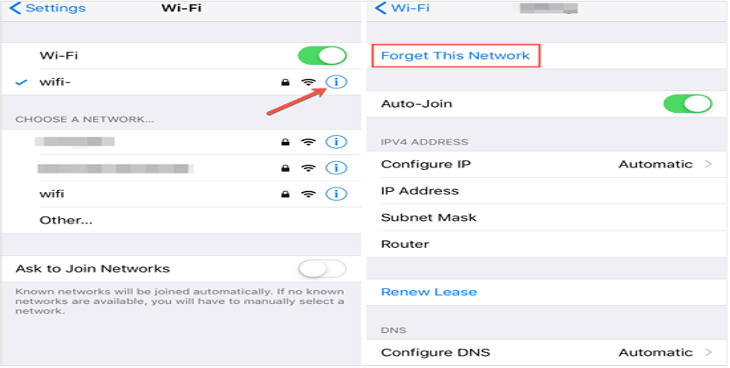
In the activation window, press the home button and then select Wi-Fi settings and then tap on the ‘I’ bonded by a circle. Now it’s time to remove the existing DNS server and put a custom one in motion. Now, let’s follow the steps below to bypass iCloud activation on iPhone.
How to bypass iCloud activation lock?
Step 1: Start the Setup Process
Turn on your Apple iPhone SE and start the setup process until you reach the page where you’re asked to connect to a Wi-Fi network.
Step 2: Select a Custom DNS Server
When prompted to connect to a Wi-Fi network and input a password, select “i” on your Apple iPhone SE screen, which will take you to a menu with network details. Tap “Configure DNS” and choose “Manual”.
Enter a DNS server address based on your geographic location:
- For USA/North America, enter 104.154.51.7
- For Europe, enter 104.155.28.90
- For Asia, enter 104.155.220.58
- For any other area, enter 78.109.17.60
Step 3: Proceed with iCloud Bypass
Return to Wi-Fi settings and select your desired network. You might need to enter a password, but instead, you can skip this step and continue. Your Apple iPhone SE will try to activate with these new settings and may allow you to bypass the activation lock.
Video Guide: How to bypass iCloud activation through DNS?
Note: The DNS method is an experimental and non-guaranteed way to bypass the iCloud activation lock. It is worth trying if you prefer not to use third-party tools, but be prepared for the possibility that it may not work for your specific device or iOS version.
Tips: During iCloud, we use it most for data backup to avoid data loss. But if you can’t access your iCloud, maybe you are supposed to back up your iPhone data to the computer .
Part 2: How to bypass iCloud activation on iPhone with a smart tool? [iOS 12.0~16.6]
A fast and safe tool to unlock locked iCloud
While talking about a suitable tool to bypass iCloud activation, missing out on Dr.Fone - Screen Unlock (iOS) doesn’t make any sense as it is the most trusted and loved tool by millions of users. Available for Windows and Mac operating systems, it offers an extremely easy process to make the work of bypassing iCloud done. Many other tools don’t hesitate to make false promises, but Wondershare has always managed to upkeep the security and trust of the users and does what it says. Let us bring you closer to this iCloud bypass tool.
Dr.Fone - Screen Unlock
Unlock iPhone, iPad, and iPod touch screen and Activation lock within minutes
- Easy for the users to unlock locked iCloud by providing a really easy interface.
- Exceptional speed for unlocking i.e., works in less than a minute.
- Compatible with iPhone 5S to iPhone X, iPad 4 to iPad 7, and iPod touch 7 to iPod touch 9 running iOS 12.0 to iOS 16.6.
- Effectively remove the Apple iPhone SE lock screen without the passcode.
3981454 people have downloaded it
Check out the following guide to know how to use this tool to bypass iCloud activation in detail.
Bypass iCloud activation on iPhone with Dr.Fone
Step 1: Click the “Download Now” button above to download Dr.Fone on your computer
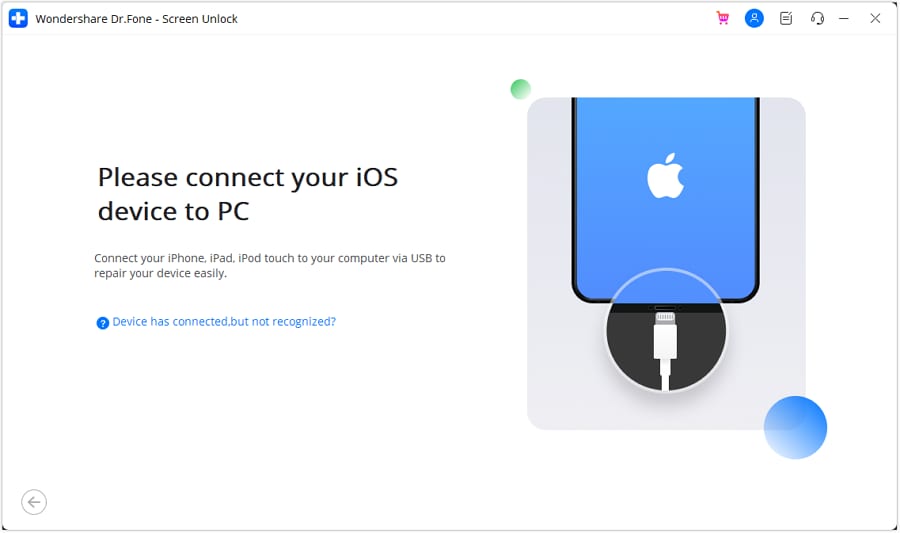
Connect your Apple iPhone SE to the system and launch the Dr.Fone. From its home, select the ‘Screen Unlock’ section.
Just choose the feature ‘iCloud Activation Lock Removal’ to unlock the Activation lock of an iOS device to continue.

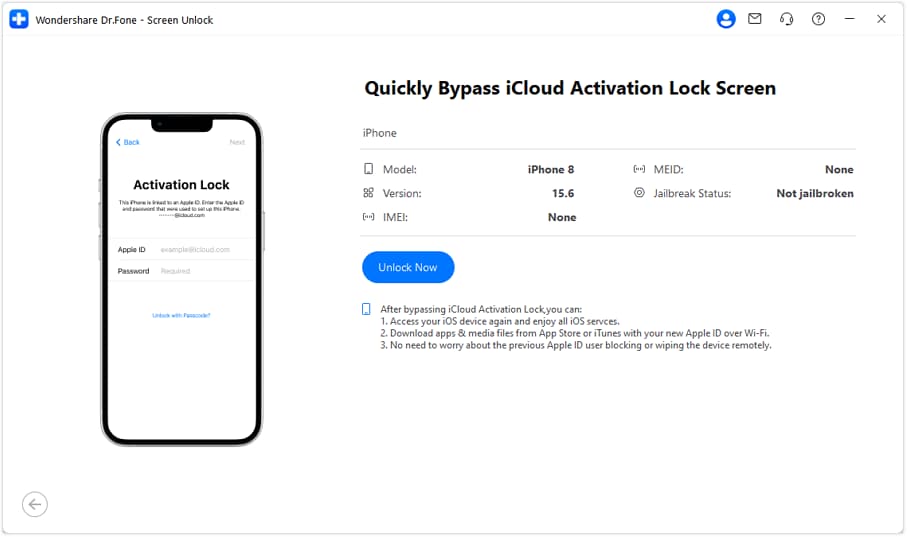
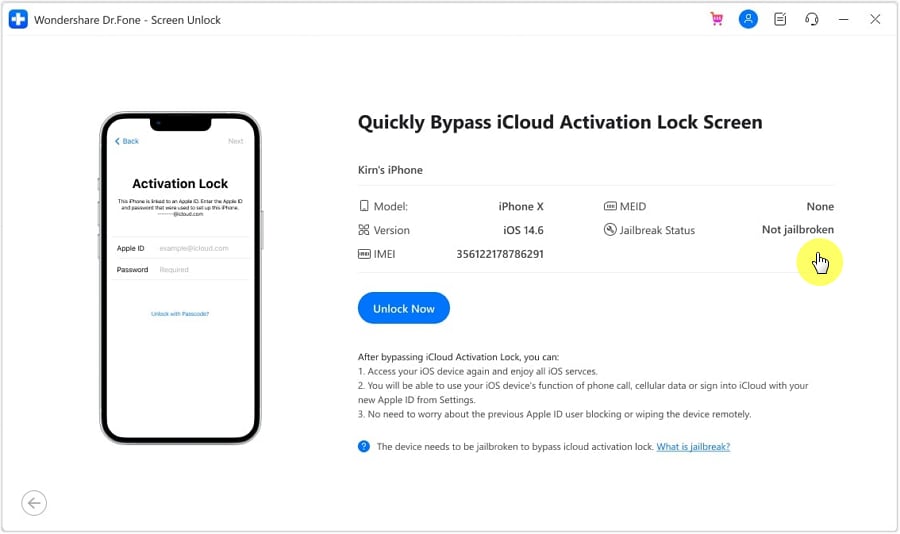
Step 2: Confirm device information
You will see your device information. Click ‘Unlock Now’ after confirming all device details are correct.
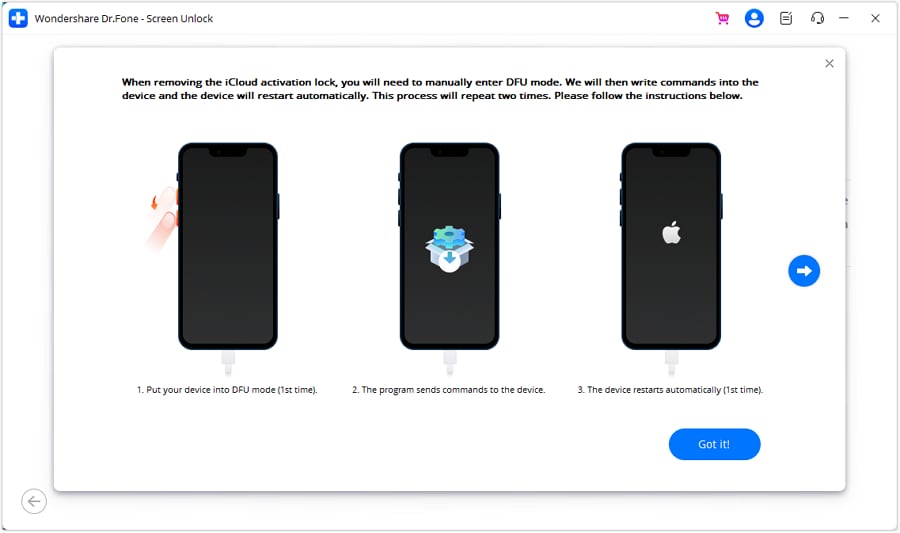
Step 3: Put your Apple iPhone SE into DFU mode or jailbreak your Apple iPhone SE properly
For iPhone users running iOS 15.316.3, to bypass the iCloud activation lock, you need to follow the instruction you will see to put your device into DFU mode. For iPhone users running iOS 12.014.8.1 or iOS 16.4~16.6, you should follow textual guidelines for jailbreaking your Apple iPhone SE .
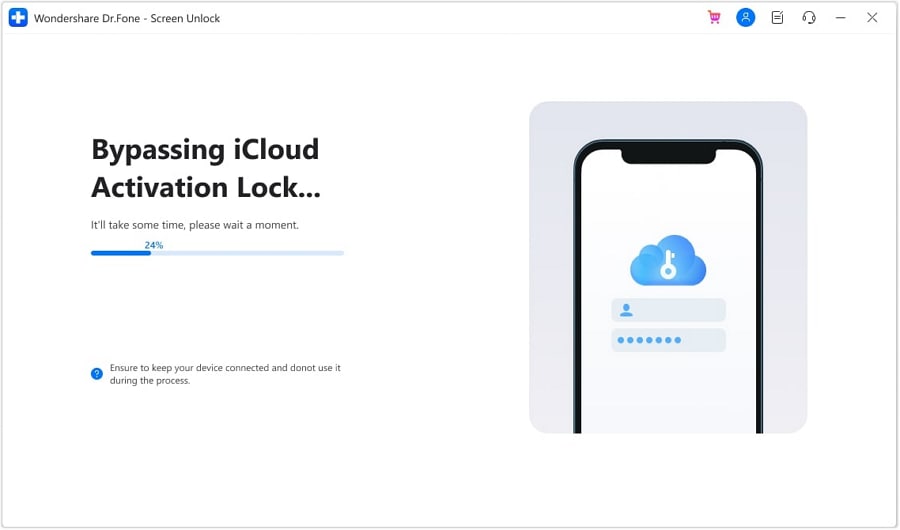
Step 4: Remove iCloud activation lock successfully
Dr.Fone will bypass activation lock automatically after your device is in DFU mode. Wait patiently to complete the bypass process.
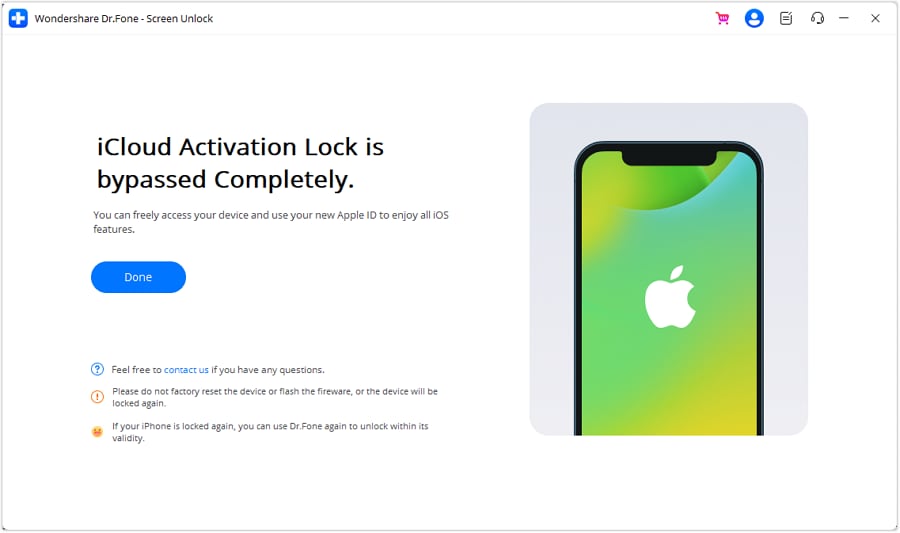
Dr.Fone - Screen Unlock (iOS) provides a hassle-free experience, consistently working across multiple iPhone models and iOS versions. It ensures that you can bypass the activation lock without password .
An optional tool to bypass iCloud activation lock
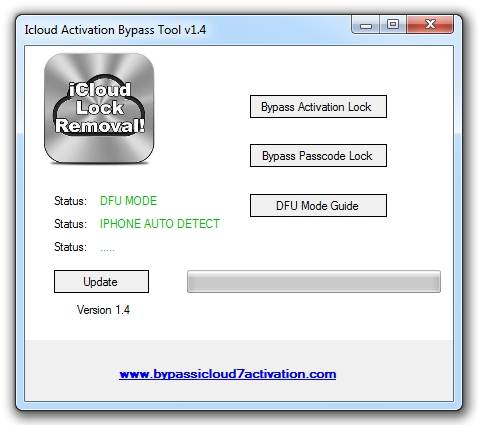
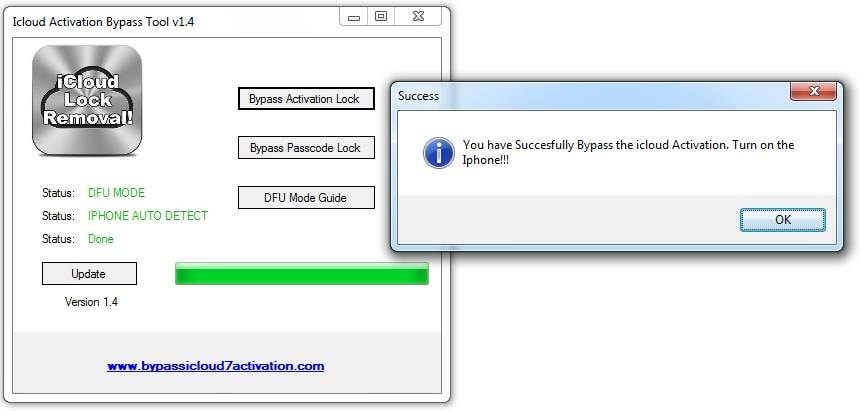
There are a limited number of functional tools available that can come in handy in bypassing the iCloud activation for your Apple iPhone SE or iPad. One of the names is ‘iCloud activation bypass tool version 1.4’. The tool’s name abides by what it says and is a really easy tool to use.
Below are the steps to bypass iCloud activation by using this tool.
Download and install the program on your desktop.
Launch the application and connect your Apple iPhone SE or iPad via the USB cable to your desktop.

The tool will now scan your device and reads its IMEI number.
Click on the ‘Bypass Activation Lock’ button and patiently wait for the procedure to be completed. The tool, with the help of your devices IMEI code will connect to the Apple servers from where it will terminate and delete all linked iCloud accounts of your device.
Once the process is complete, disconnect your phone and reboot it. You will notice that the iCloud lock has been permanently removed and hence no prior activation is required to use the Apple iPhone SE device.
Tips: If you’d like to know more about iCloud bypass tools, you can just read this article: Top 8 iCloud Bypass Tools .
Part 3: How to bypass iCloud activation on iOS 11 devices?
Starting with iOS 11, Apple has introduced a bizarre bug in their Activation mechanism that allows you to bypass iCloud activation completely (with SIM card working) in certain conditions. The bug relies on the passcode activation method and requires Second Factor Authentication (2FA) to be enabled on the account to which the Apple iPhone SE device is locked. As of iOS 11, the passcode activation option appears for the iCloud Locked devices if 2FA is on.
The bug allows a user to input a false passcode “0000” or “0000” if the requirement is for a 6-digit passcode a few times, then leave the Apple iPhone SE device to rest for ~1 hour, so that the session with the Apple Activation Server (albert.apple.com) expires. After that, the user would input the false passcode a few more times and the Apple iPhone SE device will skip the activation part, essentially disabling Find My iPhone server-side.
A video tutorial on how to apply this method can be followed here:
Note: You can only follow this tutorial on iOS 13/.x. iOS 10 and iOS 9 versions do not have the “Activate with passcode” option. Apple has patched this bug on the newer firmware, so it is recommended to try on iOS 11.1.1 and lower.
If 2FA is not enabled in the account, you will not see the “Activate with Passcode” option under the Username and Password fields. Instead, you will see an option called “Activation Help”.
Part 4: How to erase data remotely from your lost iPhone?
If your Apple iPhone SE is lost or stolen, one of the first steps you should take is to erase the data remotely. This not only protects your personal information but also removes the activation lock.
Note: Before proceeding, one should know that once all the data is erased from your Apple iPhone SE, you will no longer be able to use ‘Find my iPhone’ and all your data will be erased.
Steps to erase data remotely from your lost iPhone
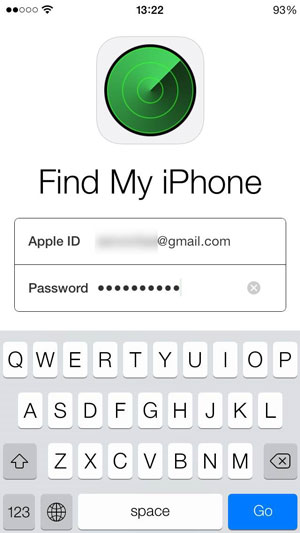
Launch Find My iPhone on any iOS device and enter your account credentials. You can use any iOS device for this procedure.
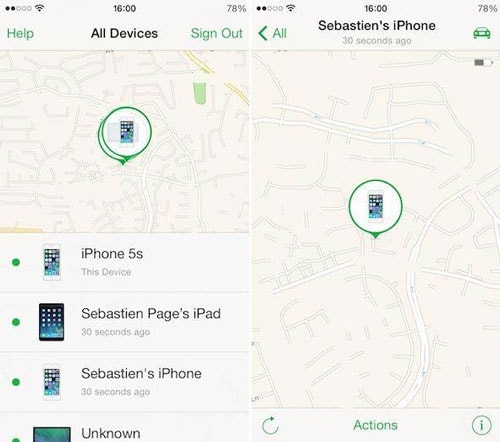
Once you log in, you’ll be able to view all the Apple iPhone SE devices linked to your account. Select the Apple iPhone SE device you wish to erase.
Please note that your device will be viewable only if the Find my iPhone feature is on your lost device and is active.
Tap on the actions button on the bottom and tap on erasing.
You will be asked for confirmation to erase your lost iPhone and will then require you to fill in your account credentials for one last time.
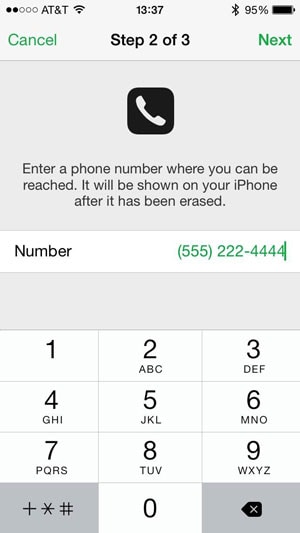
Now you will require to fill in a contact number that would appear on your lost iPhone along with a suitable message. This way, a generous person could get in contact with you to help you retrieve your Apple iPhone SE.
Once the required information is obtained, the erasing of data will start and you’ll be notified when it completes.


Video Guide
It’s pretty easy to keep your iCloud account safe if you know the simple tricks. Whether you are using iCloud on your Apple iPhone SE or any other Apple device, following these steps will ensure that your information is kept secure. And it’s really easy to bypass iCloud activation!
Part 5: How to unlock iCloud on activated iPhone / iPad / iPod?
How to remove iCloud activation lock for all iOS 13/12/11/x, iPhones 100%, and lower-version devices?
Here is how:
1. Download first the customized iTunes backup without iCloud (“Find my iPhone” should be turned OFF).
2. Connect your locked device to iTunes. Then follow the instructions in the video below, and you can add a new iCloud ID account and use the Apple iPhone SE or iPad as normal.
Note: This method will not remove iCloud from the Apple server. If you check your IMEI, you still have iCloud ON. This method, however, will remove iCloud from the local device iPhone / iPad / iPod.
Besides, Apple only offers 5GB of free storage for each iCloud account. If your iCloud storage is full or getting close, you will get annoying popups every day. You can follow these 14 simple hacks to fix iCloud storage full on your Apple iPhone SE/iPad.
Conclusion
Unlocking your Apple iPhone SE from the iCloud activation lock requires patience, precision, and tech-savviness. Choose a method that suits your comfort and device specifics: DNS servers, tools like Dr.Fone - Screen Unlock (iOS) , or Apple’s support. Evaluate methods, watch out for scams, and trust reliable solutions. The journey to an iCloud-free iPhone may have twists, but many have succeeded—so can you. This guide aims to help you reclaim your Apple iPhone SE’s functionality and demystify iCloud locks. Remember, patience, research, and the right approach are key.
How To Fix Apple iPhone SE Could Not Be Activated/Reached Issue
Are you struggling with your Apple iPhone SE’s activation? The Apple iPhone SE activation process is crucial for seamless functionality, but encountering issues like ‘iPhone could not be activated’ can be frustrating. In this guide, you’ll learn how to simplify the process of iPhone activation, shedding light on common problems that users face.
From understanding error messages to the significance of swift resolutions, this article has got you covered. Let’s navigate through these activation errors to ensure your Apple iPhone SE is activated smoothly. Because when it comes to your device, prompt problem-solving is the key to a hassle-free experience.

Part I. Explanation To Common Apple iPhone SE Activation Errors
Are you greeted with puzzling messages like “iPhone could not be activated” when setting up your device? Let’s demystify these common errors and get your Apple iPhone SE up and running smoothly.

A. Common Apple iPhone SE Error Messages
Check out below the most common error messages iPhone users might encounter:
- “iPhone could not be activated”
This message often pops up during a hiccup in the activation process. It could be due to various reasons, but fear not – solutions are within reach.
- “Activation server cannot be reached”
Imagine your Apple iPhone SE trying to connect to the activation server but facing hurdles. This error signifies a connection issue, hindering the activation process.
- “Activation lock server cannot be reached”
This error may sound complex, but it often boils down to a connectivity glitch with the activation lock server. Discover straightforward steps to address this and unlock the activation process.
B. Causes Behind These Errors
Now learn about the causes behind these reasons by reading below:
- Activation Information Issues
Sometimes, the activation information your Apple iPhone SE receives may be incorrect or incomplete. This could be due to a typo in your Apple ID or an issue with iCloud credentials. We’ll guide you through double-checking and correcting these details.
- Server-Related Problems
Your iPhone communicates with servers during activation. If there’s a hiccup in this interaction – for instance, the activation server or activation lock server cannot be reached – it can result in errors. We’ll explore troubleshooting steps to ensure seamless server connectivity.
Understanding these common errors and their causes is the first step to resolving them. In the next sections, you’ll delve deeper into troubleshooting methods and practical solutions to activate your Apple iPhone SE without a hitch. Stay tuned for a hassle-free iPhone experience!
Part II. How To Fix iPhone Activation Errors
So, you’ve encountered the frustrating activation information showing the “iPhone could not be activated” message. No worries! Let’s dive into practical solutions that will have your Apple iPhone SE activated in no time. Follow these easy troubleshooting methods, and say goodbye to activation problems.

Checking Network Connectivity
First things first – ensure your Apple iPhone SE is well-connected to the internet. Activate Wi-Fi or cellular data and try the activation process again. A stable connection is the cornerstone of a successful activation.
Verifying Apple ID and iCloud Credentials
Activation errors might stem from a small typo or a forgotten detail. Double-check your Apple ID and iCloud credentials. Confirm that you’re using the correct email and password. Accurate information is key to a smooth activation.
Ensuring Server Availability
Activation involves communication with servers. If the activation server or activation lock server cannot be reached, your Apple iPhone SE may face hurdles. Confirm that Apple’s servers are up and running smoothly. You can do this by checking Apple’s system status page online.
Following these straightforward steps addresses common activation glitches. But what if the issue persists? In the next section, you will be introduced to an effective tool that goes beyond traditional troubleshooting methods. Stay tuned to discover a hassle-free way to unlock your Apple iPhone SE’s full potential!
Part III. Still Facing Errors? Your Lifesaver: Dr.Fone - Screen Unlock (iOS)
Despite your best efforts, some iPhone activation issues persist, leaving you stuck in frustration. When traditional troubleshooting falls short, it’s time to introduce a reliable ally: Wondershare Dr.Fone - Screen Unlock (iOS). This tool emerges as a lifesaver, offering a seamless solution to activation challenges.
Dr.Fone - Screen Unlock (iOS) is not just a tool; it’s a lifeline for those struggling with persistent activation errors. Tested and trusted, it goes beyond conventional methods, ensuring you regain access to your device effortlessly.

Key Features and Benefits
These key features and benefits below collectively contribute to making Dr.Fone - Screen Unlock (iOS) a comprehensive tool for addressing various iPhone-related challenges.
- Dr.Fone - Screen Unlock (iOS) is compatible with a large number of iPhone models, ensuring that users with different devices can benefit from its features.
- The tool prioritizes the security and privacy of user data. It employs advanced encryption protocols to safeguard sensitive information during the unlocking process.
- Beyond activation issues, Dr.Fone - Screen Unlock (iOS) can handle various other scenarios, such as unlocking a forgotten passcode, bypassing the Apple ID, and recovering data from disabled devices.
- **No Data Loss.**One of the standout features is its ability to unlock the Apple iPhone SE device without causing any data loss. Users can regain access to their iPhones without compromising their valuable information.
- **Time Efficiency.**Fone - Screen Unlock (iOS) offers a quick and efficient solution. Users can save time compared to troubleshooting methods that may take longer without guaranteed results. Dr.Fone efficiently activates your Apple iPhone SE, putting the control back in your hands.
- **Risk Mitigation.**The tool minimizes the risk associated with attempting various troubleshooting methods. It provides a straightforward and less risky alternative to ensure successful iPhone activation.
- **Intuitive Interface.**Fone boasts an intuitive and user-friendly interface, making it accessible to individuals with varying levels of technical expertise. Users can navigate through the unlocking process seamlessly.
- **Reliable Results.**Count on Dr. Fone’s proven track record. It’s a reliable choice when traditional troubleshooting methods fall short.
Step-by-Step Guide
Learn how to use Dr.Fone – Screen Unlock (iOS) as an alternative tool to fix iPhone activation errors. The method provided below will not require jailbreaking the phone and supports devices running on iOS 15.0 to 16.3 (iPhone 6/6 Plus, iPhone 6S/6S Plus, iPhone 7/7 Plus, iPhone 8/8 Plus, iPhone X).
- Step 1: Get the most recent version of Wondershare Dr.Fone installed on your computer, then run the program. Navigate to Toolbox, click Screen Unlock, then select iOS. In the next screen, choose iCloud Activation Lock Removal.
- Step 2: When prompted, choose Start to begin unlocking the Activation Lock on your iOS device.

- Step 3: You will be asked to connect your iOS device to a USB cable while propagating into the corresponding function. The window will show the status as you connect the Apple iPhone SE device and will immediately bring you to the next screen.
- Step 4: Once on the next screen, double-check all the information related to the iOS device and click the Unlock Now option.
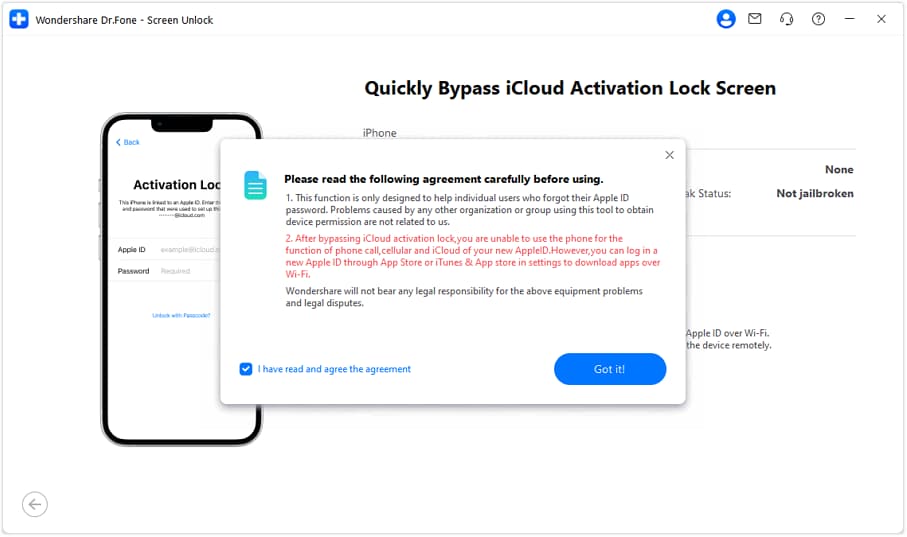
- Step 5: The next step is for a warning prompt to show up on the screen, indicating that the user should be aware of the procedure. Please read the agreement carefully and indicate your agreement by checking the appropriate box. Click the Got It! button to proceed.
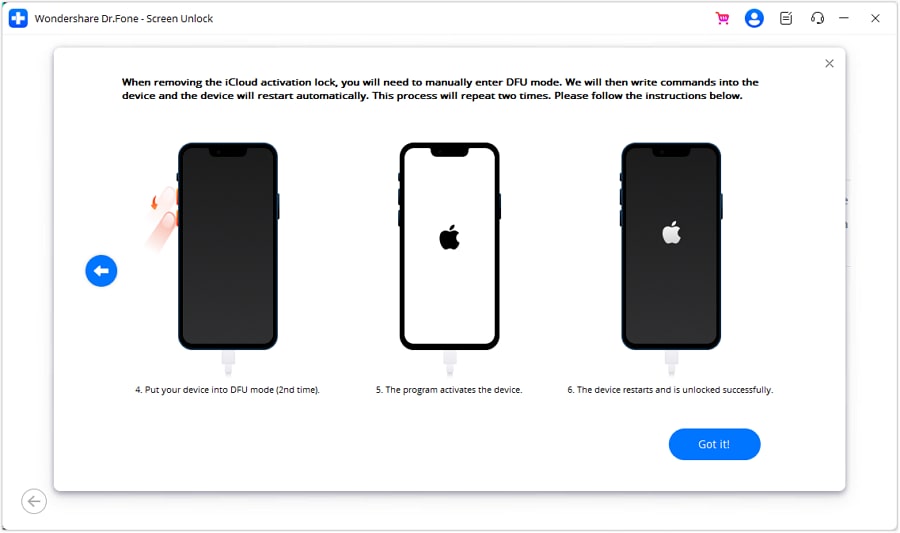
- Step 6: Follow the on-screen prompts to enter DFU Mode on your iOS device. Upon initialization of the Apple iPhone SE device in DFU Mode, the program initiates a restart process by sending a command to the Apple iPhone SE device. Press the “right arrow” to proceed.
- Step 7: Continue to set the iOS device to DFU Mode for the second time. As a result, the program activates and unlocks the gadget. When it is finished, click the Got It! button to finish.
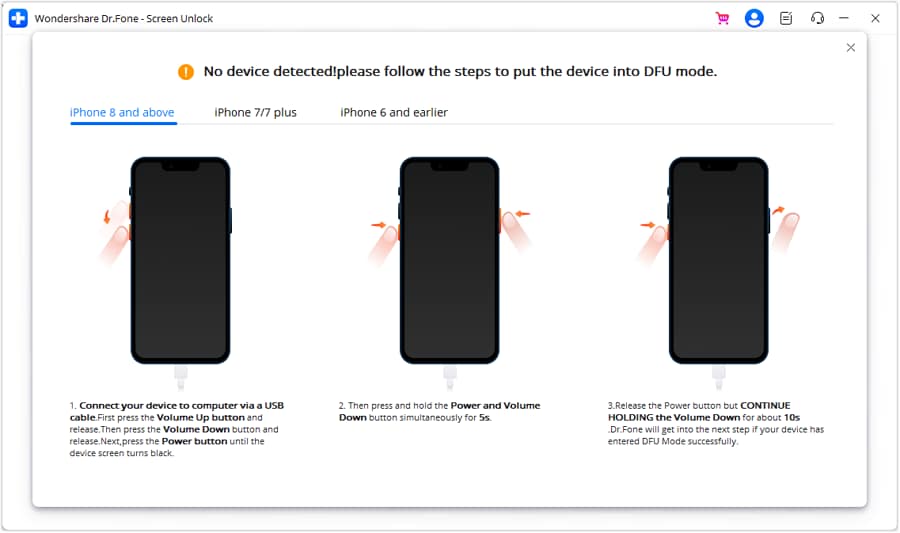
- Step 8: When the platform does not recognize a device, users must follow the on-screen instructions to enter DFU Mode on their iOS device.
- Step 9: After the Apple iPhone SE device has been processed in DFU Mode, you will be able to see the iCloud Activation Lock being removed from your computer’s screen. The screen will show a completion message once it’s done. To complete the process of removing the iCloud Activation Lock, click Done.
Dr.Fone - Screen Unlock (iOS) simplifies the complex journey of iPhone activation, providing a reliable and efficient alternative. It’s the key to unlocking your device’s full potential when conventional methods fall short. In the next section, you’ll learn how to check if your Apple iPhone SE has finally been activated.
Bonus: How Do I Know if My iPhone Is Activated?
Wondering if you have resolved your iPhone’s “can’t be activated” issue? Let’s check the clues and ensure your device is ready for action. Here are simple indicators to confirm your Apple iPhone SE’s activation status:

- Check Cellular or Network Connectivity in Settings
Navigate to your Apple iPhone SE’s Settings menu. Head to “Cellular” or “Mobile Data” and ensure it’s switched on. A lit icon signals active connectivity. If using Wi-Fi, look for the Wi-Fi symbol at the top – a strong connection is a green light for activation success.
- Apple ID and iCloud Integration
Activation relies on accurate Apple ID and iCloud details. Confirm these in Settings under “Apple ID” or “iCloud.” Ensure your email and password match the ones used during setup. A synced Apple ID ensures seamless integration, marking your Apple iPhone SE as officially activated.
- Absence of Activation Prompts
A surefire sign of a successfully activated iPhone is the absence of activation prompts. Once activated, your Apple iPhone SE should smoothly transition from the initial setup screen to your home screen without any prompts asking for activation details.
Why Does Activation Matter?
Activation is the key to unlocking your Apple iPhone SE’s full potential. It ensures you can make calls, send messages, and enjoy all your device’s features. You can confirm whether your Apple iPhone SE is activated and ready for action by checking these simple indicators.
Conclusion
In the maze of iPhone activation, you’ve decoded common errors and provided simple fixes. Especially for the ‘iPhone could not be activated’ issue, you now have the solutions to resolve it. And for a fuss-free fix, consider Dr.Fone - Screen Unlock (iOS) – your activation hero.
Swift solutions matter, ensuring you experience your Apple iPhone SE’s full potential. Don’t let activation glitches hinder your Apple iPhone SE experience; unlock its full potential today! Choose Dr.Fone and embrace seamless activation. Because in the Apple iPhone SE world, a timely resolution is the key to a smooth digital experience.
Tips: Are you searching for a powerful Screen Unlock tool? No worries as Dr.Fone is here to help you. Download it and start a seamless unlock experience!
Unlock Your Device: iCloud DNS Bypass Explained and Tested, Plus Easy Alternatives On Apple iPhone SE
Have you bought a used iPhone or iPad with an active iCloud Activation Lock? Or perhaps you have an Apple device but cannot remember your iCloud password? Without activating iCloud, you cannot utilize locked devices in either scenario.
You might try contacting Apple customer service, but they won’t be able to assist you without user identification directly. Even after the Apple iPhone SE device has been authenticated, you will still be bombarded with inquiries, and they may even want the original iOS device payment receipt.
One of the greatest free solutions to prevent these issues is to unlock your Apple iPhone utilizing iCloud DNS Bypass. Read on to know more in this iCloud DNS Bypass Guide.
Part 1: How Can We Use iCloud DNS Bypass for iOS Devices?
After a factory reset or restoration, every time you set up your iOS device, it will send an activation request to Apple’s servers. Apple responds to your request and displays your device’s status.
Additionally, if the Find My iPhone feature of your device is enabled, an iCloud Activation Lock screen will appear and prompt you for your iCloud account login information. The iCloud DNS Bypass can assist you if you forget your login information (Apple ID or password) or purchase a used device with an iCloud lock activated. It is a free approach to unlocking iCloud.
The readable names are transformed into numerical IP addresses via the Domain Name System (DNS). To launch the program, it makes use of a DNS server that serves as a host.
Use DNS to get around iCloud Server IP Address
You may first just ignore the iCloud DNS on your Apple iPhone SE or iPad. The procedure is easy. Remember that the process must be completed by inserting the SIM card into your Apple iPhone SE.
Step 1. Turn on your Apple iPhone SE, then configure it according to the on-screen instructions.
Step 2. Select your language and nation. Click Continue to access the Wi-Fi settings screen after that.
Step 3. If prompted, click the I icon next to the Wi-Fi area.
Step 4. Click Connection Settings > Forget this Network to disconnect from the Wi-Fi network.
Step 5. When asked for a DNS server IP address, tap the I symbol to unlock the iCloud activation lock. Here is a list of places for your information:
USA: 104.154.51.7
155.28.90 Europe
Africa: 35.199.88.219
Asia: 104.155.220.58
189.47.23 Australia and Oceania
It is 78.100.17.60 on other continents.
Step 6. Turn on Wi-Fi and select the Wi-Fi network you wish to connect to by tapping the Back button on the left side of the screen. Enter your passcode after that.
Step 7. When you click Next Page > Back, the iCloud bypass page will appear.
Step 8. Use your device and configure your apps.
Use iCloud DNS Bypass Crash
- Step 1. The procedures below will help you delete iCloud after DNS bypass if you cannot utilize some features on your Apple iPhone SE.
- Step 2. Tap Menu > Applications after attempting the aforementioned technique.
- Step 3. To restart your smartphone, scroll down and tap the Crash option.
- Step 4. Select “Language and Country” > Select a Wi-Fi network, click Home, More Wi-Fi Settings, Configure Proxy, and then Manual.
- Step 5. In the Server section, delete the existing HTTP address before entering 30 different emojis. Type 8888 into the Port area, then click Save at the top.
- Step 6. To access the Unlock screen, tap Back > Next. To unlock the Apple iPhone SE device, press the Home button.
- Step 7. When the Home screen appears, tap the Language choice.
Part 2: The Best iCloud DNS Bypass Alternatives to Unlock Your Apple iPhone SE/iPad/iPod Touch (Easy and Efficient)
Only if you bought a secondhand iPhone with an activation lock or want to restore the Apple iPhone SE device but forgot that Find My iPhone was ever turned on do you need Dr.Fone - Screen Unlock (iOS) . Dr.Fone - Screen Unlock (iOS) is the most promising and user-friendly product of its sort currently available. With the help of this application, you can simply fix the iCloud activation issue. You don’t need to be an expert in utilizing the application because it is simple and intuitive.
Using Dr.Fone - Screen Unlock, you can get rid of the iCloud activation lock. Launch Dr.Fone and choose “Remove Active Lock” and “Unlock Apple ID” to unlock your iCloud. It still works if you have a used iPad or iPhone.
Dr.Fone - Screen Unlock (iOS)
Remove iCloud Activation lock without Password in Minutes
- Remove Apple ID/iCloud Account efficiently.
- Save your Apple iPhone SE quickly from the disabled state.
- Free your sim out of any carrier worldwide.
- Bypass iCloud activation lock and enjoy all iCloud services
- Works for all models of iPhone, iPad, and iPod touch.
- Fully compatible with the latest iOS.

4,008,671 people have downloaded it
Here’s a step-by-step guide on how to use it
Step 1. Installing Dr.Fone on your smartphone and selecting Screen Unlock from the available options are the first steps in the procedure. You will note that there is a “iCloud Activation Lock Removal” option, among others, when you first use the Screen Unlock function. Simply clicking on it is all that is required.
Step 2. Before the bypassing process, please tape “Start”.
Step 3. After reaching the ‘Start’ page, Your Apple iPhone SE’s specific information will be detected to determine the appropriate operation process. Ensure that the data cable is properly connected during this process. Jailbreaking is required for iOS devices running 12.0 to 14.8.1, but for iOS 15.0 to 16.3, simply enter DFU mode twice and proceed to unlock. For detailed instructions on unlocking, you can visit this detailed guide about iCloud Activation Lock Removal.
Step 4. Now we’re bypassing the activation lock, soon your Apple iPhone SE will work without the activation lock.
Part 3: FAQs
1. When Do We Require iCloud DNS Bypass?
We require it when our carrier locks our phone or when we buy a used phone and cannot use it because of an iCloud activation lock. The use of iCloud DNS bypass enables temporary access to the features and functionality of an iCloud-locked device. Domain Name Server, or DNS for short, serves the function of converting your domain names into IP addresses.
2. What Can iCloud DNS Bypass Do for Us?
When you need an urgent functioning solution for a locked iPhone, using iCloud DNS bypass is helpful since it gives you temporary access to all the features and configuration of an iCloud-restricted device. DNS, or domain name server, converts your domain names into IP addresses.
3. What are the Pros & Cons of iCloud DNS Bypass
This approach can be helpful, but it does have advantages and pitfalls of its own. These advantages and disadvantages are broken down as follows:
Pros
- You may use it without installing any software on the Apple iPhone SE device, since you can do it in the Wi-Fi settings.
- The internet, camera, and games can all be used after the gadget has been engaged, making it simple to access.
- Utilizing this approach is cost-free.
Cons
- This technique only partially unlocks the Apple iPhone SE device and represents a hack.
- The iCloud DNS bypassing technique has occasionally been reported as not working by users.
Conclusion
Now you have read all about iCloud DNS bypass, what is iCloud bypass DNS, whether DNS bypass is free, and how to iPhone DNS bypass, it is time to implement all the solutions and bear in mind that all DNS Bypass solutions are 100% free. Dr.Fone - Screen Unlock (iOS) is also a great tool to bypass screen lock, even if you don’t have any tech skills.
Also read:
- In 2024, New Guide How To Check iCloud Activation Lock Status From Your iPhone SE
- In 2024, Bypass iCloud Activation Lock with IMEI Code From your Apple iPhone 14 Pro
- Top 7 iCloud Activation Bypass Tools For your Apple iPhone 15 Pro Max
- 3 Easy Methods to Unlock iCloud Locked Apple iPhone 14 Pro Max/iPad/iPod
- In 2024, How To Bypass iCloud Activation Lock On iPod and iPhone 11 Pro The Right Way
- The Ultimate Guide to Bypassing iCloud Activation Lock on iPhone 12 mini
- 3 Effective Ways to Bypass Activation Lock on Apple iPhone 6s Plus
- How to Fix iPad or iPhone 6s Plus Stuck On Activation Lock?
- Ultimate Guide from iPhone 11 iCloud Activation Lock Bypass
- In 2024, Bypass iCloud Activation Lock with IMEI Code From your Apple iPhone SE
- In 2024, How to Bypass Activation Lock from iPhone XS or iPad?
- In 2024, Effective Ways To Fix Checkra1n Error 31 From iPhone 15
- In 2024, How to fix iCloud lock on your iPhone 13 Pro Max and iPad
- In 2024, How to Unlock Apple ID Activation Lock From iPhone 6 Plus?
- In 2024, How to Unlock iCloud Activation Lock and iCloud Account From iPhone 15?
- In 2024, How to jailbreak iCloud locked iPhone 7
- In 2024, The 10 Best Tools to Bypass iCloud Activation Lock From Apple iPhone 11 Pro Max You Should Try Out
- Latest Guide on iPad 2/3 and Apple iPhone 14 Pro Max iCloud Activation Lock Bypass
- In 2024, The 10 Best Tools to Bypass iCloud Activation Lock On Apple iPhone 14 Pro You Should Try Out
- What You Want To Know About Two-Factor Authentication for iCloud From your Apple iPhone 13 mini
- How to Retrieve deleted photos on Realme GT 5
- How do I play MKV movies on Redmi Note 13 5G?
- The Top 5 Android Apps That Use Fingerprint Sensor to Lock Your Apps On Samsung Galaxy A15 4G
- The way to recover deleted photos on 12 5G without backup.
- The way to recover deleted photos on OnePlus Nord N30 5G without backup.
- Here Are Some Reliable Ways to Get Pokemon Go Friend Codes For Motorola Edge 2023 | Dr.fone
- In 2024, How to Track Xiaomi 14 Ultra Location by Number | Dr.fone
- Advance Repair for Bad and Corrupt Video Files of Honor Magic Vs 2
- How To Transfer WhatsApp From iPhone 14 Pro to other iPhone devices? | Dr.fone
- In 2024, How To Unlock Any Samsung Galaxy XCover 7 Phone Password Using Emergency Call
- In 2024, Unlock iPhone 7 Without Passcode Easily | Dr.fone
- How Can I Catch the Regional Pokémon without Traveling On Nokia C12 | Dr.fone
- In 2024, How to use Pokemon Go Joystick on Vivo G2? | Dr.fone
- Title: The Ultimate Guide to Bypassing iCloud Activation Lock from iPhone SE
- Author: Lydia
- Created at : 2024-05-19 06:51:56
- Updated at : 2024-05-20 06:51:56
- Link: https://activate-lock.techidaily.com/the-ultimate-guide-to-bypassing-icloud-activation-lock-from-iphone-se-by-drfone-ios/
- License: This work is licensed under CC BY-NC-SA 4.0.
