
Ultimate Guide from Apple iPhone 8 Plus iCloud Activation Lock Bypass
Ultimate Guide on Apple iPhone 8 Plus iCloud Activation Lock Bypass
The Apple iPhone 8 Plus’s iCloud unlock is an absolute need for each client of a locked smartphone who needs to give a second life to their iDevice. You could have bought a pre-owned iPhone from another person or failed to remember your Apple ID credentials. Circumstances can be unique, yet the process is something very similar.
You want to bypass Apple iPhone 8 Plus Activation Lock as quickly as possible. Furthermore, there are numerous ways for Apple iPhone 8 Plus iCloud bypass! Typically, a user enters the credentials of the iCloud account to which the Apple iPhone 8 Plus is connected and becomes unlocked immediately.
However, this fast strategy is good just for the first owner. If you don’t know about the iCloud account connected to your account, keep following this guide to bypass Apple iPhone 8 Plus.
Part 1:3 Useful Ways to bypass Apple iPhone 8 Plus iCloud activation lock
1. Remove activation lock with the previous device owner
The first thing you can attempt to bypass Apple iPhone 8 Plus is to contact the person you bought this device from. Ask the seller about other Apple ID details so you can enter them on the activation lock screen.
Likewise, you can ask the seller (the previous owner) to enter the details all by himself. This way, you won’t get embarrassed by asking them about such crucial details regarding their account.
This method applies if the owner lives nearby and you can meet face to face. In particular, they must still remember their Apple account password. It is a very straightforward approach to bypassing Apple iPhone 8 Plus since it doesn’t require any technical knowledge. Moreover, you don’t need to run the extra mile by paying for unlocking service since you can attempt this method for free.
So, if you are into this method, follow the given steps:
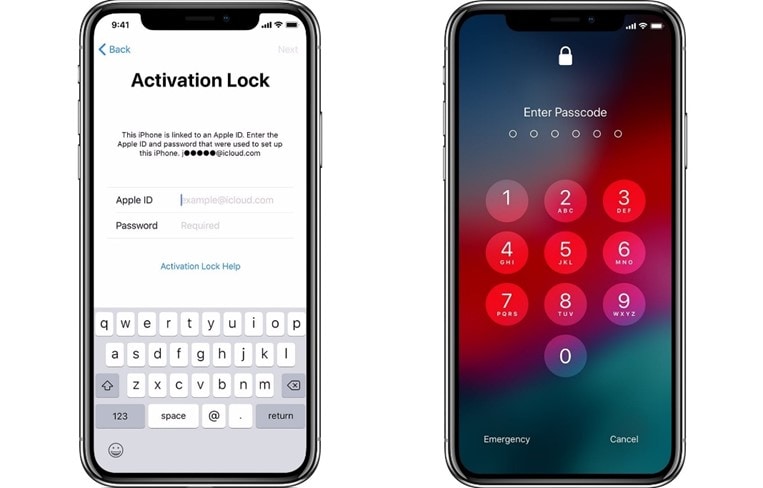
Step 1. Enter the Apple ID details on the activation lock screen when it shows up.
Step 2. After removing the activation lock, unpair any Apple accessory connected to your Apple iPhone 8 Plus.
Step 3. Log out of iTunes, App Store, and iCloud.
Step 4. At last, erase all content and settings of your device from the Settings application. Explore the General tab and click Reset > Erase All Content and Settings.
2. Use iCloud DNS Bypass
iCloud DNS Bypass is to bypass an iCloud activation lock by manipulating the DNS server. In particular, it means redirecting the activation process of your Apple iPhone 8 Plus from Apple servers to some other servers for confirmation.
Why Use iCloud DNS Bypass?
When you purchase a second-hand Apple iPhone 8 Plus, you might find that the phone has an activated lock. Before you can set up your Apple iPhone 8 Plus, the phone will request the Apple server to activate it. The method for getting around this lock is entering the correct Apple ID.
iCloud DNS bypass proves beneficial when you want to bypass Apple iPhone 8 Plus but know nothing about the past owner. It’s likewise effective if you can’t recall your iCloud credentials.
Pros of iCloud DNS Bypass:
- You can physically change the DNS address in WIFI settings.
- If it works, you can use various features and applications on your Apple iPhone 8 Plus/7.
Steps to Bypass Activation Lock via DNS:
The steps in DNS Bypass iCloud Activation are basic; here is how to bypass Apple iPhone 8 Plus:
Step 1. When you switch on your Apple iPhone 8 Plus, pick your preferred language and region from the menu.
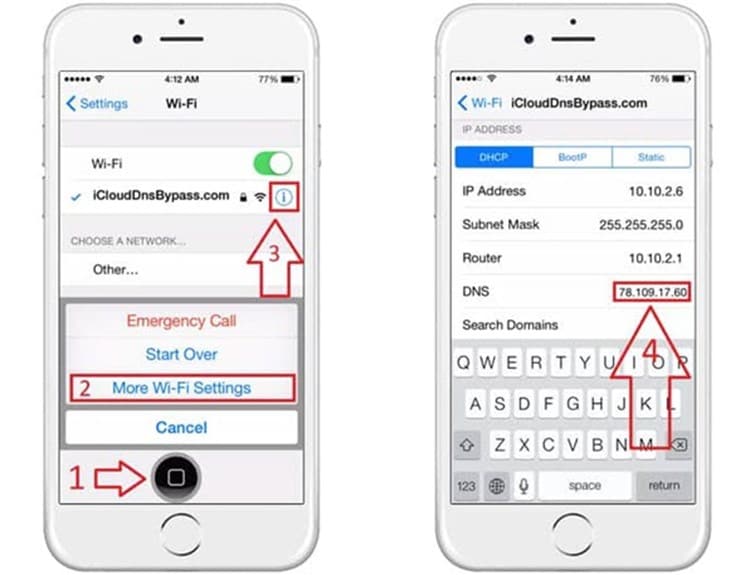
Step 2. Click “Continue” to enter the WiFi settings page. Whenever requested to connect, search for the “I” symbol near the WiFi tab.
Step 3. Presently, disconnect the WiFi, go to “Connection Settings,” and snap “Forget this Network.”
Step 4. Click the “I” and enter a DNS server IP address to bypass the iCloud activation lock. You can browse yours according to your area:
USA: 104.154.51.7
- South America: 35.199.88.219
- Europe: 104.155.28.90
- Asia: 104.155.220.58
- Australia and Oceania: 35.189.47.23
- Different Regions: 78.100.17.60
Step 5. Presently, click the “Back” choice on the left half of your screen. Turn on WiFi, select your WiFi from the rundown, and enter your password.
Step 6. Click “Next Page” and snap “Back” to enter the iCloud bypass screen.
Step 7. Set up your apps and use your Apple iPhone 8 Plus/7 as you like.
3. Dr.Fone - Screen Unlock (iOS)
The easiest way is to use an expert activation lock bypass tool to stop the issue. This method doesn’t require you to be technical or learn new concepts. You only need to search for the best available tool in the market and download it. You can do the rest of the job by just following the guidelines given by the software company.
Therefore, we recommend you use Dr.Fone Scree Unlock to bypass Apple iPhone 8 Plus. Dr.Fone is a professional tool with multiple iOS options. It can unlock the screen lock, Google FRP lock, and activation lock in a matter of minutes.
Dr.Fone - Screen Unlock (iOS)
Bypass Apple iPhone 8 Plus iCloud Activation Lock Without Hassle!
- Simple, click-through, process.
- Unlock screen passwords from all iPhones and iPads or bypass the activation lock.
- No tech knowledge is required, everybody can handle it.
- Support most iPhone/iPad/iPod Touch and most iOS versions fully!


4,395,217 people have downloaded it
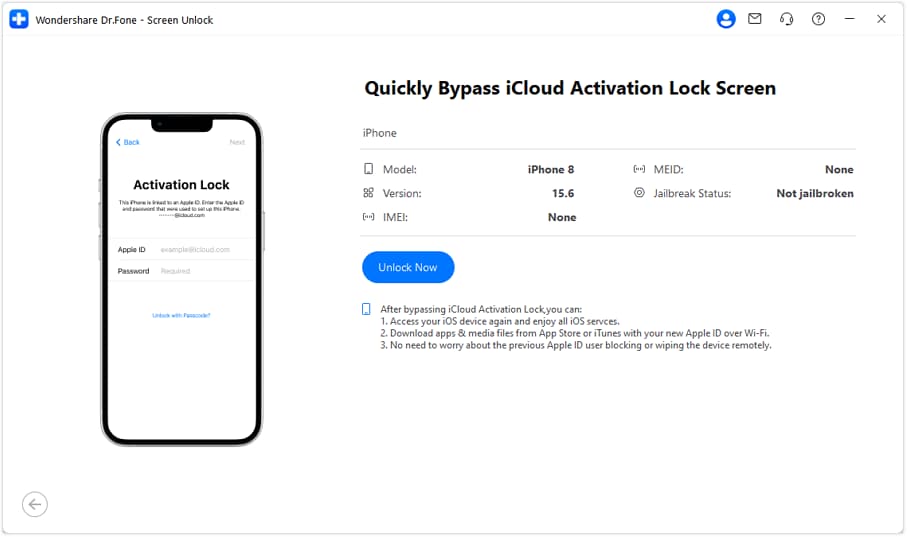
Many software require jailbreak before bypassing the IOS activation lock, but Wondershare Dr.Fone Screen Unlock (IOS) stands out for the solution without jailbreak. If your device is between iOS 12.0 to 16.3, follow the steps provided below. To bypass the activation lock, follow a few easy steps and adhere to the guidelines. Moreover, you don’t need to worry about device security while using this program. It is the best tool available for all Apple iPhone 8 Plus/7 users who wish to remove the iCloud lock without delay. The steps below will guide you on how you can use this tool for Apple iPhone 8 Plus iCloud bypass:
Step 1: Launch Wondershare Dr.Fone and go to Toolbox>Screen Unlock>IOS.

Step 2: Connect your device to the computer and select “iCloud Activation Lock Removal”.

Step 3: Click Unlock Now button on the pop-up window.
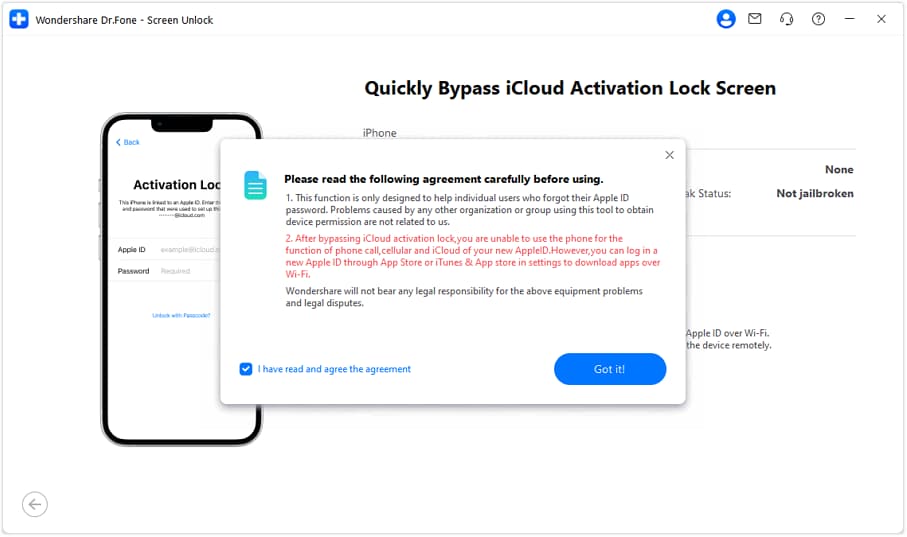
Step 4: You will see a prompt show up. Read the details carefully and checkmark “I have read and agree the agreement”. Tapping “Got it!” button.
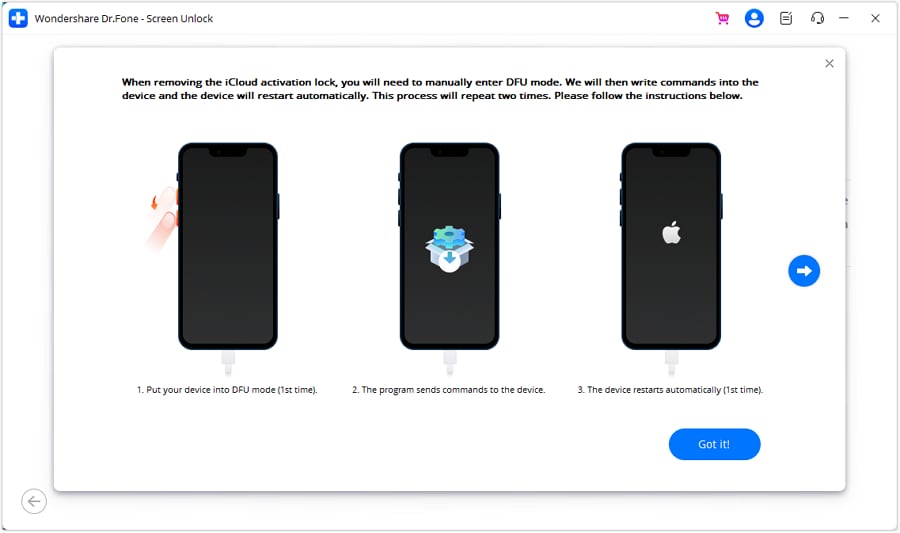
Step 5: Put iDevice in DFU Mode for the first time: the program will send a command to the Apple iPhone 8 Plus device and it will restart.
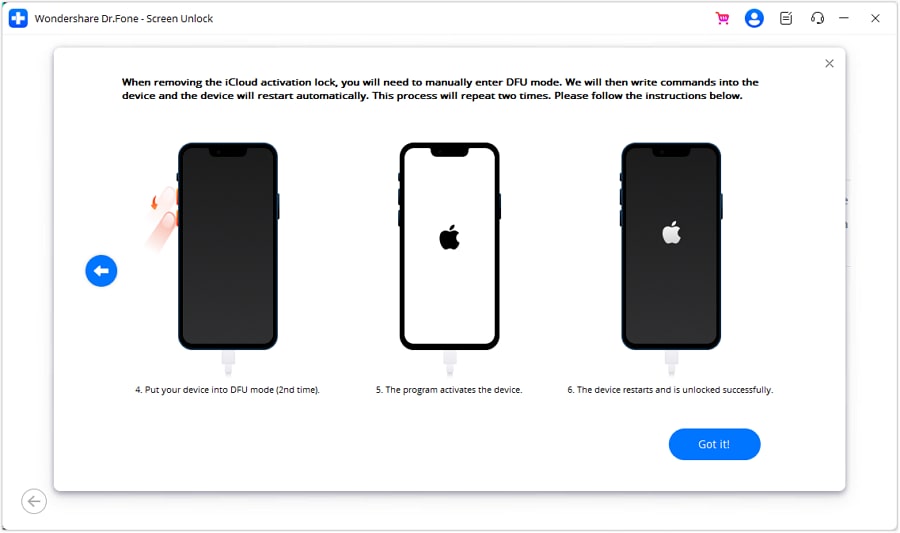
Step 6: Then you need to put the Apple iPhone 8 Plus device in DFU mode for the second time. When it’s done, the program will activate the Apple iPhone 8 Plus device.
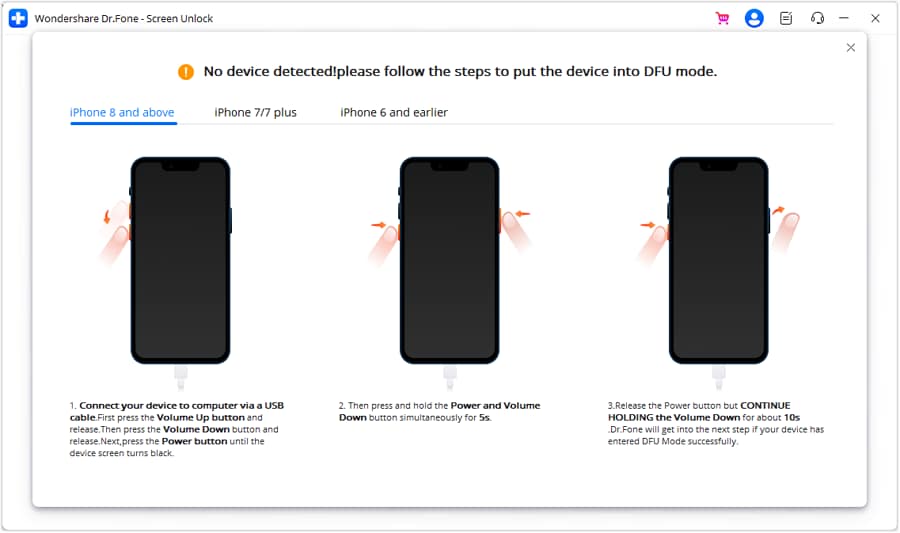
Step 7: If your device is not detected by the platform, follow the on-screen instructions to put their iOS device in DFU Mode.
Step 8: Once the Apple iPhone 8 Plus device has been processed under the DFU Mode, the computer’s screen will start displaying the removal of the iCloud Activation Lock. When it’s done, click Done in the next window.
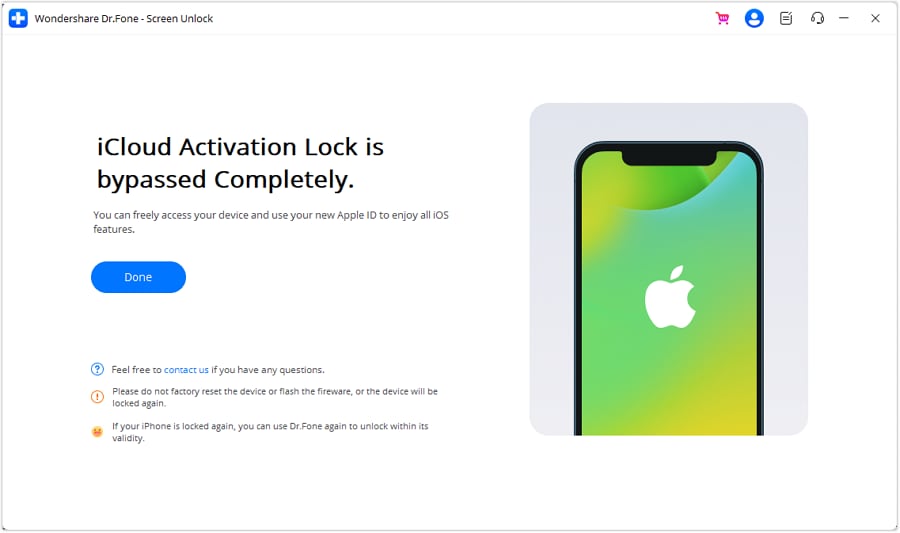
Your iPhone will start like a default phone without any activation lock. You can access and utilize the Apple iPhone 8 Plus now. Possibly, remember that you can’t utilize your new Apple ID’s phone call, cellular, and iCloud feature after that process.
Part 2: FAQs
1. What is Find My?
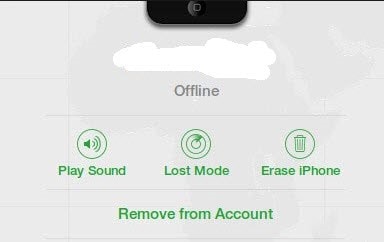
The Find My feature is an incredible method for keeping your Apple iPhone 8 Plus from getting lost, as it permits you to find and lock it, regardless of whether you have it. For instance, when Find My iPhone is initiated, you can see where your Apple iPhone 8 Plus is. You might use it to show your location to others or play a sound on your lost device, making it easier to find.
To utilize this feature, you need to initiate this feature on your device and utilize a PC or another phone to find, reset or lock your lost iPhone. If you’re selling your Apple iPhone 8 Plus or gifting it to someone else, you should first switch off the Find My feature. It becomes very awkward for the next user if the past owner’s Find My iPhone feature is still activated.
2. How to turn off Find My?
If you want to reset your Apple iPhone 8 Plus to erase every one of the data and return it to its default condition, Apple expects you to switch off Find My in advance. Also, experts at the Apple store frequently expect you to switch it off before they can repair it.
Switching it off will not erase any of your data, so you don’t have to stress over that. It’ll simply make it difficult to track down your Apple iPhone 8 Plus on a map when lost.
The best way to switch off the Find My feature is very direct. The following steps will tell you how to make it happen:
- Open the Settings of your Apple iPhone 8 Plus and tap your name or profile.
- Explore the “Find My” option and go for “Find My iPhone.”
- If the Find My iPhone feature is initiated, the toggle button on top of the page should be green. Switch the “Find My iPhone” toggle key to turn it off.
- Enter your Apple ID details.
- Affirm your activity, and that’s all you need to turn this feature off.
3. Can I bypass iOS Devices like iPad or iPods?
Yes, you can bypass the activation lock on iPhones like iPad and iPods. However, the method is a bit different regarding Apple Watches.
The Bottom Line
We hope you are now in a position to bypass Apple iPhone 8 Plus activation lock. This guide mentions the best methods you can employ to bypass this issue, but we all know each method has its pros and cons. Even if no other method works in your case, Dr.Fone - Screen Unlock (iOS) will still help you. This tool is built to provide safe iOS unlocking solutions for our readers.
How to Factory Reset iPad or Apple iPhone 8 Plus without iCloud Password or Apple ID?
If you are an iPad or Apple iPhone 8 Plus owner and are looking to reset your iPad or Apple iPhone 8 Plus without knowing the passcode, you do not need to worry anymore. Most gadget owners already know how to factory reset their phones. But in cases where you have forgotten your Apple ID password or passcode and want to reset your iPad or Apple iPhone 8 Plus, it can be done via various ways and techniques. Here, we shall discuss a few of them.
In this article, you shall find multiple ways by which you can effectively factory reset iPad or Apple iPhone 8 Plus without iCloud password and get a clean slate to work on. A factory reset will wipe all the data off of your iPad or Apple iPhone 8 Plus, so be mindful of that. The methods are all quite simple yet effective in producing the desired result. Without further ado, let us begin!
Part 1: How to Factory Reset iPad or Apple iPhone 8 Plus without Apple ID by Removing Apple ID?
If you wish to factory reset the iPad or Apple iPhone 8 Plus without an Apple ID password or iTunes, one simple way to do it is via third-party application software. A quite wonderful tool in this regard is the Dr.Fone - Screen Unlock tool. It lets its users remove multiple types of locks from screens on several different devices. Using an external tool saves users from various kinds of troubles that may arise along the way.
The Dr.Fone program is a highly useful and recommended tool for unlocking phone screens. It supports a wide range of phone models and multiple brands, including Apple, Samsung, Xiaomi, Huawei, LG, etc. Users can easily remove screen locks of multiple kinds. In addition to that, Dr.Fone also:
- It saves a lot of time and effort for the users and does its job quickly.
- Supports many brands and all the latest versions of iOS and Android.
- Protects the data of consumers, making it a trusted source worldwide.
- It is relatively easy to use, with a user-friendly interface.
 safe & secure
To factory reset the iPad or Apple iPhone 8 Plus without Apple ID using Dr.Fone, install the program on your computer, and proceed as mentioned below.
Step 1: Launch and Connect the Program to iPad or Apple iPhone 8 Plus
Launch the Dr.Fone Screen Unlock app on your computer and connect your iPad or Apple iPhone 8 Plus with the help of a data or a USB cable.
Step 2: Choose Option
On the main interface of the program, you will see various options to choose from. Click on the “Screen Unlock” button visible there.
Step 3: Select Unlock Option
On the next screen, you will see multiple options. Choose the “Unlock Apple ID” one.

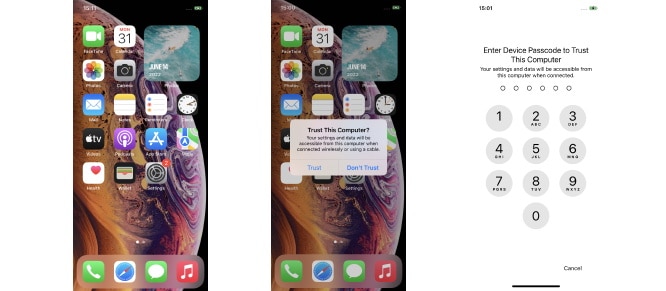
Step 4: Establish a Trusted Connection
Now, tap the “Trust” button on your iPad or Apple iPhone 8 Plus to establish a trusted connection with the computer to proceed further.
Step 5: Reset iPad or Apple iPhone 8 Plus
Then, on your computer screen, click on “Unlock Now.” Confirm the action on the appearing dialogue box. Next, follow the instructions visible on the screen to reset your iPad or Apple iPhone 8 Plus.

Step 6: Remove Apple ID
Dr.Fone will begin the process of unlocking your iPad or Apple iPhone 8 Plus. Do not disconnect the iPad or Apple iPhone 8 Plus during this process. Once the process is completed, reboot your iPad or Apple iPhone 8 Plus, and you shall be able to sign in with a new Apple ID.

safe & secure
Part 2: Factory Reset iPad or Apple iPhone 8 Plus without iCloud Password
In case you are asking yourself if it is possible to reset your iPad or Apple iPhone 8 Plus without an iCloud password, the answer is yes. If you want to learn how to factory reset an iPad or Apple iPhone 8 Plus without an iCloud password, an easy way of doing so is with an iTunes or Finder.
For Mac users with macOS Catalina 10.15 or later, they can complete the process with Finder’s help. Windows users and macOS users with older versions can use iTunes. Before restoring the iPad or Apple iPhone 8 Plus without an iCloud password, you are required to put it into Recovery mode. For that, you need to follow the steps provided as follows.
Step 1. Turn off your iPad or Apple iPhone 8 Plus
- On an iPad or Apple iPhone 8 Plus with Face ID: Make sure your iPad or Apple iPhone 8 Plus is not connected with your computer. Press and hold the Top and Volume Down button to allow the power slider to appear on the screen. Drag the slider to turn off the Apple iPhone 8 Plus device.
- On an iPad or Apple iPhone 8 Plus with Home Button: Make sure your iPad or Apple iPhone 8 Plus is not connected to a computer. Press the Side or Top button to allow the power slider to enumerate on the screen. Once it is done, drag the slider to turn off the Apple iPhone 8 Plus device.
Step 2. Enter Recovery mode
- On an iPad or Apple iPhone 8 Plus with Face ID: Connect your device to a computer. Hold the Top button for leading into the recovery mode while connecting it with the computer.
- On an iPad or Apple iPhone 8 Plus with a Home button: Connect your iPad or Apple iPhone 8 Plus to your computer. Keep holding the Home button while connecting it with the computer until the recovery mode screen appears on the front.
Step 3. Open iTunes or Finder on the computer
Open iTunes and access your iPad or Apple iPhone 8 Plus through the iPad or Apple iPhone 8 Plus’s icon present on the screen’s upper-left corner. With Finder on Mac, locate your iPad or Apple iPhone 8 Plus in the sidebar of its window. Tap it.
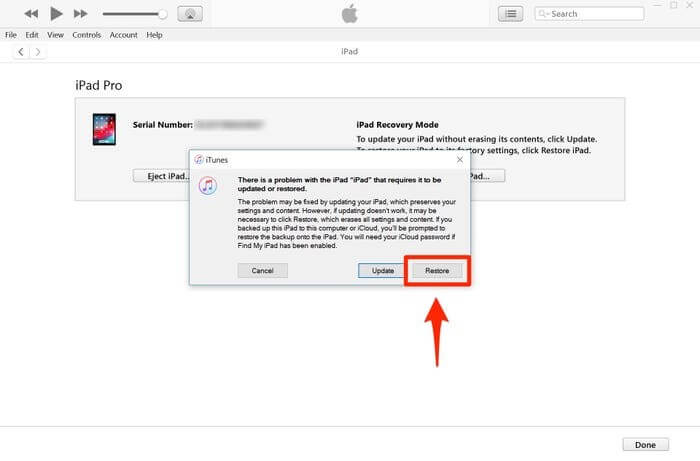
Step 4. Restore your iPad or Apple iPhone 8 Plus and set it up
The screen displays an option of ‘Restore’ or ‘Update’ for the iPad or Apple iPhone 8 Plus. Tap on the option of ‘Restore’ to let the platform download the software into the iPad or Apple iPhone 8 Plus within the recovery mode. Then set it up as a new device.
Part 3: How to Reset iPad or Apple iPhone 8 Plus without Apple ID via the Settings App?
Another way of resetting your iPad or Apple iPhone 8 Plus is via the Settings app present on your device. You can unlock a disabled iPad or Apple iPhone 8 Plus or remove all data by executing a total wipe of the iPad or Apple iPhone 8 Plus using Settings. However, before starting, please ensure that your iPad or Apple iPhone 8 Plus is connected to the internet and the “Find My iPhone” feature is disabled on it. You will also need to know the passcode of your iPad or Apple iPhone 8 Plus to proceed with this method.
Once you have done all of that, follow the steps given below.
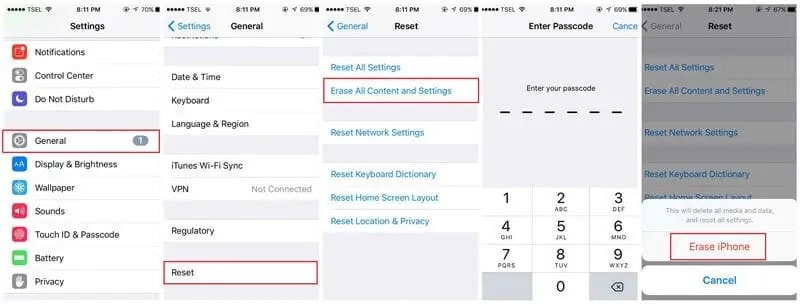
- Open “Settings” on your iPad or Apple iPhone 8 Plus.
- Go to “General.”
- Navigate to the “Reset” option and click on it.
- Select the “Erase All Content and Settings” option.
- Type in your passcode to confirm and proceed. This will wipe all the data on your iPad or Apple iPhone 8 Plus.
Based on the version of your iOS, you might be asked to enter your Apple ID password too. It will also ask for the Apple ID password if the “Find My iPhone” feature is enabled on your device. Hence, the process will not be successful without it, and your iPad or Apple iPhone 8 Plus will go to Activation Lock. Therefore, Dr.Fone is a simple, recommended, and reliable way of resetting the iPad or Apple iPhone 8 Plus without an Apple ID, saving much of the troubles.
Conclusion
There can be multiple reasons for resetting your iPad or Apple iPhone 8 Plus. Now you know how to factory reset the iPad or Apple iPhone 8 Plus without Apple ID. You can follow any of the above-mentioned methods to get the desired results as best suited to your needs. Some might work, and some might not. The Dr.Fone – Screen Unlock tool is recommended, as it is the most efficient among all the other methods. Try it to get proficient outcomes.
safe & secure
How to fix iCloud lock on your Apple iPhone 8 Plus and iPad
There’s no sad thing like working your entire life just to get yourself the latest brand of your favorite iPhone or iPad device only for you to realize that the all-too-important iCloud option has been locked out of reach either by the owner or by the company that sold it to you. Without the iCloud option, you can’t back up your information, and neither can you secure your privacy. It’s for this reason that I have with me the how-to-fix iCloud lock method. A lot of people have always argued that the iCloud lock cannot be surpassed due to certain factors. However, thanks to technology, I’m here to prove all the doubting Toms otherwise.
With the how-to-fix iCloud lock method at hand, you no longer have to worry or get stressed when purchasing an iPhone or an iPad for your own pleasure or comfort. In this article, I’m going to lay down three of the most basic and simple steps on how to fix iCloud lock in a matter of minutes.
Method 1: Fix iCloud lock via Apple
In the recent past, Apple has tried to bar its users from unlocking iCloud storage perhaps due to the increased cases of theft and privacy breach. It, however, seems too late for the company to stop this iCloud lock fix process as they nowadays help their users in unlocking the iCloud lock. The following is one of the most commonly used iCloud lock fix methods offered by Apple as a company.
Step 1: Enter your Login Details
To gain access to your device, you first need to enter your unique Apple ID and your password and log into your device.
Step 2: Find My iPhone
Once you have gained access to your device, locate the “Find My iPhone” option and turn it off. This particular option functions by locking your iCloud as a security measure. It’s also the main reason why you can’t access your iCloud account.
Step 3: Restore your Device
With the “Find My iPhone” option turned off, reset your device by deleting all your data and settings. You can do this by following this procedure. Click on Settings> General> Reset> Erase Content and all Settings. This process will completely erase your device to its default state. You should also note that this procedure may vary from one version to another.
Step 4: Sign In
With your phone back to its default state, sign in using your Apple details as explained in step 1. Once you are logged in, just set up your iPad or iPhone with new details. Also, try to access the iCloud option to make sure that the lock is no longer available. Once you are satisfied with what you see, simply sign out and sign in back again just to be sure. If everything is okay, then you are good to go.
Method 2: How to fix iCloud lock through the owner
Another easy iCloud lock fix method is by directly contacting the owner. In most circumstances, many iPhone and iPad users usually lock up the iCloud option as a way of protecting their privacy. If the person who sold you the Apple iPhone 8 Plus device happens to be the real owner, then he/she should be in a position to give you the iCloud unlock codes.
This approach, however, has a downside. It’s only applicable if you can track down the rightful owner of the iPad or iPhone device or if the company that sold it to you know how to remove the lock. If you can’t get through to the owner, then I would recommend you to look for other alternatives as we’re going to see in this article.
Method 3: How to fix iCloud lock via Official iPhoneUnlock
One of the greatest, safest and swift methods of fixing the iCloud lock is by using the Official iPhoneUnlock . With the help of the iCloud Activation Lock Removal process, you can easily bypass the iCloud Activation Lock and remove it completely from your device. The following is a detailed process on how you can seamlessly do it with the peace of mind that your data and all valuable information will be kept in place.
Step 1: Purchase the Service
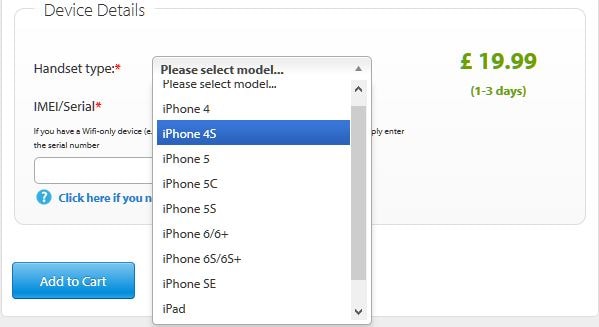
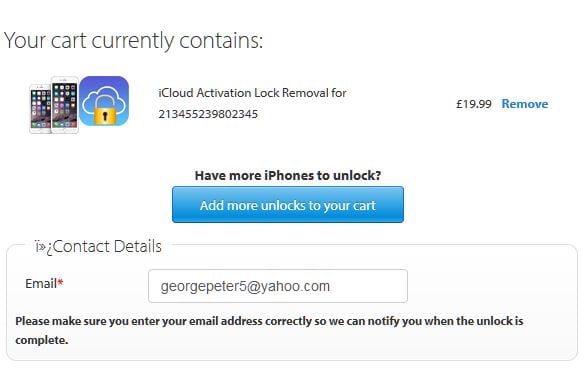
For you to unlock the iCloud lock, using this method, you first have to obtain the rights to do so. Securing these rights is simply done by purchasing their services. The price at which you’ll be charged will depend on the model of your device. To buy these services, visit the webiste of Official iPhoneUnlock and select “iCloud Unlock” to its “iCloud Unlock/Activation Lock Removal” feature, then enter your IMEI number from the drop-down list as illustrated below. Once you have located your phone make or model, click on the “Add to Cart” tab. The price at which you are going to be charged will be displayed on your right-hand side.
Step 2: Enter your Email Address
A new page with your purchase details as shown below will open up. Enter your email address as requested and click on the “Continue” button. Make sure that you have entered the correct email address as it will be used to inform you that your iCloud lock is no longer active.
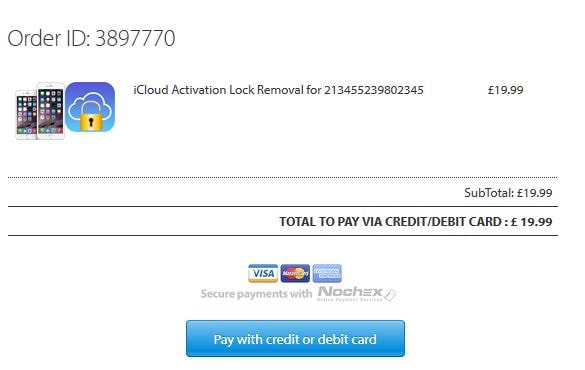
Step 3: Pay Options
Once you have entered your email address, a new interface requesting you to choose your preferred payment method will be displayed. Choose your best-preferred method by clicking on the “Pay with Credit or Debit Card” tab and enter your bank details. Once you submit your payment, your iCloud lock will be unlocked after a period of between 2-3 days. A confirmation email will be sent to your designated email address. Just like that, your iCloud lock fix is removed, and you are free to use iCloud.
Method 4: How to Fix iCloud with Efficient Tool
If you aren’t able to fix iCloud lock with the provided methods above, we would like to recommend you Dr.Fone – Unlock (iOS) – one of its kind tools that work when you wish to unlock screen locks effortlessly. It shows great compatibility with the latest iPhones and iOS versions. In addition, you don’t need to be tech-savvy to play with this tool. Let us know how it works to fix iCloud lock.
Dr.Fone - Screen Unlock
Fix the “iPhone Is Disabled Connect to iTunes” Error In 5 Minutes
- The welcoming solution to fix “iPhone is disabled, connect to iTunes”
- Effectively remove iPhone lock screen without the passcode.
- Works for all models of iPhone, iPad, and iPod touch.
- Fully compatible with the latest iOS.
3,238,377 people have downloaded it
How to fix iCloud Lock using Dr.Fone – Screen Unlock (iOS)
Step 1: Allow the Program to Start
After you download and install Dr.Fone – Screen Unlock (iOS) from its official website, launch it. Now, with the help of a USB cord, plug your device into the PC. Click “Unlock” from the main interface.
Step 2: Select Unlock Apple ID
When the next screen appears, you are required to hit on the “Remove Apple ID”.

Step 3: Key in the Password
As the next step, make sure to enter the screen password. Move ahead to trust the computer thereby letting the program scan the Apple iPhone 8 Plus device further.
Step 4: Enter Recovery mode
You will be given some instructions on the following screen. Ensure to follow them carefully and put your device into recovery mode.

Step 5: Get iCloud Lock Fixed
When the Apple iPhone 8 Plus device restarts, the program will start fixing the iCloud lock. You just need to wait patiently until the process is over.
Step 6: Check the iCloud ID
In the last, you will receive a new window where you can check whether you have fixed iCloud or not.

As we have seen, different methods of how to fix iCloud lock are available to choose from. The method you chose will solely depend on your own preferences. The various methods as we have seen have their own advantages and disadvantages. Some will delete your entire data while some will charge you a particular amount. What you should always keep in mind is the fact that you can fix iCloud lock at your own will and wish. You no longer have to be worried about being locked out of your iCloud account.
Also read:
- [New] Chuckle Cluster A Curated Collection of Funny TikTok Jokes and Riddles for 2024
- [Updated] GoPro Hero5 Captured Life Review for 2024
- 2024 Approved Explore Artistic Possibilities Premier Android Graphics App Selection
- A Comprehensive Guide to iCloud Unlock From Apple iPhone 14 Pro Online
- B550-XT: A Leap Forward in Noise Canceling, Command Systems
- Best Ways to Bypass iCloud Activation Lock on Apple iPhone 14 Pro Max/iPad/iPod
- Beste Methoden Zum Sichern Ihrer Gmail-Nachrichten - Langlebige Backup-Strategien
- Bypass iCloud Activation Lock with IMEI Code On iPhone 6s Plus
- How to jailbreak iCloud locked Apple iPhone XS
- How to jailbreak iCloud locked iPhone 6s Plus
- How to Remove Activation Lock On the Apple iPhone 8 Plus Without Previous Owner?
- In 2024, How To Bypass iCloud By Checkra1n Even On Apple iPhone 12 If Youve Tried Everything
- In 2024, How to Change Your Samsung Galaxy XCover 7 Location on life360 Without Anyone Knowing? | Dr.fone
- In 2024, The 10 Best Tools to Bypass iCloud Activation Lock On Apple iPhone 15 Pro You Should Try Out
- In 2024, Timeless Tech Posed Shots of Old iPhone X
- Niet Te Korten: 7 Keurige Methodes Voor Het Behandelen Van Schijfvoetballen
- Top 7 iCloud Activation Bypass Tools For your iPhone XR
- Viewing Tips: Access and Enjoy Roku Channels on Alternative Devices
- Windows 10におけるMP4ビデオのクリップ切り替え手順
- Title: Ultimate Guide from Apple iPhone 8 Plus iCloud Activation Lock Bypass
- Author: Lydia
- Created at : 2025-02-11 19:19:24
- Updated at : 2025-02-15 05:12:05
- Link: https://activate-lock.techidaily.com/ultimate-guide-from-apple-iphone-8-plus-icloud-activation-lock-bypass-by-drfone-ios/
- License: This work is licensed under CC BY-NC-SA 4.0.