
Unlock Your Device iCloud DNS Bypass Explained and Tested, Plus Easy Alternatives On iPhone 8 Plus

Unlock Your Device: iCloud DNS Bypass Explained and Tested, Plus Easy Alternatives On Apple iPhone 8 Plus
Have you bought a used iPhone or iPad with an active iCloud Activation Lock? Or perhaps you have an Apple device but cannot remember your iCloud password? Without activating iCloud, you cannot utilize locked devices in either scenario.
You might try contacting Apple customer service, but they won’t be able to assist you without user identification directly. Even after the Apple iPhone 8 Plus device has been authenticated, you will still be bombarded with inquiries, and they may even want the original iOS device payment receipt.
One of the greatest free solutions to prevent these issues is to unlock your Apple iPhone utilizing iCloud DNS Bypass. Read on to know more in this iCloud DNS Bypass Guide.
Part 1: How Can We Use iCloud DNS Bypass for iOS Devices?
After a factory reset or restoration, every time you set up your iOS device, it will send an activation request to Apple’s servers. Apple responds to your request and displays your device’s status.
Additionally, if the Find My iPhone feature of your device is enabled, an iCloud Activation Lock screen will appear and prompt you for your iCloud account login information. The iCloud DNS Bypass can assist you if you forget your login information (Apple ID or password) or purchase a used device with an iCloud lock activated. It is a free approach to unlocking iCloud.
The readable names are transformed into numerical IP addresses via the Domain Name System (DNS). To launch the program, it makes use of a DNS server that serves as a host.

Use DNS to get around iCloud Server IP Address
You may first just ignore the iCloud DNS on your Apple iPhone 8 Plus or iPad. The procedure is easy. Remember that the process must be completed by inserting the SIM card into your Apple iPhone 8 Plus.
Step 1. Turn on your Apple iPhone 8 Plus, then configure it according to the on-screen instructions.
Step 2. Select your language and nation. Click Continue to access the Wi-Fi settings screen after that.
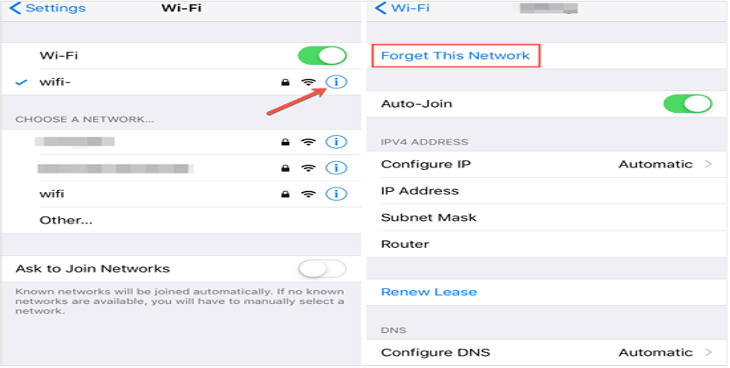
Step 3. If prompted, click the I icon next to the Wi-Fi area.
Step 4. Click Connection Settings > Forget this Network to disconnect from the Wi-Fi network.
Step 5. When asked for a DNS server IP address, tap the I symbol to unlock the iCloud activation lock. Here is a list of places for your information:
USA: 104.154.51.7
155.28.90 Europe
Africa: 35.199.88.219
Asia: 104.155.220.58
189.47.23 Australia and Oceania
It is 78.100.17.60 on other continents.
Step 6. Turn on Wi-Fi and select the Wi-Fi network you wish to connect to by tapping the Back button on the left side of the screen. Enter your passcode after that.
Step 7. When you click Next Page > Back, the iCloud bypass page will appear.
Step 8. Use your device and configure your apps.
Use iCloud DNS Bypass Crash
- Step 1. The procedures below will help you delete iCloud after DNS bypass if you cannot utilize some features on your Apple iPhone 8 Plus.
- Step 2. Tap Menu > Applications after attempting the aforementioned technique.
- Step 3. To restart your smartphone, scroll down and tap the Crash option.
- Step 4. Select “Language and Country” > Select a Wi-Fi network, click Home, More Wi-Fi Settings, Configure Proxy, and then Manual.
- Step 5. In the Server section, delete the existing HTTP address before entering 30 different emojis. Type 8888 into the Port area, then click Save at the top.
- Step 6. To access the Unlock screen, tap Back > Next. To unlock the Apple iPhone 8 Plus device, press the Home button.
- Step 7. When the Home screen appears, tap the Language choice.
Part 2: The Best iCloud DNS Bypass Alternatives to Unlock Your Apple iPhone 8 Plus/iPad/iPod Touch (Easy and Efficient)
Only if you bought a secondhand iPhone with an activation lock or want to restore the Apple iPhone 8 Plus device but forgot that Find My iPhone was ever turned on do you need Dr.Fone - Screen Unlock (iOS) . Dr.Fone - Screen Unlock (iOS) is the most promising and user-friendly product of its sort currently available. With the help of this application, you can simply fix the iCloud activation issue. You don’t need to be an expert in utilizing the application because it is simple and intuitive.
Using Dr.Fone - Screen Unlock, you can get rid of the iCloud activation lock. Launch Dr.Fone and choose “Remove Active Lock” and “Unlock Apple ID” to unlock your iCloud. It still works if you have a used iPad or iPhone.
Dr.Fone - Screen Unlock (iOS)
Remove iCloud Activation lock without Password in Minutes
- Remove Apple ID/iCloud Account efficiently.
- Save your Apple iPhone 8 Plus quickly from the disabled state.
- Free your sim out of any carrier worldwide.
- Bypass iCloud activation lock and enjoy all iCloud services
- Works for all models of iPhone, iPad, and iPod touch.
- Fully compatible with the latest iOS.

4,008,671 people have downloaded it
Here’s a step-by-step guide on how to use it
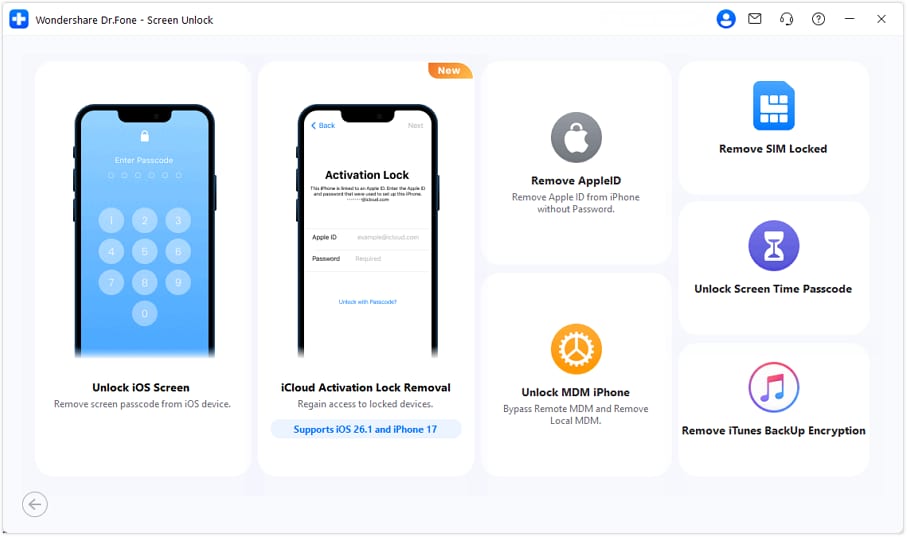
Step 1. Installing Dr.Fone on your smartphone and selecting Screen Unlock from the available options are the first steps in the procedure. You will note that there is a “iCloud Activation Lock Removal” option, among others, when you first use the Screen Unlock function. Simply clicking on it is all that is required.
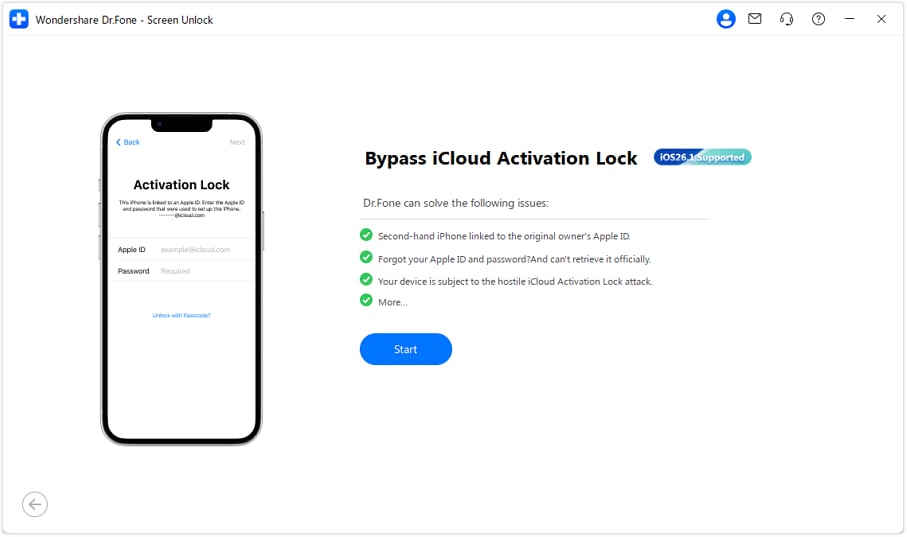
Step 2. Before the bypassing process, please tape “Start”.
Step 3. After reaching the ‘Start’ page, Your Apple iPhone 8 Plus’s specific information will be detected to determine the appropriate operation process. Ensure that the data cable is properly connected during this process. Jailbreaking is required for iOS devices running 12.0 to 14.8.1, but for iOS 15.0 to 16.3, simply enter DFU mode twice and proceed to unlock. For detailed instructions on unlocking, you can visit this detailed guide about iCloud Activation Lock Removal.
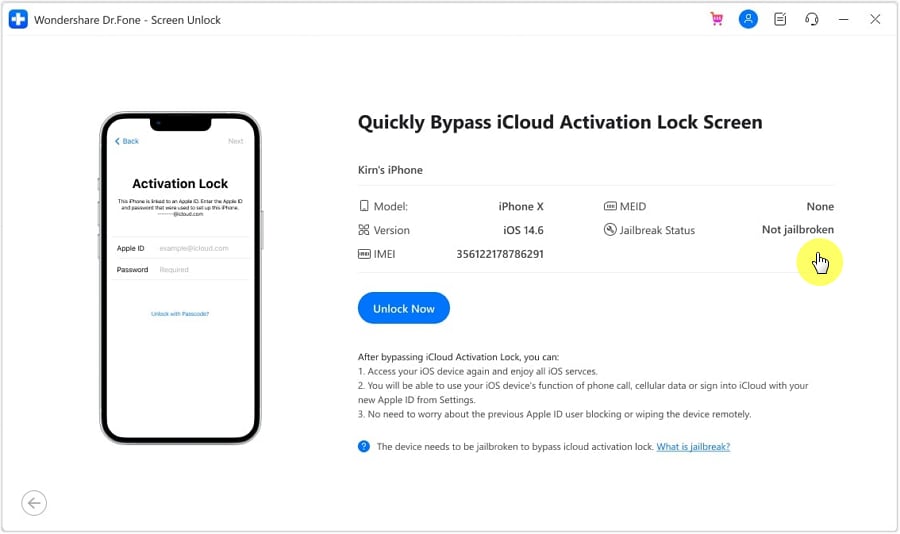
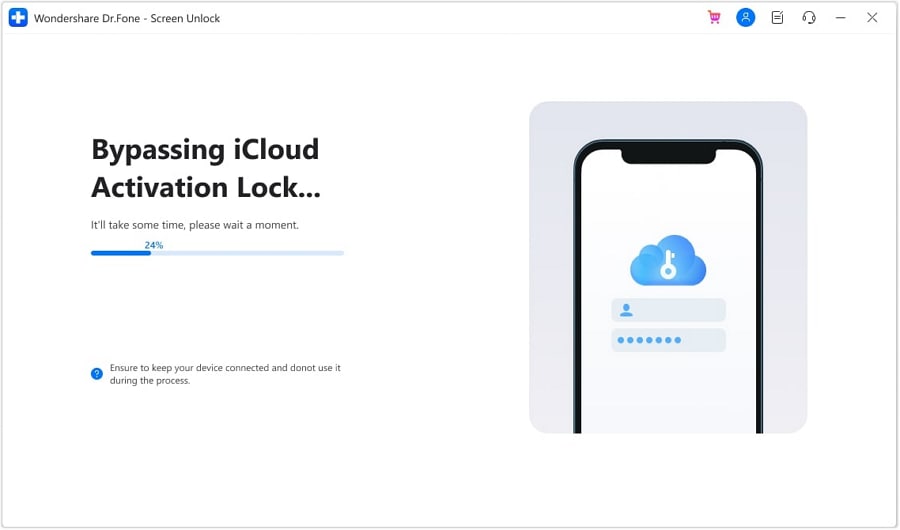
Step 4. Now we’re bypassing the activation lock, soon your Apple iPhone 8 Plus will work without the activation lock.
Part 3: FAQs
1. When Do We Require iCloud DNS Bypass?
We require it when our carrier locks our phone or when we buy a used phone and cannot use it because of an iCloud activation lock. The use of iCloud DNS bypass enables temporary access to the features and functionality of an iCloud-locked device. Domain Name Server, or DNS for short, serves the function of converting your domain names into IP addresses.
2. What Can iCloud DNS Bypass Do for Us?
When you need an urgent functioning solution for a locked iPhone, using iCloud DNS bypass is helpful since it gives you temporary access to all the features and configuration of an iCloud-restricted device. DNS, or domain name server, converts your domain names into IP addresses.
3. What are the Pros & Cons of iCloud DNS Bypass
This approach can be helpful, but it does have advantages and pitfalls of its own. These advantages and disadvantages are broken down as follows:
Pros
- You may use it without installing any software on the Apple iPhone 8 Plus device, since you can do it in the Wi-Fi settings.
- The internet, camera, and games can all be used after the gadget has been engaged, making it simple to access.
- Utilizing this approach is cost-free.
Cons
- This technique only partially unlocks the Apple iPhone 8 Plus device and represents a hack.
- The iCloud DNS bypassing technique has occasionally been reported as not working by users.
Conclusion
Now you have read all about iCloud DNS bypass, what is iCloud bypass DNS, whether DNS bypass is free, and how to iPhone DNS bypass, it is time to implement all the solutions and bear in mind that all DNS Bypass solutions are 100% free. Dr.Fone - Screen Unlock (iOS) is also a great tool to bypass screen lock, even if you don’t have any tech skills.
How to Bypass Activation Lock on Apple iPhone 8 Plus or iPad?
Apple has long been famous for providing sound devices, with nifty safety and user-friendly features. With that said, if you just purchased a used iOS device, you may be required to bypass the activation lock on your device using iCloud, or the previous user’s account. Before we take a look at how to bypass an activation lock on an Apple iPhone 8 Plus or iPad, let’s examine what an activation lock on an Apple iPhone 8 Plus or iPad entails.

Part 1. What is Activation Lock on Apple iPhone 8 Plus or iPad?
This theft deterrent feature is cool for the sole reason that it helps keep your data safe, in case of misplacement or thievery. Without access to the owner’s Apple ID and/or password, accessing the Apple iPhone 8 Plus device becomes impossible. Unfortunately for used purchases, you may have procured a used item legitimately, but have no access to said device.
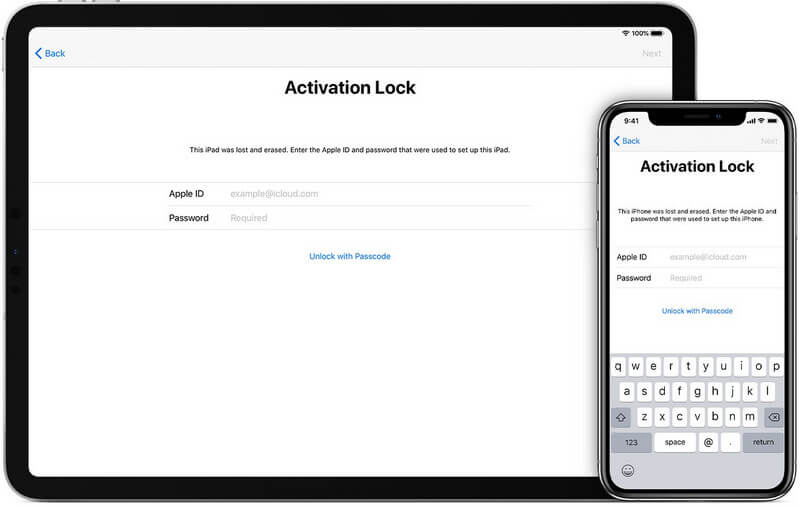
This feature is enabled by default when the Find My Apple iPhone 8 Plus option is selected on an iOS device. It is necessary when a user needs to erase data on an iOS device, set it up using a new Apple ID, or turn off Find My Apple iPhone 8 Plus. Knowing the activation lock is enabled on an Apple iPhone 8 Plus or iPad is easy, as the screen prompts you to input a user ID and password.
Part 2. How to Bypass Activation Lock on Apple iPhone 8 Plus or iPad with Previous Owner’s Account?
Using a valid Apple ID and password is the easiest way to bypass the activation lock on Apple iPhone 8 Plus or iPad Mini. In any case, if you legitimately purchased the Apple iPhone 8 Plus device from the previous owner, they should have no qualms giving you these details. If it’s a new device, and you are the original owner, you will have this information ready to use for activation. Whatever the case, follow the steps below to remove the activation lock to Apple iPhone 8 Plus or iPad Mini.
- Step 1. Have the previous owner enter their details on the Apple iPhone 8 Plus or iPad Mini, or request them to send the same to you.
- Step 2. Fire up the Apple iPhone 8 Plus device and when prompted on the Activation Lock Screen, enter the Apple ID and password.
- Step 3. Within a few minutes, the home screen should appear on the Apple iPhone 8 Plus or iPad.
- Step 4. Upon reaching this page, navigate to the settings tab to sign out of iCloud.
A note for users before we proceed with the bypass steps:
Users on iOS 12 or earlier can locate this option on settings, navigating to iCloud, then signing out. For iOS 13 or later, click on settings, then your name, and sign out.
- Step 5. Chances are, the Apple iPhone 8 Plus or iPad will prompt you to enter the original user’s ID and Password. Simply enter the details available to you.
- Step 6. Finally, the best part of the unlocking process; navigate to the settings tab to erase all data. Open up settings, click reset and proceed to erase all content, including settings.
- Step 7. At this point, your Apple iPhone 8 Plus or iPad will restart/reboot, allowing you to set up the Apple iPhone 8 Plus device anew.
There are a few web-based resources and tricks that facilitate this procedure. Suffice to say, these methods, known as Jailbreaking, do not work when activation lock is enabled. Stick to using credible methods like the one listed above. Alternatively, you can use iCloud to bypass the Apple iPhone 8 Plus or iPad Mini activation lock. It does, however, require the original owner’s iCloud information. Assuming they are in contact with you, have them use the following steps to bypass the activation lock.
Part 3. How to Remove iCloud Activation Lock on Apple iPhone 8 Plus or iPad Without Password Using Dr.Fone?
This cool software program is available for use with every iOS device out there. It offers utility for all matters security, revamping or repairing as well as unlocking of iOS devices. On removing Apple ID and activation lock without a password, Dr.Fone - Screen Unlock (iOS) is one of the few recommended programs.
Dr.Fone - Screen Unlock (iOS)
Remove Activation Lock from iPhone/Apple iPhone 8 Plus or iPad without Password
- Remove the 4-digit/6-digit passcode, Touch ID, and Face ID.
- Bypass iCloud activation lock and Apple ID without password.
- Remove mobile device management (MDM) iPhone.
- A few clicks and the iOS lock screen is gone.
- Fully compatible with all iOS device models and iOS versions.
4,395,216 people have downloaded it
Follow the guide to remove activation lock on Apple iPhone 8 Plus or iPad without a password:
- Step 1. Click the “Start Download” button above to Download Dr.Fone onto your computer. Once the interface pops up, select the Screen Unlock option.
- Step 2. Then select iCloud Activation Lock Removal.

- Step 3. Start the Remove process, and connect your Apple iPhone 8 Plus or iPad to your computer.

- Step 6. Wait a moment for the removal process.

Part 4. How to Bypass Apple iPhone 8 Plus or iPad Mini Activation Lock Using iCloud.com?
- Step 1. The original user (or yourself) should proceed to iCloud and sign in using a valid Apple ID and password. Goes without saying that they have to be valid details.
- Step 2. Click on the option to Find iPhone.
- Step 3. Select All Devices, and a screen should appear similar to the one below.
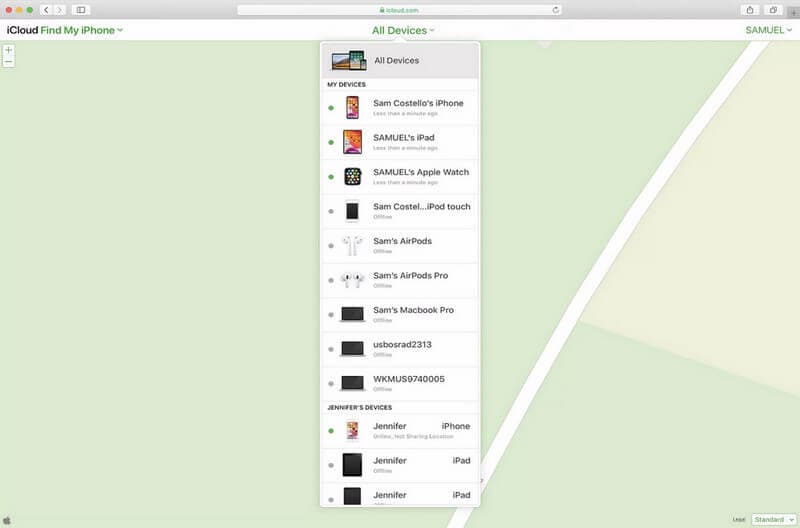
- Step 4. Select the Apple iPhone 8 Plus or iPad Mini that you need to unlock.
- Step 5. Click on the option to erase the Apple iPhone 8 Plus or iPad, then proceed to remove the Apple iPhone 8 Plus device from the account.
- Step 6. Completing this process will remove the Apple iPhone 8 Plus device from the previous user’s account, subsequently removing the activation lock from your Apple iPhone 8 Plus or iPad. Restart the Apple iPhone 8 Plus device and a different interface should appear, without the activation lock screen.
A popular query regarding the activation lock on an Apple iPhone 8 Plus or iPad Mini is why access is denied if you are not the original owner? This is explained in detail below.
Conclusion
Having an iOS device is a unique and satisfying experience, one that many smart device users wish they could have. On that note, activation locks on Apple iPhone 8 Plus or iPads and other iOS devices are meant to protect user information and ensure privacy. Furthermore, using shady programs downloaded from the web may lead to the destruction of a device. Use the handy methods suggested above to fully enjoy the features on your iOS device.
Bypass Activation Lock On Apple iPhone 8 Plus - 4 Easy Ways
We can’t say when and where we can lose our iPhone, or someone can steal it from us. All we can do as a precaution is activate the Activation Lock on the screen so that you can save your precious data from being stolen. Activation Lock is a feature of Find My in iPhone that automatically turns on whenever Find My [device] is activated.
However, you may want Activation Lock removal because you are going to sell your Apple iPhone 8 Plus, and it is no longer needed. In such a situation, you need to be well-informed of the methods or techniques you can use to bypass the Activation Lock. This article will provide you with a basic understanding of Activation Lock and how you can remove it.
Part 1: What is Activation Lock?
Apple Find My [device] presents a single feature of Activation Lock that turns on impulsively whenever Find My [device] seems activated. The responsibility of these features is to ensure that the data available in your Apple iPhone 8 Plus is kept safe and secure and avoid reactivating the data even after erasing it.
Working of Activation Lock
Whenever the Apple Silicon or T2 security chip is activated in iPod, iPhone, iPad, Mac, or etc., the Apple iPhone 8 Plus device confirms that the Activation Lock is activated by contacting Apple. The time you set “Find My”, your Apple ID is securely stored and linked to the Apple iPhone 8 Plus device by Apple.
Part 2: How to Bypass the Activation Lock on iPhone or iPad
There are many scenarios that are considered as the most preferred professional methods adopted by the users for iPhone Activation Lock removal, are discussed below:
Method 1: Using iCloud.com
iCloud is one of the Apple services which is responsible for storing data like photos, passwords, notes, files, etc., and keeps the data up to date. It also provides you with a smooth transfer of data stored in it. The question is, how can we use iCloud to bypass the Activation Lock? The steps below will resolve our query by providing the required steps of solution:
Step 1: Visit “iCloud.com” and enter the correct Apple ID and Password on the iCloud website. Now choose “Find iPhone’’ and select one of the Apple iPhone 8 Plus devices from all the Apple iPhone 8 Plus devices available on the top of the main screen.
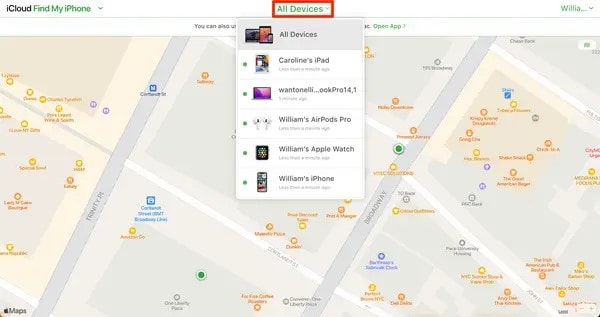
Step 2: Either click on “Erase iPhone” or “Erase iPad” and then again hit on the “Erase” choice to confirm your action. The website might ask for the Apple ID again from the Apple iPhone 8 Plus device’s owner.
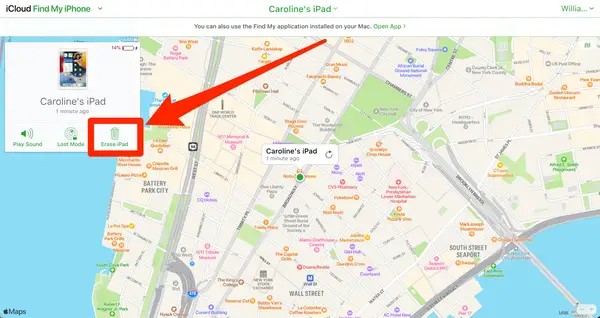
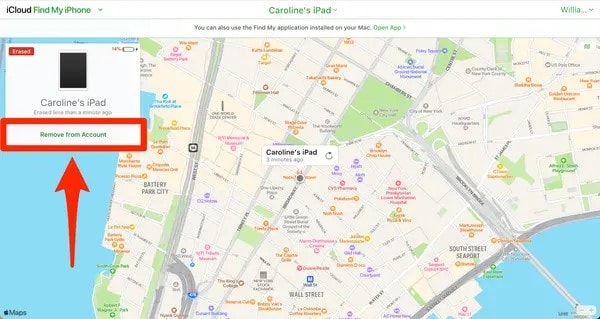
Step 3: You can then click on “Next” with your own choice if you want to leave a message or contact number on your device. After that, click on the button, “Remove from Account”.
Some pros and cons of using iCloud for Activation Lock removal are listed below so you can decide whether you are going to use this method or not:
Pros:
- It does not need any third-party tool or application to carry out the procedure.
- A user with basic knowledge can easily access and manage the whole process.
Cons:
- If you are not the Apple iPhone 8 Plus device owner, this method is not useful.
Method 2: Use iCloud DNS Bypass
The Domain Name System (DNS) transmits readable domains (names) into numerical IP addresses. Whereas iCloud DNS Bypass means we are bypassing the Activation Lock on iCloud by manipulating the DNS activation path, DNS server, and namely. You apply this method for iPhone Activation Lock removal by following the mentioned steps below:
Step 1: After switching on your device, select your “Country” and “Language” from the menu. Now, enter the settings page of WI-FI, tap on “Proceed” and look for the symbol “i” whenever you are asked to connect to the Wi-Fi.
Step 2: At that point, disconnect the internet connection and open the “Connection Settings,” then tap on the “Forget this network” choice. Now hit the “i” to bypass the iCloud Activation Lock and for this, enter a DNS server IP address. You can select one of them from the given list with respect to your location:
- For Europe, it is: 104.155.28.90
- For Asia, it is: 104.155.220.58
- For the USA, it is: 104.154.51.7
- For Australia and Oceania, it is: 35.189.47.23
- For South America, it is: 35.199.88.219
- For Europe, it is: 104.155.28.90
- And for other continents, it should be: 78.100.17.60
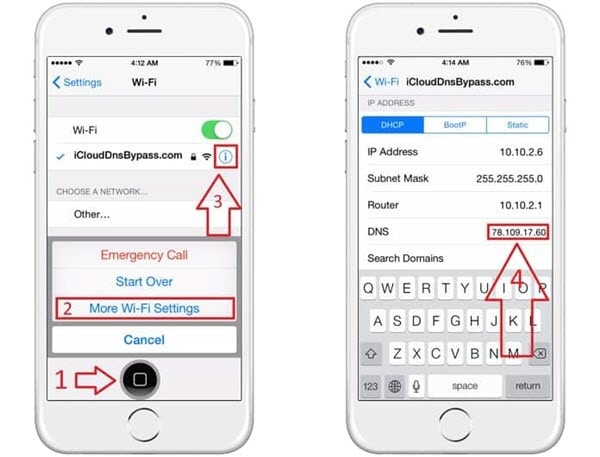
Step 3: Now, click on the “Back” option from the top left of the screen. After that, turn on the internet, choose the right network and enter your password.
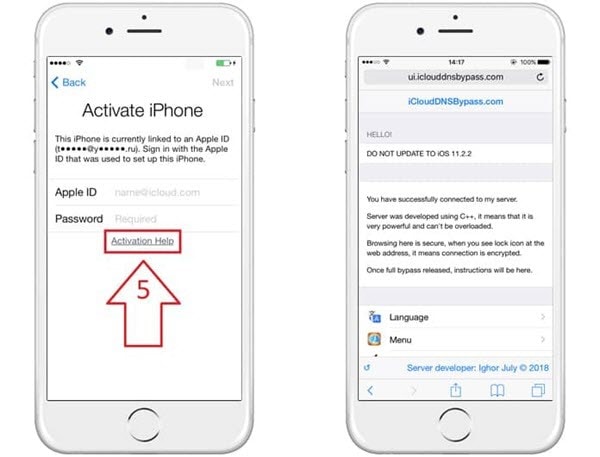
Step 4: Now, to enter the iCloud bypass screen, hit the “Next Page” and hit “Back”. Now you are free to set up your applications and use the Apple iPhone 8 Plus device in your own way.
Some pros and cons of using this method are listed below so you can decide whether you are going to use this method or not:
Pros:
- You can manually operate iCloud DNS Bypass from your Wi-Fi settings.
- It provides you with amazing functionalities and features for your Apple iPhone 8 Plus.
Cons:
It is hard for those clients who don’t understand technical things easily.
Method 3: Contact Apple Support
In case the above methods seem improper for your query, so you don’t have a lot of options left for you. Simply pick up your phone and contact Apple Support ; however, you should be the real owner of your device. Otherwise, they won’t let you do anything. You need to give them proof that you are the real owner by providing them with the Apple iPhone 8 Plus device’s MEID, serial number, and IMEI.
Check the mentioned pros and cons of using this method:
Pros:
- It is a costless and easiest approach to get help.
- You can remove the Activation Lock without any function limitation if you are the real owner of the Apple iPhone 8 Plus device. Using this method could also be in your favor or the other way around.
Cons:
You can’t get help from Apple support if you have purchased your Apple iPhone 8 Plus from secondhand vendors.
Method 4: Use Dr.Fone - Screen Unlock to Bypass Activation Lock
Dr.Fone is one of the best-known software applications that brings a complete solution for any complications in your Android or iOS mobile device. It supported all kinds of iOS mobile devices and versions from iPhone 5s to iPhone X and from iOS 9 to iOS 14.8 for bypassing Activation Lock. If you try to bypass the Activation Lock using Dr.Fone - Screen Unlock, then it will erase all your data.
Some other features of Wondershare Dr.Fone that show its efficiency and ability to overcome every arisen problem with a good solution:
Dr.Fone - Screen Unlock
Screen Unlock to Bypass Activation Lock
- Unlock Face ID, Touch ID, Apple ID without password.
- Bypass the iCloud activation lock without hassle.

- Remove iPhone carrier restrictions for unlimited usage.
- No tech knowledge required, Simple, click-through, process.
4,005,553 people have downloaded it
How to Jailbreak on Windows and Mac
Jailbreak on Mac and Windows should be the first thing you need to do when you are going to bypass the Activation Lock. As we know, many available tools in the market are not compatible with it. You should know what needs to be prepared before you jailbreak on Windows and Mac.
Jailbreak on Windows
The first thing you need to make sure of is that your computer runs on version 7 or above, and you have a USB flash drive with 2 GB capacity. After that, download the “checkn1x-amd64.iso “ and “WinRa1n2.0 .”
Jailbreak on Mac
To jailbreak iOS on Mac, download the “Checkra1n “ and then simply try to connect the Mac computer and the iOS device using a USB cable.
Step-by-Step Guide to Bypass Activation Lock
There are some steps that you need to follow in order to bypass the Activation Lock using Wondershare Dr.Fone. These steps are:
Step 1: Install and Download Dr.Fone, and Select Remove Active Lock
On your computer system, install and download Wondershare Dr.Fone and hit the “Screen Unlock” module from the main interface. Now go to the “Unlock Apple ID” option and then choose “Remove Active Lock”.

Step 2: Jailbreak and Confirm Device Information
Now jailbreak your Apple iPhone 8 Plus, and once it is done, a warning message will appear on the screen. You need to “Tick” the confirmation statement that you agree with the terms and conditions and click on the “Next” button. You are also required to confirm the information, like the Apple iPhone 8 Plus device model.

Step 3: Remove iCloud Activation Lock
Initiate the Activation Lock removal process, and it will convert the phone into a normal phone as it removes the Activation Lock without any password. It will be done in seconds, and now you are free from the Activation Lock.


Conclusion
In this article, we discussed the solutions for iPhone Activation Lock removal and how viewers can implement them if they are in need. We proposed the simplest methods, and one of them is using the Wondershare Dr.Fone - Screen Unlock (iOS) feature that can remove Activation Lock in seconds.
Also read:
- [Updated] Examining the Huawei P10 Camera and Display Capabilities
- [Updated] Gain Traction in the Digital Sphere - Explore the Quintessential Five YouTube Tactics
- A How-To Guide on Bypassing the iPhone 7 Plus iCloud Lock
- Command the Century: Ranking the 11 Finest WW2 Games
- Download and Update Wi-Fi Drivers for Windows 7 – Simple Steps!
- Effortless DVD-to-MKV Conversion for Users of Windows 11 & 10 - A Step-by-Step Guide
- How to Factory Reset iPad or Apple iPhone 8 Plus without iCloud Password or Apple ID?
- In 2024, Here are Some Pro Tips for Pokemon Go PvP Battles On Oppo A78 5G | Dr.fone
- In 2024, Streamlining the Conversion of Shorts to MP4
- Mastering the Art of YouTube Shorts Formatting: How to Scale Videos Perfectly
- Mastering Windows 11: Essential Tips & Tricks for Ultimate Optimization - Guided by YL Computing
- The Most Effective Ways to Bypass Apple iPhone 6s Activation Lock
- The Ultimate Guide to Unlocking Apple Watch Or iPhone SE from iCloud
- Title: Unlock Your Device iCloud DNS Bypass Explained and Tested, Plus Easy Alternatives On iPhone 8 Plus
- Author: Lydia
- Created at : 2025-01-26 17:03:40
- Updated at : 2025-02-01 03:50:24
- Link: https://activate-lock.techidaily.com/unlock-your-device-icloud-dns-bypass-explained-and-tested-plus-easy-alternatives-on-iphone-8-plus-by-drfone-ios/
- License: This work is licensed under CC BY-NC-SA 4.0.
