
:max_bytes(150000):strip_icc():format(webp)/Race-982fb219114a48fb96b9c5a2c6f93847.jpg)
What You Want To Know About Two-Factor Authentication for iCloud On your iPhone XS
What You Want To Know About Two-Factor Authentication for iCloud On your Apple iPhone XS
Hackers have stolen millions of iCloud credentials in the past and demanded Apple pay for a ransom. This is starting to become a thing of the past as Apple implemented two-factor authentication to secure your Apple ID.
However, it’s not always perfect, as sometimes you need to get past two-factor authentication on your iCloud for various reasons. That’s why this article will teach you how to set it up and bypass two-factor authentication on iCloud yourself if you need to. Read further to learn more.

Part 1: What Is Two-Factor Authentication for iCloud?
Not to be confused with Apple’s two-step authentication, the new and more secure two-factor authentication on iCloud introduces push notifications on your iOS device to keep your data safe. With Apple’s two unique ways to prove your identity, hackers will find it harder to access your personal and financial data.
Switching to two-factor authentication rather than two-step is becoming more common nowadays as security measures are more advanced. You can always switch your security measure at any point, but remember that two-factor authentication is now an essential way to keep your data safe.

Part 2: What Are the Benefits of Two-Factor Authentication?
Setting up two-factor authentication is a secure way to protect your device against unauthorized access. Adding another layer to your username and password highly reduces the chances of hackers obtaining your account.
Here are some of the benefits of activating two-factor authentication on your device.
- Improved security - A second form of identification aside from your password reduces the chance for someone to gain access to your information.
- Interconnectivity to mobile engagement - Two-factor authentication from businesses provides users with a stronger login system to ensure their information is safe in the digital world.
- Reduces Fraud - Due to the rise of identity theft in recent years, businesses risk losing trust, brand equity, and credibility. A secure authentication system adds a layer of protection to keep you secure.
Part 3: How To Set up Two-factor Authentication for iCloud?
If you haven’t set up two-factor authentication yet on your iCloud, here are the steps to activate it right now.
Step 1: On your Apple iPhone XS/iPad, go to Settings and tap your Apple ID profile at the top.

Step 2: Tap Password & Security and turn On Two-Factor Authentication.
Step 3: Enter a phone number to receive the two-factor code via an SMS or a phone call.
Step 4: Enter the 6-digit verification code received on your device and wait for the process the finish.
Note
You can turn off two-factor authentication within two weeks of enrollment. After that, it’s permanent.
Part 4: How To Turn Off Two-Factor Authentication on Your Apple iPhone XS?
As previously stated, once two-factor authentication is active on iCloud, you only have a two-week window to deactivate it again.
To get past two-factor authentication on iCloud, Go to Settings > your name > Password & Security. Tap Two-Factor Authentication and turn it Off again.
Meanwhile, here are the steps to learn how to bypass 2-step verification on iCloud on the web.
Step 1: Go to the Apple ID sign-in page and log in with your Apple ID.
Step 2: Click Sign-In and Security > Account Security.

Step 3: Click Turn Off Two-Step Verification. Answer a security question you’ve set up previously to finish the process.
Part 5: Is It Possible to Bypass Two-Factor Authentication for iCloud?
If you’re wondering how to bypass two-factor authentication on iCloud, the answer is no, you can’t. However, if you don’t have access to your trusted device, you can have a code sent to your trusted phone number via an SMS or an automated phone call to prove to Apple that you own the iCloud account.
If this is impossible, you should request account recovery to regain access to your account.
The easiest way to prevent this issue is by adding another phone number to your Apple ID so you’ll always have a backup. Here’s how.
Step 1: On your Apple iPhone XS, go to Settings and tap on your Apple ID > Password & Security.
Step 2: Tap Edit and choose to Add a Trusted Phone Number. You’ll have to enter your device’s passcode to continue.

Step 3: Enter your new phone number. Select a way to receive a verification code via sms or phone call and tap Send.
Step 4: Enter the verification code and wait for the process to finish.
Bonus Tips: Forgot Your iCloud Password? Here’s What To Do
Using special programs like Dr.Fone can help you recover your iOS device if you forget your iCloud password.
Dr.Fone’s key features are:
- Removes all types of iPhone locks such as Apple ID password, Face ID, Touch ID, and more.
- Bypass iCloud activation lock.
- Unlock your Apple iPhone XS without carrier restrictions.
- Remove MDM profile / bypass MDM lock without data loss.
Here’s how to use Dr.Fone if you forget your iCloud password.
Step 1: Download and install Dr.Fone .

Step 2: Click Screen Unlock on the main program window. On the next screen, click Bypass Activate Lock.

Step 3: Click Start to initiate the process of unlocking your Apple iPhone XS without an iCloud password.

Note
Your iPhone will need to be jailbroken before bypassing it using Dr.Fone.
After step 3, there are two possible outcomes for GSM and CDMA iPhone devices.
- If you own a GSM device, the unlocking will do no harm to your iOS device, and you can enjoy your Apple iPhone XS as usual.
- If the Apple iPhone XS is CDMA, you won’t be able to use the Apple iPhone XS device for phone calls, cellular data, and iCloud of your new Apple ID.
Conclusion
Turning on your iCloud’s two-factor authentication is necessary for today’s high-tech society. It ensures your information is always secure and minimizes the risk of getting hacked or having your account stolen. Once two-factor is active on your Apple ID, Apple provides you with a two-week window to deactivate it if you change your mind.
Meanwhile, if you forgot your iCloud and have a hard time recovering your account, you can try using dedicated programs like Dr.Fone to unlock your iOS device in a few steps.
Easy Fixes: How To Recover Forgotten iCloud Password On your Apple iPhone XS
In the fast-paced digital era, it’s not uncommon to face the common dilemma: “I forgot my iCloud password.” The significance of accessing your iCloud account, which is packed with precious data and services, cannot be overstated. In this guide, you’ll learn how to find your forgotten password of iCloud, offering you a lifeline back into your digital world.
Get ready to navigate simple steps in recovering your iCloud access, ensuring you effortlessly regain control. Say goodbye to the worry of “forgotten iCloud password.” This article features easy-to-follow solutions to make the journey back to your iCloud account both straightforward and stress-free.
Part I. How To Find Your iCloud Password
In the digital world dominated by Apple services, your iCloud password is the golden key, granting access to a treasure trove of data and seamless connectivity. A forgotten iCloud password could greatly impact your daily life as an Apple user—a potential roadblock to photos, documents, and essential services.
How To Find Your iCloud Password
Thankfully, finding your iCloud password is a straightforward process. Check out the steps below:
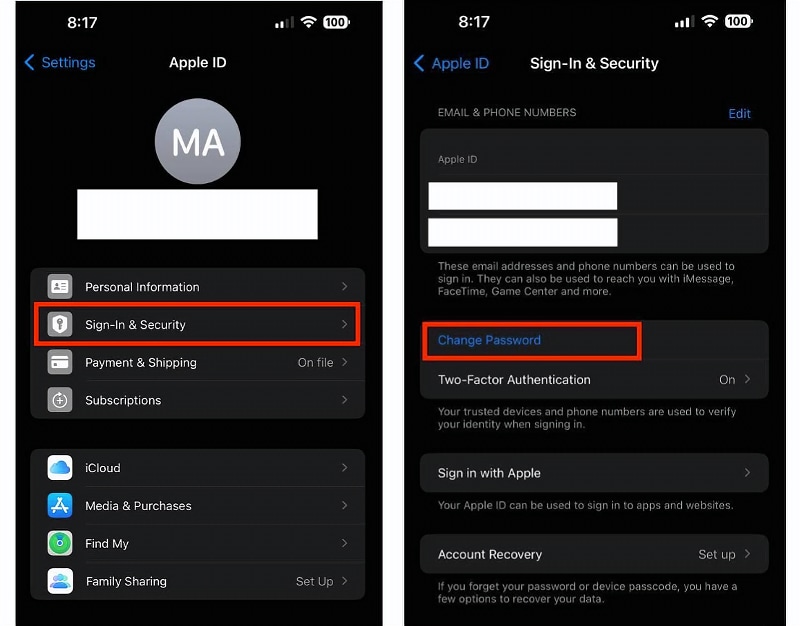
- Step 1: Begin by opening your device’s Settings.
- Step 2: Scroll down and tap on your name, then select Sign-In & Security. There, you’ll find the Change Password option.
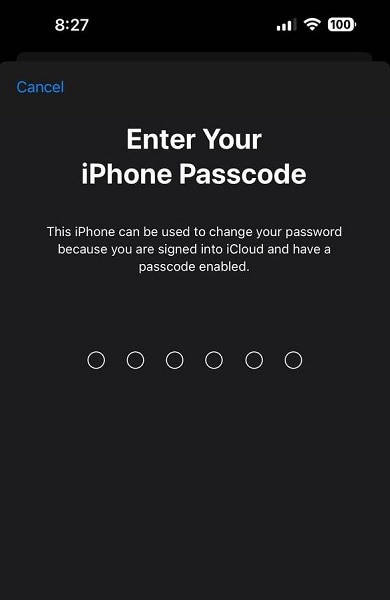
- Step 3: You may be asked to Enter Your Apple iPhone XS Passcode to proceed.
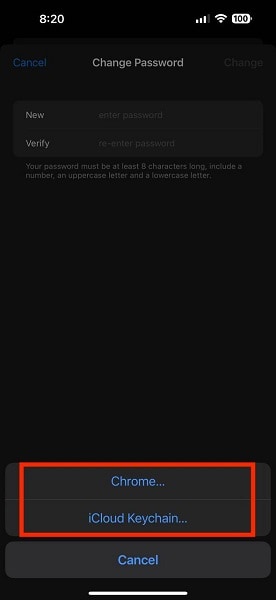
- Step 3: If you can recall your current password, you can proceed to update it. If not, you may use Chrome Passwords or Apple’s iCloud Keychain feature, where you may have saved your iCloud password.
The Frustration of Forgetfulness
The frustration of don’t remember iCloud password is all too relatable. It’s a moment of panic when you realize your access to Apple’s ecosystem is temporarily halted. But fear not, as in the upcoming section, this article will guide you through the simple and effective steps to recover the password, ensuring a swift return to your iCloud account.
Part II. Easy Ways To Recover Forgotten iCloud Password
Recovering a forgotten iCloud password may seem hard, but armed with these easy-to-follow methods, you can reclaim access to your Apple universe.
Official Channels
These are the methods to reset the forgotten password through Apple’s official channels:
Apple ID Account Recovery Process
Apple provides a user-friendly account recovery process.
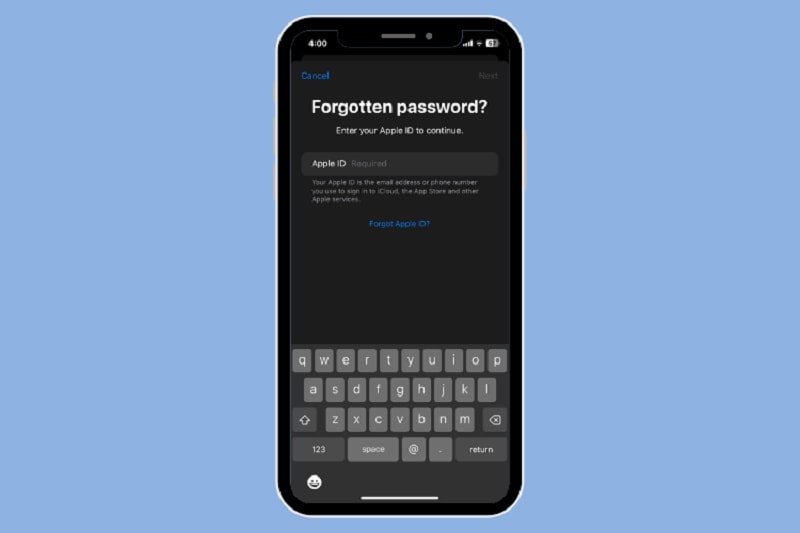
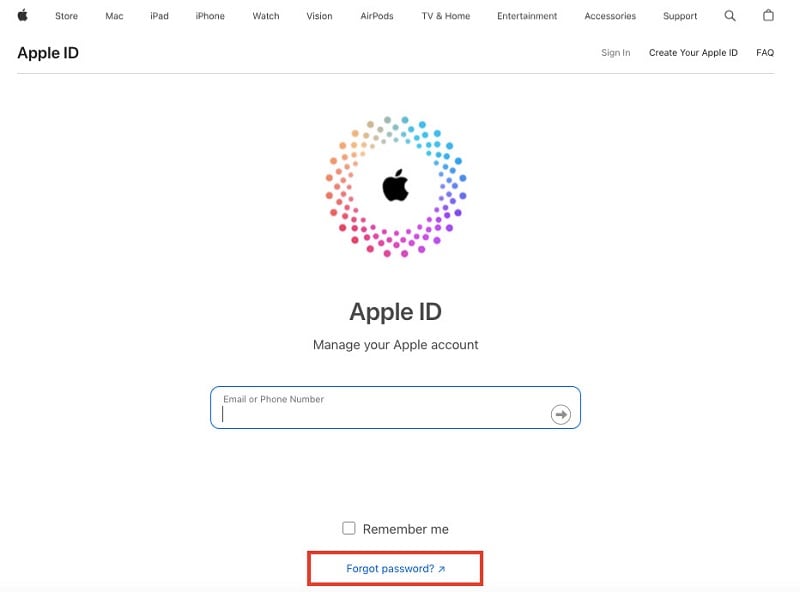
- Step 1: Visit the official Apple iCloud account page. Click Sign In then choose Forgot password?.
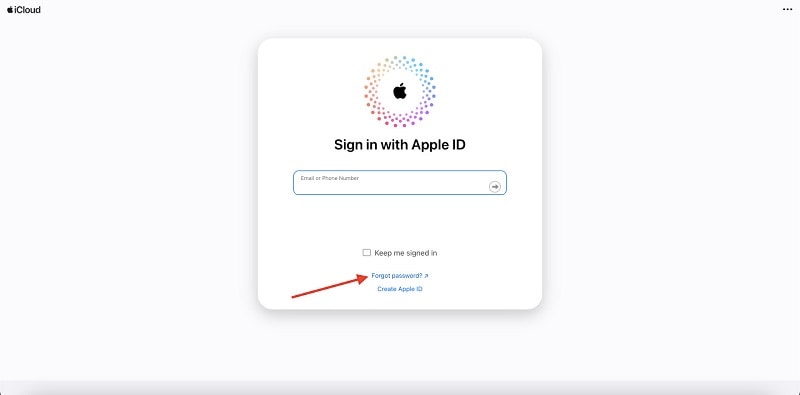
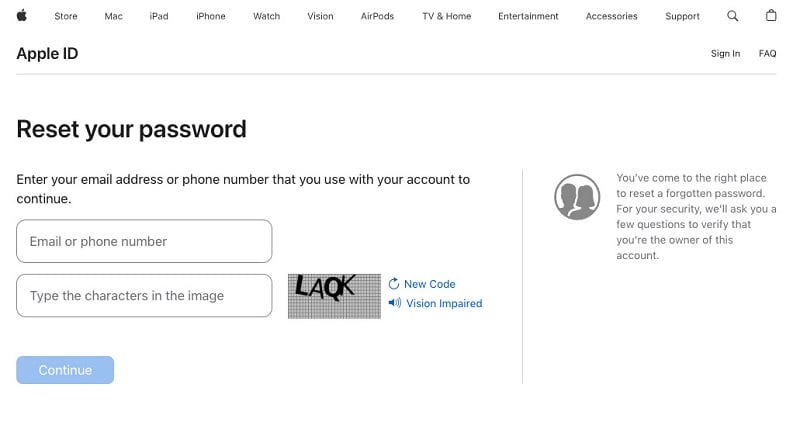
- Step 2: You will then be redirected to a new window to recover access to your iCloud account. Enter your Email or phone number and Type the characters in the image. Click Continue to proceed.
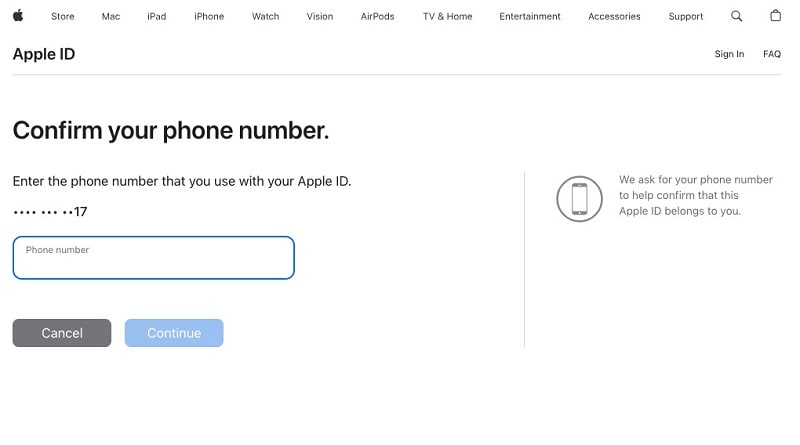
- Step 3: You will then be asked to Confirm your phone number so that Apple can verify that the account belongs to you.
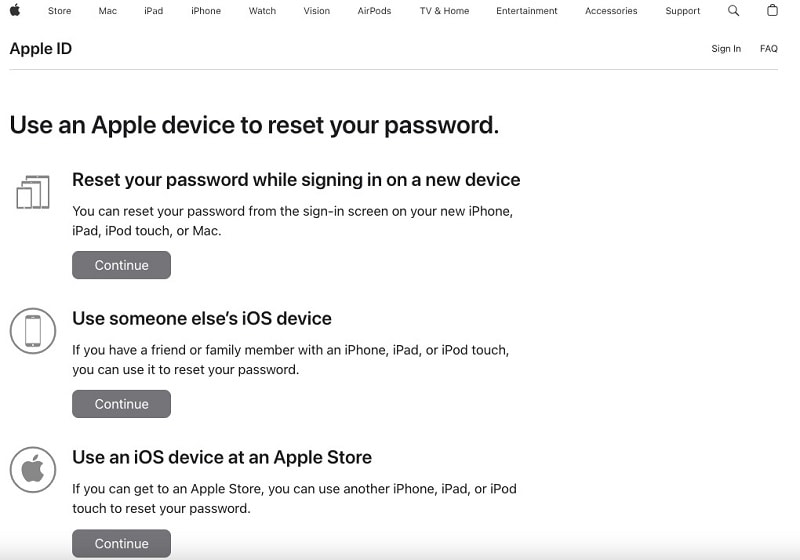
- Step 4: You will be presented with three options. Choose the best option that works for you, then follow the on-screen instructions for the option you’ve chosen.
Two-Factor Authentication Recovery Steps
Recovery is equally straightforward for those who have embraced the added security of two-factor authentication. Access a trusted device or request account recovery through another trusted device. Follow the prompts, confirm your identity, and reset your iCloud password hassle-free.
B. Alternative Approaches
Check out these alternative processes if the above options don’t work for you:
Security Questions and Rescue Email
Don’t overlook the power of security questions and rescue email to recover forgotten iCloud passwords. Access the Apple ID account sign-in page, select Forgot Password? and choose the option to answer security questions or receive an email. Providing the correct answers or accessing the rescue email will pave the way to resetting your iCloud password.
Contacting Apple Support for Assistance
Sometimes, a helping hand is the best solution. If the DIY approaches seem daunting, reaching out to Apple Support can provide personalized assistance. Connect with Apple’s knowledgeable support team via phone or online chat, explain your situation, and let them guide you through the steps to regain control of your iCloud account.
Whether you choose Apple’s official channels or alternative approaches, the goal remains the same – a seamless recovery experience that ensures you’re back in command of your digital kingdom. Stay tuned as this article introduces a reliable advanced solution for a forgotten iCloud password.
Part III. Advanced Solution for Forgotten iCloud Password
What if the above methods to recover your forgotten iCloud password did not work, and you find yourself locked out of your Apple iPhone XS? Don’t worry; this section offers an advanced solution – Wondershare Dr.Fone – Screen Unlock (iOS). It’s a powerful tool designed to effortlessly unlock your Apple iPhone XS and rescue you from the frustration of being locked out of your device.
Experience the unparalleled capability of Dr.Fone – Screen Unlock (iOS) to unlock your Apple iPhone XS easily. No more daunting “I forgot iCloud password” moments. Dr.Fone empowers you to regain control swiftly.
Key Features and Benefits
Check out these amazing features of Dr.Fone – Screen Unlock:
- **Simple and User-Friendly.**Intuitive interface ensuring a hassle-free user experience. No technical expertise is required – just a few clicks to unlock your Apple iPhone XS.
- Works seamlessly across various iPhone models and iOS versions. Your reliable companion for iCloud password recovery, regardless of the Apple iPhone XS device.
- **Efficient iCloud Unlock.**Swiftly unlock your device without the need for extensive technical knowledge. Say goodbye to prolonged wait times; Dr.Fone – Screen Unlock ensures a quick and efficient solution.
- **Safe and Secure.**Your data integrity is a priority – Dr.Fone guarantees a secure unlocking process. It protects your privacy while providing a seamless iCloud password recovery experience.
How To Use Dr.Fone – Screen Unlock (iOS)
Dr.Fone – Screen Unlock (iOS) offers a comprehensive solution for unlocking iOS devices without a passcode. The following instructions demonstrate how to unlock an iPhone without a password using this screen unlocking tool:
Step 1: Install Wondershare Dr.Fone on your computer, then open the iOS tool in a new window by going to Toolbox > Screen Unlock > iOS.
Step 2: To unlock your iOS device’s screen, select the Unlock iOS Screen button on the next screen. Press Start on the next screen to start unlocking the iOS device.
_Note:_ Before proceeding, ensure your device’s battery is fully charged.

- Step 3: Next is to enter your iOS device into Recovery Mode. Follow the on-screen prompts to switch your iOS device into the mode for your specific model. If the Recovery Mode fails on your end, you may try DFU mode instead. Just click the Try DFU Mode button at the bottom of the page to proceed.

- Step 4: Once the user has successfully entered Recovery Mode on their iDevice, the platform will automatically detect the Device Model and present it in the appropriate section. Adjust the model and choose the System Version as needed to meet your needs. When you’re ready to unlock your device’s screen, click Start.

- Step 5: You may see how far along the iOS firmware download is on the following screen. If you want to stop the procedure, click the Stop button. When the platform’s iOS firmware download link takes too long, you can copy the link manually by hitting the Copy button.

- Step 6: The iOS firmware is checked and shown on the following screen after a successful download. To proceed with unlocking, click the Unlock Now button again.
- Step 7: A confirmation window will then pop up and ask you to confirm the process. To proceed, type in the appropriate code and then hit Unlock. The iOS device’s progress meter as it unlocks is displayed on the following screen.
_Note:_ Your device needs to stay connected; failing to do so will cause it to brick.

- Step 8: When done, click the Done button to finish unlocking the iDevice. Click Try Again to begin the procedure once more if you still face a locked iDevice.

When all else fails, and you find yourself locked out due to a forgotten iCloud password, Dr.Fone – Screen Unlock (iOS) emerges as the advanced solution you need. Unlock your Apple iPhone XS effortlessly, ensuring a smooth, stress-free journey back into your digital world. Don’t let iCloud issues hold you back – trust Dr.Fone to be your key to access.
Conclusion
In this article, you navigated the twists and turns of forgotten iCloud passwords, providing you with simple methods and advanced solutions. Whether through official channels, alternative approaches, or the powerful Dr.Fone – Screen Unlock (iOS), this article ensured a comprehensive guide for every user.
Now, as you try reclaiming your iCloud access, remember the ease and efficiency Dr.Fone brings. Say goodbye to the worry of locked iPhones and ‘forgotten iCloud password’ issues. Trust Dr.Fone to be your digital savior, making the whole process smooth and stress-free. Your access, your control – it’s all at your fingertips.
Bypass Activation Lock On Apple iPhone XS - 4 Easy Ways
We can’t say when and where we can lose our iPhone, or someone can steal it from us. All we can do as a precaution is activate the Activation Lock on the screen so that you can save your precious data from being stolen. Activation Lock is a feature of Find My in iPhone that automatically turns on whenever Find My [device] is activated.
However, you may want Activation Lock removal because you are going to sell your Apple iPhone XS, and it is no longer needed. In such a situation, you need to be well-informed of the methods or techniques you can use to bypass the Activation Lock. This article will provide you with a basic understanding of Activation Lock and how you can remove it.
Part 1: What is Activation Lock?
Apple Find My [device] presents a single feature of Activation Lock that turns on impulsively whenever Find My [device] seems activated. The responsibility of these features is to ensure that the data available in your Apple iPhone XS is kept safe and secure and avoid reactivating the data even after erasing it.
Working of Activation Lock
Whenever the Apple Silicon or T2 security chip is activated in iPod, iPhone, iPad, Mac, or etc., the Apple iPhone XS device confirms that the Activation Lock is activated by contacting Apple. The time you set “Find My”, your Apple ID is securely stored and linked to the Apple iPhone XS device by Apple.
Part 2: How to Bypass the Activation Lock on iPhone or iPad
There are many scenarios that are considered as the most preferred professional methods adopted by the users for iPhone Activation Lock removal, are discussed below:
Method 1: Using iCloud.com
iCloud is one of the Apple services which is responsible for storing data like photos, passwords, notes, files, etc., and keeps the data up to date. It also provides you with a smooth transfer of data stored in it. The question is, how can we use iCloud to bypass the Activation Lock? The steps below will resolve our query by providing the required steps of solution:
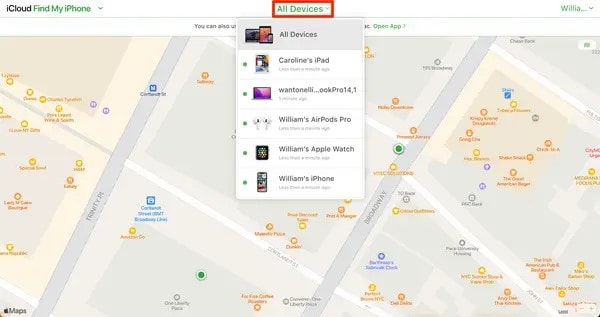
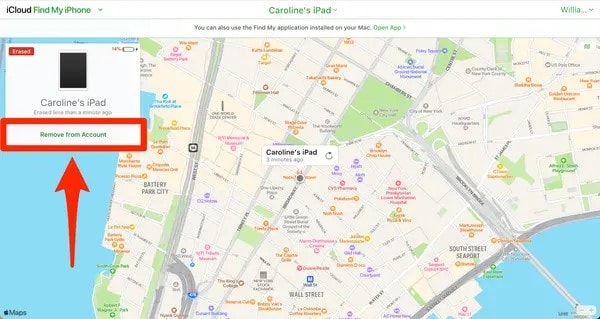
Step 1: Visit “iCloud.com” and enter the correct Apple ID and Password on the iCloud website. Now choose “Find iPhone’’ and select one of the Apple iPhone XS devices from all the Apple iPhone XS devices available on the top of the main screen.
Step 2: Either click on “Erase iPhone” or “Erase iPad” and then again hit on the “Erase” choice to confirm your action. The website might ask for the Apple ID again from the Apple iPhone XS device’s owner.
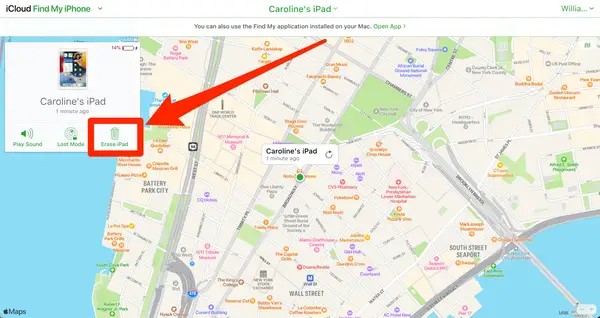
Step 3: You can then click on “Next” with your own choice if you want to leave a message or contact number on your device. After that, click on the button, “Remove from Account”.
Some pros and cons of using iCloud for Activation Lock removal are listed below so you can decide whether you are going to use this method or not:
Pros:
- It does not need any third-party tool or application to carry out the procedure.
- A user with basic knowledge can easily access and manage the whole process.
Cons:
- If you are not the Apple iPhone XS device owner, this method is not useful.
Method 2: Use iCloud DNS Bypass
The Domain Name System (DNS) transmits readable domains (names) into numerical IP addresses. Whereas iCloud DNS Bypass means we are bypassing the Activation Lock on iCloud by manipulating the DNS activation path, DNS server, and namely. You apply this method for iPhone Activation Lock removal by following the mentioned steps below:
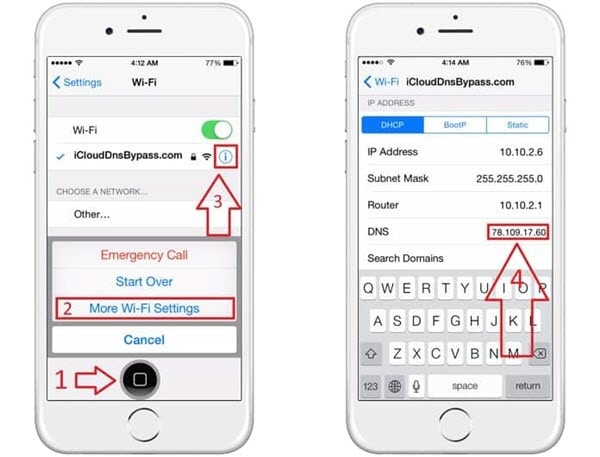
Step 1: After switching on your device, select your “Country” and “Language” from the menu. Now, enter the settings page of WI-FI, tap on “Proceed” and look for the symbol “i” whenever you are asked to connect to the Wi-Fi.
Step 2: At that point, disconnect the internet connection and open the “Connection Settings,” then tap on the “Forget this network” choice. Now hit the “i” to bypass the iCloud Activation Lock and for this, enter a DNS server IP address. You can select one of them from the given list with respect to your location:
- For Europe, it is: 104.155.28.90
- For Asia, it is: 104.155.220.58
- For the USA, it is: 104.154.51.7
- For Australia and Oceania, it is: 35.189.47.23
- For South America, it is: 35.199.88.219
- For Europe, it is: 104.155.28.90
- And for other continents, it should be: 78.100.17.60
Step 3: Now, click on the “Back” option from the top left of the screen. After that, turn on the internet, choose the right network and enter your password.
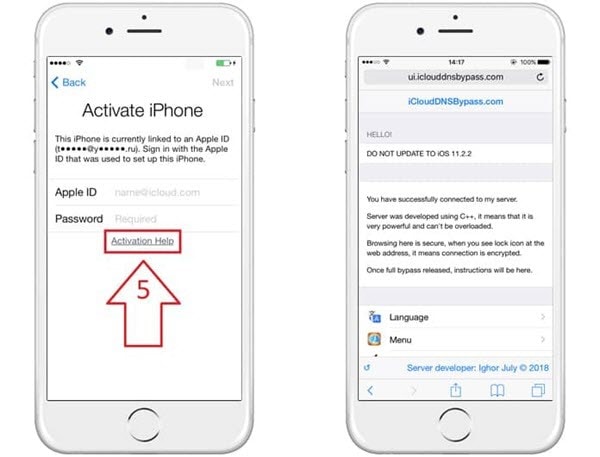
Step 4: Now, to enter the iCloud bypass screen, hit the “Next Page” and hit “Back”. Now you are free to set up your applications and use the Apple iPhone XS device in your own way.
Some pros and cons of using this method are listed below so you can decide whether you are going to use this method or not:
Pros:
- You can manually operate iCloud DNS Bypass from your Wi-Fi settings.
- It provides you with amazing functionalities and features for your Apple iPhone XS.
Cons:
It is hard for those clients who don’t understand technical things easily.
Method 3: Contact Apple Support
In case the above methods seem improper for your query, so you don’t have a lot of options left for you. Simply pick up your phone and contact Apple Support ; however, you should be the real owner of your device. Otherwise, they won’t let you do anything. You need to give them proof that you are the real owner by providing them with the Apple iPhone XS device’s MEID, serial number, and IMEI.
Check the mentioned pros and cons of using this method:
Pros:
- It is a costless and easiest approach to get help.
- You can remove the Activation Lock without any function limitation if you are the real owner of the Apple iPhone XS device. Using this method could also be in your favor or the other way around.
Cons:
You can’t get help from Apple support if you have purchased your Apple iPhone XS from secondhand vendors.
Method 4: Use Dr.Fone - Screen Unlock to Bypass Activation Lock
Dr.Fone is one of the best-known software applications that brings a complete solution for any complications in your Android or iOS mobile device. It supported all kinds of iOS mobile devices and versions from iPhone 5s to iPhone X and from iOS 9 to iOS 14.8 for bypassing Activation Lock. If you try to bypass the Activation Lock using Dr.Fone - Screen Unlock, then it will erase all your data.
Some other features of Wondershare Dr.Fone that show its efficiency and ability to overcome every arisen problem with a good solution:
Dr.Fone - Screen Unlock
Screen Unlock to Bypass Activation Lock
- Unlock Face ID, Touch ID, Apple ID without password.
- Bypass the iCloud activation lock without hassle.

- Remove iPhone carrier restrictions for unlimited usage.
- No tech knowledge required, Simple, click-through, process.

4,005,553 people have downloaded it
How to Jailbreak on Windows and Mac
Jailbreak on Mac and Windows should be the first thing you need to do when you are going to bypass the Activation Lock. As we know, many available tools in the market are not compatible with it. You should know what needs to be prepared before you jailbreak on Windows and Mac.
Jailbreak on Windows
The first thing you need to make sure of is that your computer runs on version 7 or above, and you have a USB flash drive with 2 GB capacity. After that, download the “checkn1x-amd64.iso “ and “WinRa1n2.0 .”
Jailbreak on Mac
To jailbreak iOS on Mac, download the “Checkra1n “ and then simply try to connect the Mac computer and the iOS device using a USB cable.
Step-by-Step Guide to Bypass Activation Lock
There are some steps that you need to follow in order to bypass the Activation Lock using Wondershare Dr.Fone. These steps are:
Step 1: Install and Download Dr.Fone, and Select Remove Active Lock
On your computer system, install and download Wondershare Dr.Fone and hit the “Screen Unlock” module from the main interface. Now go to the “Unlock Apple ID” option and then choose “Remove Active Lock”.

Step 2: Jailbreak and Confirm Device Information
Now jailbreak your Apple iPhone XS, and once it is done, a warning message will appear on the screen. You need to “Tick” the confirmation statement that you agree with the terms and conditions and click on the “Next” button. You are also required to confirm the information, like the Apple iPhone XS device model.
Step 3: Remove iCloud Activation Lock
Initiate the Activation Lock removal process, and it will convert the phone into a normal phone as it removes the Activation Lock without any password. It will be done in seconds, and now you are free from the Activation Lock.

 safe & secure
Conclusion
In this article, we discussed the solutions for iPhone Activation Lock removal and how viewers can implement them if they are in need. We proposed the simplest methods, and one of them is using the Wondershare Dr.Fone - Screen Unlock (iOS) feature that can remove Activation Lock in seconds.
Also read:
- 3 Effective Ways to Unlock iCloud Account Without Password From iPhone SE (2022)
- In 2024, How To Remove iCloud From Apple iPhone 11 Pro Max Smoothly
- How to Bypass iCloud Lock from iPhone 11
- New Multiple Ways How To Remove iCloud Activation Lock From your Apple iPhone 6s
- Unlock Your Device iCloud DNS Bypass Explained and Tested, Plus Easy Alternatives From iPhone 6s
- In 2024, How to Successfully Bypass iCloud Activation Lock from iPhone 14 Plus
- iPhone 12 iCloud Activation Lock Bypass
- In 2024, Ultimate Guide on Apple iPhone XS iCloud Activation Lock Bypass
- The Ultimate Guide to Unlocking Apple Watch Or Apple iPhone XS from iCloud
- In 2024, How to Remove Activation Lock On the iPhone 12 Pro Max Without Previous Owner?
- In 2024, Bypass iCloud Activation Lock with IMEI Code On your iPhone 8 Plus
- In 2024, How to Unlock iCloud Activation Lock and iCloud Account On Apple iPhone 14 Plus?
- New Multiple Ways How To Remove iCloud Activation Lock On your Apple iPhone SE (2020)
- In 2024, Best Ways to Bypass iCloud Activation Lock from Apple iPhone 12 Pro Max/iPad/iPod
- How to Fix iPad or iPhone XS Max Stuck On Activation Lock?
- In 2024, Easy Fixes How To Recover Forgotten iCloud Password From your Apple iPhone 12 Pro
- In 2024, How To Stream Anything From Itel S23+ to Apple TV | Dr.fone
- 6 Ways to Change Spotify Location On Your Vivo S17t | Dr.fone
- 7 Fixes for Unfortunately, Phone Has Stopped on Samsung Galaxy M54 5G | Dr.fone
- How to Change Location on TikTok to See More Content On your Samsung Galaxy F14 5G | Dr.fone
- How to Transfer Data from Vivo V29 Pro to Other Android Devices? | Dr.fone
- 11 Best Pokemon Go Spoofers for GPS Spoofing on Apple iPhone XS | Dr.fone
- How to Share Your Winning Forex Trades With Friends and Family on Local Trade Copier™ Together
- In 2024, How to Access Your iPhone X When You Forget the Passcode? | Dr.fone
- In 2024, How to Check Distance and Radius on Google Maps For your Realme Narzo N53 | Dr.fone
- In 2024, 10 Free Location Spoofers to Fake GPS Location on your Oppo Reno 10 Pro+ 5G | Dr.fone
- Read This Guide to Find a Reliable Alternative to Fake GPS On Lava Yuva 2 Pro | Dr.fone
- Title: What You Want To Know About Two-Factor Authentication for iCloud On your iPhone XS
- Author: Lydia
- Created at : 2024-05-19 06:52:25
- Updated at : 2024-05-20 06:52:25
- Link: https://activate-lock.techidaily.com/what-you-want-to-know-about-two-factor-authentication-for-icloud-on-your-iphone-xs-by-drfone-ios/
- License: This work is licensed under CC BY-NC-SA 4.0.
